Wednesday, August 20th, 2014

A Great Microsoft Office Tutorial Resource

Great find! A list of good quality Microsoft Office tutorial resources

I’ve recently discovered an enormous list of Microsoft Office tutorials that may be worth checking out. Each piece of Office software has several listed tutorials ranging from beginner to advanced difficulty and general to specific usage.

Best of all, each tutorial has a brief summary of its contents so you can quickly decide if its new and interesting information. Hopefully every Office user will find something of use. You can visit the page here.

Monday, June 16th, 2014

Resize and Position Photos in SmartArt Placeholders


Yikes! Just how do you resize a photo inside a PowerPoint or Word SmartArt placeholder

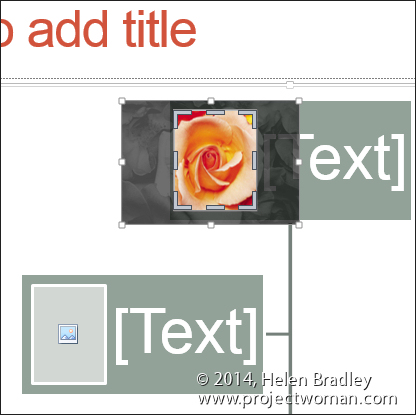
I got an email from a reader this morning. He has a PowerPoint slide (but it could as easily be a Word document or an Excel worksheet) and he wants to size a photo inside a placeholder. You see he was making an organization chart and he was dealing with lots of different head shots – all photographed differently. He wanted to make the faces the same relative size inside the placeholders – but to do this he had to get access to the photos inside the placeholders.

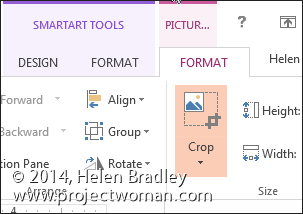
You see that’s the problem, every time you right click the placeholder and choose Size and Position you’re affecting the placeholder not the thing inside it! The solution is to use the Crop tool – so click on the placeholder and choose Picture Tools > Format tab and click the Crop tool.

Now you get handles around your photo and you can drag the handles to resize the image and you can move it to change its position inside the placeholder. When you’re done, click Crop again to finish. Easy when you know how.

Monday, November 25th, 2013

Cometdocs – A smarter file converting tool

Learn how to convert files directly from Dropbox and Google Drive

Needing to converted a document from one file type into another is very common today, which is why online file conversion services have become so popular. One service that has made a name for itself by offering free high-quality file conversion capabilities is Cometdocs. Cometdocs is a document management service that also offers cloud storage and file transfer options, the website is still primarily used by people who need fast and accurate file conversion online.

The service has unveiled a bunch of updates recently, one of them being integration with popular cloud storage services such as Dropbox and Google Drive. Even though Cometdocs offers free storage to its users (2GB worth), there is no denying that there are many much more popular cloud storage competitors out there.

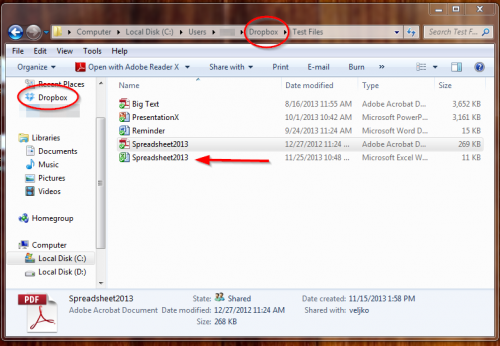
Thanks to this new update, Cometdocs users can convert files directly from their Google Drive or Dropbox accounts in two different ways – via their browser or using Cometdocs’ new desktop app.

Of course, in both instances you need to sign up for a free Cometdocs account first. Once you have signed up and logged in, here’s how to integrate Google Drive and Dropbox with the online service.

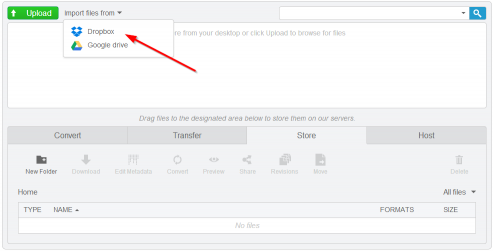
Right at the top of Cometdocs’ online interface, you will see a button that says “Import file from.” Click on that button and choose to synch either Dropbox or Google Drive with Cometdocs.


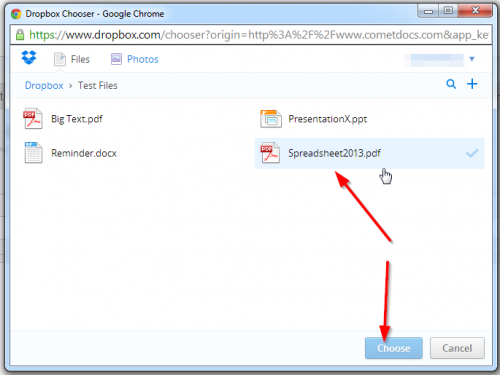
Once the synch has been completed, a window will open up listing all of your Dropbox or Drive files. Click on the file you want converted and then click “Choose.”

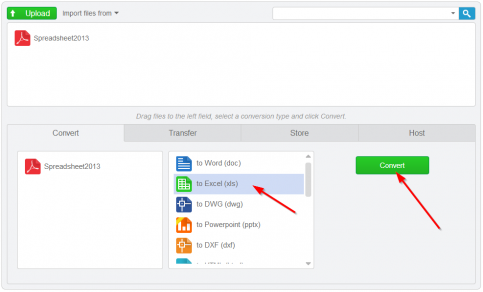
The file is now sent to your Cometdocs clipboard from where you can drag it to the Convert tab and choose your conversion option. Cometdocs allows users to convert PDFs into a large number of different file formats including MS Excel, Word, PowerPoint, HTML, Text, AutoCAD formats and more. You can also convert these files types and more into PDF with Cometdocs. It’s safe to say that the conversion options are plentiful.


Integrating Cometdocs with your favorite cloud storage service is even easier when using the desktop app. Once you have downloaded and installed the app and you have signed in to your Cometdocs account through it, the conversion process can be completed in just one step.

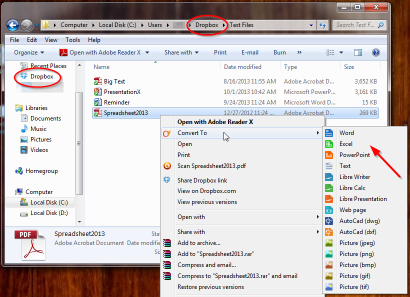
Simple open your cloud storage folder of choice. When using the desktop app, you are no longer limited to Google Drive and Dropbox integration. You can open up the folder of any cloud service you prefer to use.

Now simply right-click on the file that you want to convert. Find the Cometdocs logo in the menu and select your conversion type.

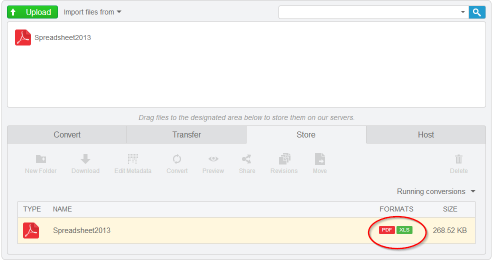
And that’s all there is to it. The app sends the file off to Cometdocs’ server for conversion, and once the process is complete, the newly converted file is downloaded automatically into your cloud storage folder and synched.

If you are looking for a faster and easier way to convert files from within your cloud storage conveniently, Cometdocs’ integration features are hard to beat.

Go to: http://www.cometdocs.com/  or http://www.cometdocs.com/desktopApp


Helen Bradley

Friday, July 26th, 2013

PowerPoint VBA – adding shapes to slides programatically

I’ve been working on a project which involves adding shapes to a PowerPoint slide using VBA.

One big big problem with PowerPoint is that there is no longer any macro recorder. This means you can’t get information about methods and properties by recording the steps you perform to, for example, add a shape to a slide. In other programs you can get a lot of  useful information from recorded macros – in PowerPoint – nada!

So, if you, like me are struggling to make sense of a language that uses such wonderfully nonsensical properties like TextFrame.TextRange then here is the benefit of my research.

Here, in no particular order, is a grab bag of MSDN articles and references for adding and formatting (and adding text to) shapes in PowerPoint using VBA. Enjoy! and if you have any additional useful resources, please add them to the comments to keep us all from going crazy!

Constants to use with the SchemeColor property

http://msdn.microsoft.com/en-us/library/office/bb230611(v=office.12).aspx

ColorFormat object

Properties you can use to color an object – eg its fill, font, outline and so on:
http://msdn.microsoft.com/en-us/library/office/bb265494(v=office.12).aspx

TextRange.font property

How to configure a font for a shape:
http://msdn.microsoft.com/en-us/library/office/ff744240.aspx

LineFormat object

How to configure the line and arrowhead for a line or shape with a border
http://msdn.microsoft.com/en-us/library/office/aa220968(v=office.11).aspx

Shapes Object

How to create a shape on a PowerPoint slide
http://msdn.microsoft.com/en-us/library/office/ff746621.aspx

Shape.height property

Measured in (Oh so helpful) points (72 to the inch)
http://msdn.microsoft.com/en-us/library/office/ff744642.aspx

Shapes members

Some things you can add to a slide:
http://msdn.microsoft.com/en-us/library/office/ff745286.aspx

Shapes.AddShape method

How to add a shape to a PowerPoint slide:
http://msdn.microsoft.com/en-us/library/office/ff744336.aspx

An explanation of working with text in a shape

aka Microsoft’s attempt to explain why you need to use TextFrame.TextRange to add text to a shape!:
http://msdn.microsoft.com/en-us/library/office/aa198526(v=office.10).aspx

The MsoAutoShapeType Enumeration

ie how you can find what a shape is called so you can add it to a slide:
http://msdn.microsoft.com/en-us/library/aa432469(v=office.12).aspx

ParagraphFormat.Alignment property

How to align text in a shape in PowerPoint – :
http://msdn.microsoft.com/en-us/library/office/ff744029.aspx

Info on the TextFrame.TextRange property in PowerPoint:

http://msdn.microsoft.com/en-us/library/office/ff744793.aspx

Info about the TextFrame members in PowerPoint:

http://msdn.microsoft.com/en-us/library/office/ff745830.aspx

Helen Bradley

Wednesday, October 24th, 2012

PowerPoint 2013 – What’s new and cool

PowerPoint just got a whole lot cooler, so come check out what’s new. I’ll walk you through many of PowerPoint 2013’s features, including the new start screen and account screens, how saving is new, using the new task panes, charting options, and discovering theme variants.

Transcript:

Hello, I’m Helen Bradley. Welcome to this video tutorial. Today we’re going to be looking at the new PowerPoint 2013 and asking what’s new and cool for PowerPoint users. There is a lot to like about the new PowerPoint 2013. And we’re going to have a look at some of the features of it here in this video.

The first thing is the Start screen. This opens as soon as you open PowerPoint 2013. And there’s a lot here for new users. You can actually turn the screen off. But I think most people are going to opt to turn it on. The default is to start with a new presentation with a default theme, but you can see here that we’ve got recent files that we’ve opened in PowerPoint so they’re all available to us. We could go online and search for templates and themes online. And there are some suggested searches here. We can also click here to open other presentations that we might have stored on SkyDrive or on our local computer or SharePoint. And up here is the current account. So when You open PowerPoint 2013 or any of the new Office 2013 applications you’re going to be logged into your SkyDrive account, and this is access to it. And here we could switch accounts if we wanted to. These are just for testers so I think that they’re probably going to go in the final production.

But let’s have a look and see what would happen if we selected one of these templates. So I’m just going to click this one to open it. And you can see here that there’s some variants in this theme. We’re having a look right now at the More Images so we can see what this layout is going to look like if we select this particular one. And there’s this title layout, and this is what the chart would look like, and then smart art graphics, and this is a photo layout. And then there are different variants, different color combinations that we could use in this particular theme. Now what they’ve done in PowerPoint 2013 is that they’ve removed some of the color options that we had previously and sort of scaled them down to a more manageable group. So this particular design has four color options and you choose one of them and go with it rather than having to select from a set of color schemes that are probably twenty or thirty of them.

So I’m really liking this sort of red one so let’s click Create. And we’re now all ready to start our PowerPoint presentation. None of this is going to be unusual for PowerPoint users. A little bit has changed with the interface here. You can see that it’s got a metro style look to it so everything is a lot flatter. There’s no dimension in the screen, no shading. The buttons have sort of all gone to the back and really what we’re doing is focusing a little bit more on the content of our presentation.

Let’s go to Backstage View before we come back here though and see what’s there. I’ll click File to go to Backstage View. Now some of these options have changed. There’s Save and Save as. If we go to Save as you’ll see that by default we’re now saving to SkyDrive so this is the SkyDrive account that I was already logged into. Details are up here, and it’s opting to save it to SkyDrive by default. If I want to I can save it to my own computer so I can click Computer and this gives me access to my own folder structure. I can also add a place. So I could add things like a SharePoint location or a different SkyDrive account. Print is pretty standard. There’s not much changes here but Share has some options. You can invite people to share your document on your SkyDrive account. You can email it. You can present it online or publish your slides here. Export here we’ve got our PDF, XPS document support. Here’s the video option. Here’s packaging it for a CD, creating handouts and changing our file type. Down here are the standard options. This is general options for working inside PowerPoint and there’s not much changed here. Let’s go back here however to this Account area. And this is where you manage your accounts. So at the moment you can see that I’ve got a connected service with my Facebook account, my SkyDrive account, Twitter. I can also add LinkedIn if I wanted to. I could add Flickr. There’s the ability to add SharePoint or another SkyDrive account, lots of options here. And I imagine that over time we might see even more appearing here. This is also showing me where I am with my product. I can get updates and get information about whether the updates are installed, whether there are any, and it’s just telling me which version of Microsoft PowerPoint I’m using. So there’s our Backstage View. There’s our Start screen.

So let’s go back now and have a look and see what’s different inside the PowerPoint interface itself. The ribbon is pretty standard from the older versions of the ribbon. The difference is that the Design tab is split in two now with the themes and the variants. So here we have the various themes that we can use. We’re using this one here, but you can see that what we’re using this variant of it. This is another one of the built in themes for PowerPoint 2013, and here are the variants so we could make it blue or pink, whatever we want to do here.

The Developer tab is now visible by default so that’s a big change for people who want access to macros. I’ve got some additional things open here, and it’s picked up my old handy Tools tab which is one that I added to my PowerPoint 2010 and it’s been brought forward into 2011. So too has the add-in Visual Bee. But these are things that I’ve added in myself. They’re not actually in the default PowerPoint install. There is a new button here on the toolbar. It’s the Touch Mode button, and you can enable it if you’re on a touch screen. With that enabled, if I just tap it what happens is that the buttons become a little bit further apart and everything is a little bigger for work on a touch screen. Click it again and everything shrinks down just a little bit.

Let’s have a look at adding a chart so I’m just going to go back to the Home screen. And we’ll do a new slide with a chart so I’m going to choose a title and a content slide. And let’s just add a chart to our Presentation and close this down. These settings here are new, and these are in Excel as well. So these give you the ability to add chart elements or remove them. For example if we don’t want a legend we could just disable the legend here. We could also for example disable the chart title if we planned to add the chart title in as the slide title. There’s access here to styles and color options. And you can see that we could change the colors but we’ve got a smaller subset of colors this time. And they’re more true to the theme itself. So we’ve been given smaller numbers of options but probably more relevant options if you could think of it that way. And then here we’ve got other settings. We can change the values and the names. So there’s options here for working with our chart.

Let’s go again and let’s add another new slide. This time I want to add an image. So I get a choice of selecting pictures from my own computer or online pictures. Online pictures allows me to select images from Office.com clipart. I can search them using Bing or I could go and get them from my SkyDrive account. It’s also possible for me to get them from my Flickr account. So let’s just go and get an image right now. Let’s go and get a coffee image. Okay, let’s grab this one here. And I’m going to insert it so I’m just clicking it and tap Insert. And now we’ve got our image inserted on our slide.

Now if we wanted to make changes to this image we would typically go to the Picture Tools Format tab. But watch what happens when I right click the image here and choose Format Picture. What we get is this new format picture pane here. It’s a task pane. And in it are all the things that we can use to format our pictures. So let’s go ahead and let’s add a reflection to this picture, just add a very simple reflection to it.

Okay, let’s go now and add another slide and this time I’m going to add a small art graphic. So let’s just add a default smart art graphic. But look what’s happened to our pane. Now we’re seeing Format Shape options because these are the options that we can use with this smart art graphic. If we go back to this slide here and click on the picture the pane is still there. It stays in place if we want it to, but it changes to show us the kind of options that we have for the object that we’re working with. And I think users are going to really like this because you don’t have dialogue sitting over the top of your slides. This is all tucked away on the side and you can leave it open as you work. And it’s just giving you much quicker access to things. You can see we haven’t moved away from the Home tab and yet we’ve got most of the smart art tools available that allow us to format the smart art as we work.

Now another handy tool we’ve got is the eyedropper tool. So I’m just going back to this image and I am going to click on the image and go to Picture Tools Format tab. And I’m going to select Picture Border. So instead of actually choosing one of these theme colors what I can do is use the new eyedropper tool. What the eyedropper tool does is to allow me to select a color from the image itself. So I can just mouse over an area of the image and select that as the color of my picture border for example. So it’s now my selected color so I can now add a border to the image that is a color that I’ve selected from the image itself. Now you may be missing the color options that you used to have inside PowerPoint, but we still have access to them. We just have access to them in a limited way.

So let’s say that we like this general layout, but we’d really like it to be a different color combination. In this case we’ll go to the View option and we’ll go to Slide Master View. In Slide Master View we can control the slide master that controls the look and feel of out presentation. And you can see here that the All Theme Color options are back again. So for example if we wanted to use a theme color for example medium we could do that. And here’s our medium color scheme that’s now been applied to the presentation. I’ll close Master View and let’s go back into the Design View.

We’ve still got the four options that came with this slide presentation, but we also have our own custom option that’s a Slide Master that we can use. Now if we like this color scheme in preference to the other variants we can save it as we always could, just drop down this theme option and save the current theme. So you do get the customization options of being able to change colors, but you get it where they really should have been all along which is in the Slide Master because you really want it to be thematically strong and you want this color scheme to be applied throughout the entire presentation. Now some of the other options that are available inside PowerPoint 2013 is the Video options so you can select Online Video or Video on your PC. There are a few more options in working with video content. You’ll find things in the Slide Show menu.

When you go to rehearse a slide show or set up a slide show you’ll have different options in terms of viewing presenter view so you can actually see presenter view if you want to. So let’s just do that. And let’s send the slide show to the monitor and the primary monitor which is not the one I’m using right now, and let’s do Presenter View. And let’s just view the slide show. So here’s our Presenter View. You can see that we can see which slide we’re on and we can navigate through the slides. In fact this is my title slide and this is the next one up. And there’s two and three. We can also use a See All Slides option where you can see the slides themselves. You can press Escape here and you’re just going back into Presenter View, not ruining the presentation which is actually running on my second monitor right now. You’ve got the ability to zoom into the slide show so you can click on here and zoom it up full screen. And there are the standard laser pointers so you can use a laser pointer on your screen and you can see other slide show options here.

So there’s plenty to like about this new PowerPoint 2013. I think you’ll like it a lot. If you haven’t already done so why not go and download the customer preview and install it and have a play around with it. I’m Helen Bradley. Thank you for joining me for this presentation. You can find more of my videos here on my YouTube channel. I encourage you to subscribe to the video channel as we’re releasing at least two new videos every week. And also follow me at projectwoman.com where you’ll find tips and tricks for all the Office applications as well as much, much more. If you liked this video please go ahead and like it and I’m always happy to hear your comments.

Helen Bradley

Thursday, July 19th, 2012

pptPlex-cool PowerPoint Presentations

Check out all our video tutorials on our YouTube channel.

Helen Bradley

Wednesday, May 2nd, 2012

Office 2010 – how to save files as templates

Each of the Office applications allows you to configure a look for a document, spreadsheet, publication or presentation and then save it as a template so that you can reuse it anytime.

Templates in PowerPoint 2010

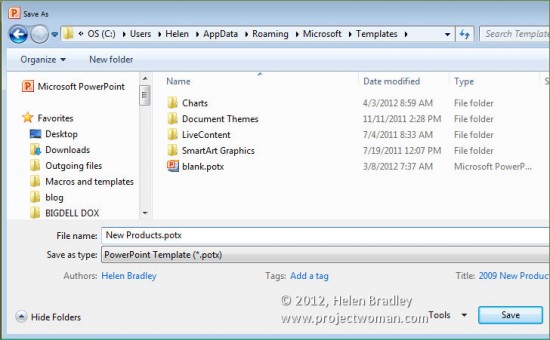
In PowerPoint you’ll create your presentation and then save it using File > Save As and select from the Save As Type list choose PowerPoint Template (*.potx). Give your presentation template a name and click Save.

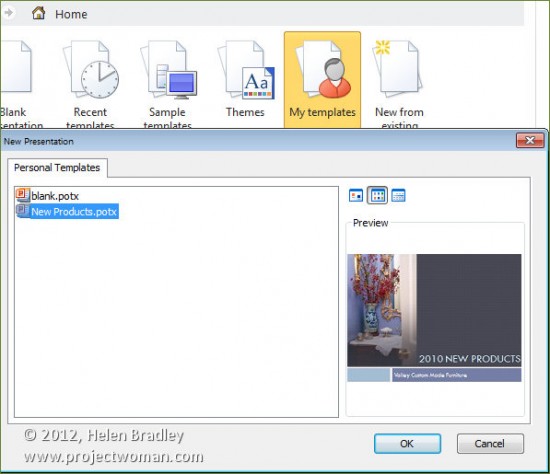
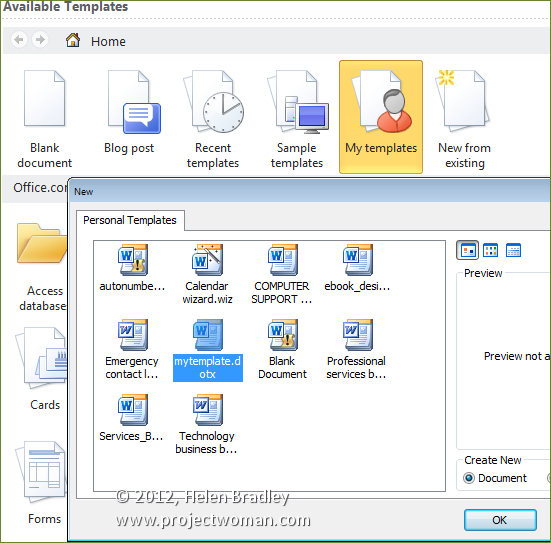
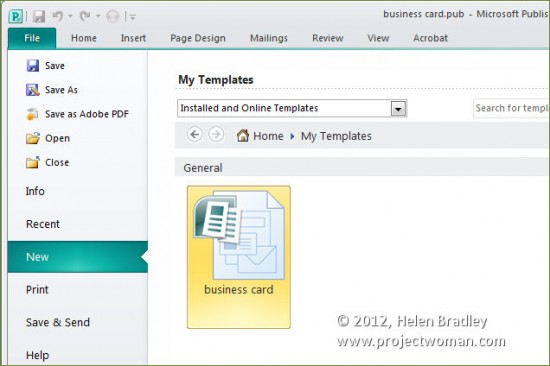
In future you can locate this presentation by choosing File > New > My Templates and click on the template to use it as the basis of a new document.

Templates in Word 2010

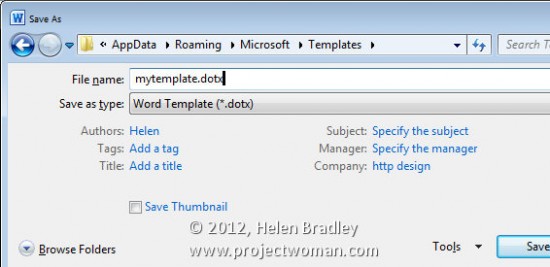
In Microsoft Word choose File > Save As and from the Save As Type dropdown list choose Word Template (*.dotx). In the top left of the dialog click the Templates option to make sure that the template will be stored in the correct location and give the template a name.

In future choose File > New > My Templates and select the template to use.

Templates in Excel 2010

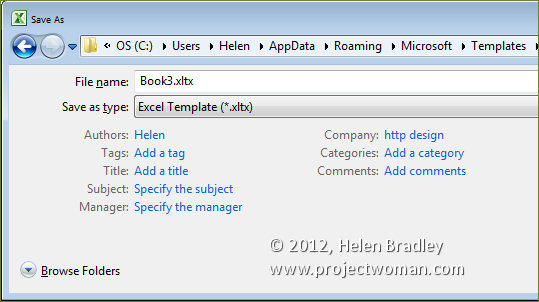
In Microsoft Excel, you can save the look of your document so that it can be used as the basis of a new document by choosing File > Save as and choose Excel Template (*.xltx ) as the file type. Type a name and save the template file.

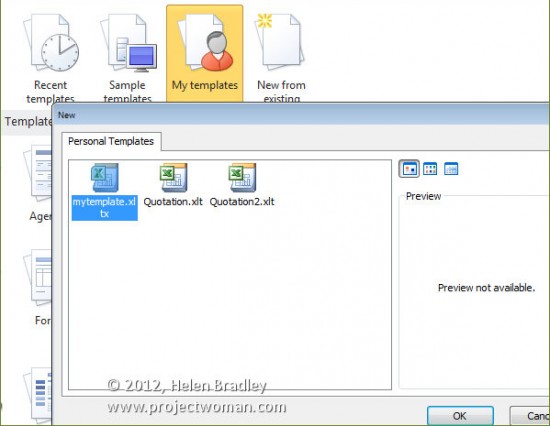
In future you can base a new worksheet on this template by choosing File > New > My Templates and select it from the Personal Templates list.

Templates in Publisher 2010

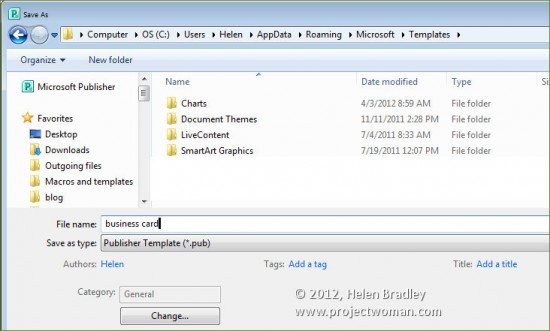
In Publisher you’ll choose File > Save As and then select Publisher Template (*.pub). Type a name for the template and click Save.

In future you can access this template by choosing File > New > My Templates, select the template and click Create. You may need to close and reopen your software before the new templates are available.

Helen Bradley

Wednesday, April 18th, 2012

Unhide Hidden PowerPoint 2010 animations

Sometimes when you’re working in PowerPoint you’ll notice that an animation is not available and it is greyed out.

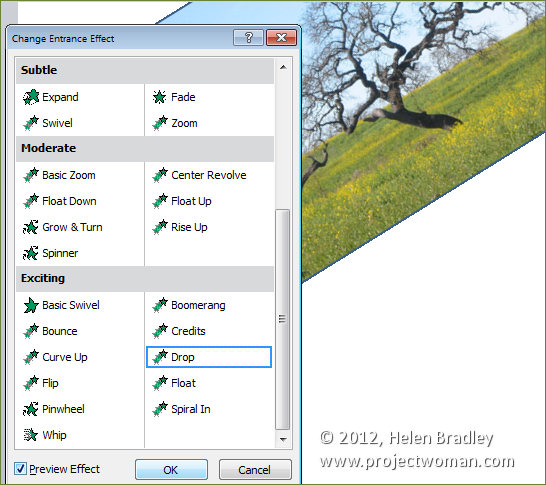
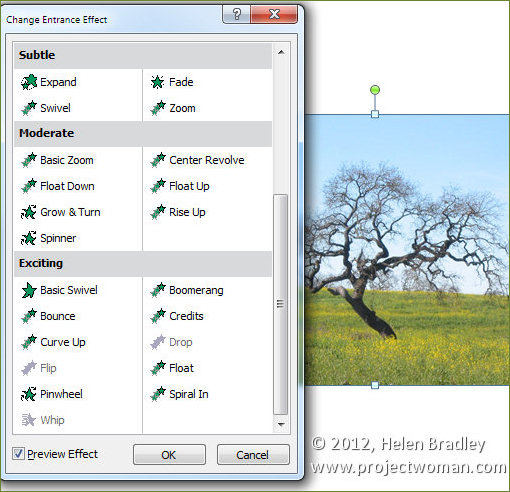
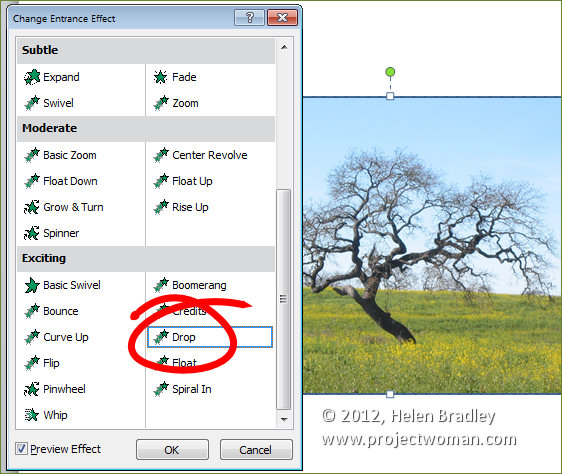
For example add an image to a slide and then try to select the drop animation from the Entrance Effects. It’s not available because what you’re trying to select is a tool that is used to animate text and  you are using an image.

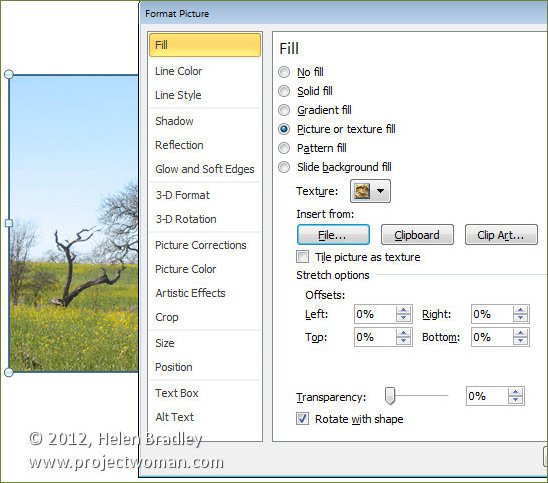
However you can use this animation on an image, you just need to know how to do so. To do this, place the image inside a shape. So, add a shape to the slide – a plain rectangle will do, and as the shape background add the picture by right-clicking the shape, choose Format Shape and then from the shape Fill options select Picture and fill it with a picture.

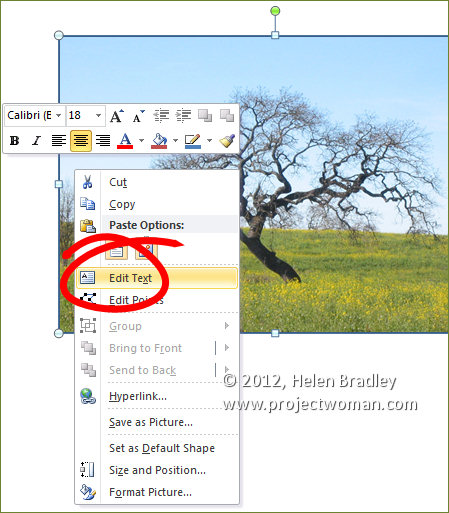
Right click the shape and choose Edit Text and press the spacebar a couple of times so that you add some text to the shape – spaces won’t show but they are text. It’s critical that you do this because without the text the shape will not be able to be animated using text animation tools.

Now when you select the Animate options and the Entrance Effects you’ll find that the effects that you couldn’t use before like Drop, Flip and Whip are now available because you’re working with PowerPoint deems to be a text object.


Helen Bradley

Wednesday, November 10th, 2010

Microsoft Office columns at SmallBusinessComputing.com

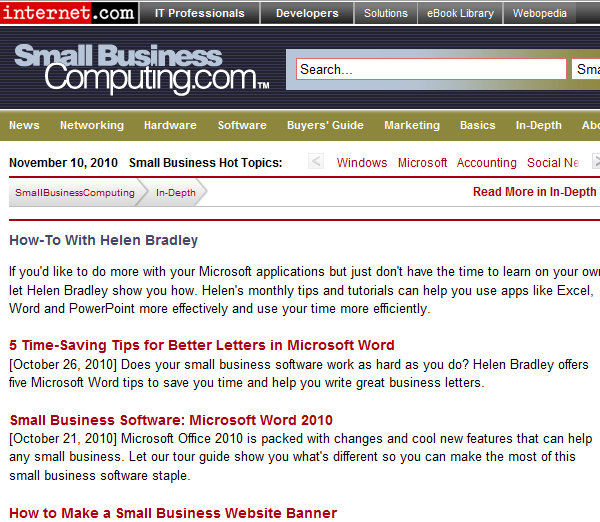
I work for some totally cool people and organizations. One of them is SmallBusinessComputing.com. I write a lot of pragmatic Office columns for the site – I love getting down to the tools you most need to use every day and where you can make get the most time saved.

Well my editor loves my stuff so she has created a How To with Helen Bradley page which includes links to all my columns. You can either head over there and browse to find what you want, or read on – I’ve grabbed all the things there and the links to make it super simple for you to read any of the articles on the site. The first link to Time Saving tips for better letters in Word got picked up by one of the NYTimes business blogs:

5 Time-Saving Tips for Better Letters in Microsoft Word

[October 26, 2010] Does your small business software work as hard as you do? Helen Bradley offers five Microsoft Word tips to save you time and help you write great business letters.

Small Business Software: Microsoft Word 2010

[October 21, 2010] Microsoft Office 2010 is packed with changes and cool new features that can help any small business. Let our tour guide show you what’s different so you can make the most of this small business software staple.

How to Make a Small Business Website Banner

[September 20, 2010] Simple touches can make your small business Web design stand out. Helen Bradley explains how to create a great-looking collage banner for your small business website.

Small Business Solution: Manage Your Money in Excel

[August 23, 2010] Helen Bradley explains how any SMB can project and track cash flow with a budget in Excel.

5 Image-Editing Tips to Improve Any Photo

[July 20, 2010] Helen Bradley shows you five ways to make your small business website photos look better using Photoshop or Photoshop Elements.

MS Office Live Brings Small Business Computing Online

[June 21, 2010] Helen Bradley explains how you can leverage your small business software using Microsoft Office Live Workspaces and SkyDrive.

Microsoft Small Business Software: OneNote

[May 20, 2010] Helen Bradley introduces Microsoft’s note-taking and research tool (not to mention unsung hero), OneNote 2003.

Small Business Software: Survey Forms in Word 2007

[April 28, 2010] Surveys are a great way to find out what your customers are thinking. This Word 2007 tutorial will teach you how to create your own survey forms, plus it offers a few tips on writing better surveys.

Customer Databases as Marketing Tools

[April 21, 2010] A strong customer database is a valuable asset and a great small business marketing tool. Are you making the most of yours?

Small Business Software: 7 Tips for Excel Charts

[April 8, 2010] Use small business technology to your advantage. These seven handy Excel charting features make the data in your charts easier to read and comprehend.

Small Business Marketing: How to Create a Web Site

[March 22, 2010] A Web site is one of the most essential Internet marketing tools for a small business. Helen Bradley explains the basics of creating a Web site without spending a fortune.

Multimedia How-To: Producer for PowerPoint 2007

[March 8, 2010] Need a creative boost to your small business marketing materials? Helen Bradley shows how to add multimedia to your presentations with Producer for PowerPoint 2007.

E-mail Marketing: Create a Newsletter in Publisher

[February 19, 2010] Give your small business marketing a boost by making your own custom e-mail newsletter. Helen Bradley shows how easy it is to do in Microsoft Publisher 2003.

How To Make Image Maps in PowerPoint 2003

[January 4, 2010] Helen Bradley explains how to create clickable hotspots, or image maps, that simplify navigating a PowerPoint presentation.

Find Info Fast: How to Create an Index in MS Word

[December 17, 2009] Helen Bradley walks you through Word 2007’s built-in indexing tool and shows how to make document indexes — by hand or automatically.

PowerPoint 2003: How to Animate a Slide Background

[December 10, 2009] Helen Bradley explains how to create a moving picture background that, when used sparingly, makes a more compelling PowerPoint slideshow.

Web Site Design: Simplify with CSS

[November 23, 2009] Whether you’re redesigning your Web site or starting from scratch, consider using CSS — it’ll make future style changes much easier down the road.

Microsoft Tips: How to Make Signs in Word

[November 4, 2009] Ready for do it yourself signage? Our Microsoft tips guru explains the basics of creating professional, functional signs in Word.

Good Web Design Turns Visitors Into Customers

[November 3, 2009] A consistent Web design not only makes visitors more comfortable on your site, it increases your chances of converting them into customers.

How-To: Make a Feedback Quiz in PowerPoint

[October 9, 2009] Helen Bradley shows how you can gather information from someone while they view a Microsoft PowerPoint 2007 presentation.

How to Create Lists in Microsoft Word

[October 8, 2009] Helen Bradley walks you through the steps to create and customize bulleted and numbered lists in Word 2003.

How to Make Charts in Microsoft Access

[September 28, 2009] Helen Bradley explains how you can chart your data without ever leaving Microsoft Access.

Create Custom Functions in Excel 2007

[September 2, 2009] Helen Bradley shows how custom Excel functions save time and effort and how you can use your custom functions in all your workbooks.

How To Design Brochures in Microsoft Publisher

[August 26, 2009] Helen Bradley shares design tips to create great-looking brochures in Microsoft Publisher.

Microsoft Excel: Design Error-Free Worksheets

[July 29, 2009] Helen Bradley looks at simple ways to avoid introducing errors in Excel worksheets.

How To: No-Hands PowerPoint 2007 Presentations

[July 1, 2009] Helen Bradley walks you through building a PowerPoint slide show that can run automatically – a handy promotional tool to use at events or in reception areas.

Working with Word 2003: Add a Professional Look

[May 28, 2009] Helen Bradley shows you how to add finishing touches that make Word documents look polished and professional.

Word 2007: Working with Numbered Elements

[May 15, 2009] Helen Bradley shows how to create duplicate and sequential numbering in Microsoft Word 2007.

How to Create Custom Formatting in Excel

[February 17, 2009] Helen Bradley demonstrates Excel formatting tricks that will help you when things don’t work as planned.

Microsoft Excel 2007: Outlining Worksheets

[February 10, 2009] We show you how to summarize important data in your Excel 2007 worksheets and reduce the data to more manageable levels with the ultra-efficient outline tool.

How To Make Templates in Microsoft Word 2003

[January 27, 2009] Helen Bradley shows you how to create Word document templates to quick start your day-to-day tasks.

How to Use Teamwork Tools in Microsoft Word 2007

[January 7, 2009] When working on documents with other people, tracking changes has the potential to save time and help keep others well informed and on the same page.

Excel 101: Create Worksheets and Charts

[December 19, 2008] Helen Bradley introduces the basics of creating a worksheet and chart in Microsoft Excel.

Link or Embed: How To Add an Excel Chart to a Word Doc

[December 1, 2008] Microsoft maven Helen Bradley explains how to place an object from one Office application inside of another.

Microsoft Access: Customize Forms and Reports

[November 10, 2008] Our Microsoft application guru Helen Bradley explains how to make Access database forms and reports more functional and attractive.

Create a Web Site in Publisher 2003

[September 18, 2008] Helen Bradley shows how to use Microsoft Publisher to build a basic Web site for your business. Bonus: you can use the same design set for your Web site that you use for your print marketing materials.

Basic Formatting in Microsoft Word

[August 28, 2008] Our resident document diva, Helen Bradley takes us on a tour of the rudimentary, but essential, formatting features in Word 2003.

Create Custom Headers and Footers in Word 2007

[August 13, 2008] Tapping into the new document properties and content controls in Word 2007 generates some very sharp-looking professional building blocks.

Create Marketing Materials in Publisher

[August 4, 2008] Our designing diva, Helen Bradley shows you how to create your own sharp, professional marketing materials using Microsoft Publisher.

How-To: Animate Microsoft PowerPoint Presentations

[July 30, 2008] Our application expert Helen Bradley explains ways you can add animation effects to your slide shows.

Office 2007: Keep Excel Data Visible At All Times

[July 3, 2008] With a little imagination and skill you can work on one part of a spreadsheet and see data in other areas at the same time.

Microsoft Word: Working with Field Codes

[June 24, 2008] We look at ways to harness the power of Word Field codes to automate and simplify document production.

Discovering Dashboards in Excel 2007

[June 6, 2008] We step through the process of creating a Dashboard chart and data display in Excel 2007 for more efficient analysis of and quick access to your critical information.

Access 2003: Extracting Data Through Queries

[May 22, 2008] You’ve put in the time and effort to build and populate a database — now what? We take a look at the ways to create queries to find pearls of business wisdom. Plus: watch the video.

Microsoft Word Tips: AutoCorrect and AutoText

[March 10, 2008] Don’t get caught up in repetitive typing and correcting common typos. The AutoCorrect and AutoText tools in Word can help you to increase your efficiency and speed up your day.

Exploring Office 2007: Error-Free Worksheets in Excel 2007

[February 19, 2008] It’s critical to understand the problems that might occur in your Excel worksheets. In this article, we’ll show you how to keep them as error-free as possible.

PowerPoint Tips: Slide and Title Masters

[February 14, 2008] Mastering the art of PowerPoint masters will save you time, repetition and a whole lot of aggravation.

Hand-Drawn Charts in PowerPoint 2007

[January 24, 2008] We take a look at handy new features in PowerPoint 2007 that let you create attractive hand-drawn charts to give a visual boost to your presentations while still getting your message across to your audience.

Build Your First Database with Access

[January 14, 2008] Creating a database in Access can be a bit daunting for the uninitiated. We’ll walk you through how to build your own, plus a report and a query, too.

Exploring Office 2007: Quick and Efficient Data Entry in Excel

[January 4, 2008] There are many times in Excel when you find yourself entering the same data over and over again. In many cases, you can spare your fingers the work of typing and fast-track repetitive data entry. As the latest article in our Exploring Office 2007 series shows, it’s all about working smarter and more effectively.

Exploring Office 2007: Collaboration in Word 2007

[December 11, 2007] Microsoft Word 2007 is a great editing tool to use when you’re working with others on a project. We explore the features in Word 2007 that allow you to manage workgroup changes and contributions to documents.

Working with Action Buttons in PowerPoint 2003

[December 6, 2007] Action buttons let you navigate quickly through a PowerPoint presentation, add sounds or any number of other interactive effects. We’ll show you how easy it is to do.

Working with Images in Word

[November 20, 2007] They say a picture’s worth a thousand words, but wait ’til you see what Word can do with that picture. We take a look at the application’s image tools and how using them lets you add pop to any document.

Working with Tables in Word 2003

[October 22, 2007] Tables let you organize information in a concise, visual way, but working with them in Word can be a bit tricky. We’ll take a look at some of the tools and show you how to make the most of Tables.

Take the Guesswork Out of Printing in Excel 2007

[October 1, 2007] With a little pre-planning and some knowledge of the print options that can be configured to your advantage in Excel, you can turn your next Excel print job from an exercise in frustration to an effortlessly simple and successful procedure.

Learning About Lists in Excel

[September 11, 2007] Excel offers a simple way to manage lists of data without resorting to the complexity of a database. We show you how it works in both Excel 2003 and 2007.

MS Office 2007: Applying and Customizing Themes

[August 24, 2007] One of the new features in Microsoft Office 2007 that has everyone talking is Themes. Discover how this new feature can improve your everyday productivity and efficiency while helping you create attractive, professional-looking documents and presentations with minimal effort.

Analyzing with Excel

[August 23, 2007] Excel makes comparing business decisions a bit easier with its Scenario Manager tool. We take a look at how you can use the spreadsheet to set up different scenarios whether it’s comparing products or budget numbers.

Exploring Office 2007: Top Ten Excel Chart Tips

[August 2, 2007] Excel charts have been given a makeover in Excel 2007 and the Chart Wizard of earlier versions is now gone. Our Exploring Office 2007 series continues with a list of the top tips for creating functional and attractive charts in the new Excel 2007 release.

Three Must-Know Excel Tools

[July 25, 2007] Excel jockeys saddle up. We take a look at how using Reports, Views and Outlining saves you time and simplifies your spreadsheets.

Exploring Office 2007: PowerPoint 2007 Tips and Tricks

[July 3, 2007] PowerPoint 2007 delivers a wealth of new features and enhancements that make it easier to create attractive, professional-looking presentations. Our Exploring Office 2007 series continues with a list of the top tips for getting the most out of the new PowerPoint 2007 release.

Exploring Office 2007: Outlook 2007 Tips and Tricks

[June 15, 2007] While Outlook 2007 may look a lot like older releases, there’s a great deal to like about the upgrade and plenty of new tools to help you be more productive. Our Exploring Office 2007 series continues with a list of ten top tips for using Outlook 2007.

Word Mail Merge: It’s not Just for Letters

[June 11, 2007] Microsoft Word can merge more than just mail. Use the popular app’s mail-merge feature for create lists, nametags and even catalogs with images. We’ll show you how.

Exploring Office 2007: Using SmartArt Graphics

[May 22, 2007] Office 2007 delivers an abundance of new features and enhancements, many of which aren’t exactly obvious at first glance. The first article in our new Exploring Office 2007 series takes a closer look at working with the SmartArt tool to easily create everything from simple diagrams to cutting-edge business graphics.

Take Your Excel Charts Beyond the Basics: Five Cool Tips

[May 3, 2007] Add some life to your spreadsheets and make your data easier to understand. These five tips can make Excel charts sing.

Helen Bradley

Thursday, September 16th, 2010

Borrowing PowerPoint Image Designs

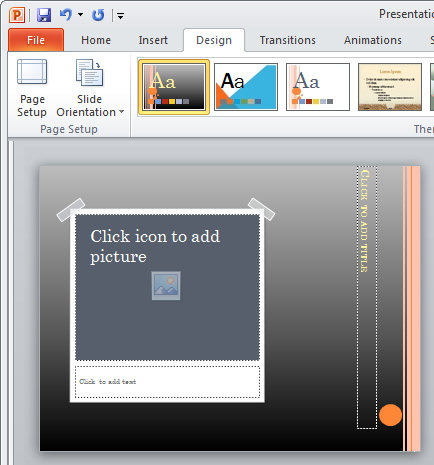
This stickytape image border comes from the Solstice Theme and here I’ve added it as a new layout in my Oriel Theme.

I saw a recent post on a blog which referred to one of my earlier posts about creating torn edge image effects in PowerPoint 2007. You can see my original post here: http://www.projectwoman.com/2007/03/powerpoint-2007-torn-photo-edges.html.

Someone who responded to the post asked if there was a way of using the photo edges from a theme but not the theme itself. Their problem was they loved the edges but because their organization had a custom theme that was always used, the person wasn’t allowed to change it. The question got me thinking about a solution and here it is!

To use an image design from a PowerPoint theme first create a new file by choosing File > New > Blank Presentation and then choose the New Slide > Picture with Caption Layout – this is the layout typically used to apply fancy styles to images.

Click on the image locator and add an image to the slide – it doesn’t matter what image you add – you just need something so you can see how the image design looks.

Now go to the Design tab and arrow over each of the Themes in turn to see what the image layout looks like. For example, Solstice has a sticky tape edge to the image, Pushpin adds the image with a pushpin background and Opulent has a layered frame look. Flow has a bent corner on the image, Couture has an interesting beveled edge and Summer has a series of illustrative dots around the image. You may find other interesting designs in other Themes such as those that you download from Office Online.

Select the Theme that has the look you want to borrow.

Now choose View > Slide Master and locate the Picture with Caption Layout. Drag over the elements that create the look that you want such as the Pushpin and frame, the sticky tape frame or the circles. Make sure to include the image placeholder. Right click the selected elements and choose Copy.

Now open a file that uses your corporate Theme – or the Theme you prefer to use. Choose View > Slide Master and locate the Picture with Caption Layout slide layout. Right click it and choose Duplicate layout.

Click the image placeholder on this duplicate layout and delete it. Right click on the layout and choose Paste to paste the elements that you copied from the other layout. Move the design elements into a new position, if desired.

You can now adjust the text and title boxes on the layout so that they don’t encroach over the elements that you’ve just added to the design.

When you’re done, click Close Master View.

To save the Theme with the new Layout, from the Design tab open the Themes dropdown palette and choose Save Current Theme and save it.

In future you can use this Theme for your slideshows and to use the layout you created select it from the Layout list where it appears with all the other layouts from the original theme.

Helen Bradley
Page 1 of 3123