Thursday, July 11th, 2013

See your document as a web page and keep it looking that way
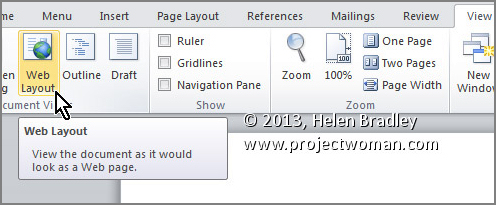
To see how any of your Word 2010 and 2013 documents will look when they are saved as web pages, select the View tab on the Ribbon, then click Web Layout.
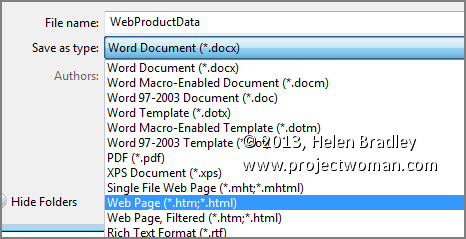
Now, to save a document as a web page, select File > Save As. In the Save As dialog, under click the Save as type: dropdown list and choose Web Page (*.htm;*.html).

Make sure to choose a location to save the document in, give it a name (it should have the .htm extension), and click Save.
Helen Bradley
Labels: .htm, .html, 2010, 2013, file, File name, Microsoft Office, Microsoft Word, preview, save, Save As, save as type, tip, trick, Tutorial, view, Web, Web Layout, web page, Word, Word 2010, Word 2013
Categories:office
posted by Helen Bradley @ 6:13 amNo Comments links to this post
Tuesday, June 11th, 2013

Learn to use ‘Save as type’ to format your document so users of older versions of Word can access them
You can easily exchange files with users of older versions of Word. This is because Word 2007, 2010, and 2013 essentially share the same file format. So it is pretty easy to open any Word document created using version 2007, 2010 or 2013 in any other of these three versions of Word. In addition, Word 2007, 2010, and 2013 will open files from any previous version of Word.
However, when you need to share a Word 2007, 2010, or 2013 file with someone using a much earlier version such as Word 2003 or a Mac version of Word, you must save the file using their particular Word file format. This is because the file formats are not the same and the older versions of Word cannot read the newer file formats.
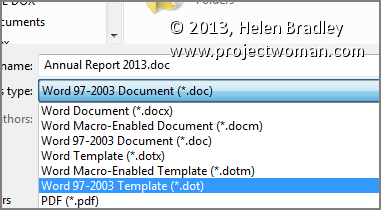
To save using the appropriate format, select the File tab on the Ribbon, and click Save As. In the Save As dialog, click the Save as type: dropdown list and select the word processing format that matches the software that your other user is using such as Word 97-2003 Document (*.doc). Then click Save to save it in that format.
Helen Bradley
Labels: 2003, 2007, 2010, 2013, convert, file, format, mac, Microsoft Office, Microsoft Word, old, open, Save As, save as type, share, software, tip, trick, Tutorial, Word, Word 2010, Word 2013
Categories:office
posted by Helen Bradley @ 6:28 amNo Comments links to this post
Monday, May 17th, 2010
 There’s been a lot of excitement over the Content Aware Fill feature in Photoshop CS5 (Edit > Fill > Content Aware). It’s a big new feature but it’s often the little day to day changes that really make a difference. For me there are two big “little” changes that I love.
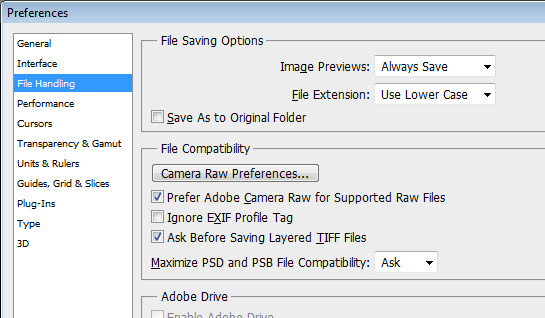
One is the ability to stop Photoshop wanting to save files to where they came from. So, now, when you choose Save As, Photoshop doesn’t have to default to where the file came from and it can be made to point to the last place you saved a file into. This could mean the difference between using Photoshop for day to day screenshots and not.
Until now I’ve used PaintShop Pro and I’ve done so for around 10 years because it defaults to the last save location which works best for me. Now, at last Photoshop can be configured to behave the way I want it to behave. You will find this setting in Edit > Preferences > File Handling – disable the Save As to Original Folder checkbox.
The other big plus is that the Ruler tool now includes a rotate feature. In the past you’d choose the Ruler tool, mark the horizontal line then go to Image > Image Rotation > Arbitrary to make the rotation. Now there’s a Straighten option on the tool options bar when you select the Ruler tool.
Still on my wishlist is a one step paste to new image option. I’d love to be able to have something on the clipboard and choose Paste to New Image and have a new image the size of the clipboard object automatically created for me. Shouldn’t be too difficult – really! For now I have an action which does it but it would be nicer to have a menu item.
Helen Bradley
Labels: Photoshop CS5, Rotate, ruler., Save As
Categories:Uncategorized
posted by Helen Bradley @ 2:25 pmNo Comments links to this post


