Sunday, April 1st, 2012

Scale a Pattern in Photoshop

I use patterns a lot in Photoshop to fill backgrounds and to apply effects to my images. Problem is that ahead of time I never really know how big the pattern needs to be. If you fill an image with a pattern using Edit > Fill then you get the pattern in the image but at the size it is in the pattern swatch so you get zero control over it.

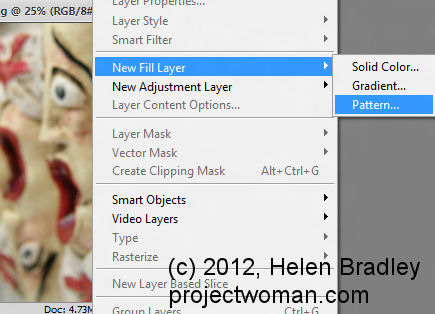
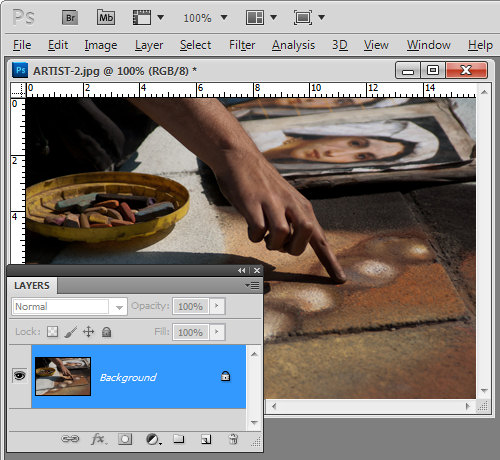
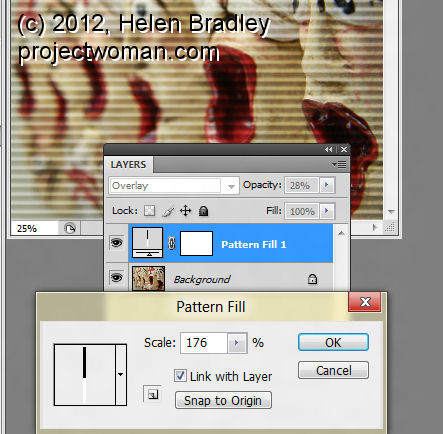
Instead, if you prefer to add your pattern in a scalable way, apply it using a fill layer. To do this, choose Layer > New Fill Layer > Pattern, click Ok and then select your pattern to fill the layer with.

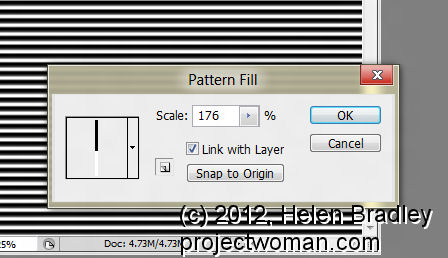
You will see a Scale slider and you can use this to scale the pattern to suit the image.

If you don’t want it to stay a fill layer, right click the pattern layer and click Rasterize Layer to rasterize it so that you can then do other things with it.

While it remains a pattern fill layer you can double click the layer and rescale the pattern if desired.

Helen Bradley

Saturday, March 10th, 2012

Pixel Bender Droste Filter video tutorial

I work for Practical Photoshop mag in the UK which is a totally cool job. One of the projects I did recently is creating a spiral image using the Droste filter for the Pixel Bender extension for Photoshop CS4 & CS5 – try saying that quickly 5 times!

The guys at the mag – Ben and James have added my video tutorial to the magazine’s YouTube channel. Here is the video in all its glory and I highly recommend you subscribe to the channel there are some terrific tutorials there (if I say so myself!):

Helen Bradley

Friday, January 27th, 2012

Smarter Content Aware Fill

If you’re like me, you’ve tried out the new Content Aware Fill feature in Photoshop CS5 and you’ve been left just a little bit disappointed.

What Content Aware Fill does is to replace unwanted areas of an image in a smart way. It can reduce the amount of time you spend working with the Clone Stamp and other fixing tools when you have something you need to get rid of in an image. However, where the Content Aware Fill feature appears to fail is when you want to remove a large portion of an image – those very times you wish it would work perfectly.

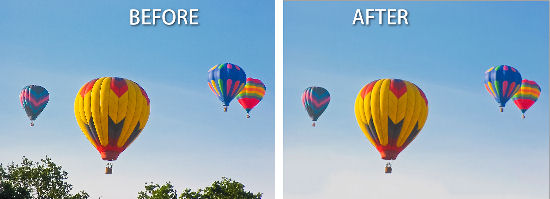
Well, last week I learned a cool technique to use with Content Aware Fill that solves these problems, thanks to Adobe’s Bryan Hughes. So here’s a way to make Content Aware Fill behave a whole lot smarter.

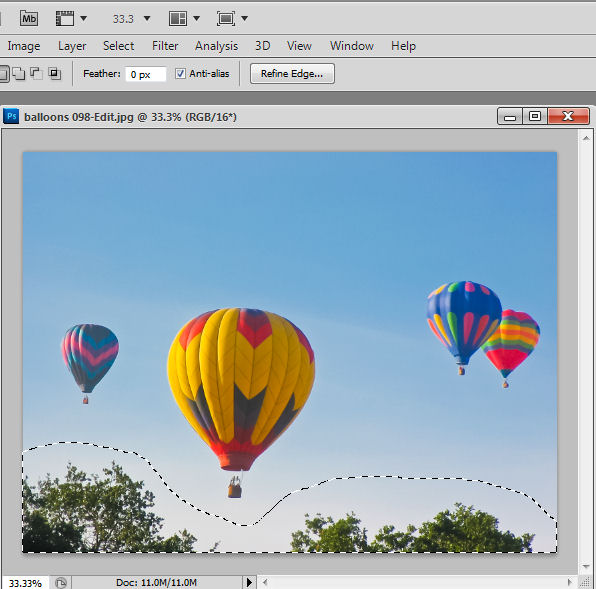
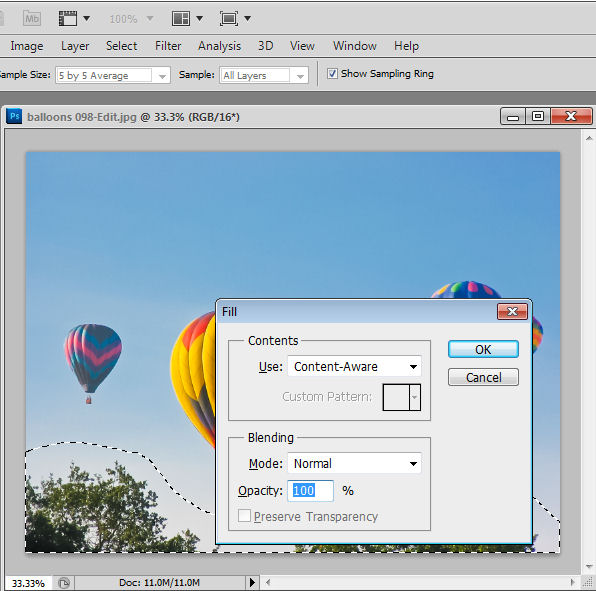
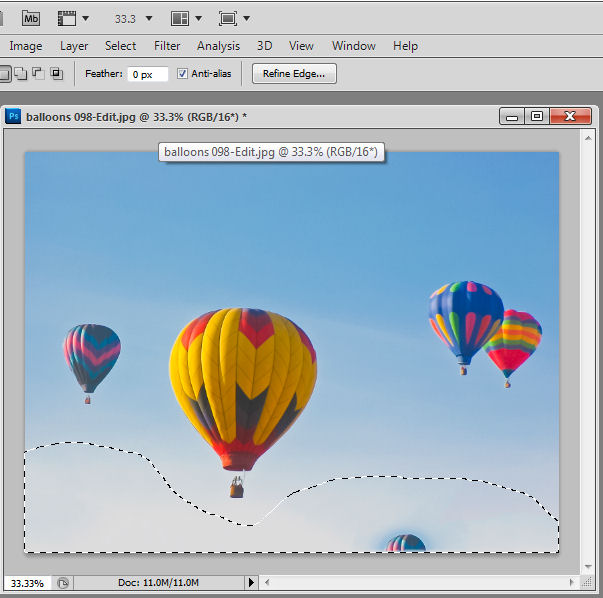
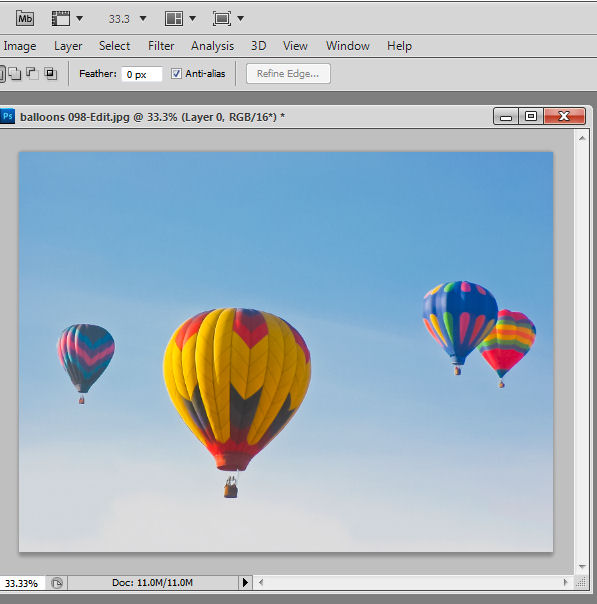
In this balloon image, if I want to remove the trees at the bottom of the image, I would make a selection around them with, for example, the Lasso tool.

Then, in Photoshop CS5 – even though the bottom layer of the image is a Background layer I would press Delete to open the Fill dialog. Here I can choose Use: Content Aware Fill and press Enter to have Photoshop remove the trees for me.

The problem is, that as often as not, part of one or more balloons will appear in the filled area. What I want is blue sky and not balloons. I could repeat the “Select and Delete” process until the image looks as I want it to but there is an alternative way to use the Content Aware fill feature. This way of working is great when you are trying to remove a large object and where there is not a lot of clean image data for Photoshop to use to do the fill with.

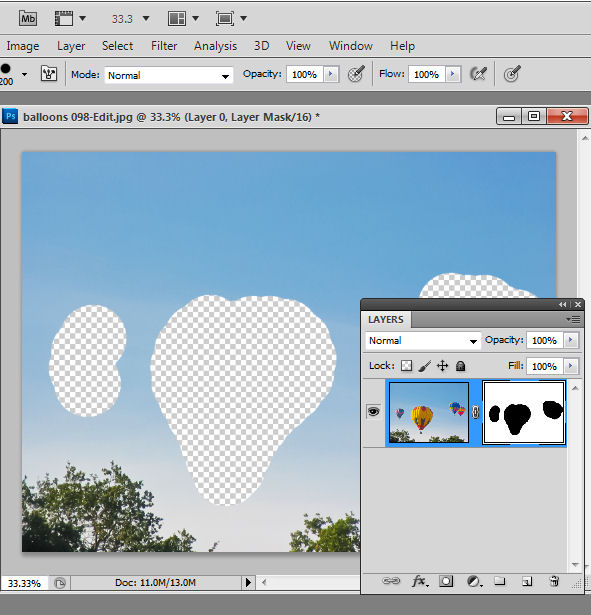
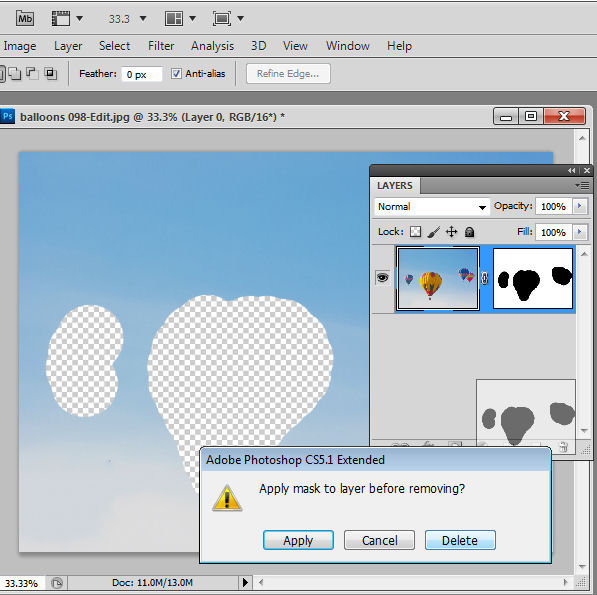
This solution involves removing any part of the image I don’t want the content aware fill feature to use – here that is the balloons – temporarily leaving only the content I want it to use – here that is blue sky. To do this I converted the background layer to a regular layer by double clicking it and pressing Enter.

Then I added a layer mask using Layer > Layer Mask > Reveal All and painted on the mask in black to remove the balloons – a hard edge brush is a good choice here.

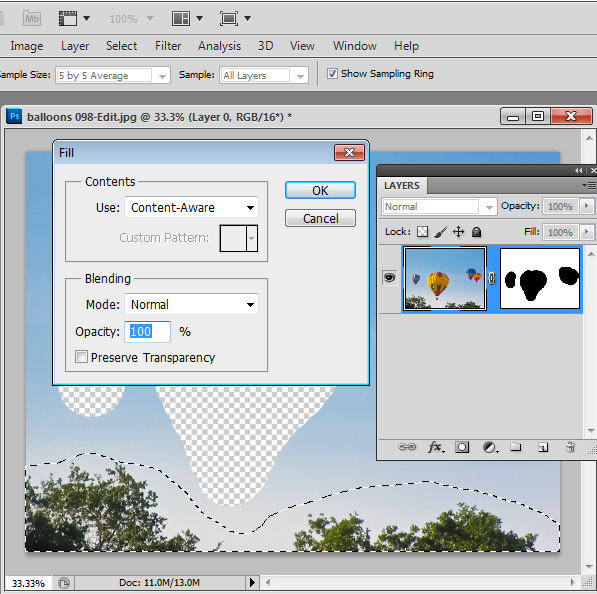
Now I’ve reselected the image – not the mask – and made a selection around the trees again using the Lasso tool. Pressing Delete this time won’t work – it just deletes the selection so, instead, I need to press Shift + F5 or choose Edit > Fill to open the Fill dialog. Make sure that Use: is set to Content Aware and click Ok.

This time Photoshop uses only the visible content to fill the area and because the balloons aren’t visible they aren’t used to fill the area when the trees are removed.

Once you are done, you can bring back the balloons by dragging and dropping the layer mask into the trashcan – select Delete when prompted so you remove the mask – don’t apply it.

Now the content aware fill tool works as you would expect it to – allowing you to remove large portions of an image and have the area filled in an intelligent way.

Helen Bradley

Friday, September 23rd, 2011

Photoshop: Applying fixes using masks

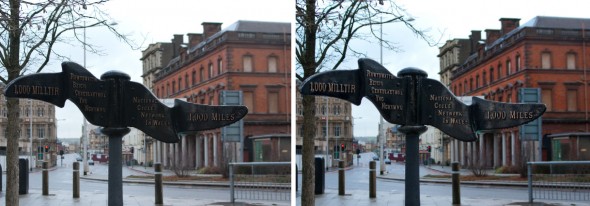
Sometimes a photo needs two opposing fixes applied to different areas of the image. This poses a dilemma – if you fix one area you’ll make the other areas far worse than they started out being and vice versa. The solution is to apply both fixes but to do this on different layers and to blend the results together using a mask. Here’s how to do it:

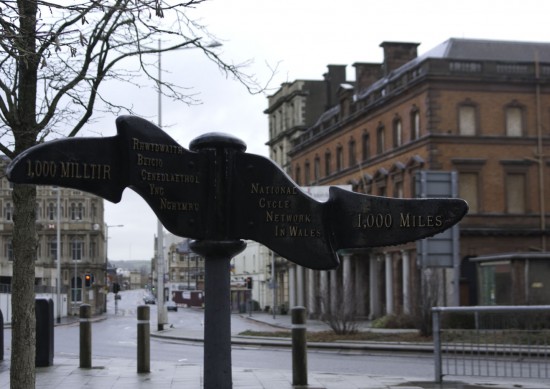
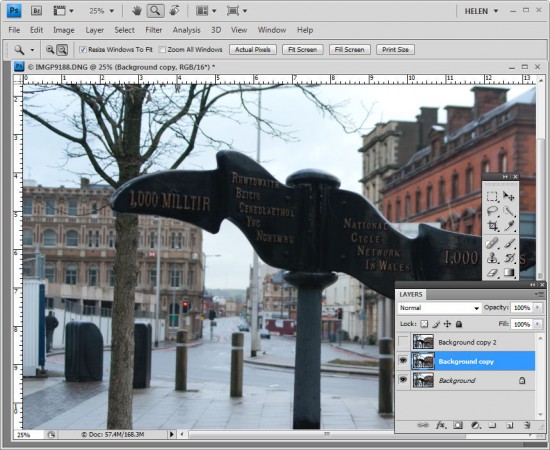
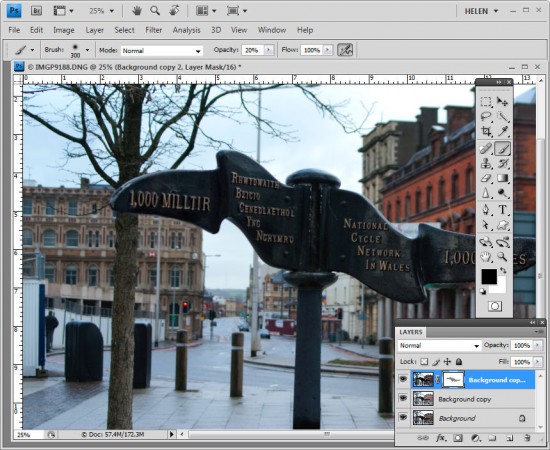
Look at this photo – the sign in the middle is dark and hard to read and the area behind it is lighter than it should or could be. The camera has exposed primarily for the lighter areas in the image but the entire image needs work.

Step 1

Make multiple duplicate layers

To fix the image make two copies of the background layer so that you do your work on duplicate layers. To do this, right click the Background layer in the Layers palette and choose Duplicate Layer and then repeat this step a second time. Disable the visibility icon on the topmost layer and select the middle layer.

Step 2

Using Shadow/Highlights to lighten the darks

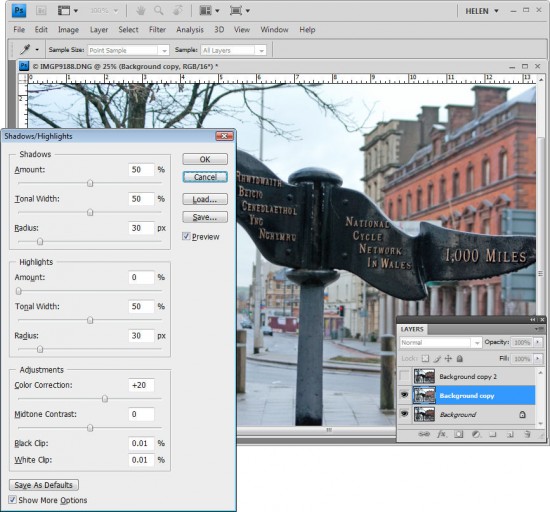
To bring detail out of the darker area in the sign, I’ll use the Shadow/Highlights tool. To do this choose Image > Adjustments > Shadows/Highlights and adjust the Shadows but leave the highlights settings untouched. Typically the default setting will be all you need but you can fine tune the settings using the sliders which appear when you click Show More Options if desired. Ignore the impact that this fix has on the lighter areas of the image.

If you prefer to use another tool for this fix, do so. The important thing is to fix the shadows and ignore any changes to the highlights.

Step 3

Levels to fix the highlights

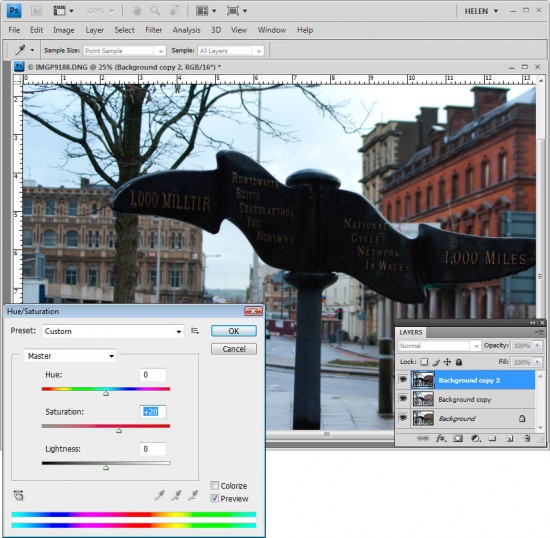
Enable the visibility icon on the top layer and select the top layer – this hides all the changes you have made so far. Choose Image > Adjustment > Levels and adjust the levels to improve the contrast in the lighter areas of the image – this time ignore the darker areas entirely as they are not part of this fix. You can also adjust the saturation using Image > Adjustments > Hue/Saturation if desired.

Again, if you prefer to use another tool, do so. The important thing is to fix the highlights and ignore any changes to the shadows.

Step 4

Blending the results with a mask

The top layer contains the adjustment for the lighter areas of the image and the middle layer contains the adjustment for the dark areas of the image. To blend these layers, I’ll use a layer mask to selectively adjust the opacity of the top layer so I can see the fix applied on the middle layer through it.

Unlike the layer opacity slider which sets every pixel to the same opacity value, a mask lets you adjust the opacity selectively so one area can be 100% opaque and others can be partially or fully transparent.

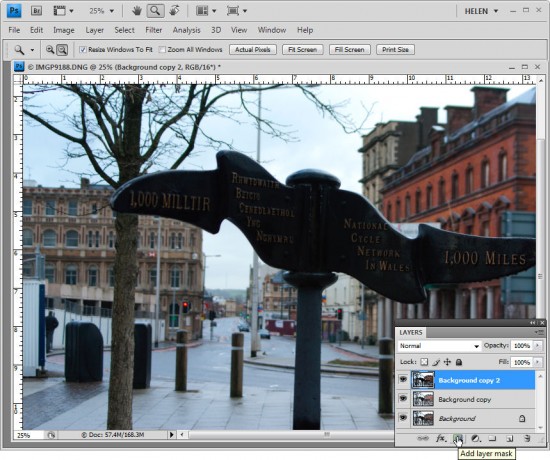
To add a mask to the top layer, first select the topmost layer and click the Add Layer Mask button at the foot of the layer palette. This adds a white layer mask to this layer. When working with masks, “black conceals and white reveals” so the white mask reveals everything on the top layer and the image is unchanged.

Step 5
Set the foreground color to black, select a soft round brush and set its Opacity to approximately 20%. Click on the mask to select it – it will have a small border around it showing that you have it selected. Now paint over the darkest areas of the image to reduce the opacity of the top layer where you are painting – this reveals the fix from the layer below. Using a low opacity brush lets you reduce the opacity gradually to build up the effect.

Continue and paint over the darker areas of the image to reveal more of the layer below through the mask. It can help to see how much more detail you can still recover if you turn the visibility of the top layer on and off. Make sure to select the layer mask again before painting on the mask – if you don’t do this, you’ll paint on your image.

If you go too far, make white your foreground color and paint on the mask to bring back parts of the top layer of the image. This is one of the benefits of using a mask – simply by painting you can apply or remove the fix. You wouldn’t have this flexibility if you used the Eraser tool on the top layer, for example.

To finish, I rotated the image to straighten the sign and cropped it to remove the distracting elements on the left side of the image.

Helen Bradley

Tuesday, July 12th, 2011

Structuring a Photoshop workflow with Configurator

In a previous post, I explained how to create panels for Photoshop using Configurator. This time I want to show you a way to structure panels as something more than just a place to put the tools you use most often.

To follow along, you’ll need to download Adobe Configurator 1.0 if you’re using Photoshop CS4 or Adobe Configurator 2.0 if you’re using CS5. You can find both programs for downloading at http://labs.adobe.com/technologies/configurator/. Panels created using Configurator 1.0 only work in Photoshop CS4 so, if you’re using CS5, you must download the new Configurator 2.0.  To get started, launch Configurator and choose File > New Panel to create a new panel.

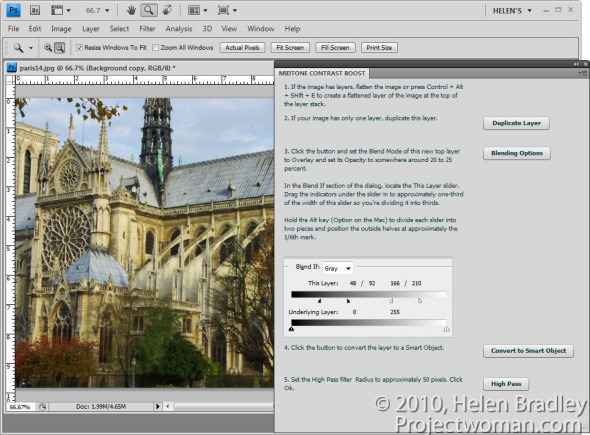
The panel I’ll show you how to create will step you through the process of enhancing midtone contrast in Photoshop that I discussed in a previous blog post. It will contain not only buttons that you press but also text that explains the workflow.  You can get the instructions for your panel from the steps in that post.

1          Set the panel title to read Midtone Contrast Boost and size the panel so it is quite large.
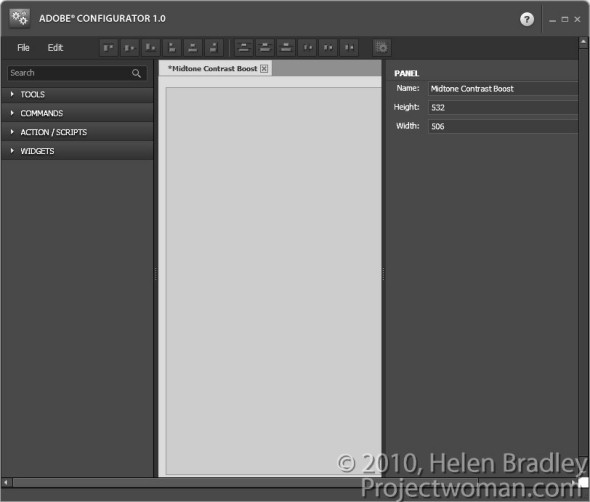
2 The first step in the midtone contrast workflow is to ensure that you have a flattened image or and, if not, you should flatten it. Open the Widgets area in Configurator and double click Simple Text to add a textbox to the panel.

Type number 1 and then the instructions for the first step into the text box.

Add a Simple Text box for the instructions for the second step. If you need to duplicate the background layer then this can be done using a button so add one to the panel by choosing Commands > Layer > New > Duplicate Layer/Group and drag the button onto the panel. Rename this button by typing a new entry in its caption property.
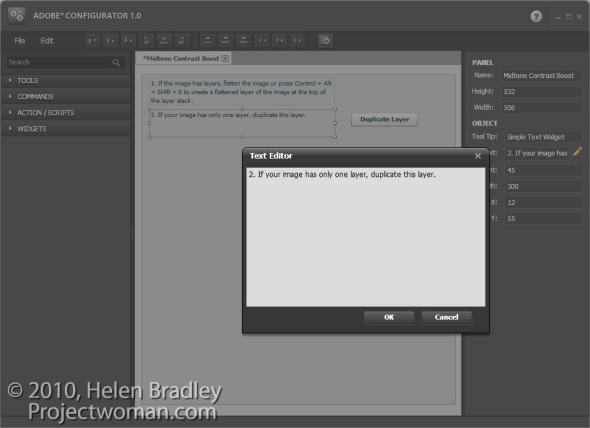
3 Add the instructions for the third step which are to adjust the opacity, blend mode and  blending options for the layer. This can all be done with one command so you can add a button to launch the Layer Style dialog at the Blending Options area. To find this button choose Layer > Layer Style > Blending Options and drag the button into position.

You can also add images to the panel illustrating crucial steps. For example, you could take a screen grab of the Blending Options dialog, crop it to show only the relevant portion of the dialog and save it as a JPG image. Make a note of the image’s width and height in pixels. To add the image to your panel, double click the SWF/Image Loader widget to add it. In the URL box, type the location of the image on your disk. Set the width and height of the Image Loader to match the width and height of the image and position the image in the panel.
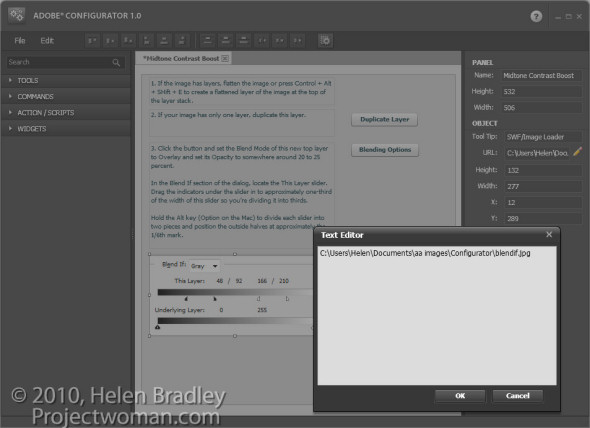
4 The next step of the midtones contrast process is to convert the layer to a Smart Object. Add an explanation of this process to your panel and add a button to perform the task by choosing Commands > Layer > Smart Objects > Convert to Smart Object.
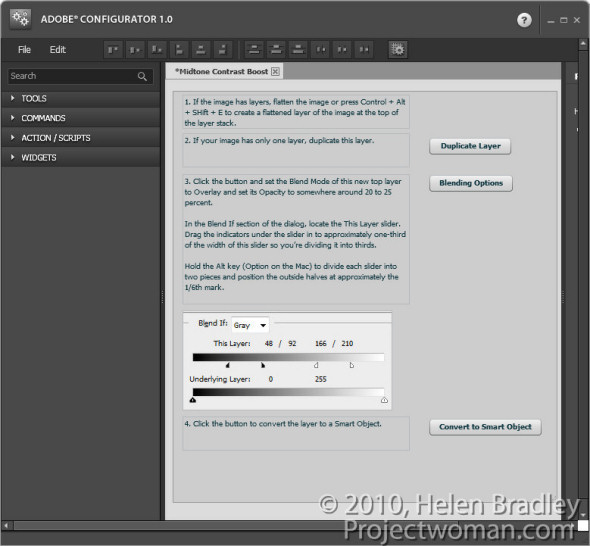
5 The next step is again a command, so choose Commands and then Filter > Other > High Pass and drag that command button into the panel. Add a textbox explaining this step.

To line everything up, select each of the textboxes in turn and select an appropriate alignment option from the toolbar.

Once you’ve completed your panel, save the design by choosing File > Save Panel. Saving the design means you can come back at a later date and alter the panel if required.

Export your panel to use in Photoshop by choosing File > Export Panel, select your Panels folder and click Ok.

When you next open Photoshop, you can load your panel by selecting Window > Extensions and click the panel’s name.

Panels like this, which step you through a process, are a handy way to document processes that you want to remember and use. They can also be shared with others as a learning tool.
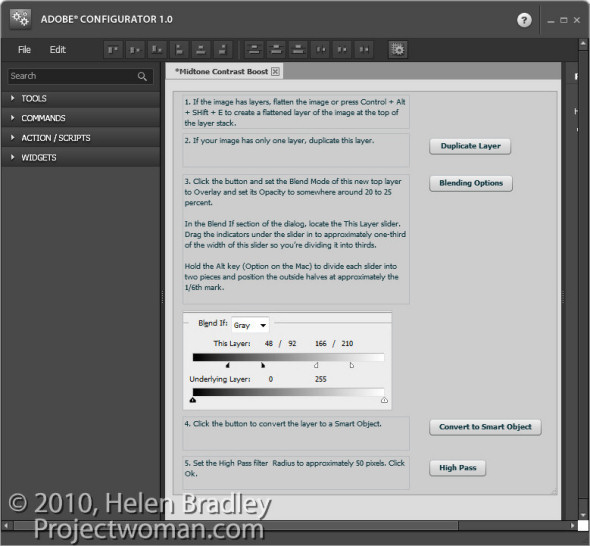
6 Always test your panel once you have created it to make sure that it works as expected. If it needs to be changed, return to Adobe Configurator, open your saved panel file, make the changes, save it again and then re-export the panel. Back in Photoshop, close the panel and reopen it to get access to the changed form.

Helen Bradley
Saturday, July 9th, 2011

Photoshop wizardry – create the Droste ‘frame in a frame’ effect

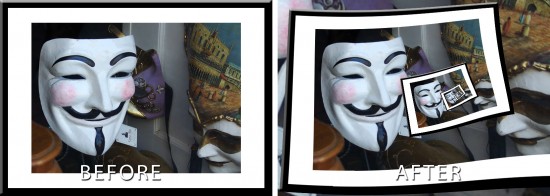
In previous posts I’ve introduced the Pixel Bender extension for Photoshop CS4 and CS5/5.5 and the Droste filter created by Tom Beddard. This post I’ll show you how to create the classic frame in a frame image effect using these tools.

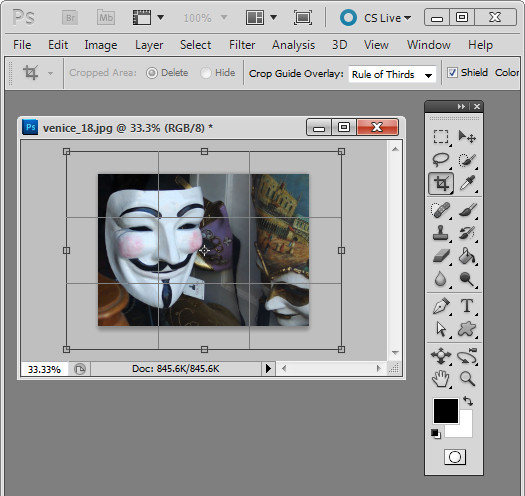
The critical part of this effect is getting the image right before you start. You need a framed image so start by opening an image to use. Add some white canvas around the flattened image by first setting the background color to White. Select the Crop tool and drag over the image. Let go the mouse button and then hold the Shift + Alt (Option) key as you drag outwards on a corner handle to add an extra canvas around the image.

Convert the background layer to a regular layer.

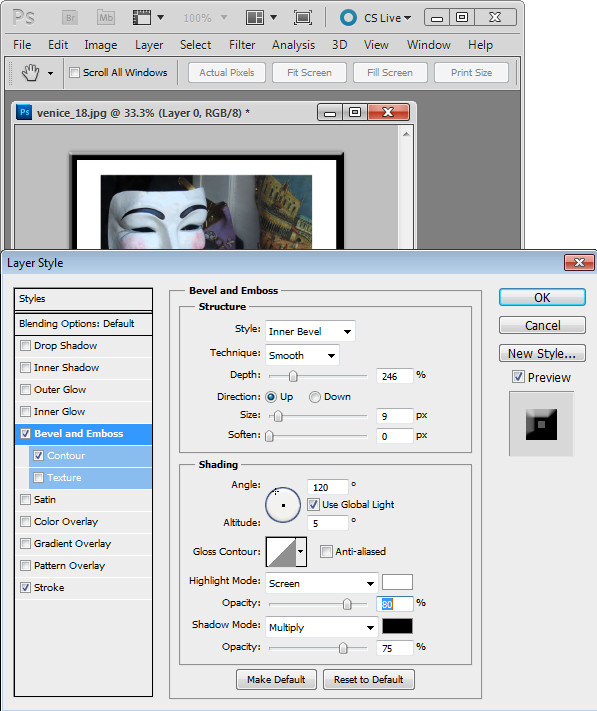
Now add a frame border. I did this using a Layer Style to add a black Stroke to the inside of the image and then I used Bevel and Emboss and Contour to make the frame more dimensional.

Check the image dimensions – they must be below 4096 x 4096 – so size the image down if it is too big. Flatten the image and save it as a .jpg image. Close and reopen the image.

Now launch the Droste filter by choosing Filter > Pixel Bender > Pixel Bender Filter and select Droste.

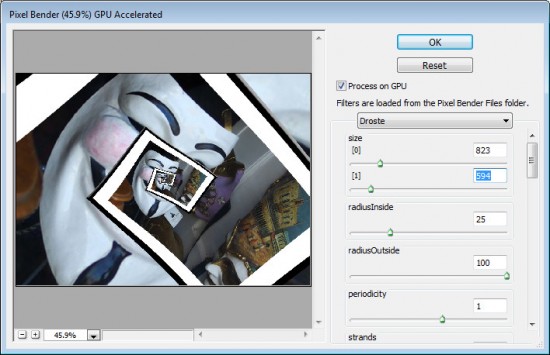
Hold Alt (Option) as you click on the Reset button and then set these values:

Set Size [0] and Size [1] to the dimensions of your image – width and height.

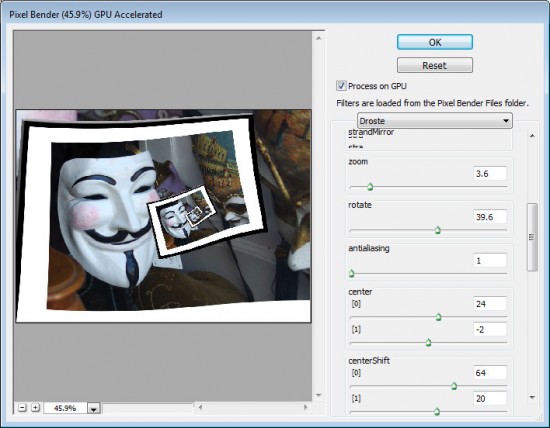
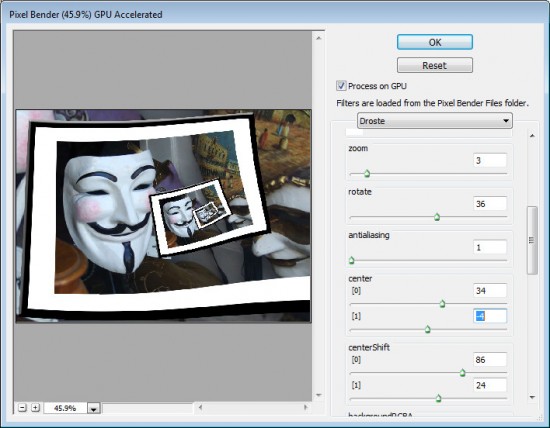
Adjust the CenterShift [0] and [1] values so that the part of the image you are most interested in seeing in the frame is where you want it in the effect – in my case I wanted the mask on the left but you may want the image in the center or on the right.

Adjust the Rotate slider to rotate the image so the frame is aligned as you want it to be. If you want the ‘frame’ to start other than where it appears, use the Zoom slider to move into the image – I did this so the composition would look better.

Adjust the Center [0] and [1] values to adjust the positioning of the effect in the image area.

Adjust the RadiusInside and RadiusOutside values to adjust the size of the image frame effect – in this case I wanted to have the main mask well outside the frame so it would be a focal point.

Finish off by fine tuning the values you have already set to ensure the best result. Click Ok to finish.

Helen Bradley

Thursday, January 13th, 2011

Unlocking layers in Photoshop

Unlock the Background layer in Photoshop

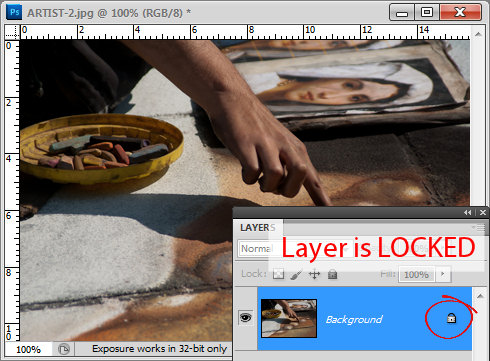
When you first start working with layers in Photoshop, you’ll discover something about the background layer. The layer is locked which means a few things. Firstly, you can’t move the layer anywhere else in the layer stack because it’s locked. Secondly, while you can use the eraser on the bottom layer – because it is the bottom layer the eraser doesn’t erase to transparent and instead it erases to the background color. You also can’t add a layer mask to the background layer again, because it is locked and it cannot have any transparency applied to it.

When used on a Background layer the Background Eraser and Magic Eraser might look like they are making the background layer transparent but they are, in fact, first converting the background layer into a regular layer unlocking it in the process and then they perform the erase.

You will see that the background layer of a document is locked if you open the layers palette by choosing Window > Layers. There is a lock icon opposite the layer.

How to unlock a layer in Photoshop and Photoshop Elements

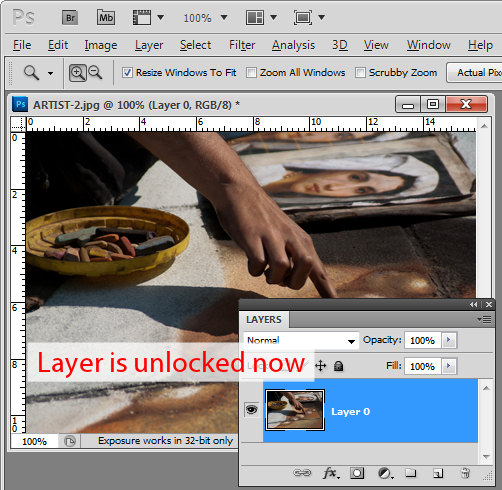
There are a few ways to unlock the layer in Photoshop (these also work in Photoshop Elements). The first one is to double click on the background layer and a New Layer dialog will appear. If you want to rename the background layer, type a name for it, otherwise just click Ok and the background layer will be converted to Layer 0. You’ll see that the lock icon is now removed allowing you to add a layer mask to the layer and delete content from it as well as move it elsewhere in the layer stack.

Another way to unlock a locked layer is to drag the lock icon onto the trashcan. You can also right click the background layer and choose Layer from background and click Ok.

Photoshop - how to unlock a layer in Photoshop and Photoshop Elements

Helen Bradley

Sunday, December 26th, 2010

Photoshop Creative: A Simple Composite


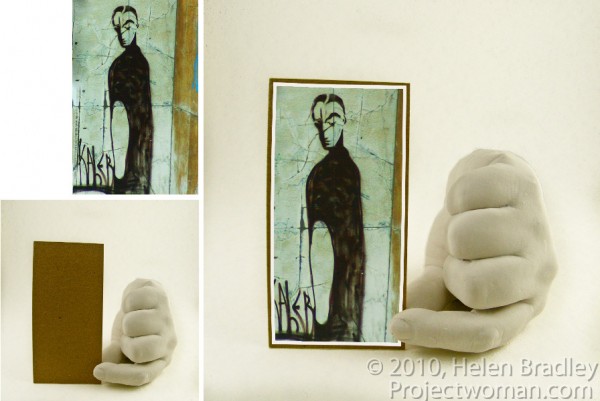
In this post, I’ll show you how to create a simple composite by placing one image in another. Along the way, I’ll not only bend one image to fit its new position but I’ll also show you a layer style trick that overcomes the problem that you’ll see if you scroll down to step 6 and take a look at what happens when I mask the image to make the fingertip show.

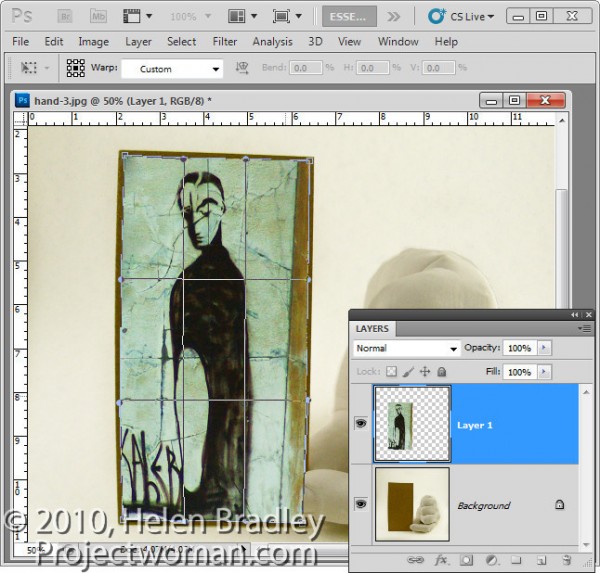
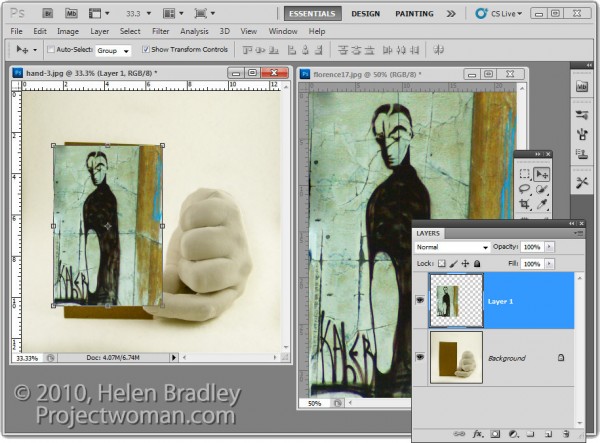
1 To create this composite, open the images to use. We’ll assemble the composite in the image of the plaster hand. Start by dragging the background layer from the photograph into the hand image. It will appear on its own layer and you can now close that image as it is no longer needed.

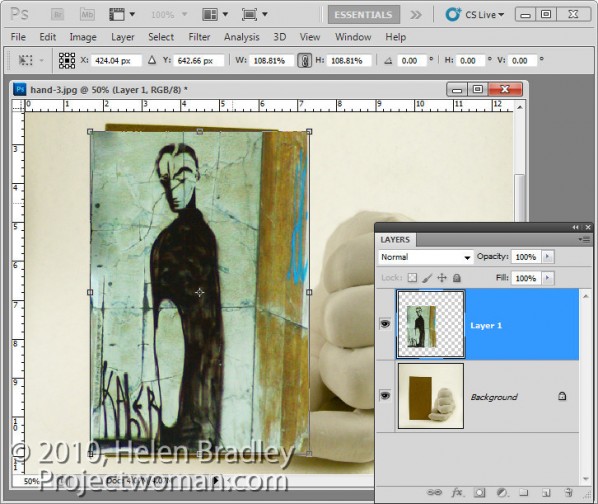
2 Size the imported image to fit where it needs to go. In this case the border will be added inside the image so I’ll make the image almost as large as the cardboard it will be ‘attached’ to.

Size the image in proportion so you don’t skew it. To get it to fit on in dimension it will probably be either too tall or too wide in the other dimension and that’s fine.

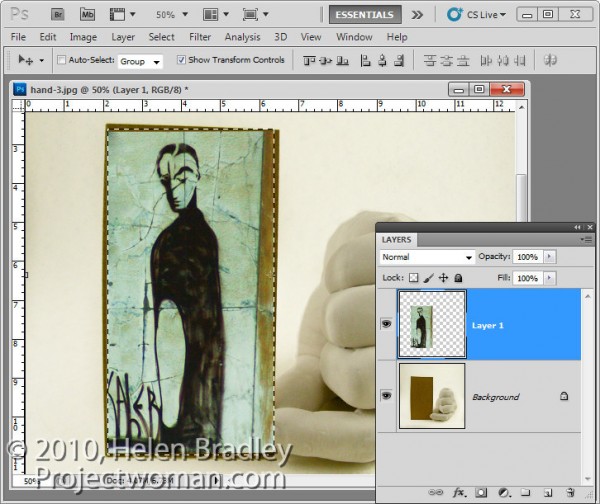
3 Once you’ve applied the transformation, select the rectangular marquee tool and drag over the area of the photo that you want to retain. Choose Select > Inverse to invert the section and press Delete to delete the excess image.

4 To warp the image to fit the shape of the card, select the image and choose Edit > Transform > Warp. This adds a series of warp handles to the image. Drag on these to bend the image so it fits over the area you want to cover.

When you’re done, confirm the transformation.

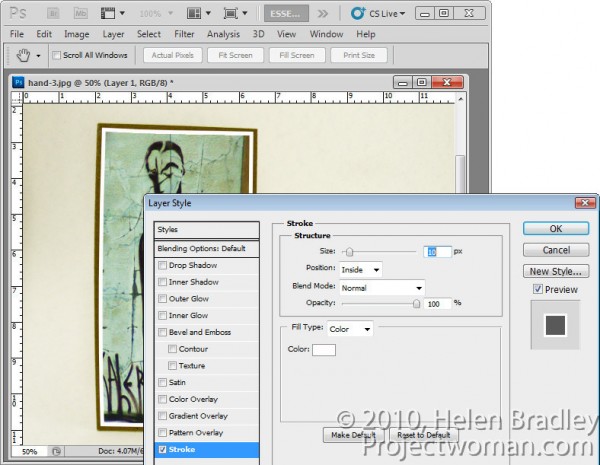
5 To add a white border around the image as if it were a photo stuck to the card, select the image layer, click the Add a Layer Style button at the foot of the Layers palette and choose Stroke.

Set the color to white and the size to a size appropriate for your image. Set the position to Inside so you get square corners on the image (if you choose Center or Outside the corners will be rounded).

 When you are done, click Ok.

6 With this image layer still selected, click the Add Layer Mask icon at the foot of the Layers palette.

Select a medium hard brush, set the foreground color to black and paint on the mask to reveal the finger on the underlying layer. This makes the finger look like it is above the image and not behind it.

One simple way to do this is to hide the photo layer and use a tool like the Quick Selection tool to select over the finger on the background layer. Then, with the selection in place, display the top layer and select its mask. With black as the foreground color, press Alt + Backspace (Option + Delete on the Mac), to fill the selected area on the mask with black.

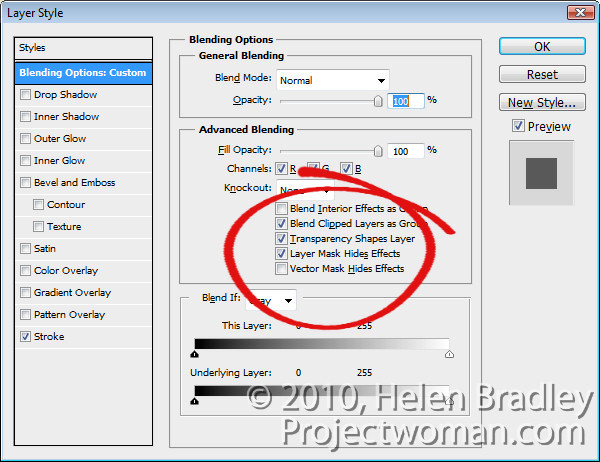
You’ll see that we have some problems with the mask because it distorts the stroke around the picture. We want the stroke applied to the image and we don’t want the mask to have any effect on it – right now it is having an unwanted effect.

7 To solve the problem, double click the Effects entry in the Layers palette to open the Layer Styles dialog. In the Blending Options area of the dialog, select the check box for Layer Mask Hides Effects.

This configures the mask on the layer to hide not only the image content on that layer but also a style applied to that layer.

Helen Bradley

Monday, May 17th, 2010

Worth the price of admission – CS5

There’s been a lot of excitement over the Content Aware Fill feature in Photoshop CS5 (Edit > Fill > Content Aware). It’s a big new feature but it’s often the little day to day changes that really make a difference. For me there are two big “little” changes that I love.

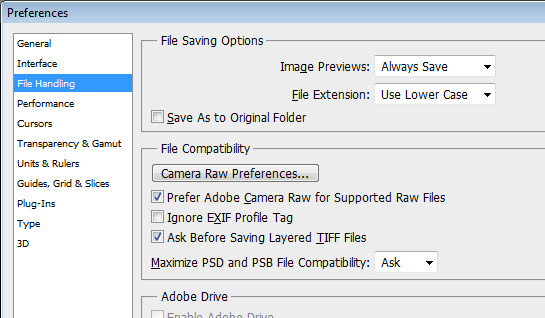
One is the ability to stop Photoshop wanting to save files to where they came from. So, now, when you choose Save As, Photoshop doesn’t have to default to where the file came from and it can be made to point to the last place you saved a file into. This could mean the difference between using Photoshop for day to day screenshots and not.
Until now I’ve used PaintShop Pro and I’ve done so for around 10 years because it defaults to the last save location which works best for me. Now, at last Photoshop can be configured to behave the way I want it to behave. You will find this setting in Edit > Preferences > File Handling – disable the Save As to Original Folder checkbox.

The other big plus is that the Ruler tool now includes a rotate feature. In the past you’d choose the Ruler tool, mark the horizontal line then go to Image > Image Rotation > Arbitrary to make the rotation. Now there’s a Straighten option on the tool options bar when you select the Ruler tool.

Still on my wishlist is a one step paste to new image option. I’d love to be able to have something on the clipboard and choose Paste to New Image and have a new image the size of the clipboard object automatically created for me. Shouldn’t be too difficult – really! For now I have an action which does it but it would be nicer to have a menu item.

Helen Bradley