Saturday, March 10th, 2012

Pixel Bender Droste Filter video tutorial

I work for Practical Photoshop mag in the UK which is a totally cool job. One of the projects I did recently is creating a spiral image using the Droste filter for the Pixel Bender extension for Photoshop CS4 & CS5 – try saying that quickly 5 times!

The guys at the mag – Ben and James have added my video tutorial to the magazine’s YouTube channel. Here is the video in all its glory and I highly recommend you subscribe to the channel there are some terrific tutorials there (if I say so myself!):

Helen Bradley

Thursday, November 3rd, 2011

Photoshop CS5: Oil Painting with Pixel Bender

One of the cool new tools from Adobe Labs is Pixel Bender. This free extension lets you apply any one of a series of filters that comes with the extension to your images in Photoshop CS5. But that’s not all – Adobe also provides a simple interface for Pixel Bender that lets you create your own filters. As a result a community is building around Pixel Bender with users sharing custom created filters with others. In this post I’ll show you how to get started with Pixel Bender.

You will find the Pixel Bender extension here for download: http://labs.adobe.com/downloads/pixelbenderplugin.html this is the version for Photoshop CS5 and CS5.5. Go to this site to find the Pixel Bender download for Photoshop CS4 you will see the link in the top right of the page. Make sure to download the version that matches your operating system and your version of Photoshop CS4, or 5/5.5 (32 or 64 bit). The extension is an .mxp file and you need to install it using the Adobe Extension Manager.

You can install the extension by double clicking on the file to launch the Adobe Extension Manager. If you’re using Windows Vista or Windows 7, you should run the Adobe Extension Manager as an Administrator. So, from the Start menu, locate the Adobe Extension Manager entry, right click it and choose Run as Administrator. The reason for this is that the extension needs to be placed in a folder that you can only access if you have administrator privileges. If you launched the program manually choose File > Install Extension and locate and select the extension that you just downloaded.

Accept the license terms and the extension will be automatically installed inside the appropriate Photoshop CS5 program folder.

When you’re done, close the Extension Manager, close Photoshop and reopen it.

Pixel Bender won’t work on images larger than 4096 x 4096 so start by resizing your image if necessary. If desired, you can convert an image to a Smart Object before applying a filter.

To run Pixel Bender open an image and choose Filter > Pixel Bender > Pixel Bender Gallery. You’ll see a list of filters in the dropdown list which currently displays CircleSplash. Select the OilPaint filter and then adjust its settings. Using Stylization, you can adjust the length and bend of the brush strokes – the larger values look best.

Cleanliness will adjust the smoothness of the effect and typically looks good at around 7 or 8. Colorization allows you to apply more or less color to the image. BrushScale changes the size and length of the darker brush strokes – a small value gives thin long lighter brush strokes and a larger value gives shorter thick very dark brush strokes. BrushContrast will adjust the contrast of the brush strokes and is probably better left at a value approaching 1.

In short, adjust the sliders until you get a result you like. If you are unsure how a slider is affecting the image drag it all the way to the left or right to see the effect. Then adjust from there.

When you’re done, click Ok to apply the result to the image. Unlike most filters which convert images to look like an oil painting, this one does well at identifying edges in the image so the painting looks more realistic.


Helen Bradley

Saturday, July 9th, 2011

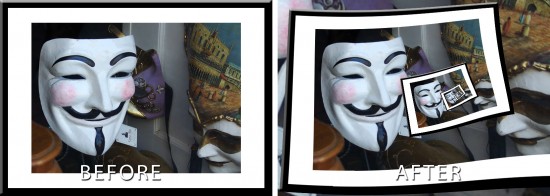
Photoshop wizardry – create the Droste ‘frame in a frame’ effect

In previous posts I’ve introduced the Pixel Bender extension for Photoshop CS4 and CS5/5.5 and the Droste filter created by Tom Beddard. This post I’ll show you how to create the classic frame in a frame image effect using these tools.

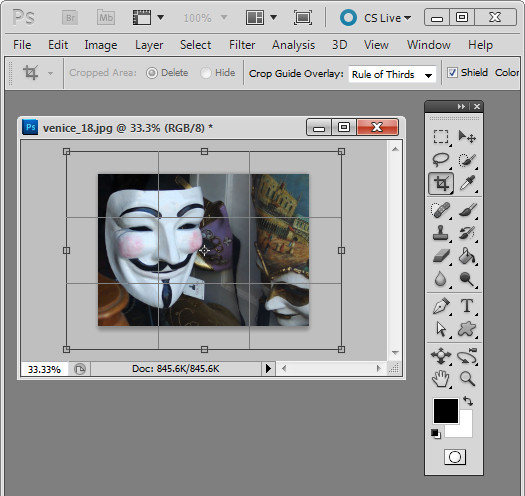
The critical part of this effect is getting the image right before you start. You need a framed image so start by opening an image to use. Add some white canvas around the flattened image by first setting the background color to White. Select the Crop tool and drag over the image. Let go the mouse button and then hold the Shift + Alt (Option) key as you drag outwards on a corner handle to add an extra canvas around the image.

Convert the background layer to a regular layer.

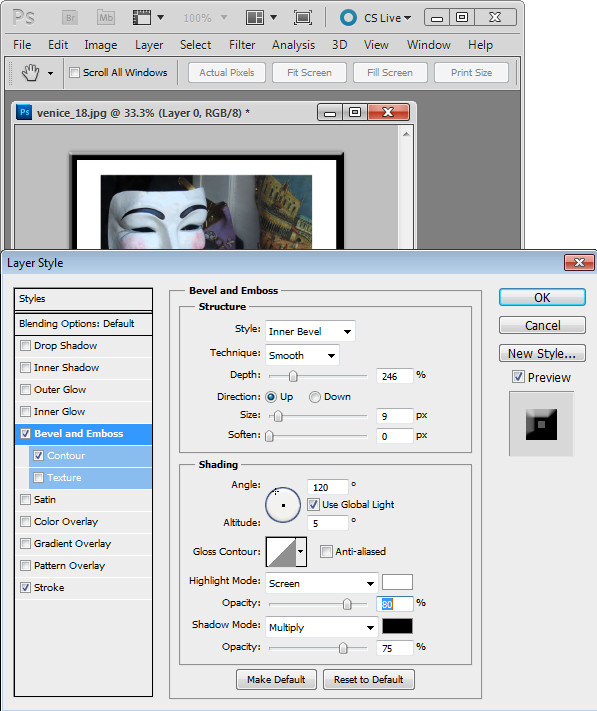
Now add a frame border. I did this using a Layer Style to add a black Stroke to the inside of the image and then I used Bevel and Emboss and Contour to make the frame more dimensional.

Check the image dimensions – they must be below 4096 x 4096 – so size the image down if it is too big. Flatten the image and save it as a .jpg image. Close and reopen the image.

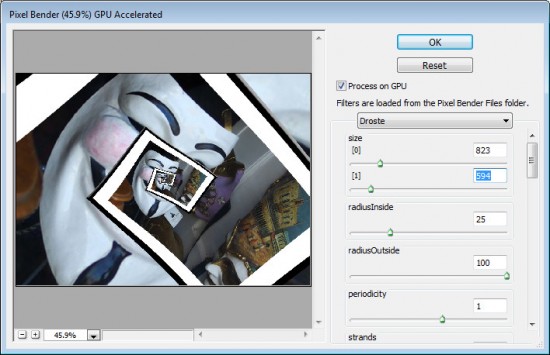
Now launch the Droste filter by choosing Filter > Pixel Bender > Pixel Bender Filter and select Droste.

Hold Alt (Option) as you click on the Reset button and then set these values:

Set Size [0] and Size [1] to the dimensions of your image – width and height.

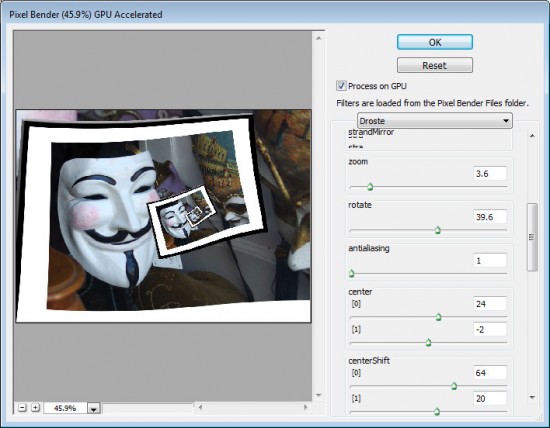
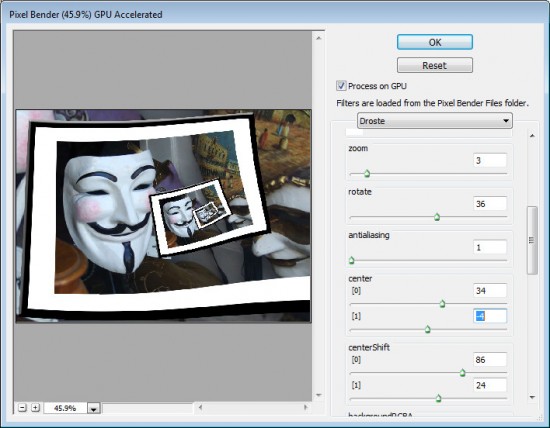
Adjust the CenterShift [0] and [1] values so that the part of the image you are most interested in seeing in the frame is where you want it in the effect – in my case I wanted the mask on the left but you may want the image in the center or on the right.

Adjust the Rotate slider to rotate the image so the frame is aligned as you want it to be. If you want the ‘frame’ to start other than where it appears, use the Zoom slider to move into the image – I did this so the composition would look better.

Adjust the Center [0] and [1] values to adjust the positioning of the effect in the image area.

Adjust the RadiusInside and RadiusOutside values to adjust the size of the image frame effect – in this case I wanted to have the main mask well outside the frame so it would be a focal point.

Finish off by fine tuning the values you have already set to ensure the best result. Click Ok to finish.

Helen Bradley

Sunday, June 5th, 2011

Install and use the Droste Filter in Photoshop CS4, CS5 & CS5.5

I an earlier blog post I introduced Pixel Bender a new extension for Photoshop CS4 and CS5 from Adobe Labs. In this month’s tutorial I’ll show you a great filter which lets you create a Droste effect with an image. The filter is free to download and once it is installed you can apply it from inside Pixel Bender. It was created by Tom Beddard who is author of a lot of really wonderful filters – you can see more of them here: http://www.adobe.com/cfusion/exchange/index.cfm?event=authorExtensions&authorid=14858639

The Droste effect is an image effect named after a Dutch cocoa company called Droste. In 1904 it produced packaging for its cocoa product showing a woman carrying a tray with a box of cocoa and a cup on it. A small version of the package appeared on the cocoa box on the tray and so on – each version of the image being successively smaller than the last.

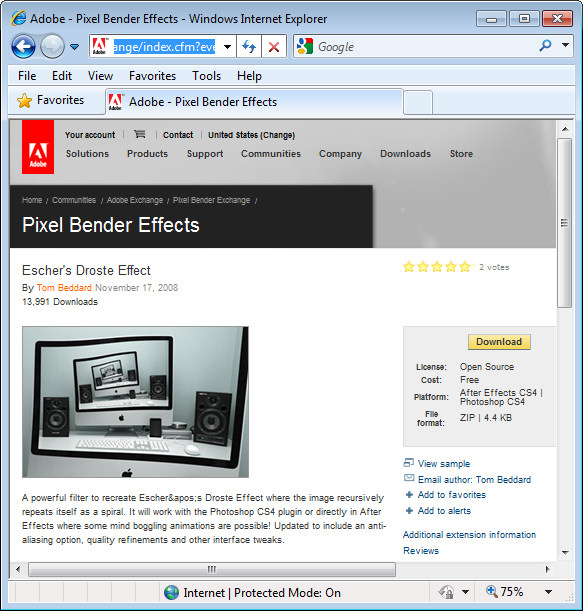
To create the Droste effect you must first have Pixel Bender installed so, if you don’t, visit my earlier post to learn where to find it and how to install it. Then, you’ll need to download the Droste filter from: http://tinyurl.com/pbdroste.
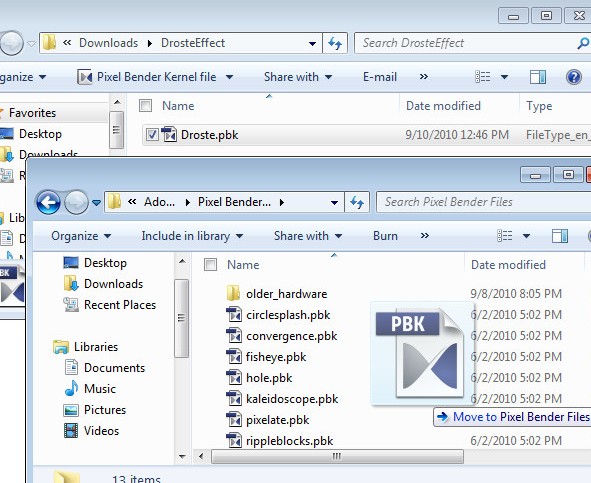
Unzip the folder and copy the .pbk file to your Program Files\Adobe\Adobe Photoshop CS5\Pixel Bender Files folder. Restart Photoshop and the Droste filter will be in place.
 

Start with an image that is square with some element of interest centered in the middle of the image. I chose a flower against a neutral background – start with something simple as you learn how the filter works – then plan to use a more complicated image later on.

Make a note of the size of the image by choosing Image > Image Size and write down the image width and height.

There is a physical limit to the file size of images you can use with Pixel Bender which is 4096 x 4096 so make sure your image is smaller than this. Even smaller images render faster.

To run the filter, choose Filter > Pixel Bender > Pixel Bender Gallery and select Droste from the dropdown list. If you have used the filter previously, hold Alt (Option on the Mac) and click on the Reset button to reset the filter settings.

Set the Size [0] and Size [1] sliders to match the width and height of your image – my image is 530 x 530 pixels.

By default, you should see a typical Droste file image with straight edges.
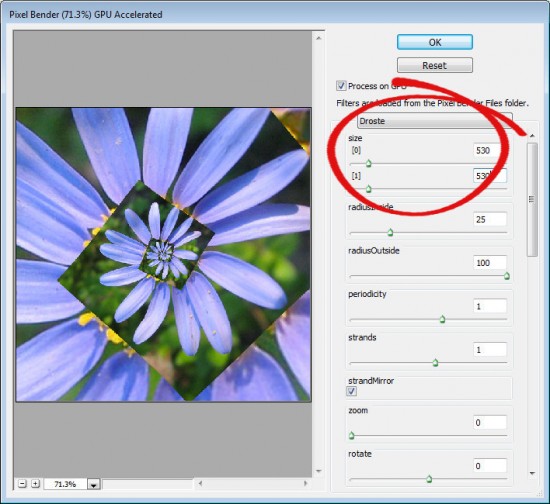
 

To turn the straight edges into a curved spiral, deselect the TransparentInside checkbox.
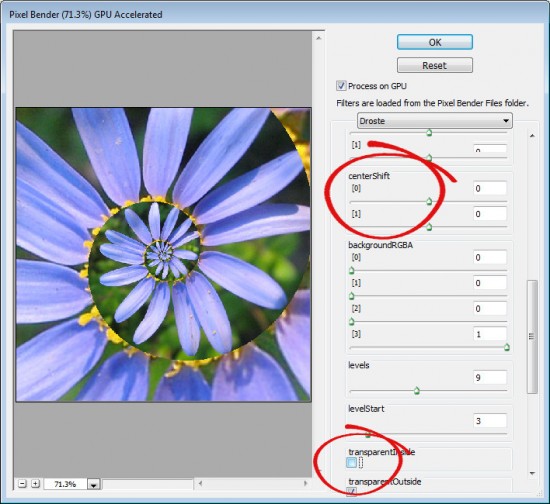
If the image is off center, the spiral will look askew at this point. To change the center point of the image and align it with the center of the spiral, adjust the centerShift [0] and [1] sliders – each of these operates in a different dimension. Adjust the center of the image until the spiral looks correct.

To adjust the center of the image itself, use the Center [0] and [1] sliders.

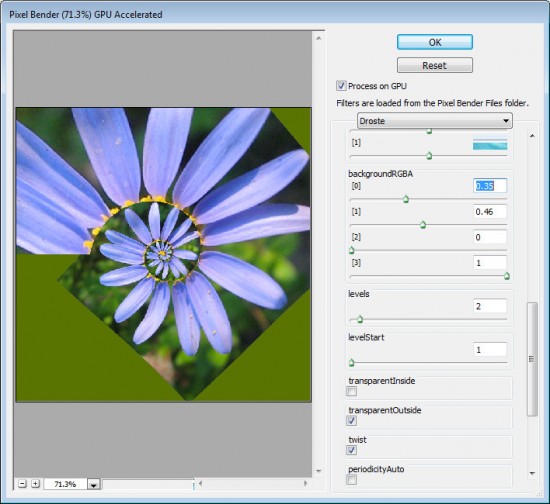
If you do not have an image spiral that completely fills the image area you will see some black background color outside the spiral. You can control the color used for this background by setting the BackgroundRGBA values. The [0] setting controls the Red value, [1] controls Green, [2] controls Blue and [3] controls the opacity of the background. The default is that all sliders are set to 0 and the Opacity slider to 1 which gives the black color. You can view the current background by setting Levels to 2 and the LevelsStart value to 1. Then create your own background color and, when you’re done, increase the Levels value to back up again to around 7.
To make the spiral tighter or looser, adjust the RadiusInside value. Set it to a very small value to get a small number of loops and to something like 50 to get one with lots of loops. The default setting is 25.

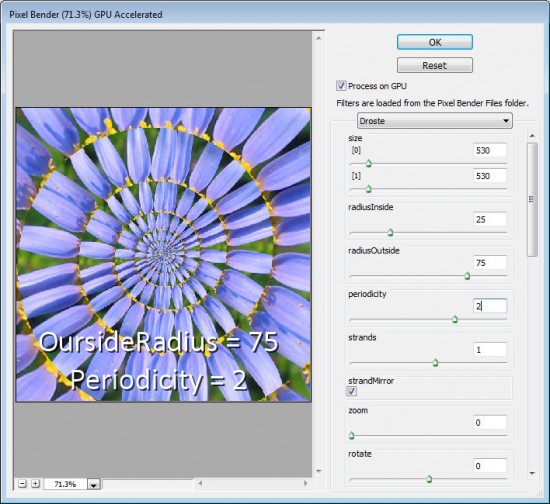
Decreasing the OutsideRadius twists the spiral more tightly. The default value of 100 makes the spiral looser.

Periodicity is the number of times the image repeats in each loop of the spiral. If you set this to 2 the image will be repeated twice per spiral – the Default value is 1.
The Strands value sets the number of loops in the spiral. If you set this to 2 you will have two interlocking spirals and if you set it to three you’ll get three strands/spirals  and so on.
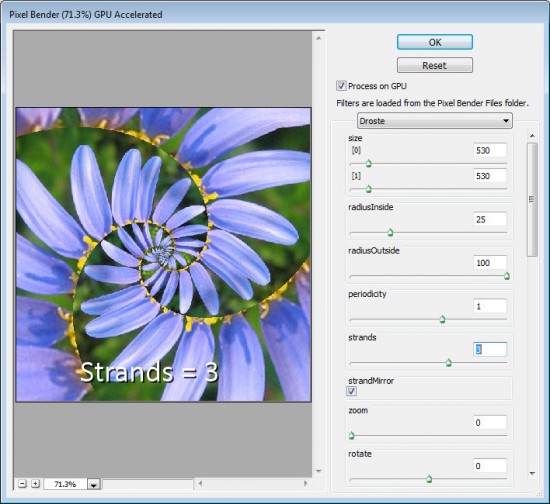
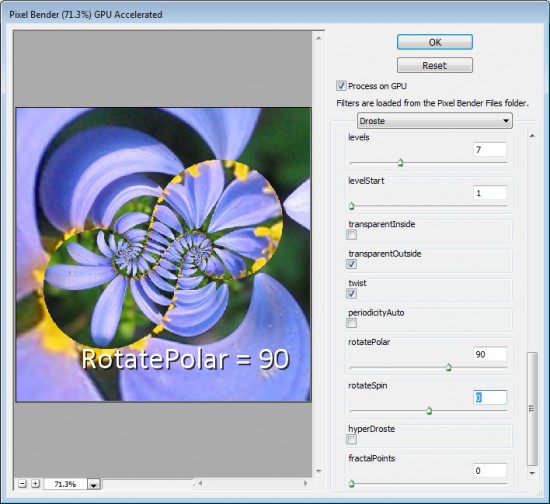
Other interesting effects include using the RotatePolar value. By setting it to, 90 as shown here you will get different spiral loops on the screen. Having done this, you can then select RotateSpin to adjust the effect.
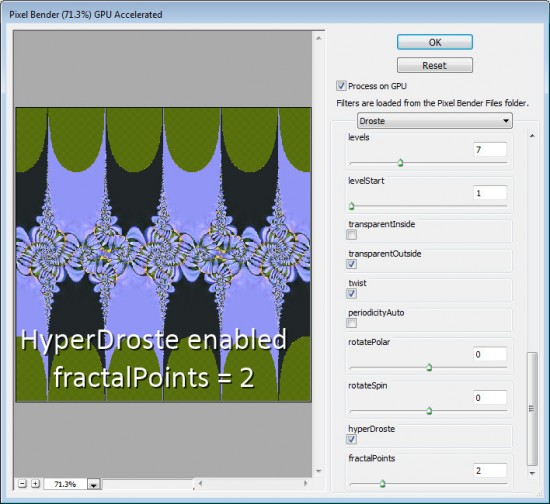
If you enable HyperDroste then adjust the FractalPoints value, you will create an image that is reminiscent of a fractal style image.

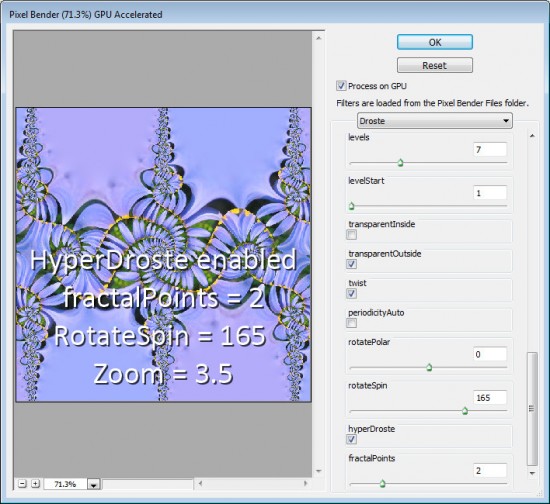
If desired adjust the Zoom value to zoom into the design.
Use RotateSpin and RotatePolar with FractalPoints and HyperDroste to fine tune the effect.

When you have a design you like, click Ok button to apply the Droste effect to your image.

Once you know how the controls in the Droste filter work you’re ready to apply it to a more complex image.

To get best results, start with a square image with something of interest in the center and make sure to set the image dimensions in the filter before working with the other sliders.
 

Helen Bradley