Monday, March 31st, 2014

Create Guides Accurately in Illustrator


image credit ©ezza116, istockphoto.com

Learn to place guides in Illustrator in the position you want them to appear

Sometimes the differences between Illustrator and Photoshop are really annoying. In Photoshop it is simple to place guides in exactly the position you want them to appear but in Illustrator it isn’t easy at all.

I want to create a square document with guides half way vertically and horizontally so, I’ll start with a new document of a fixed and known size such as 1000 x 1000.

Then choose View > Rulers > Show Rulers so you can see the rulers top and left. With the Selection tool selected, click and drag on the ruler and drag a guide into position. You probably won’t be able to get it exact but that’s ok for now. You can go ahead and drag a guide from the other ruler too.

Guides are, by default, locked so you need to unlock them to move them. Choose View > Guides > Lock Guides to disable the check mark. Now you can drag the guide into position. On the Tool options bar you will see values for X and Y. For the vertical guide, X should be half your document width – in my case 500 and for the horizontal guide the Y value should be 500.

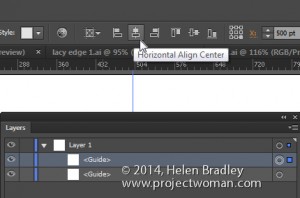
If you open the Layer palette you will see that guides are objects in the current layer. This means that you can click on a guide to select it in the Layer palette and use the tools at the top of the screen to align the guide. So, clicking on it and choosing Horizontal Align Center will center the vertical guide and Vertical Align Center will center a Horizontal guide.

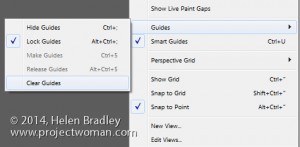
Once your guides are in position, choose View > Guides > Lock Guides to lock them so they won’t move. On this same submenu you can hide guides – this locks them when they are unhidden again or clear guides to remove them from the document entirely.


Other handy tricks include being able to create a vertical guide by dragging down from the top ruler  and hold Alt or Option to change if from horizontal to vertical.

You can make new guides (but not existing ones) snap to dividers on the rulers if you hold Shift as you draw them by dragging down from the ruler.
Helen Bradley

Helen Bradley

Monday, May 17th, 2010

Worth the price of admission – CS5

There’s been a lot of excitement over the Content Aware Fill feature in Photoshop CS5 (Edit > Fill > Content Aware). It’s a big new feature but it’s often the little day to day changes that really make a difference. For me there are two big “little” changes that I love.

One is the ability to stop Photoshop wanting to save files to where they came from. So, now, when you choose Save As, Photoshop doesn’t have to default to where the file came from and it can be made to point to the last place you saved a file into. This could mean the difference between using Photoshop for day to day screenshots and not.

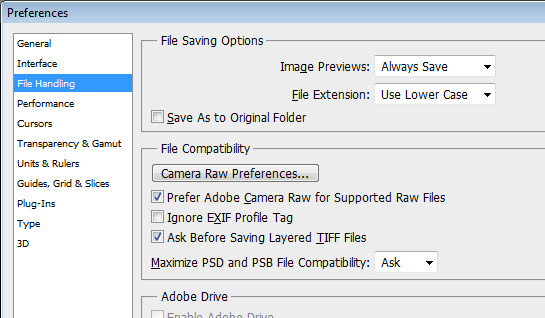
Until now I’ve used PaintShop Pro and I’ve done so for around 10 years because it defaults to the last save location which works best for me. Now, at last Photoshop can be configured to behave the way I want it to behave. You will find this setting in Edit > Preferences > File Handling – disable the Save As to Original Folder checkbox.

The other big plus is that the Ruler tool now includes a rotate feature. In the past you’d choose the Ruler tool, mark the horizontal line then go to Image > Image Rotation > Arbitrary to make the rotation. Now there’s a Straighten option on the tool options bar when you select the Ruler tool.

Still on my wishlist is a one step paste to new image option. I’d love to be able to have something on the clipboard and choose Paste to New Image and have a new image the size of the clipboard object automatically created for me. Shouldn’t be too difficult – really! For now I have an action which does it but it would be nicer to have a menu item.

Helen Bradley

Thursday, December 4th, 2008

Straightening images with Photoshop’s Lens correction tool


Let’s be honest, Photoshop’s tool for straightening an image sucks – well it would if it really were a tool – it’s not even that. It’s a cumbersome workaround.

Start with the Ruler tool (if you can find it – it’s stuck away under the Eyedropper) then ‘measure’ along the line you want to be horizontal. Then choose Image > Rotate Canvas > Arbitrary and accept the value for the angle – that’s what you used the Ruler tool to measure. Wow, that’s sophisticated – NOT! And it gets worse. While now have a ‘straight’ image, the edges look horrible. Grab the Crop tool and crop the image to remove the messy edges.

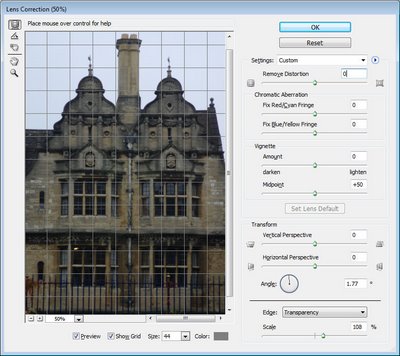
So, while there isn’t a tool, there is a slightly smarter workaround. Choose Filter > Distort > Lens Correction – ok, I promised it would be smarter – I didn’t say it would be any easier to remember where to find it.

In the Lens Correction dialog, drag on the Angle to straighten the image – best thing about this is that you get a grid to guide you. Then, drag the Scale slider upwards until the rough edges disappear. Then click Ok and you’re done.

So, there you have it, a one stop straightening tool – still sucks compared with programs like Paintshop Pro and Photoshop Elements which will straighten and crop in one step but it does it in one menu rather than 3 tools – I call it an improvement – just!

Helen Bradley