Monday, July 8th, 2013

Recolor clip art in Microsoft Office 2013 and earlier

Learn to recolor clip art using theme colors so it is not only the color that you want it to be but it also matches the theme and it changes color when the theme changes.

This works with pretty much all versions of Office and all apps including Word 2013, PowerPoint 2013, Excel 2013, Publisher 2013 and older versions of Office including 2010, 2007, 2003 and earlier.

Transcript:

Hello, I’m Helen Bradley.

Welcome to this video tutorial. In this tutorial I’m going to show you how you can easily recolor clipart in Microsoft Office and how you can use theme colors so that your clipart changes when your theme changes.

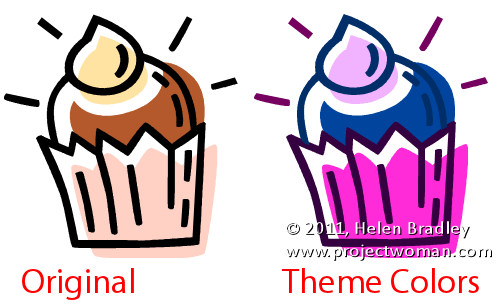
Before we get started with this tutorial let’s have a look and see what it is that we are trying to achieve. This is the same piece of clipart and I just made a duplicate of that clipart image and I recolored it in the way that I’m going to show you how you can recolor your clipart. But let’s have a look and see the impact of the recoloring.

I’m going to choose the Colors tool here and watch as I arrow over all of these colors in turn. And you’ll see that the clipart image that I have recolored I have recolored this time with theme colors. And the beauty of this is that the clipart image is going to change colors in accordance with the theme that is in use.

The only thing that hasn’t been recolored is the black and the little yellow light in the candle. Everything else is a theme color and it’s going to change color using the new theme colors whenever the theme or the design of this PowerPoint presentation changes. So this is the concept that we’re going for here.

Now I have a slightly simpler image here. All I did to find these images was I chose Insert and then Online Pictures and I went looking for cake. And I particularly wanted wmf files as that’s Windows metafile and that is an illustrative file most of which can be recolored inside of PowerPoint or Word or Excel or any of the Microsoft applications.

And you don’t have to be using Microsoft Office 2013. You can choose any version of Microsoft Office. I’ve been doing this for years in Microsoft Office. It’s just that the way that you add images is a little bit different in this new version. Now before I start let’s just take a copy of this image and let’s paste it so that we’re working on a duplicate.

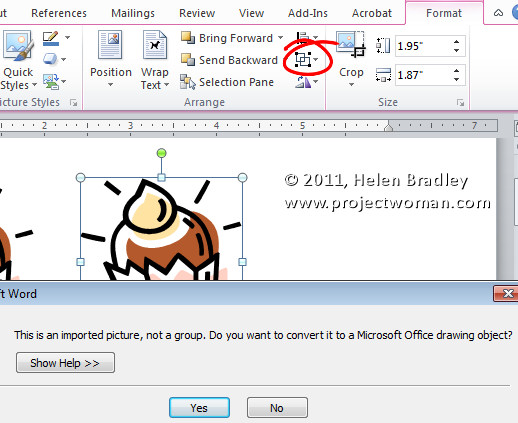
We can see then how far we’ve come later on. I’m just going to get rid of these images. Now with the image that I’m working on selected I’m going to choose Picture Tools, Format tab and I’m going to choose Group and then Ungroup.

Now you’ll see that the group option sometimes is not available from this dropdown menu but it will always be available from the Picture Tools, Format tab if the image is able to be ungrouped. You’ll get a message showing that this is an imported picture and not a group and asking you if you want to convert it to a Microsoft Office drawing object.

The answer to that is yes. And then you’ll go and repeat the process. You’ll right click and choose Group, Ungroup or from the Drawing Tools, Format tab you’ll choose the Group button here and choose Ungroup.

That ungroups the object so it’s now a whole lot of smaller objects. I’m just going to click outside it and then we’re going to start selecting individual pieces of this object. And I suggest that you start with a nice color scheme. So I’m just going to go to the color schemes and let’s choose something relatively colorful.

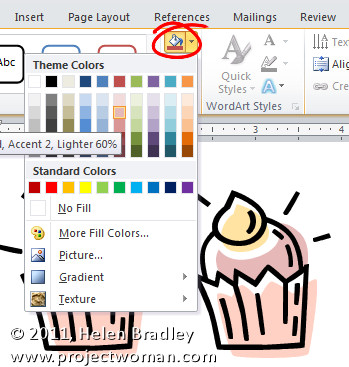
I found slip stream was a good option to use but any of these such as red violet that is fairly colorful is a good choice. Drawing Tools, Format tab and now from the shape filled dropdown list we’re going to make sure that we recolor all of the shapes using the fill colors that are theme colors.

So, again, I’m going to select here, this is on this sort of turquoise bit, and I’m going to color it a darker version of that same blue. I’m going to click on the candle light and see if I’ve got something I can use for candle light. I think I’m going to choose one of these colors because I would really like my candle light this time to be a theme color.

To select multiple colors or multiple shapes at a time I’m just selecting the first and then Ctrl clicking on the last. And again, I want these to be colored the same color as the candle light. Now I’m going to click here. There’s a shape here.

If you ever want to see what the shape is that you’re working on just press the Delete key and it will disappear and then you can undo it to be able to work on it. Or of course you can just fill it and see what it is that you are actually filling.

So I’m going to select that color. And now we’re going for this shape over here and I want a slightly darker or lighter version here. I think I’m going for a darker version. And here we have the shadows. Again, I’ll want a darker color for the shadow. I think I’ll go back for these blues. I’m going to stick to the turquoises and this sort of purple color.

So I’m going to now select these smaller items here and when I’ve got them selected I’m going to fill them as well. And when I’m pretty happy with my shape that has been recolored I’m going to select over the entire shape because now what I want to do is to stick it all back together again because I don’t want lots of little pieces.

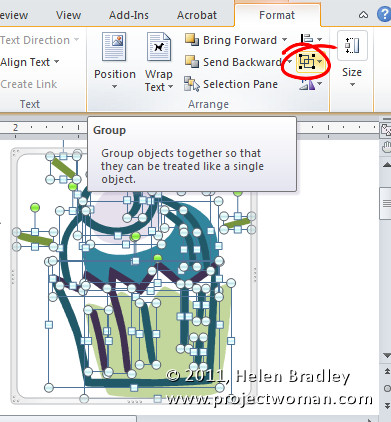
Drawing Tools, Format tab, Group and this time I want to Regroup. And I’ll just test this by moving the object and it should all move as one. And now let’s look and see that this object is going to recolor unlike the original object if we change the color of this particular design that we’re using in PowerPoint.

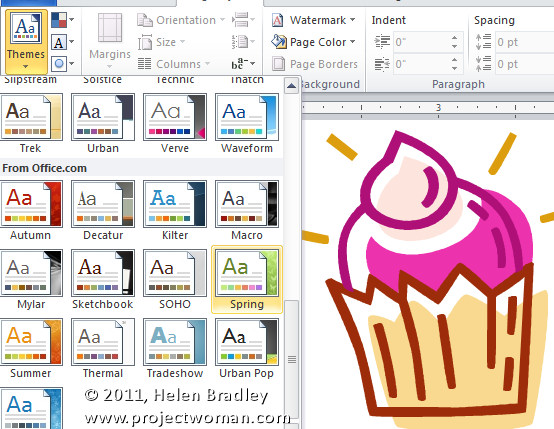
So I’m going to choose the colors dropdown list here and as I choose a different color scheme you can see that my clipart shape is changing color. And as I said this works exactly the same way in any of the Office applications and in pretty near any version of these. You can do this in Word 2003.

You can do it in PowerPoint, Excel, Publisher, any of the applications and you can create clipart so that it not only matches the current theme but also looks the colors that you want it to look but which will change colors as the theme colors change.

I’m Helen Bradley.

Thank you for joining me for this video tutorial. Look out for more of my PowerPoint and Microsoft Office tutorials on this YouTube channel.

And visit my website at projectwoman.com for more tips, tricks and tutorials on a range of Microsoft Office applications as well as Photoshop, Lightroom, Illustrator and a whole lot more.


Helen Bradley

Sunday, March 17th, 2013

Photoshop – Using Kuler Color Schemes

Learn how to use Kuler color schemes in Photoshop via the Kuler Extension.

This video includes details of how to add color schemes to swatches and how to edit, customize, and create Kuler color schemes inside Photoshop CS4, CS5 & CS6.

Transcript:

Hello, I’m Helen Bradley. Welcome to this video tutorial. In this tutorial I’m going to show you how you can use Kuler colors in Photoshop. In this video tutorial we’re going to have a look at Kuler which is a way that you can find custom color schemes from inside Photoshop.

Now Kuler is also available online but we’re going to work with the Photoshop extension. And that’s been there since CS4. To see it choose Window and then Extensions and then Kuler. And when Kuler launches you get to see some of the color schemes.

Now I last looked for vintage car and that’s in actual fact what we’re going to look for now. So I’ve typed in vintage car and clicked the Search button and here are color schemes that are related to vintage cars. And if I can’t see anything I like there I can click the View Next Set of Themes option and we can go forward to see other themes. Now these themes have been designed by other people and they’re available online. And people put them up online when they create them and then they are accessible for us to use if we want to use them.

So I’m looking for a theme to use for my car. And let’s say that I find one, so let’s just go and find one that we sort of like. I’m thinking this one here. And if I like it I can just click on this arrow icon here and I can add it to my swatches panel. And when I do that it becomes the last five colors in my swatches panel and I can click on any of these colors to add it as my new foreground color. And that allows me to paint on it for example to recolor my car.

Now if I sort of like it but think I like to edit a color for example maybe the red in this, then I can click here and choose Edit this theme. And this opens the Kuler panel but this time in the edit mode. And this is where I can change some of these colors.

For example I can take the red and walk it around to maybe make it an orange. And if I like that then I can use this particular color scheme. If I want to save this theme to my swatches panel I can do so by clicking here, Add this theme to swatches panel, again this time all five colors go into the swatches panel. I could upload it to Kuler if I wanted to and I can name and save the theme.

You can also create your own custom themes here so for example if you wanted to create an analogous color scheme you could do that. So you could just click there and then you can drag around on these sliders to make the color scheme that you want to use. If you want to use a complementary one you can do that and just drag in and out on these colors to create your own complementary color scheme. And if you like it then you can add it to your swatches panel. You can upload it to Kuler.

Kuler is a really handy tool for finding color schemes if you’re not sure what you want to use and so you can quickly and easily find color schemes and add them to your swatches panel. So it can help you get inspiration when you want to use a limited color palette on your images and you’re just not really inspired to find it yourself.

I’m Helen Bradley. Thank you for joining me for this video tutorial. Look out for more tutorials on this YouTube channel. Also visit my website at projectwoman.com for more tips, tricks and tutorials on Photoshop, Photoshop Elements, Lightroom, Illustrator and a whole lot more.
Helen Bradley

Wednesday, June 29th, 2011

DIY Color Changing Clip Art

Much of the illustration Clip Art in the Microsoft Clip Organizer can be edited by changing its colors. By doing this you can not only recolor the art to match the look of your document but, if you use Theme colors then the art will change color when the Theme or Color scheme changes.

Now you won’t need information technology degrees to learn this – but maybe you’ll be so good at it, you just might consider graphic design college.

So, let’s see how the recoloring is done. First select the Clip Art and from the Picture Tools -> Format tab click the Group > Ungroup button. Answer Yes if you are prompted to convert the image to a Microsoft Office Drawing Object. In some applications  such as Publisher you’ll need to repeat the process and select Ungroup again.

Now click on individual parts of the object and either remove them or recolor them by selecting a Shape Fill Color from the Drawing Tools > Format tab. If you use Theme colors then the colors will change later on when the theme changes.

When you are done and you have recolored all the pieces you want to recolor, select all the pieces, right click and choose Group.

Change the document theme or Color Scheme to see the image change color to match the look of the theme.

Helen Bradley

Thursday, September 20th, 2007

Color your world in Word 2007

Let’s face it, plain old white backgrounds are, just that, plain old white backgrounds. If you’re like me, you’ll want to change the color of your page background.

To do this, choose the Page Layout tab from the Word 2007 Ribbon, and choose the Page Color dropdown list and choose a page color from it. If you choose a color from a Theme set then, later, when you change the Theme – the page color changes accordingly.

Helen Bradley

Friday, June 8th, 2007

What’s your fancy? It’s Oriel for me…

The new PowerPoint 2007 is just wonderful! It really makes the task of creating a presentation easy and fun. Pity you can’t say that for the task of sitting through most of them!

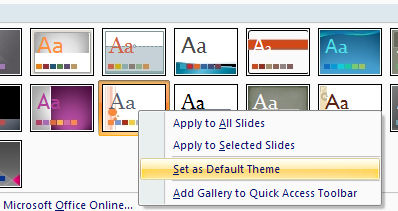
If you don’t like the Office Theme which is the default, you can easily make any theme your own. Open the Theme gallery on the Design tab and right click the theme of your choice, choose Save As Default Theme and every time you start PowerPoint that’s what you’ll see. Neat huh?

Helen Bradley

Thursday, February 8th, 2007

Excel 2007 goes total color!

It’s always been confusing to me and my readers why you have an unlimited number of colors to choose from in Word but only a handful of really ugly colors to use in Excel. It doesn’t make sense – do Word users have better design skills than Excel uses – do they think that those of us who create worksheets somehow won’t be blindsided by how ugly the color combinations we’re being served up are?

Well, if you’ve been hankering after a rich color palette for your worksheets, you need do so no more. Excel 2007 gives you access to a full range of 16 million colors from the colors dialog so that you can use these colors, for example, for formatting text, charts or drawn objects. You can also select a Theme which gives you instant access to colors that are selected from the same monochromatic group and guaranteed to look great together. The new and very colorful options in Excel 2007 are guaranteed to wow you!

Helen Bradley