Tuesday, April 16th, 2013

Help! My images disappeared from my iPad and iPhone

Understand the limits of the Photo Stream and how to save images from it so they aren’t removed from your iPad or iPhone

Sometimes you may know that you had some images on your iPad or iPhone but suddenly you find that they’ve gone.

This happens to me when I drop some images into my Photo Stream on my Windows PC that I want to use on my iPad. I drop images into the Uploads folder on my PC and, via the iCloud, they are synced automatically to my iPad. I know the images got there safely – I put them there months ago and I know that I saw them on my iPad but suddenly today they aren’t there. Confusing? Happened to you? It probably has and here is the explanation as to why they disappear and how to stop them from doing so.

The issue is the Photo Stream. The photo stream on the iPad and iPhone only store the last one thousand images – if you shoot lots of images and, say have your iPhone and iPad synced then you’ll run out of space pretty quickly. When you do then images are knocked out of the Photo Stream to make room for more recent ones.

The issue doesn’t happen on your Mac or PC because they have plenty of space so photos in your Photo Stream folders there are always there – it is just a protection against junking up your iPhone or iPad with ‘stuff’.

So, what do you do when you want to keep some of the images from your Photo Stream permanently and you don’t want to lose them? The answer is to move them to an album or to your Camera Roll. The images in your camera roll and in albums are there to stay. And just to clarify, you don’t have to move images from the Photo stream that you captured with that device – because images you capture on the iPad for example are in the Camera Roll and stay there. The images you want to save are those that get synced to the iPad via iCloud from other devices such as your iPhone or PC or Mac – they are the ones that only hang around for a short time.

How to move images from your Photo Stream to an album

So, to move a lot of images to an album (an easy solution for lots of images that you want to save to somewhere that isolates them from all your other images), tap Photos, tap Photo Stream, tap My Photo Stream.

You should now see all the thumbnails of images in your photo stream. Then tap Edit.

In this mode you can now tap the images that you want to save – each of them should have a blue checkmark on them. Now tap Save and choose to Save to an Existing Album or Save to New Album.

I have an album for images I want to edit and play with on the iPad called Editable Pix so I typically tap that to select it. This lets me store those images so they are isolated from all the other images in my Camera Roll.

How to move images from your Photo Stream to your Camera Roll

It is also possible to save photos from the Photo Stream to the Camera Roll. The advantage of this is that they are in the Camera Roll itself and in some situations that might work best for you.

To do this, again tap Photos, tap Photo Stream, tap My Photo Stream so you see all the thumbnails of images in your photo stream. Again tap Edit. In this mode you can now tap the images that you want to save – each of them should have a blue checkmark on them. Now, tap the Share button in the top left of the screen:

And choose Save to Camera Roll. (It is very confusing that these two processes that really are so similar are handled so differently in iOS6).

How to save one image from your Photo Stream to your Camera Roll

Now, if you just want to save one image from the Photo Stream to the Camera Roll, tap Photos, tap Photo Stream, tap My Photo Stream so you see all the thumbnails of images in your photo stream. Tap the one image that you want to copy to the Camera Roll so it is showing full screen. Now tap the Send to button that is a box with an arrow coming out of it in the top right of the screen and choose Save to Camera Roll from the menu.

Now you will never again lose images off your iPhone or iPad that you really want to keep.

Helen Bradley

Friday, March 22nd, 2013

Sync photos from iPad or iPhone to your Mac

Learn how to download photos from your iPad or iPhone to your Mac


I’ve been using iCloud on the PC for a while now to sync photos from my iPad to my PC and it works well. On my new Mac, however, I had a problem, you see the feature is built in so you don’t have to install it – but you do have to find it! Here’s how:

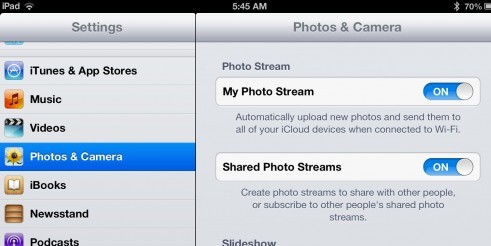
1. Assuming you already have an iPad or iPhone and you have been taking photos with it, then you want to get them to your Mac. Start on your iPad and make sure it is set to sync. Do this in Settings – scroll to find Photos & Camera and make sure that My Photo Stream is turned on. This means that when you are on a wifi connection your photo stream will be synced with iCloud.

Note:
The photo stream has some limits. One is that iCloud itself only stores images for 30 days so after that they disappear. However provided you are connected via wifi on a regular basis these will be synced frequently so that won’t be a big issue.

On a device like the iPad and iPhone the photo stream will only contain those most recent 1,000 images – older ones are removed. This is because you have less space on your iPad and iPhone than on a Mac or PC. Remember too that the photo stream contains images from the iPad/iPhone and from your Mac or PC so this 1,000 image limitation is for images from all devices in total, so it’s not as big as it might seem.

On the PC that is less of a problem because you have a special Photo stream folder that you put images into to sync them, so you know how many you are putting there. It is more of an issue on the Mac because the process is more automated so you have to be mindful of what is happening. On your Mac or PC all the images from your Photo stream are stored – because there is more storage available on them.

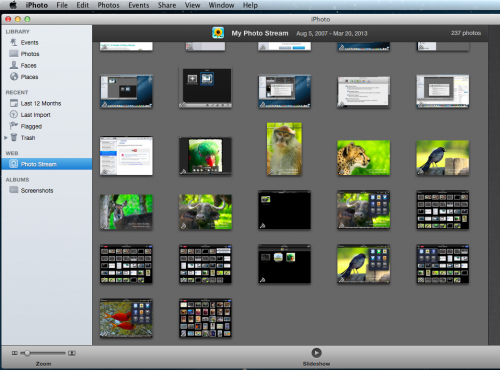
2. To set up the Mac. You need to click iPhoto to launch it and then click Web: Photo Stream and turn this on.

3. Now, if you are connected via wifi you can wait as your photo stream downloads automatically for you otherwise this will happen automatically next time you are connected.

Once images are downloaded to iPhoto they will be added to the Photos folder so even if you turn off Photo Stream at some time the images that are already downloaded will have be stored there permanently.

Helen Bradley

Tuesday, March 19th, 2013

Improve your photography today with apps

image credit: © istockphoto.com, Yuri Arcurs

Learn how you can improve your photography with handy apps

Among the thousands of new apps and programs we’ve seen in the last couple of years, there are many that are ideal for photographers, both amateur and professional. Whether you’re a professional looking for a way to edit and share your photos, or someone who simply wants to do more with photos with your phone or tablet, there are dozens, if not hundreds of apps and programs designed to help you out. What you choose to use will depend to some extent on how serious a photographer you are, but ultimately there is something for everyone.

Here is a look at how to improve your photo taking and editing through 5 simple apps and programs.

Photoshop Express

This is a fairly self-explanatory app – from the makers of Photoshop and Photoshop Elements which most photographers will be familiar with. This app is by no means as complete or effective as the full version program, but the interface is simple and easy to use, and for basic effects on the go it is a handy app. It is free in its basic form, but has additional features available for purchase.

Camera+

If you’re looking for an app that improves the quality of your photos without any complicated editing, this is the one for you. Basically, Camera+ is a better version of the basic camera in your smart phone, and has the ability to take clearer, more sharply focused photos. You can apply basic effects such as contrast, color schemes and retro effects as well as crop and rotate the photo to improve the quality of photos that your phone’s camera captures.

Dynamic Light

This is a great app for manipulating the lighting in your photos. The end result can look more artistic than natural, so if that’s something that interests you as a photographer, this is definitely an app for you. You can select a photo and an effect, then adjust the “dynamic light” dial to control how the effect is applied to the image or you can shoot the image using the app. It’s a great way to turn an ordinary image into a striking one.

Filterstorm

A great app for photo editing, Filterstorm essentially takes the best features of Adobe Photoshop Lightroom and puts them in a simple app. It’s more about adjustments than filtering, but does allow you some simple effects for manipulating lighting, colour, and brightness among other things.

This is a guest post by Dylan Bailey. Dylan is a freelance writer and keen amateur photographer.

Helen Bradley

Sunday, March 17th, 2013

Add images to your iPad & iPhone photo stream from your Mac

See how to upload images from your Mac to your iPad or iPhone

Sometimes you will get images on your Mac that you want to share with your devices such as your iPad or iPhone. To do this you can add them to your photo stream and they will be synced automatically next time you are connected using a wifi connection.

To do this, from inside iPhoto, click the image(s) to add to the photo stream then click the Share option on the toolbar, click Photo Stream > My Photo Stream. The images will be uploaded to your photo stream and then downloaded to other devices when they next update via a wifi connection.

Of course, for this to work the images have to be in iPhoto. If an image is not, for example, it is on the desktop – you can add it to iPhoto by dragging and dropping it into iPhoto and then add it to your photo stream.

Of course if you have your iPhoto set up to automatically send all new images to your photo stream the very process of adding images to iPhoto will add them to your Photo Stream. To do this in iPhoto, choose iPhoto > Edit Preferences > Photo Stream and, under My Photo Stream (which should already be enabled), check Automatic Import.

Helen Bradley

Monday, November 5th, 2012

Photoshop Elements – color fix images

Learn to fix images that have iPhone filters applied to them using Photoshop Elements. Remove unwanted color casts from the images using two different methods.

Transcript:

I was sent this image by a gentleman who wanted me to fix the color in the image because this was shot with an iPhone and the young lady had applied a filter to it. I sent him a few copies back each one of them altered a little differently. And this is the one that he came back and said this is the truest to what her hair color looks like. So now I’m going to show you how you go ahead and fix an image like this.

Now I’ll always work on a copy of the original image, so I’ve made a copy. I’m just going to size this down so we can see both images side by side. Now there are a couple of tools that I would typically use. One of them is Enhance, Adjust Color, Adjust Color for Skin Tones. In this case what we do is we just click on some skin tone in the image and try and fix it that way.

Now it’s not giving me great results here so I want to show you another tool that we could use. And that is just the colorcast tool, Enhance, Adjust Color and then Remove Colorcast. And here we would click on somewhere in the image that was supposed to be a sort of neutral gray, black sort of white area. So we could sample some of her clothes here to see if we get a good fix. We could sample around her teeth as well. And I think that this is a pretty good result as a match for this image over here, so I’m just going to click Ok.

Let’s just zoom out here and see. So these two images have pretty much the same look in them. The hair color is pretty much the same. If anything I might just reduce the saturation a little bit on this image which I could do by choosing Enhance and then Adjust Color. And we could do hue/saturation and then we could just decrease the saturation a little bit across the entire image. And that would get rid of some of the yellow. In fact I think I’ve actually got a better fix on this image probably than I had on the original.

So there’s one way of fixing a colorcast in an image. I have another pair of images of the same young girl. Let’s have a look at them here. And I have one here that was said to be a reasonably good fix for that image. Now I’m going to show you some means of getting this result from this sort of an image. The first thing I’m going to do with this image is because it’s got a sort of reddy orange colorcast on it I think that if I apply a filter to this image we might be able to kill some of that color. So I’m going to choose Layer, New Adjustment Layer, Photo Filter. And here’s my photo filter dialog, click Ok. And what I want is a cooling filter. That’s a blue filter. So I’m going to go for one of these cooling filter effects. I’m going to wind it up quite high. So let’s see which is the better of them. And I think the 82 is a better cooling filter. You can see that now we’ve got some sort of reasonably good skin tones here. So I’m thinking about 65 is pretty good there. So let’s call that done.

Now one of the things that I would like to do with this image is to get rid of the sort of grain that there is on her skin. So I’m going to take this cooling filter and click on it and just press Ctrl Alt Shift E which will give me a duplicate of that image as it was. So I haven’t got rid of these two layers, but what I’ve got is a layer that contains everything that was in those two layers. And I’m going to duplicate this as well. So I’m going to drag it onto the New Layer icon so we have two versions of her face. This one I’m going to blur. So I’m going to use a blur. I’m going to choose Filter, Blur and then we’ll use a surface blur. Now surface blur is a blur that will blur the surface but not around the edges. It tends to keep edges very crisp. We don’t actually want crisp edges but we do want the edges around her face not to be blurred. So I’m going to reduce the threshold and the radius to small values. What I want to see on this image is a lessening of this grain so it’s sort of blurring out. I don’t want it too blurred, but I do want it blurred. And since I’m only going to use the lightened values here, I’m not really too concerned about the fact that it looks a little unreal at this point, I’m just going to click Ok.

And now I’m going to blend this back in using lighten. So with the lightening we’re actually lightening the pixels underneath so that’s a pretty good result there. But let’s have a look at what we’re sort of targeting. I don’t think this is great, but I don’t think this is quite there either. So let’s have a look and see what we could do.

Well we could apply another photo filter. So let’s go to Layer, New Adjustment Layer. Let’s go and get another photo filter and again, a cooling filter. So I’m thinking one of these others might be appropriate. Let’s just wind the value down and let’s check those again. This one’s pretty good. It’s a little bit red but it’s not a bad sort of cooling filter for this image if we could get the density of it correct. Let’s have a look at this other one. Again, that’s having quite a nice effect on her skin tone. So I might choose one or other of these cooling filters to apply to the image.

So now if I was continuing to work on the image I might want to for example apply a curves adjustment to it. So let’s just go and get our layers. We’re working on an adjustment layer right now so I’ll need to give us a full image layer to work on. So I’ve pressed Ctrl + Alt + Shift + E so we’ve got a new layer to work on. And now we could use a curves adjustment, Enhance, Adjust Color, Adjust Color Curves. And here what I’d be looking for is to sort of just generally lighten the image. So, I think the backlight will give us a reasonably good start here. And I’m just going to adjust this curve so that everything is just a little bit lighter. So I’m just looking at pulling all of these curve marks up a little bit. Here’s our before and after. And you can see that we’ve got a little bit better skin tones here so I’ll click Ok.

And I think in actual fact this time round I’ve probably got a better fix than I had the first time. Perhaps if I have a look at that smart blur again I might to do something else or what I could do is just blur a duplicate of the image using for example a Gaussian blur and then just bring back these areas into the image. Let’s see what we would do there.

I’m just going to duplicate this layer. I’m going to apply a blur for example, a Gaussian blur to this layer looking to get the smoothest skin tones. That’s really all I’m interested in here is the slight smoothening of the skin so that we get rid of the grain that we got in from the iPhone, click Ok.

I’m going to add a layer mask to this layer. And what I’m going to do now is to just paint out the areas where we’ve got some softening of the image. The softening areas are going to be around the eye and perhaps over the lips. So I’m going to bring these areas of detail back a little bit in these areas. So there’s how I would fix these images to remove the impact of using an iPhone to take the images in the first place. Let’s just go back to the Undo history on this image and let’s see how far we’ve come. This is the original image and this is what we’ve got now, a much more pleasing result for the family of this young woman.

I’m Helen Bradley. Thank you for joining me for this video tutorial. I encourage you to subscribe to my YouTube channel so you’ll be advised when new videos are released. And look out at projectwoman.com for more Lightroom, Photoshop, Photoshop Elements and Illustrator tutorials.

Helen Bradley

Friday, April 27th, 2012

Edit images on the iPad with PhotoPower

Download: PhotoPower on the iPad – 2.99

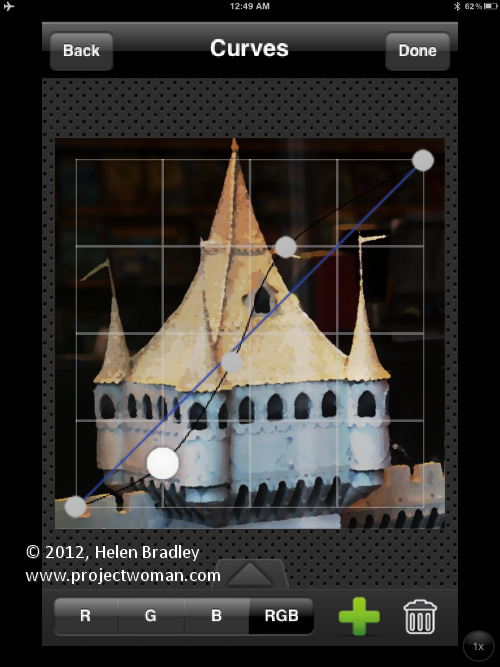
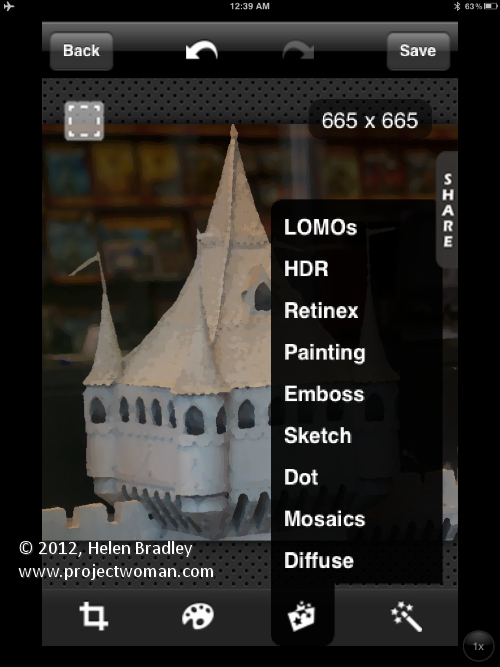
This is an iPhone app that runs on the iPad. It totally rocks and it’s an example of what a photo fixing app should do. It is simple to use but extraordinarily powerful it even includes a curves tool!

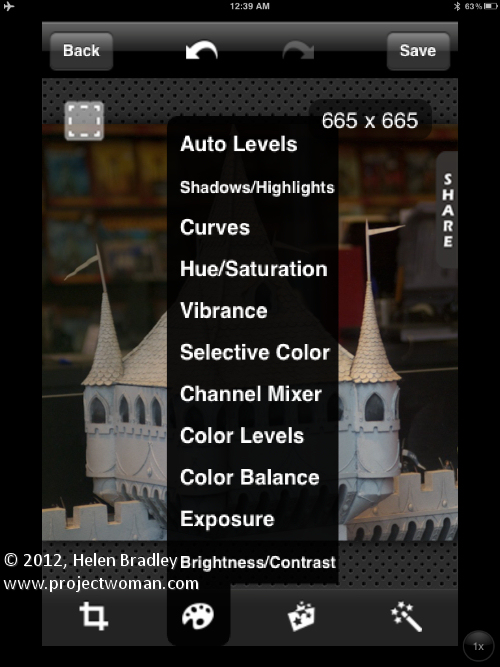
Open an image, crop  it and then adjust it. There are tools from Exposure to Vibrance and in many tools you can adjust the separate color channels or the composite channel.

Tap any of the Adjustments, Effects or Filters and you’ll see a long list of options to choose from. This is a seriously awesome program with heaps of cool features. It’s a pity it isn’t available for the iPad at full screen size but that gripe aside it is well worth looking at as a tool for adjusting your images.

Helen Bradley

Thursday, April 19th, 2012

Age an image on the ipad with OldPhotoPRO

Download: OldPhotoPRO on the iPad – Free

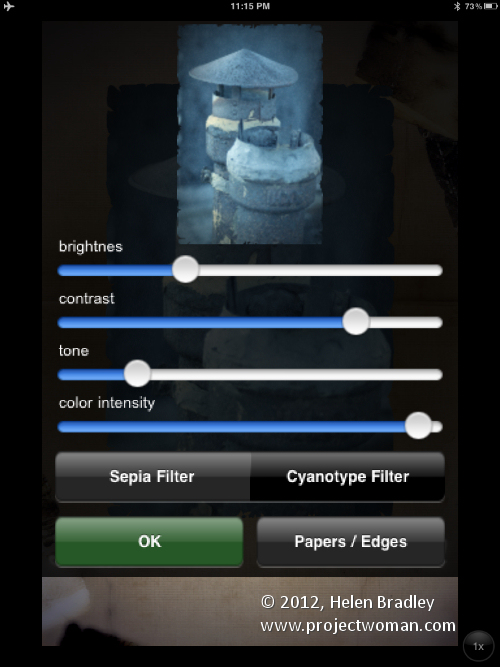
This free app doesn’t promise much and doesn’t disappoint, in fact quite the opposite. You simply open an image and it applies an old photo effect to it. Click Edit and you get a heap of edits you can make from Brightness, Contrast, Tone and Color intensity and a couple of options for Sepia and Cyanotype.

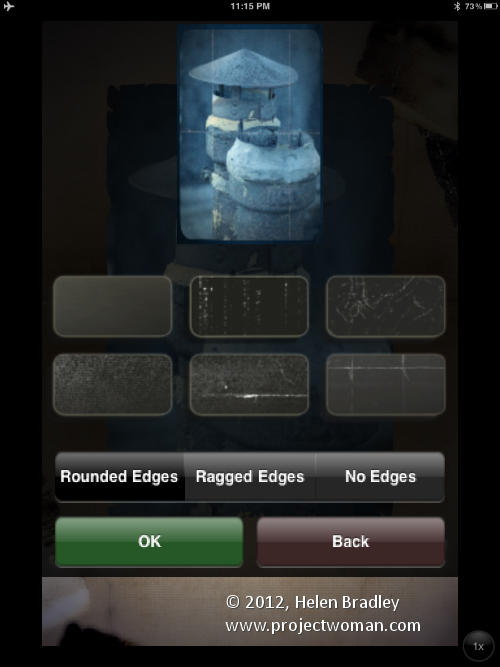
Tap Papers / Edges and you can add edge effects and scratches.

This is a no frills app. It is simple to use and can crank out some fun effects for aging images.

Helen Bradley

Tuesday, April 17th, 2012

Photo editing with Snapseed on the iPad

Download: Snapseed on the iPad – 4.99

Snapseed comes from the folks at Nik Software. It’s an interesting app but can leave you more confused than enlightened regarding what you did to your image.

When you open the image there are selectable options all down the left of the screen – big icons to click on. Then everything gets really small and not a little confusing.

Some features let you add a control point to the image that you use to adjust just that position on the image – in others you swipe across the image to apply a change.

In the brightness fix, for example, you will drag across the image to adjust the brightness.

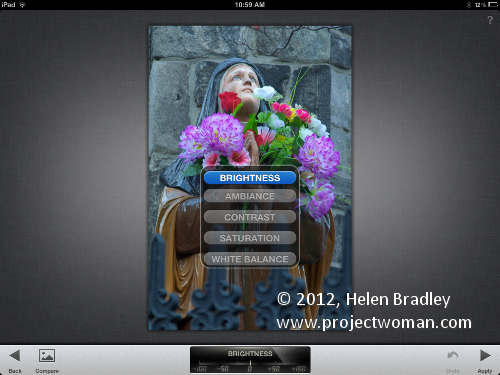
In other cases you swipe down to reveal different options. In Tune Image this means that options for Brightness, Ambience, Contrast, Saturation and White balance are all hidden from view and you have to ‘discover’ them to use them.

All these features are hard to discover when you first start working with the program and eave you wondering just who designs iPad interfaces and why they think that  hiding features is smart? There is plenty of room on the screen to put some sliders or options which would make this program much easier to use than it is.

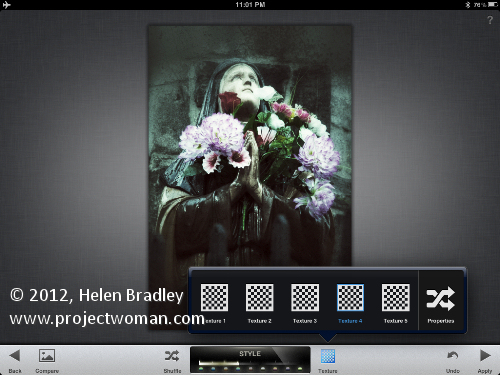
The Grunge fix has thousands of Styles which all tend to morph into each other – they aren’t different enough to even care too much about. I’d settle for 20 really different effects to choose from than this range of thousands of similar ones. Worse still, if you choose Shuffle to apply an effect you can’t easily see what number it is so you can reuse it. When applying styles you can also apply textures but the preview shows nothing about what that texture will look like!

The program doesn’t really seem to be too clear as to whether it is a serious fixing tool or a fun one for applying effects – it tries to take a bet each way and misses a bit on both counts.

At first looks it appears to be serious and the sample image is very attractive and well shot so grunge and vintage aren’t the first things that come to mind when you open the app. The tools however, lend themselves more to the fun side with the Vintage, Grunge and Tilt shift features.

In the scheme of things, this isn’t an app I’d use much. It is a bit too messed up for me and doesn’t do anything well enough to be a tool of choice for general day to day work. Perhaps for the occasional photo it might offer something but this will be occasional only.

I don’t dislike Snapseed I just don’t really understand the point of it – it seems a bit haphazardly put together. I think if you used it a lot you could grow to like it, I just don’t want to put that much effort into something that isn’t feature rich.

Helen Bradley