Every digital camera user will have confronted or will confront one day the issue of sensor dust. Every time you change the lens on your SLR there is a chance that dust will enter your camera. Some of this dust finds its way to the camera’s sensor with the result that you see unwanted and distracting spots on your images.
Built-in dust removal
Most cameras have some sort of dust removal feature built in. For example, my Pentax K7 has one that applies (according to its manual) “ultrasonic vibrations to the filter on the front surface of the CMOS sensor for approximately one second”. Sometimes this is all it takes to remove the dust. Just as often, however, the dust remains stuck fast.
This isn’t unusual because there are different ways dust can get to the sensor area and not all of it is ‘loose’ in the sense that it can be shaken off. Some particles can actually become stuck to the sensor.
Also, just to be clear, when I am talking about dust on the sensor, it isn’t really on the sensor itself but rather on a thin glass plate that is on top of the sensor. It’s just easier to call it sensor dust and to talk about cleaning the sensor than talk about cleaning the glass filter on top of the sensor.
When built-in methods fail
If your camera’s on board dust removal feature fails, the recommended solution is to send your camera to a service center that is authorized by your camera manufacturer and to have them clean it.
Because this is a service, you’ll be charged appropriately for it. You’ll also be without your camera for the length of time it takes to get it cleaned. Inspite of these issues, for most camera owners this is the safest and best solution.
Another option is to utilize the cleaning services provided by your local camera store. However, this is not without its risks – if the service technician isn’t authorized by the camera manufacturer to clean the camera then the cleaning could void your warranty -even if the cleaning doesn’t cause damage to the camera.
However, for a lot of photographers these options are just plain expensive and inconvenient.
For me, the issue is just that – cost and convenience. To get my camera cleaned at the local camera store costs $75 a time and it involves a one week turnaround – the service technician picks up and delivers to the store only on Tuesdays. In addition I have two one-hour round trips to drive to the camera store to drop it off and pick it up and I have to strip everything off the camera including the camera strap before it goes out and then put it all back together when it is done. All of this I was content to do until Mike from my local camera store suggested an alternative – cleaning the sensor myself.
Not for the faint of heart
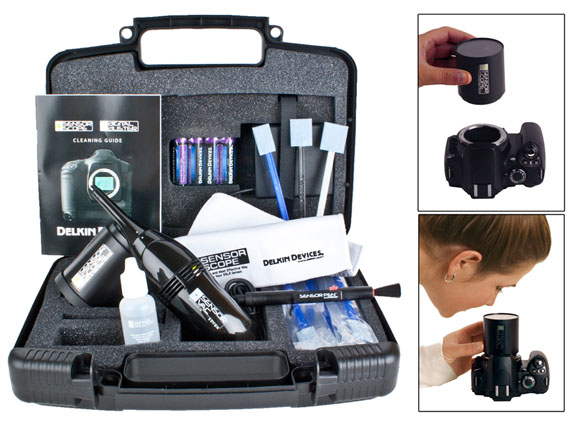
On Mike’s recommendation, I bought a sensor cleaning kit which included a vacuum, wipes and cleaning solution as well as a magnifying light all packaged in a padded toolkit. The cost of the kit was a little more than one cleaning so on my second cleaning I stood to be ahead on cost.
Kiss your warranty goodbye
I’m not recommending self-cleaning to anyone. It is a decision each camera owner needs to make themselves. You need to do as I did and ask yourself if you are prepared to shoulder the cost if you damage your camera and void your warranty? If not, then pay your money and leave it to the professionals.
I accepted I would be up for the cost of a new camera body if I damaged it because that’s about what it would cost to fix the damage I would do if the cleaning went wrong. I also acknowledged that I have probably voided my camera warranty by cleaning the camera myself even if it isn’t damaged by the cleaning. However, for me it made sense to see if I could save some time and effort by doing my own cleaning.
Scouts’ motto: Be prepared
Here is what I suggest you do if you plan to clean your own camera:
1 Read the Manual
However you behave and whatever you do in any other aspect of your life this is the one time you should read the manual for your camera and your cleaning kit before you get started. In fact, read it four or five times until you’re completely familiar with what you’re about to do and the risks.
I also found a good deal of useful information at the Cleaning Digital Cameras website (http://www.cleaningdigitalcameras.com).
In short the better informed you are the more likely you are not to fail. And if it all sounds too risky and beyond your skills, then don’t do it – after all that’s why they have service centers that do it for you!
2 Power it up
If your camera has an AC connector, connect it to the AC so that you won’t run out of power in the middle of the cleaning. This is an extremely dangerous situation as lack of power will cause the camera to shut down and if it shuts down on your cleaning tool then you are almost guaranteed to damage something.
If you don’t have a mains power connector for your camera, make sure to charge a fresh set of batteries and put these in the camera before you begin.
3 Make sure you have a problem
This probably should really be step 1 – you need to make sure you have a problem before you start. If your camera is not dirty then don’t clean it.
Many cameras will have some form of dust alert system that will show you dust on the sensor. For the Pentax K7 there’s a dust alert setting that requires you to set the camera in C or AF.S shooting mode and point at an evenly lit even color subject such as a white wall or an empty word processing document on a computer screen and take a shot. The resulting image shows you if there is dust and where it is.
You will need to read your camera’s manual to see if you have a similar system and how to capture an image of the dust.
Of course, some of us will be in no doubt that our camera needs cleaning because we can see the dust on our photos. My own cleaning efforts were driven by a particularly large gob of dust stuck in the middle of the sensor which showed up on nearly every image I shot and which just wouldn’t move inspite of numerous attempts to vibrate it free.
4 Check your tools
Check your tools before you begin making sure that you have everything that you need arranged on a clean work surface in a clean environment. Because you’ll be removing the lens from the camera you don’t want to risk getting dust into it while you are cleaning it.
5 Prepare the camera
Your camera will have a sensor cleaning feature in it. You use this to raise the mirror so you can access the sensor to clean it. Check your camera’s manual for instructions as to how to access this feature and how to return the camera to its usual setting when you are done. On my camera, simply powering it off resets it – so I have to be very careful not to touch the power button while cleaning it and that’s why freshly charged batteries are critical.
6 Clean the sensor
Clean your camera following the instructions in your camera’s manual and those in your sensor cleaning kit (all the time having regard to the terms of your camera’s warranty).
Take care – this is a delicate piece of equipment and needs to be cleaned with a light and steady hand. A half cleaned sensor in a camera that still works is better than a squeaky clean sensor in a broken camera.
7 Check the results
When you have finished cleaning, check the results to make sure the dust is gone.
Now for the good news
The good news is that many people do clean their sensors successfully.
If you do it yourself and if you do it right, you will find the cost of sensor cleaning is much less than sending the camera away to be cleaned. It’s also very convenient because you don’t have to be without your camera for a period of time and it feels good to know you can deal with a dust problem yourself.
For me, it will be a task I’ll always approach with some trepidation and mindful that it’s one that needs to be done carefully and not hurriedly or under stress. It does however give me a new sense of freedom particularly when traveling. With my cleaning kit I’ll never be caught on day one of a two-week trip with a nasty gob of dust on the sensor and no way to remove it until I get home.
Helen Bradley


