Wednesday, July 3rd, 2013
Use a text box in Word to control text wrap around a table
In a previous tip I showed you how to place a table inside a text box so you could put two tables side by side. You can use the same process to make the text on your page wrap around a table.
Click here to learn how to place a table inside a text box
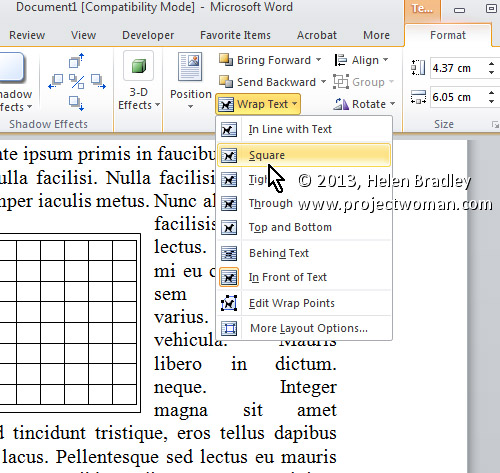
To control the way text wraps around a table, first create a text box and place a table inside it.
Then click to select the text box and, from the Ribbon, select the Format tab > Text Box Tools. Click the Wrap Text dropdown menu and choose the desired wrapping option from those in the list – typically you will use Square to wrap text round the text box with its inserted table.
Helen Bradley
Labels: 2010, 2013, format, insert, Microsoft Office, Microsoft Word, option, part 2, table, text, Text Box Tools, tip, trick, Tutorial, Word, Word 2010, Word 2013, wrap, Wrap text, wraparound
Categories:office
posted by Helen Bradley @ 6:05 am1 Comment links to this post
Wednesday, June 26th, 2013
Place tables side by side in a document using text boxes to keep them in place
If you add a table to a text box in Microsoft Word, you can position the text box wherever you want it to be on the screen.
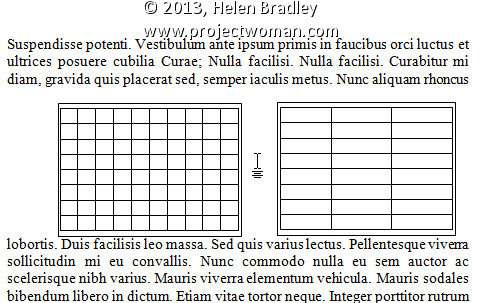
If you need two tables to be placed side by side in your document you can do so by placing each of them inside a text box and then arranging the text boxes side by side.
To do this, create a text box by selecting the Insert tab on the Ribbon, click Text Box and click Draw Text Box. Click and drag to create a text box and then click inside it and create a table by choosing Insert > Table. Repeat the process to create the second table in its text box then drag to position the text boxes side by side.
Helen Bradley
Labels: 1, 2010, 2013, insert, Microsoft Office, Microsoft Word, Page, Part 1, Ribbon, side, side by side, Simple Text Box, table, text box, tip, trick, Tutorial, Word, Word 2010, Word 2013
Categories:office
posted by Helen Bradley @ 6:00 am11 Comments links to this post
Tuesday, June 18th, 2013
Modify a Style’s Font Color to help find missed formatting
Quickly determine which paragraphs in a document have been formatted using one style, rather than another, by changing the colour of the formatted text.
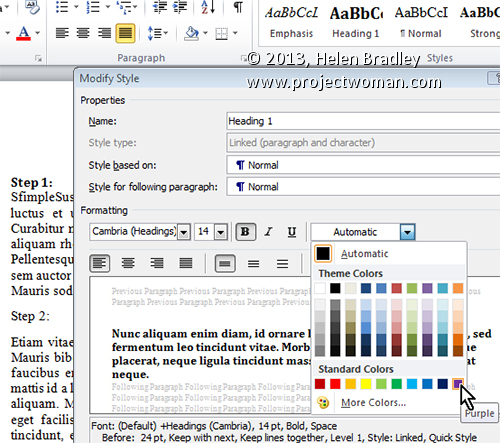
To do this, click the Home tab on the Ribbon, hover over the style’s name you want to edit in the Styles gallery. Now, right click it and select Modify. In the Modify Style dialog, change the Font Color to something that will stand out on the page (such as purple) and click OK.
Now scroll through your document to see if the style has been applied everywhere you wanted it applied. Remember, if you don’t make any changes at this point, you can quickly undo the colour change by selecting Undo.
Otherwise, when you are done formatting the document, set the colour back to the original Font Color by repeating the above steps.
Helen Bradley
Labels: 2010, 2013, color, colour, font, Font Color, format, Home, Microsoft Office, Microsoft Word, miss, mistakes, modify, Modify Style, style, Styles Gallery, tip, trick, Tutorial, Word, Word 2010, Word 2013
Categories:office
posted by Helen Bradley @ 5:44 amNo Comments links to this post
Tuesday, June 11th, 2013
Learn to use ‘Save as type’ to format your document so users of older versions of Word can access them
You can easily exchange files with users of older versions of Word. This is because Word 2007, 2010, and 2013 essentially share the same file format. So it is pretty easy to open any Word document created using version 2007, 2010 or 2013 in any other of these three versions of Word. In addition, Word 2007, 2010, and 2013 will open files from any previous version of Word.
However, when you need to share a Word 2007, 2010, or 2013 file with someone using a much earlier version such as Word 2003 or a Mac version of Word, you must save the file using their particular Word file format. This is because the file formats are not the same and the older versions of Word cannot read the newer file formats.
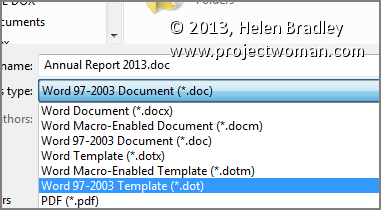
To save using the appropriate format, select the File tab on the Ribbon, and click Save As. In the Save As dialog, click the Save as type: dropdown list and select the word processing format that matches the software that your other user is using such as Word 97-2003 Document (*.doc). Then click Save to save it in that format.
Helen Bradley
Labels: 2003, 2007, 2010, 2013, convert, file, format, mac, Microsoft Office, Microsoft Word, old, open, Save As, save as type, share, software, tip, trick, Tutorial, Word, Word 2010, Word 2013
Categories:office
posted by Helen Bradley @ 6:28 amNo Comments links to this post
Monday, June 3rd, 2013
Automatically Number Any and All Rows in a Table
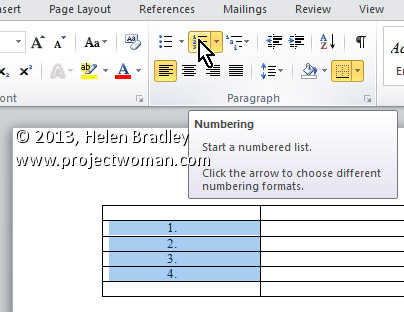
To automatically number rows in your table, select the column you wish to number (or the specific cells in the column you wish to number). Now, click the Numbering button on the Home tab on the Ribbon. After the rows are numbered, you can move the rows anywhere and the numbering will readjust automatically.
Helen Bradley
Labels: 2010, automatically, autonumber, cell, column, Home, Microsoft Office, Microsoft Word, Number, Numbering Button, Ribbon, row, Tab, table, tip, Word, Word 2013
Categories:office
posted by Helen Bradley @ 6:18 am2 Comments links to this post
Thursday, May 30th, 2013
A Quick Guide of Shortcut Keyboard Combinations to Accent Marks over Characters
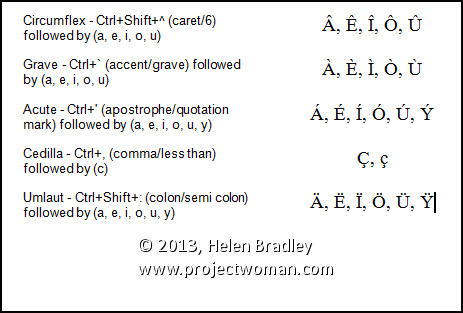
Word allows you to create accented letters quickly using its inbuilt accent shortcuts. To do this, press the accent shortcut key combination, then release, and follow it up with the letter to accent.
Some of the more commonly used shortcuts are:
Circumflex – Ctrl+Shift+^ (caret/6) followed by (a, e, i, o, u)
Grave – Ctrl+` (accent/grave) followed by (a, e, i, o, u)
Acute – Ctrl+’ (apostrophe/quotation mark) followed by (a, e, i, o, u, y)
Cedilla – Ctrl+, (comma/less than) followed by (c)
Umlaut – Ctrl+Shift+: (colon/semi colon) followed by (a, e, i, o, u, y)
Helen Bradley
Labels: ^, ;, :, ', ", <, 2010, 2013, 6, a, accent, Acute, c, Cedilla, character, Circumflex, Combination, CTRL, e, follow, following, Grave, i, inbuilt, key, keyboard, letter, Microsoft Office, Microsoft Word, o, shift, shortcut, tip, trick, u, Umlaut, Word, y
Categories:office
posted by Helen Bradley @ 6:02 am6 Comments links to this post
Tuesday, May 21st, 2013
Learn more about the formatting applied to text in your document with this handy Keyboard Shortcut
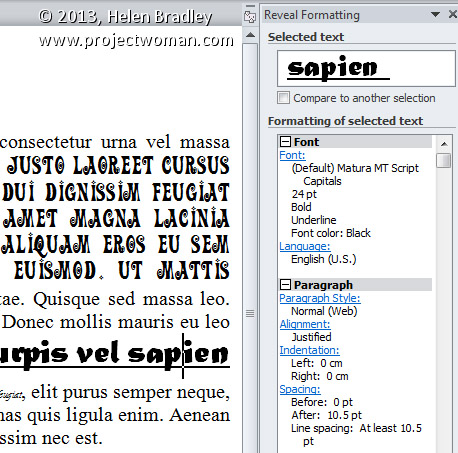
If you want to quickly find out what formatting has been applied to any piece of text, click in the text and press Shift + F1. A task pane will open in the right of Word window. This Reveal Formatting task pane displays details about the text format being used for the word that your insertion point is closest to.
With this task pane open you can click on any piece if text to learn more about its formatting.
Helen Bradley
Labels: 2010, 2013, Combination, F1, format, formatting, insertion, key, keyboard, Microsoft Office, Microsoft Word, pane, point, Reveal, Reveal Formatting, right, shift, shortcut, task, text, tip, trick, Word
Categories:office
posted by Helen Bradley @ 5:53 am1 Comment links to this post
Monday, May 13th, 2013
Finding and Fixing Page Numbers that Can’t be Seen and/or Won’t Print
If you have included page numbers at the foot of a page and find that they’re missing from your printouts the problem lies with your page settings. The footer text is being forced to print so far down the paper that your printer is ejecting the paper before this point is reached.
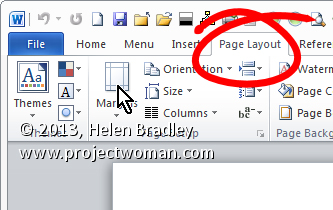
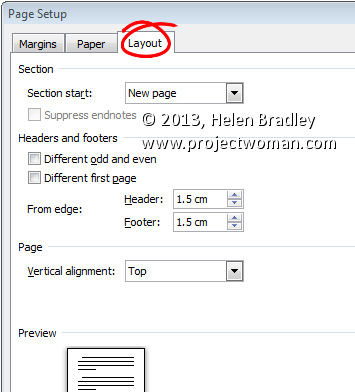
Solve the problem by selecting the Page Layout tab, click the Margins dropdown list, and click Custom Margins. Now, in this dialog select the Layout tab. Finally, increase the From edge: Footer measurement slightly. Experiment to find the smallest increase which will allow your page numbers to print.
Helen Bradley
Labels: 2010, 2013, Custom, Find, fix, footer, From edge, layout, locate, margins, measurments, Microsoft Office, Microsoft Word, Number, Page, Page Layout, print, tip, trick, Word
Categories:office
posted by Helen Bradley @ 6:42 am2 Comments links to this post
Tuesday, April 30th, 2013
Move a Paragraph, at Any Time, with Ease!
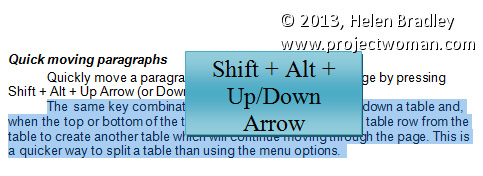
To quickly move a whole paragraph up or down a Word document, click in the paragraph and press Shift + Alt + Up Arrow (or Down Arrow).
The same key combination will move an entire table row up or down a table and, when the top or bottom of the table is reached, it detaches the table row from the table to create another table which will continue moving through the page. This is a quicker and simpler way to split a table.
This tip works in just about any version of Word.
Helen Bradley
Labels: 2010, 2013, Alt, bottom, down, down arrow, key, key combination, Keyboard Shortcuts, Microsoft Office, Microsoft Word, move, moving, Paragraph, quick, row, shift, split, table, tip, top, up, Up Arrow, Word
Categories:office
posted by Helen Bradley @ 6:20 am1 Comment links to this post
Wednesday, April 24th, 2013
How to make a New Page (or Page Break) When and Where you Want
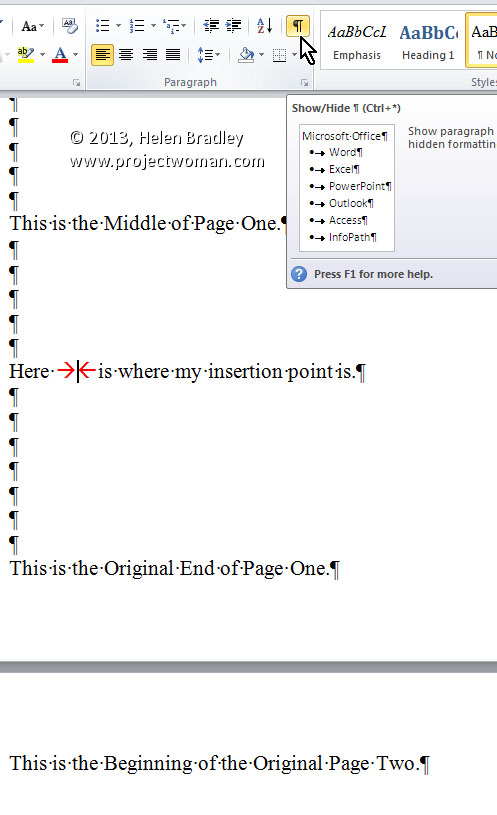
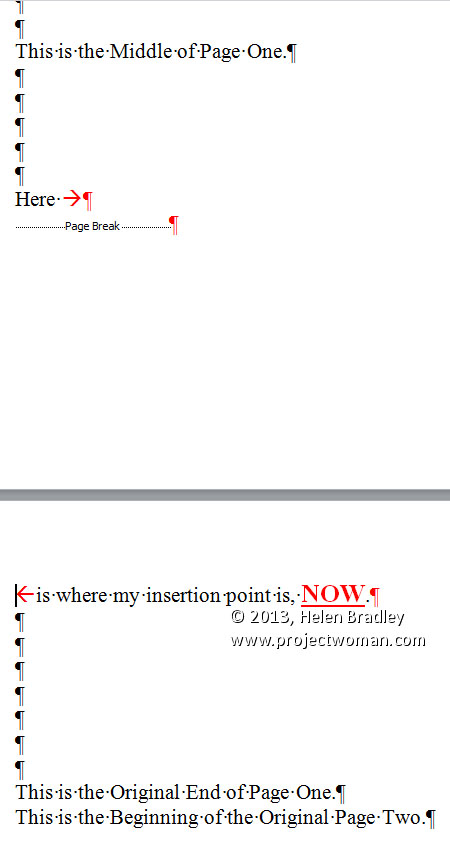
To create a new page in a Word 2010 and 2013 document before you’ve reached the end of your current page, simply press CTRL + ENTER. This places a ‘…Page Break…’ in your document exactly where your insertion point was. It also moves the insertion point onto the top of the next page. You can see the page break marker if you select the ‘¶’ button on the Home tab of the Ribbon.
Lastly, if you need to, you can delete the page break by positioning the insertion point immediately in front of it and pressing Delete.
Helen Bradley
Labels: 2010, 2013, create, CTRL, ENTER, instantly, Microsoft Office, Microsoft Word, new, Page, Page Break, tip, Word
Categories:office
posted by Helen Bradley @ 6:50 amNo Comments links to this post


