Using Word to Create Multiple Return Address Labels
Create your own return address labels in Word 2010 or 2013 by selecting the Mailings tab and clicking the Labels button. Type your address into the text area under Address.
Alternately, select the ‘Use return address’ checkbox and select the address to use from your address book or from your Outlook contact list.
Select the ‘Full page of the same label’ option button and select Options to select your paper from the list.
Select New Document to create a document full of your labels or click Print to send the job straight to the printer.
One easy and fun way to add visual interest to a text heavy page is to use a Drop Cap. A Drop Cap is when the first letter of a paragraph is increased in size and, more often than not, put in a more ornate font.
To create a Drop Cap, place your insertion point in the paragraph you wish to start with a Drop Cap. Then, choose Insert on the Ribbon, click Drop Cap > Drop Cap Options. The ‘Drop Cap Options’ allows you to either insert the Drop Cap into the paragraph, with ‘Dropped’, or place it separate from the text, with ‘In margin’. If you’re unsure what to use, I would suggest ‘Dropped’ and increase the ‘Distance from text’ setting to .3cm and the ‘Lines to drop’ setting (which affects the Font size of the actual Drop Cap) to 5 and click OK.
To change the font of the Drop Cap, you can either select the font you want directly in the ‘Drop Cap Options’ window or highlight the letter (which appears in a Frame) afterwards and changing it. You could even use Format, Borders and Shading, Shading tab to fill the frame with colour.
The new SmartArt feature in Word 2007 and 2010 helps you create timelines very easily:
Step 1
Choose Insert -> SmartArt -> Process and select one of the process options such as Basic Timeline and click Ok. Type the text into the textboxes in the SmartArt object. Alternately, click the arrows at the far left of the object and add text via the dialog.
Step 2
To format the timeline SmartArt, select the object and choose Format -> Design on the Ribbon and then select one of the SmartArt Styles. Click Change Colors to alter the colours used in your SmartArt object.
Step 3
From the Shape Effects list you can customise an effect such as reflection or shadow for the art. In addition, as the look of a SmartArt object is controlled by the document theme you can choose Page Layout -> Themes and select an alternate theme for your document.
While these days it’s easy enough to get data from programs like Excel and Word into a PDF file, sometimes it’s just a little bit difficult to get it back out again.
Often all I need is a picture from a PDF file that I can drop into a Word document add a signature or some text, and then re-bundle it as a PDF and distribute.
Not everyone sets up PDF files so that they can be edited and in most cases I’ll need to do the editing myself – so for that I use Word as I can drop in a signature or a text box really easily.
The problem then becomes how do you get the data out of the PDF and into Word. Luckily the Adobe Acrobat Reader has a tool for this built in.
From the menu select Tools > Select & Zoom > Snapshot Tool. Now position yourself in the file where you want to grab the data from and drag over the area to capture.
A picture of the area is captured to the Windows clipboard which you can now paste into another program such as a Word document. It’s not the world’s prettiest solution but it is quick and easy and that works for me.
So, you’ve finished designing your presentation in PowerPoint and it’s time to you’re your final preparations.
One thing you will need is handouts for your participants. It is easy to use Microsoft Word to create custom handouts for your PowerPoint presentation.
First complete the presentation so the slides are all is complete select the Office button and choose Publish > Create Handouts in Microsoft Office Word.
When the Send to Microsoft Office Word dialog appears, select the layout for the slides and text. There are various combinations of slides, notes and blank lines that you can choose from.
Select either the Paste or the Paste Link button depending on whether you want to embed the slides in the Microsoft Word document or simply link to them.
When you are done, click Ok and wait as Microsoft Word opens and the slides, notes and blank lines are created automatically for you in a new Word document.
Once the handouts are complete, you can format the document as you wish and add a cover page, headers and footers as desired and then print your slide handouts for distribution at presentation time.
Just a short tip today, I just tripped over this and thought “WOW! I didn’t know that!” so I wonder if you know it too?
Ok.. step back a bit. I’m doing a column on columns in Word and I’m showing how to place a text box or image in a document laid out in 2 columns so the text box or image travels with the text and how to take it out of the line of text so it floats independently.
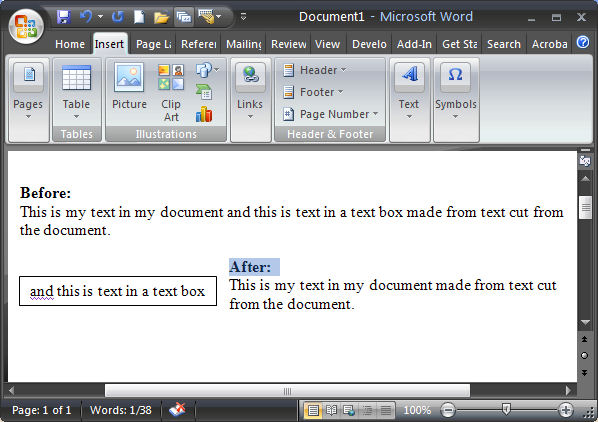
To create the text box, I select my text, then realize I need to create the text box first and click the Text box button without deselecting the text. [insert WOW moment in here].
What happened was that the text box got created automatically and the selected text appears inside it – just like that – how cool is that?
So, next time, instead of creating a text box and then copying and pasting text into it, select the text and click the Text Box button on the Drawing toolbar in Word 2003 and earlier and it will all be done automatically for you in one smooth step. The same process works in Word 2007 too but you must click the Insert tab, click the Text box button and choose Draw Text Box for it to happen.
Instant text in text boxes in Microsoft Word – can’t ask for anything more simple than that.
First the explanation: Look at any book and the characters in it don’t look quite like those you print on your printer. The reason? the characters in the book are placed closer together than those on your printed page.
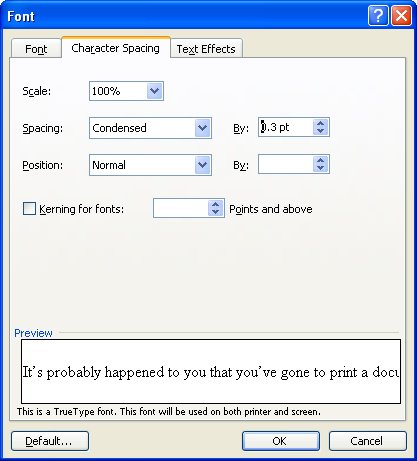
Now the technical stuff: Character spacing is the amount of space between characters of type. If you reduce the amount of spacing just a bit, you get a nicer look to your font, it just looks that little bit more professional.
Now the how to big: To alter the spacing between characters, select the text to alter and select Format > Font > Character Spacing tab. From the Spacing list box select Condensed and in the By: textbox set the reduced spacing value to somewhere between .1 pt and .3 pt – the results will be subtle but noticeable and your text will look lots nicer.
You’ll have seen preview images when you open a file in Word. If you choose File > Open and, from the Views option list you choose Preview, you will see either a small image of the full page or some of the text on the page. All this begs the question of what determines what you see?
The full page preview is an option when you save a file in Word. To configure it, choose File > Properties > Summary tab and enable the Save Preview Picture checkbox. Now, when you save the file it will have a preview image saved with it which will show in the preview area.
To ensure the Properties dialog appears everytime you save a file the first time so you can configure the Save Preview Picture option, choose Tools > Options > Save tab and enable the checkbox for Prompt for Document Properties.
I’m sure it’s happened to you just as it has to me. You copy and paste some text in from the web or an email message and it comes in with leading spaces – on evey line. There are lots of ways to remove the problem starting with hitting the delete key way too many times. Stop already!
There is, however one very smart way to do it without getting a repetitive strain injury. Select the lines of text and press Control + E to center the text. With the text still selected press Control + L to left align it and voila! the spaces are gone.