Tuesday, October 16th, 2012

Install Picture Package in Photoshop CS6 – step by step

How to install Picture package into Photoshop CS6

Yes! It can be done! Don’t let anyone tell you it can’t.

Ok, so if you read some of the information that’s available on the web you’ll be lead to believe that, in Photoshop CS6 the Picture Package feature has at last been permanently removed from Photoshop and only the Contact Sheet feature is available.

You’ll also read that the Picture Package is not a supported plug-in. Well, it might not be supported but that doesn’t mean it doesn’t work. If you are a Windows user then it does work – in fact it works just fine. And thanks to J. J. Mack’s research here, step by step is how to put the Picture Package back in Photoshop CS6 for Windows.

Step 1

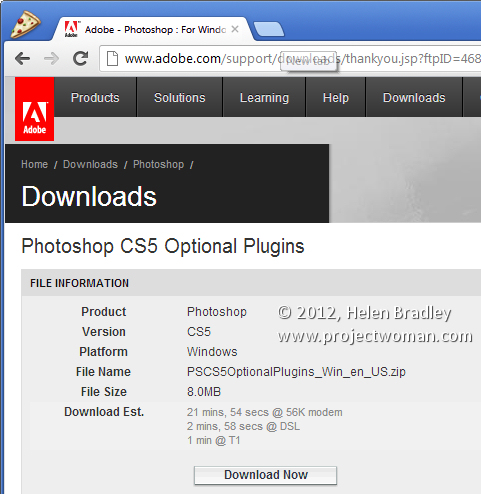
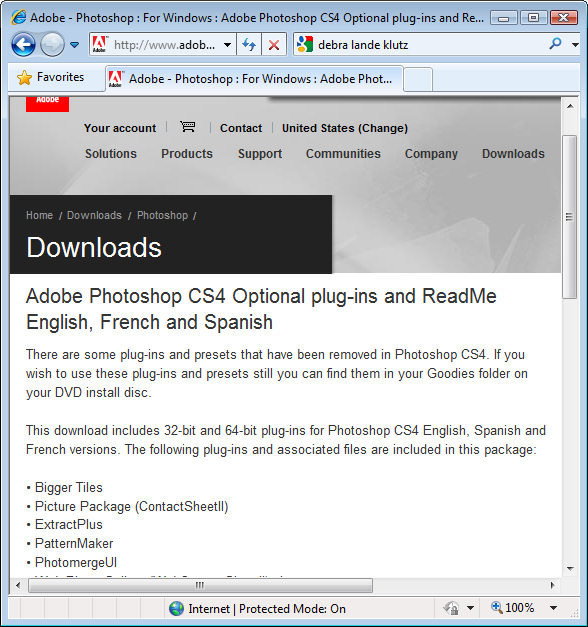
Download the Picture Package and Contact Sheet add-in for Photoshop CS5 from this location: http://www.adobe.com/support/downloads/detail.jsp?ftpID=4688. It is part of the Optional Plugins collection.

Step 2

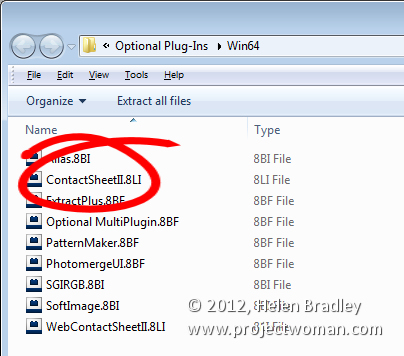
Once you’ve downloaded the plug-in zip file, open it up because what you want is two parts of it. You want the appropriate ContactSheetII.8LI file and the layouts.

install picture package add in into Photoshop CS6

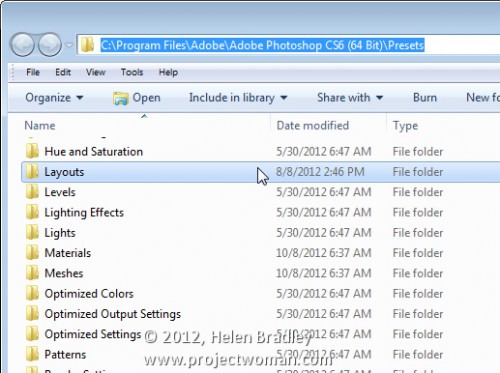
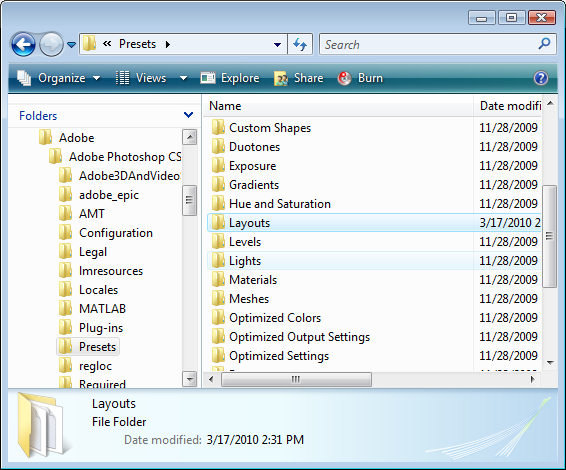
So, once you’ve unzipped the file use Windows Explorer to locate your Adobe folder – you will need the C:\Program Files\Adobe\Adobe Photoshop CS6 <64 bit or 32 bit>\Presets folder. Depending on whether you are using the 32 or 64 bit version of Photoshop, you will need to locate the correct folder. On my machine, I am using the 64 bit version of Photoshop so the folder is: C:\Program Files\Adobe\Adobe Photoshop CS6 (64 Bit)\Presets.

Put the folder of Layouts that were in the zip file into this folder – so you will now have a Presets\Layouts folder with a set of layouts in it.

Step 3

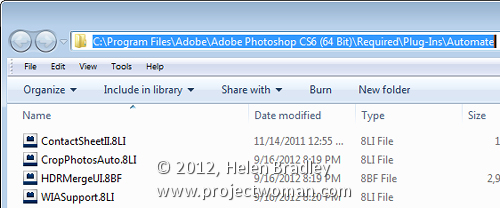
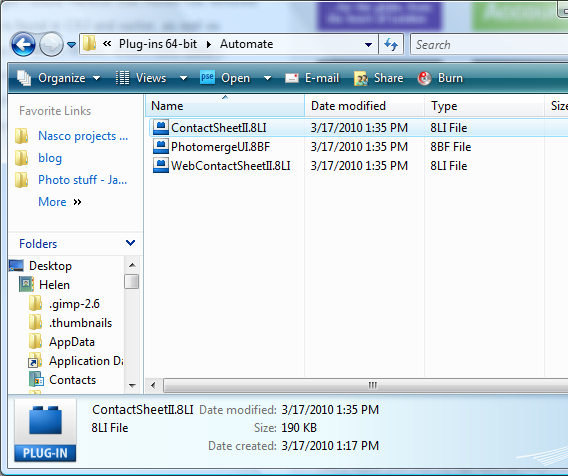
Locate your Adobe Photoshop \Required\Plug-Ins\Automate folder – the Required folder is at the same level as your Presets folder so, on my computer it is here:

C:\Program Files\Adobe\Adobe Photoshop CS6 (64 Bit)\Required\Plug-Ins\Automate

Into this folder copy the ContactSheetII.8LI file from the zip download.

Step 4

Once you’ve done this simply close and restart Photoshop.

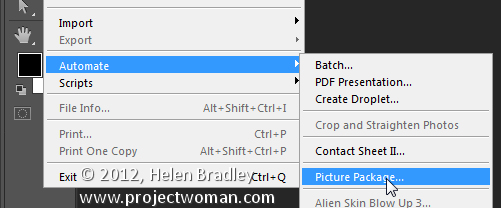
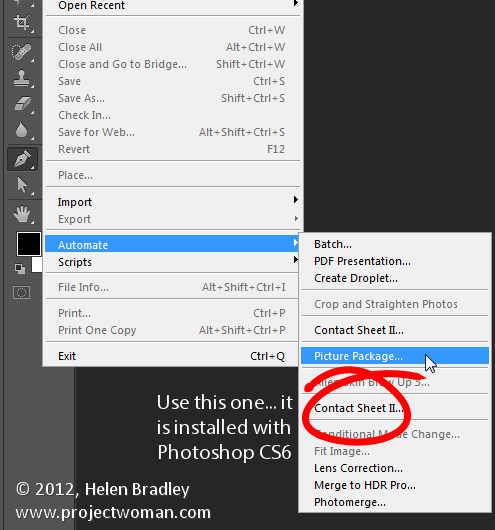
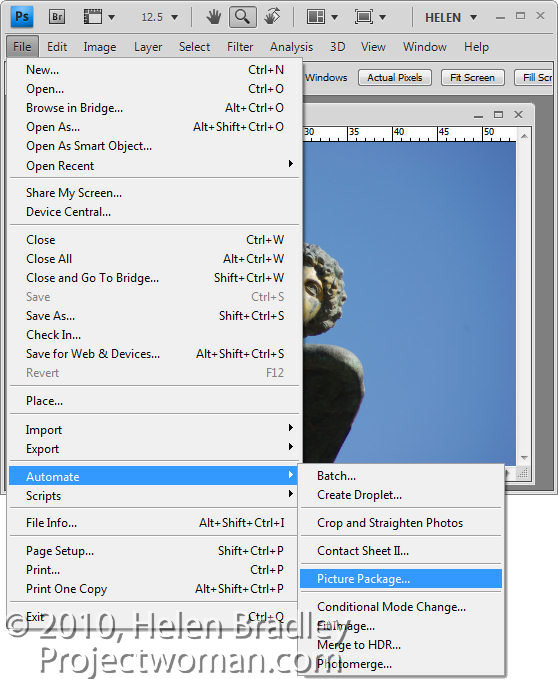
Choose File > Automate and you’ll see the Picture Package option.

You’ll also find that you have two Contact SheetII entries – you want to use the second one of these as this is the one that is installed with Photoshop CS6.


If desired you can use the Edit Menus feature to remove the unwanted entry from the Automate menu to make things neat and tidy.

Step 5

To run the Picture Package plug-in in Photoshop CS6, choose File > Automate > Picture Package. You can now proceed as you did with earlier versions. You can edit layouts, open layouts, you can click on an image to add it, you can go and add a file to the layout and basically do anything that you used to do with the Picture Package in any earlier version of Photoshop.

So when someone tries to tell you that Picture Package is not available in Photoshop CS6 feel free to send them here to prove that it can be done.

Helen Bradley

Tuesday, January 31st, 2012

5 Gotchas in the Lightroom Print Module

When you’re setting up single or multiple image printing in the Lightroom Print module here are some things to be aware of:

Nonexistent Drag and drop

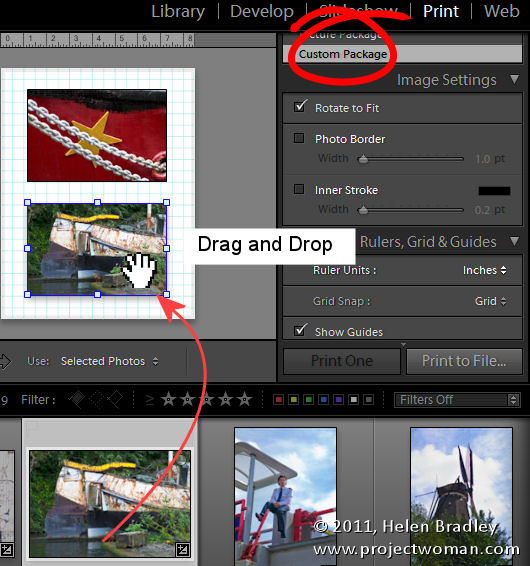
You can drag and drop pictures onto a print template in Lightroom in some circumstances but not in others. This can be confusing but there is some logic behind it.

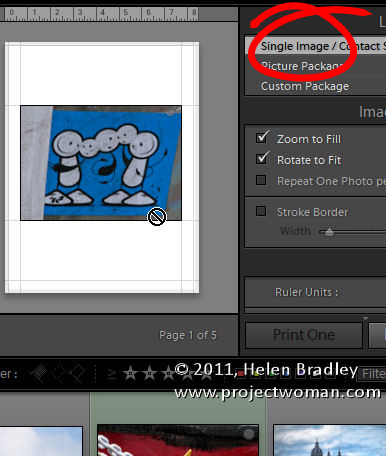
When you select a Lightroom template from the Template Browser, make sure to open the Layout Style panel on the right at the same time. Templates can be one of three layout styles and each operates differently. Knowing what style a template is will help you understand its behavior.

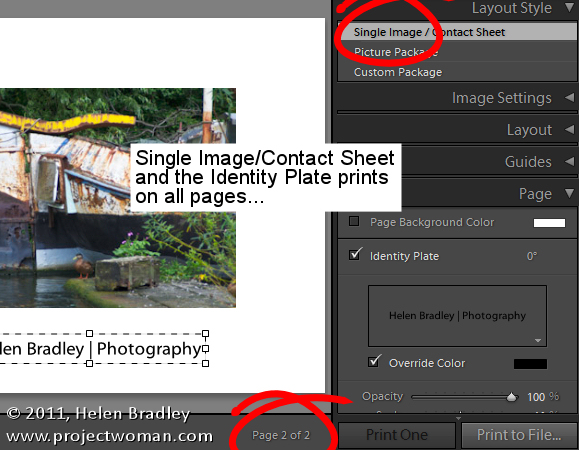
If it is a Single Image/Contact Sheet template then you must select images on the filmstrip to add them to the contact sheet and they appear in the layout in the order they appear in the filmstrip. You can’t drag and drop images from the filmstrip into a Single Image/Contact Sheet layout.

If the template is a Custom Package then you can drag and drop an image into any of the containers on the screen. You can also drag and drop an image into any position in the layout and it will sit on the screen even overlapping other images.

If a template is a Picture Package, then you can fill it by clicking an image in the filmstrip. A picture package prints multiple images on a single sheet of paper. If you select two images in the filmstrip, you’ll then have two pages in your picture package – one for each of the selected images. You can drag and drop an image into a Picture Package but when you do, you’ll create all sorts of issues. Not only will you add a new image to the layout page you are seeing on the screen but you’ll do the same for all the pages in the current layout. It’s generally best not to drag and drop images into an already tightly designed picture package layout.

Understand Border behavior

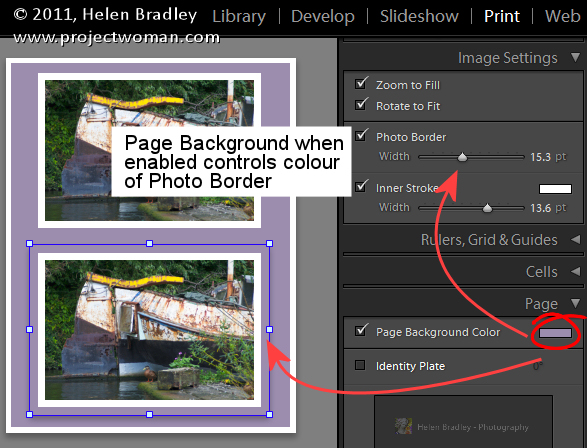
If you have a Photo Border enabled for a either a Custom Package or a Picture Package then the width of the border will make the image smaller. The color of the border is the color of the page background if you have a page background selected. If not, it will be white. If you set an Inner Stroke then it too will reduce the size of the image but it can be set to your choice of color.

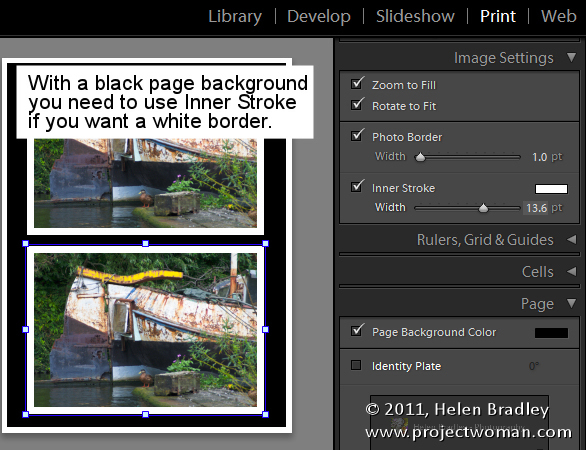
So, for example, if you want a black page background but a white border around your images, set the page background color to black and use the Inner Stroke rather than the Photo Border to apply the white border to the image.

Identity Plate Behavior

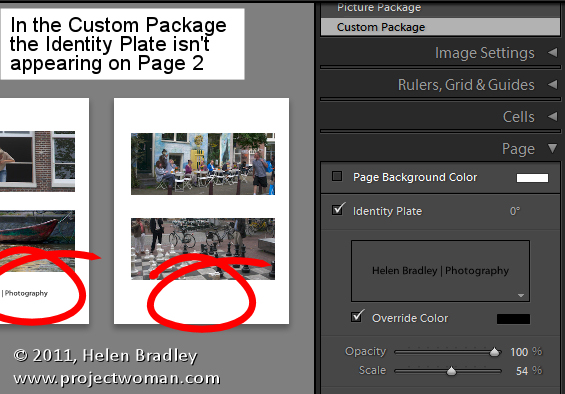
When you add an Identity Plate to a Custom Package it appears once on the page and you resize it to suit and place it where you want it to go. However, it only appears once in the layout so, if you add a second page to the print layout, the identity plate will appear only on the first page.

Alternatively you can add the identity plate to every image by selecting Render On Every Image. Now the identity plate will appear on each image rather than on each page but it will appear in the very middle of the image and  you can’t move it.

So, if what you want is your name on each printout as an Identity Plate, create a Custom Package design with an Identity Plate but not set to render on every image. Make sure the identity plate is in the correct position and fill the page with images and print or save it. Then fill it again with a new set of images and output the result and repeat as required.

On the other hand, an Identity Plate added to a Single Image/Contact Sheet prints on every page of the document in the place you position it in.

Any size JPG output

You can print your layout to a JPG file that you can then upload to the web or send out for printing. To do this, from the Print Job panel, click the Print To: dropdown list and choose JPEG File.

Set the File Resolution and then the Custom File Dimensions for the page. Then, when you’re done assembling the images, click Print to File to print the layout to an image file rather than to a printer.

Crop your images

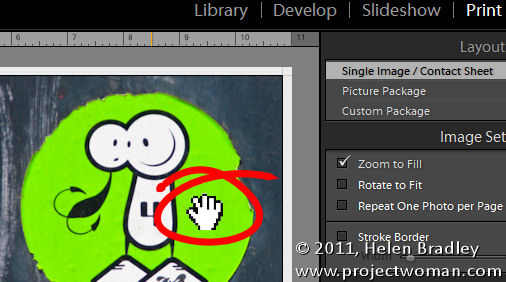
When you’re working with a Single Image/Contact Sheet, if the image is set to Zoom To Fill it will be made large enough to fill the container on the page. If the image height and width does not match the size of the container then part of the image will be removed. You can adjust the positioning of the image within the container by dragging on it with the mouse.

If you have a Picture Package or Custom Package selected you can move an image within its container also, but to do so you must hold the Ctrl key (Command) on the Mac.

The different behaviors of images within what appear to be similar layouts in Lightroom can be confusing but once you understand that different layout styles bring with them different key combinations and behaviors you’ll be on your way to creating great looking prints in Lightroom.

Helen Bradley

Friday, March 4th, 2011

Multiple image printing in Photoshop CS4 & CS5

One real annoyance with Photoshop CS4 and CS5 is that Print Package and Contact Sheet printing is missing. These options appeared in earlier versions of Photoshop but they aren’t installed automatically in Photoshop CS4 & CS5.

You might be excused for thinking this means you can’t print multiple photos per page in Photoshop CS4 & CS5. Nothing could be further from the truth. The secret is to find the missing features on your program disk or, quicker still, download them from the web.

Here are links to the files you need for the Mac and the PC:

Mac version for CS4:

http://www.adobe.com/support/downloads/detail.jsp?ftpID=4047

and for CS5:

http://www.adobe.com/support/downloads/detail.jsp?ftpID=4687

Windows version for CS4:

http://www.adobe.com/support/downloads/detail.jsp?ftpID=4048

and for CS5

http://www.adobe.com/support/downloads/detail.jsp?ftpID=4688

Download and run the files. If you’re on a PC the download zip file contains an executable file you simply run and it places the files you need in a folder on your desktop.

Open the desktop folder, open the appropriate English, French or Spanish folder, choose Goodies > Optional Plug-ins. Then choose the plug-ins appropriate to your version of Windows. In the folder are the Contact Sheet, Web Contact Sheet and PhotoMerge plug-ins. You need the Contact Sheet plug in as it provides both the Picture Package and Contact Sheet features.

Copy the ContactSheetII.8LI file to your C:\Program Files\Adobe\Adobe Photoshop CS5\Plug-ins\Automate folder.


You will also need to copy the Goodies> Presets > Layouts folder and place it in your C:\Program Files\Adobe\Adobe Photoshop CS5\Presets folder – just drag and drop the entire Layouts folder into the Presets folder.


Restart Photoshop, open a file and choose File > Automate > Picture Package.

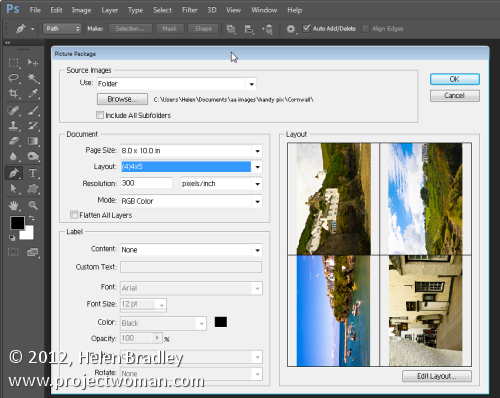
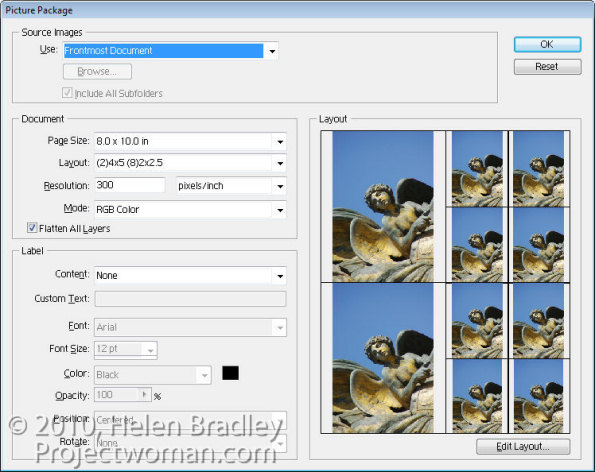
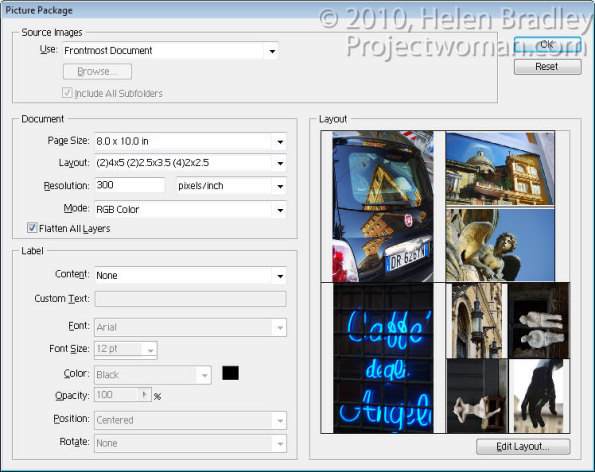
When you launch the Picture Package choose either the Foremost Document, Folder or File from the Use menu as the image(s) to start with.

Select the page size to use and then the layout arrangement. You can, for example, print four 4 x 5 images or a combination of 4 x 5 and 2 x 2.5” – there are plenty of options to choose from.

If you enable the Flatten All Layers checkbox you will end up with all images on a single layer rather than each  image appearing on its own layer.

Set the printing Resolution and add Labels to your images if desired and click Ok.

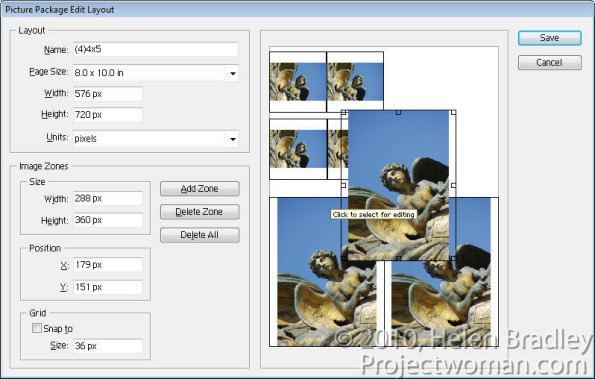
To customize a layout, click Edit Layout and you can click and drag to resize any of the images in the layout.

To add an additional image click Add Zone and then size it.

If the ratio of your selected image’s height and width are different to the ratio of the zone the image is placed in, the image will be scaled to fit one dimension – it will not be cropped – but it will print slightly smaller in the other dimension.

What isn’t at all obvious is how to print multiple images at various sizes in the Picture Package.

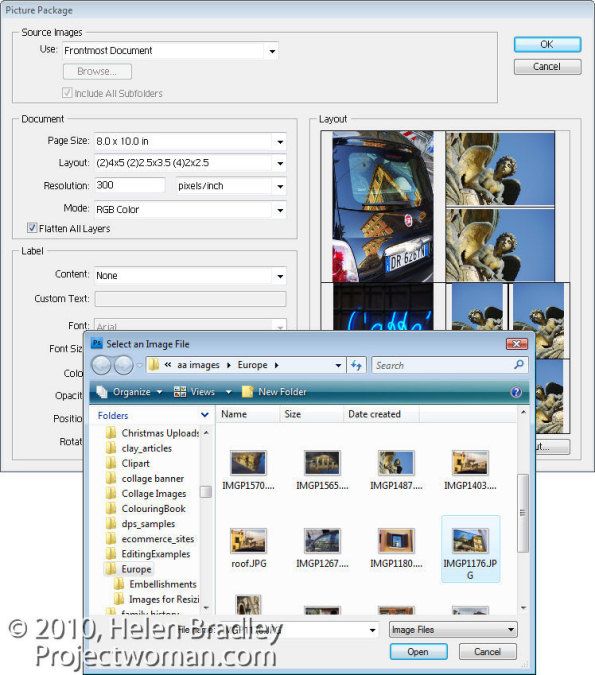
To do this, click on an image in the Picture Package and a File dialog will open. Select the image to print at this location in the Picture Package.

Continue and select different images for every one of the layout boxes if desired.

When you are done, click Ok.

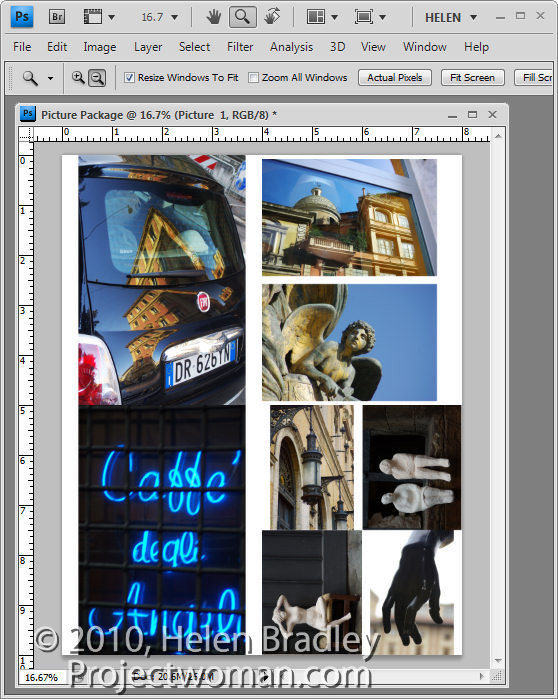
Photoshop creates an image the size that you specified with all the images that you selected sized and positioned in the layout. Depending on whether you had Flatten All Layers enabled or not, each image will be on a separate layer or your image will have one layer full of images.

You can now save or print this image.

Print Package is a feature of Photoshop that really should have been included in a regular install of Photoshop CS4 or CS5. It shouldn’t be as difficult as it is to find and install.

The good news, however, is that once you’ve gone to the trouble of installing it, it will be there every time you need it and also, by adding this feature you’ve also reinstated the Contact Sheet option.

Helen Bradley