Monday, November 14th, 2011

Photoshop – convert a black background to white

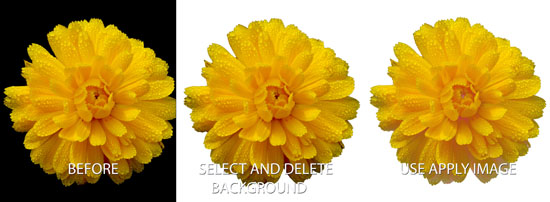
I was recently asked how to convert the background of an image from black image to white. It isn’t a trivial task so it got me thinking. One of the problems is that things shot against a black background actually pick up black or dark reflections so it’s not enough to merely remove the black – you also have to solve some of the reflection problems as well.

This method won’t work on every image but provided the subject is well lit so there are minimal dark reflections to deal with, it is quick and effective.

Step 1

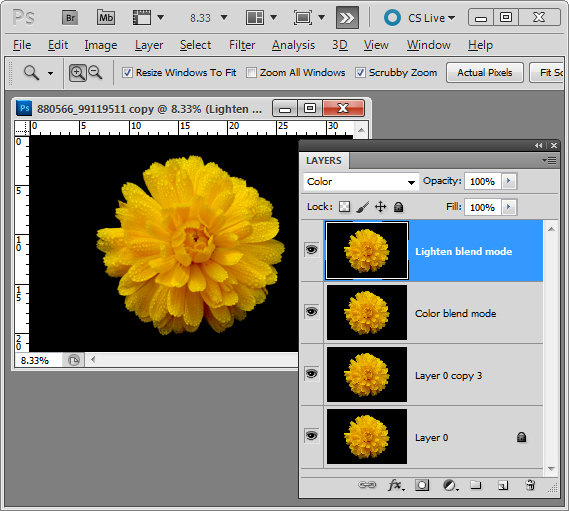
Start by making three copies of the background layer of the image by right clicking it and choose Duplicate Layer three times.

Set the top layer’s blend mode to Color and the second top layer’s blend mode to Lighten.

Step 2

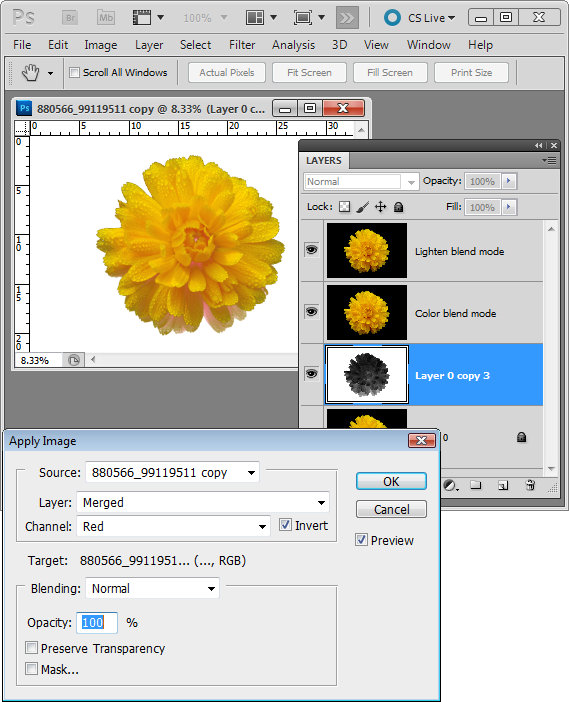
Target the third top layer and choose Image > Apply Image. Set the Channel to Red as it is typically lightest in the areas where the data is that you want to retain. Select Invert and make sure the Blend mode is set to Normal. You will see the image now with the background removed. Click Ok.

Step 3

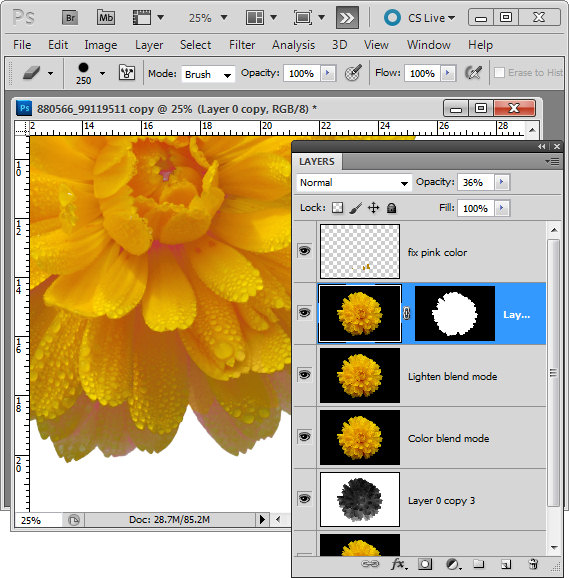
Now all you have to do is to tidy up the problems. Typically this is problems with color or the edges. For this I make yet another duplicate of the background layer and drag this to the top of the layer stack. Make a rough selection of the background using a tool like the Quick Selection tool and then hold Alt (Option on the Mac) as you click the Add Layer Mask icon at the foot of the layer palette. You can now use this layer to add color or to fix other problems.

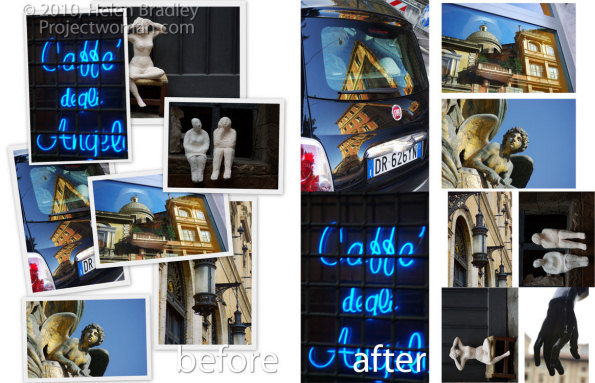
In this image I reduced the opacity of this layer to around 30% to bring back some missing detail in the flower.

I also added a new layer, set its Blend Mode to Color, sampled some color from the flower and painted over some of the petals where they showed pink once the black was removed.

The image is © Lars Sundstrom from sxc.hu


Helen Bradley

Wednesday, October 19th, 2011

Photoshop: Working with Locked Pixels

If you’ve ever wondered what the small icons in the Layer palette do, you might be surprised at how useful they can be. Here’s what the Lock Transparent Pixels icon does and how you can use it.

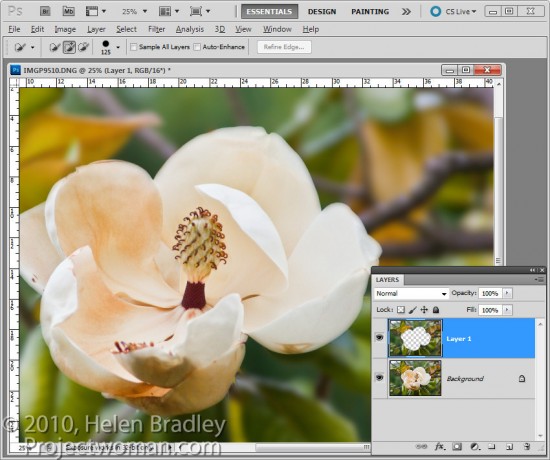
There are times when you are working with content on layers in Photoshop that the layers can do things that you don’t expect them to do. For example, in this image, I have extracted the background to a layer of its own by selecting it and then choose Layer > New > Layer via Copy.

I now want to blur this layer so if I select it and apply a Gaussian blur filter to it, you will see that the Gaussian blur filter pushes the background over the edges of the flower.

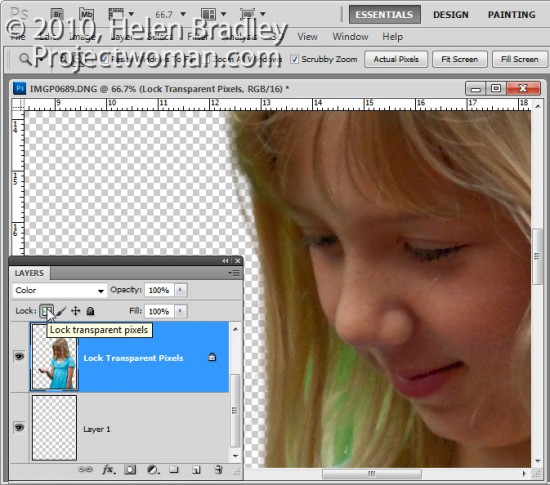
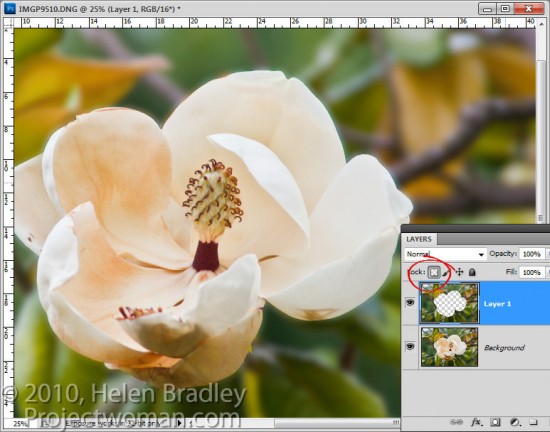
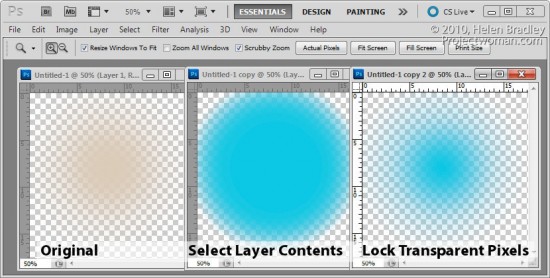
This time, instead of selecting the layer contents I selected the Lock Transparent Pixels icon in the layers palette.

Now when I apply the same heavy blur filter you’ll see that the edges of the background are maintained.

The layer is blurred but only the area that was covered by the original pixels is blurred and the blur isn’t permitted to ‘bleed’ into the area that contains fully transparent pixels.

This option is useful when painting over details to change their color. For example, when you photograph someone against a green screen background you will find hairs and areas around the very edge of your subject may have a green tinge.  Or when you extract a subject, like a building, photographed in bright sunlight it may display some chromatic aberration around its edges.

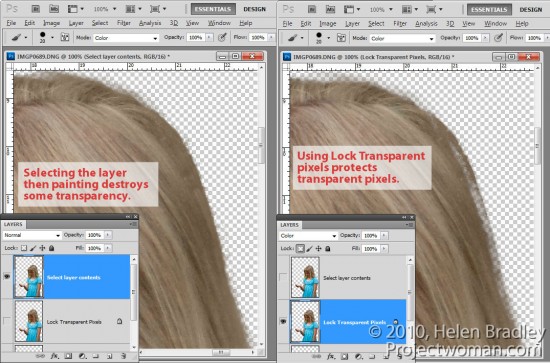
If you select the layer by Control + Clicking on it (Command + Click on the Mac) and sample a color from adjacent pixels you can set the Brush to Color mode and paint over the edges. The problem is that, as you paint, the color is built up on partially transparent pixels which, if you paint too many times, begin to lose their transparency.

If, on the other hand, instead of selecting the layer, you click the Lock Transparent Pixels option and then paint with the brush set to the same Color blend mode and sampling colors from the image as you go, you’ll paint out the problem colors but without affecting transparency.

The same option can be used when you fill a selection with a foreground or background color by pressing Alt + Backspace (Option + Delete on the Mac). If the selection is partially transparent and if you simply Control + Click on the layer to select it, the more you fill it the more transparency is lost. On the other hand, if you select Lock Transparent Pixels you can fill it over and over again and no transparency is lost.

In short, using Lock Transparent Pixels ensures that an object on a layer can never become more or less transparent than it was when first created and that its edges won’t change if you, for example, add a blur to it.

Helen Bradley

Friday, March 4th, 2011

Multiple image printing in Photoshop CS4 & CS5

One real annoyance with Photoshop CS4 and CS5 is that Print Package and Contact Sheet printing is missing. These options appeared in earlier versions of Photoshop but they aren’t installed automatically in Photoshop CS4 & CS5.

You might be excused for thinking this means you can’t print multiple photos per page in Photoshop CS4 & CS5. Nothing could be further from the truth. The secret is to find the missing features on your program disk or, quicker still, download them from the web.
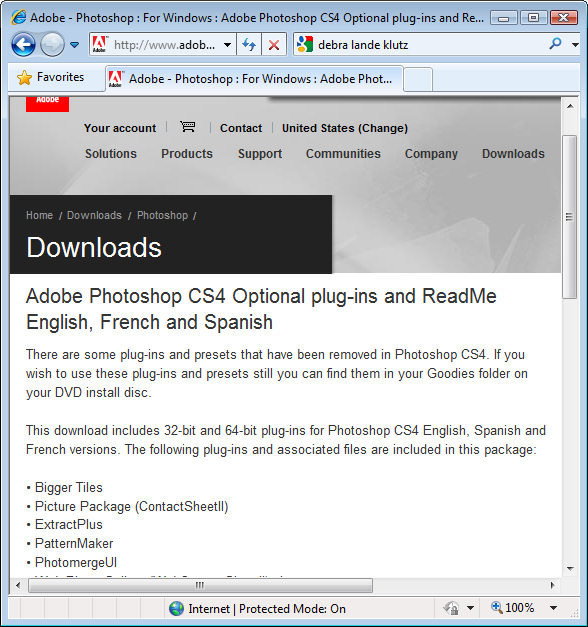
Here are links to the files you need for the Mac and the PC:

Mac version for CS4:

http://www.adobe.com/support/downloads/detail.jsp?ftpID=4047

and for CS5:

http://www.adobe.com/support/downloads/detail.jsp?ftpID=4687

Windows version for CS4:

http://www.adobe.com/support/downloads/detail.jsp?ftpID=4048

and for CS5

http://www.adobe.com/support/downloads/detail.jsp?ftpID=4688

Download and run the files. If you’re on a PC the download zip file contains an executable file you simply run and it places the files you need in a folder on your desktop.
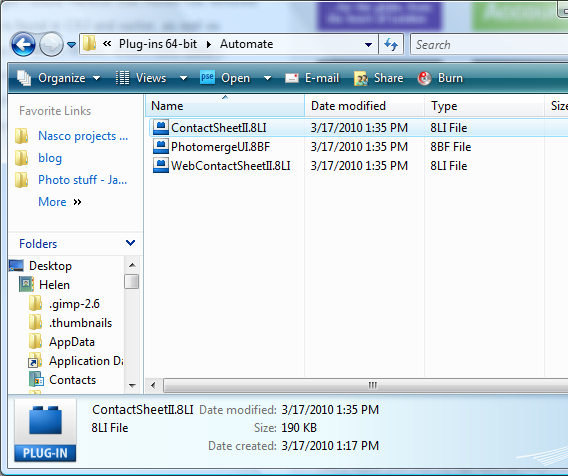
Open the desktop folder, open the appropriate English, French or Spanish folder, choose Goodies > Optional Plug-ins. Then choose the plug-ins appropriate to your version of Windows. In the folder are the Contact Sheet, Web Contact Sheet and PhotoMerge plug-ins. You need the Contact Sheet plug in as it provides both the Picture Package and Contact Sheet features.

Copy the ContactSheetII.8LI file to your C:\Program Files\Adobe\Adobe Photoshop CS5\Plug-ins\Automate folder.
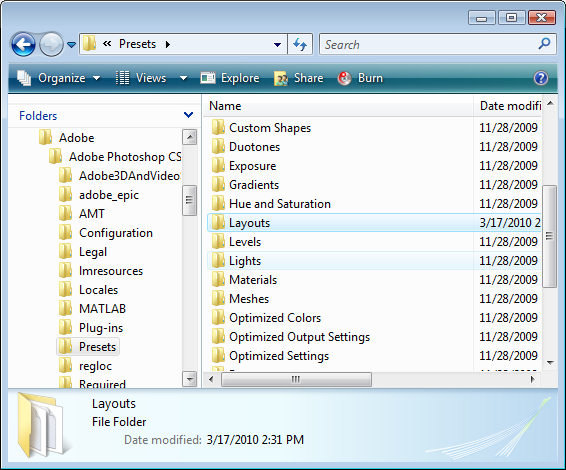

You will also need to copy the Goodies> Presets > Layouts folder and place it in your C:\Program Files\Adobe\Adobe Photoshop CS5\Presets folder – just drag and drop the entire Layouts folder into the Presets folder.
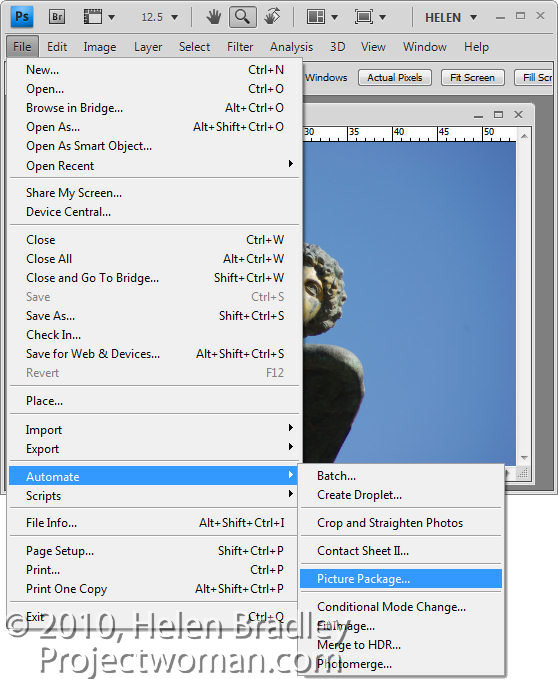

Restart Photoshop, open a file and choose File > Automate > Picture Package.
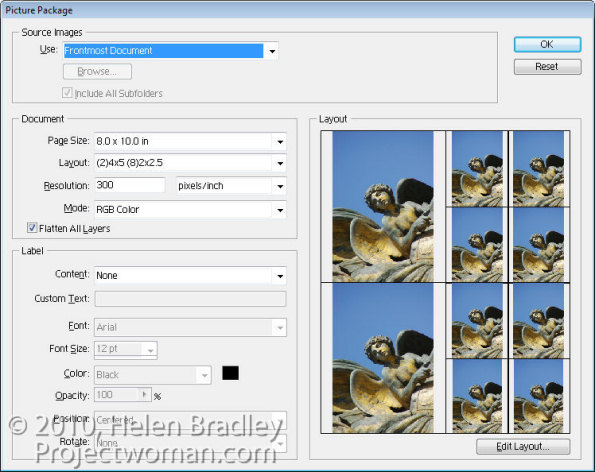
When you launch the Picture Package choose either the Foremost Document, Folder or File from the Use menu as the image(s) to start with.

Select the page size to use and then the layout arrangement. You can, for example, print four 4 x 5 images or a combination of 4 x 5 and 2 x 2.5” – there are plenty of options to choose from.

If you enable the Flatten All Layers checkbox you will end up with all images on a single layer rather than each  image appearing on its own layer.

Set the printing Resolution and add Labels to your images if desired and click Ok.
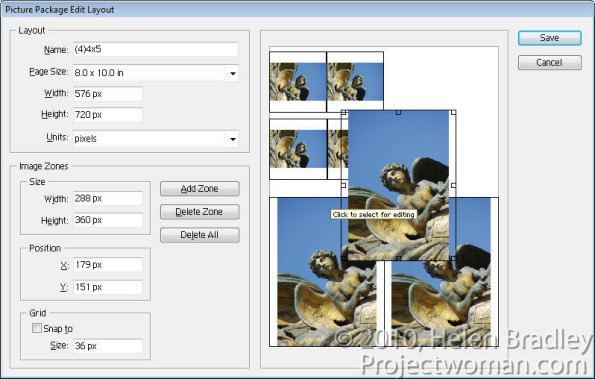
To customize a layout, click Edit Layout and you can click and drag to resize any of the images in the layout.

To add an additional image click Add Zone and then size it.

If the ratio of your selected image’s height and width are different to the ratio of the zone the image is placed in, the image will be scaled to fit one dimension – it will not be cropped – but it will print slightly smaller in the other dimension.
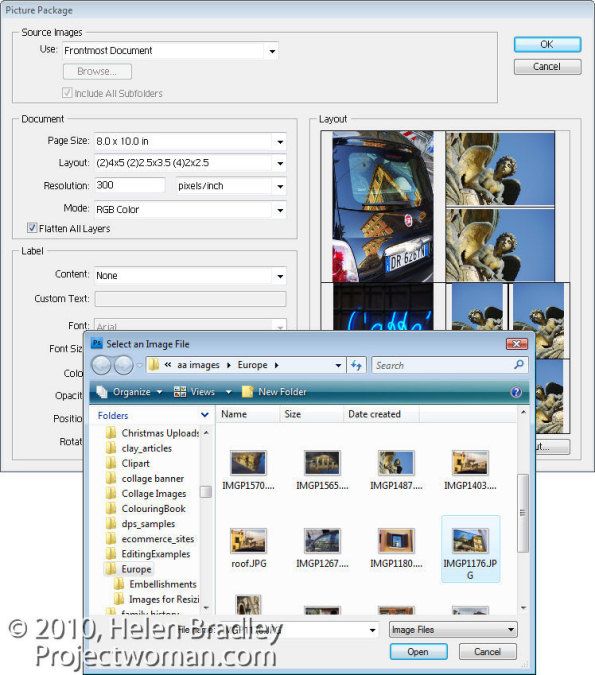
What isn’t at all obvious is how to print multiple images at various sizes in the Picture Package.

To do this, click on an image in the Picture Package and a File dialog will open. Select the image to print at this location in the Picture Package.
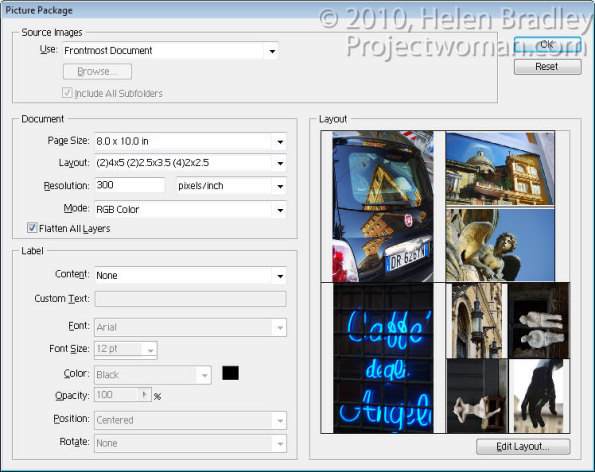
Continue and select different images for every one of the layout boxes if desired.

When you are done, click Ok.
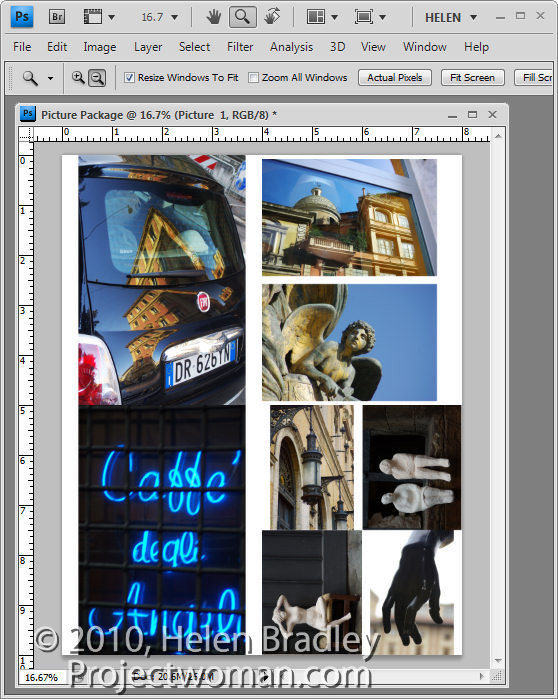
Photoshop creates an image the size that you specified with all the images that you selected sized and positioned in the layout. Depending on whether you had Flatten All Layers enabled or not, each image will be on a separate layer or your image will have one layer full of images.

You can now save or print this image.

Print Package is a feature of Photoshop that really should have been included in a regular install of Photoshop CS4 or CS5. It shouldn’t be as difficult as it is to find and install.

The good news, however, is that once you’ve gone to the trouble of installing it, it will be there every time you need it and also, by adding this feature you’ve also reinstated the Contact Sheet option.

Helen Bradley