Fall in love with silky water photography – it’s so easy when you know how
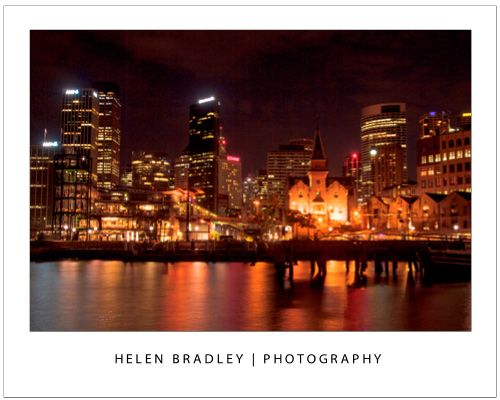
You have probably seen images like the one above that feature impossibly smooth water.
You might have even asked yourself how it was done? Or perhaps you think it is something that can’t be done without expensive equipment and lots of know how.
Well that’s not true. I shot this image with no extra equipment and I’m going to tell you how.
The secret is to shoot really slow. This image took 10 seconds to shoot.
Now I can’t stand still for 2 secs, much less 10 and neither can you so start by finding somewhere to put the camera. I found a place for it at ground level and took a test shot to see it would work, which it did. I backed off the zoom and the composition was pretty good.
So, I had a sturdy place to shoot from. Now, how to easily slow everything down?
You see, slow shooting is what you need for this image. In this night shot the only thing that will be moving a lot is the water. If you can capture the image over a long enough time the movement of the water will blur deliciously and the buildings will remain sharp. That’s the secret to the shot – a long exposure that blurs the water but leaves everything else nicely exposed and sharp.
One option for a long exposure is to use Tv mode on the camera – fancy speak for controlling the speed of the camera. I opted not to do this as I really wanted to use a small aperture and I didn’t want to let the camera choose the aperture size – it would have chosen too large a size resulting in a smaller depth of field – I wanted a deep depth of field so everything would be in focus.
I could have used Manual mode but then I’d have had to make calculations for the shutter speed – too much time and effort to get this right.
So, I selected Av or Aperture Priority mode and set the aperture to f/11. That is a very small aperture so the shot is going to take some time to capture – especially after dark. So far so good. But I wanted it to be slower still and I didn’t want a lot of noise messing up the image.
The next setting was for ISO which is sensitivity. You use small values like 100 in the daylight and 6400 at night. I set it to 100 – totally the wrong setting for shooting at night because it makes for long shutter speeds but remember we want silky water so it works here. Also a small ISO like ISO100 means less noise than higher ISO values. Don’t get me wrong, I love noise in my images but in its place – I didn’t want it for this image.
So ISO100 both slows down the shot and reduces noise.
So, now the camera is set up, it is nearly time to shoot.
The final camera setting is to set it up for continuous shooting. Ideally you need to take a few shots at once so you want to press the shutter down and hold it and have the camera take a few shots in a row without you having to repeatedly press the shutter. The problem with pressing the shutter is that it moves the camera and movement = blur which is so not what you want.
Continuous capture means you sit with your finger on the shutter so you don’t move much except on the first and last shot – that’s why you take a few – the first and the last will probably have movement because of the shutter press and release – the shots in the middle should rock!
Now place the camera in the place you already determined it is secure and steady. Steady yourself – I sat down beside it – press the shutter and hold it.
Wait through at least 3 shots (remember the first and last in the sequence are probably ruined so you need at least 3 and preferably more).
When the sequence is complete, review the shots, correct any issues and try again. I took about 4 series of 4+ images to get a couple that were great.


