Friday, October 16th, 2009

Letting the kids lose with the camera


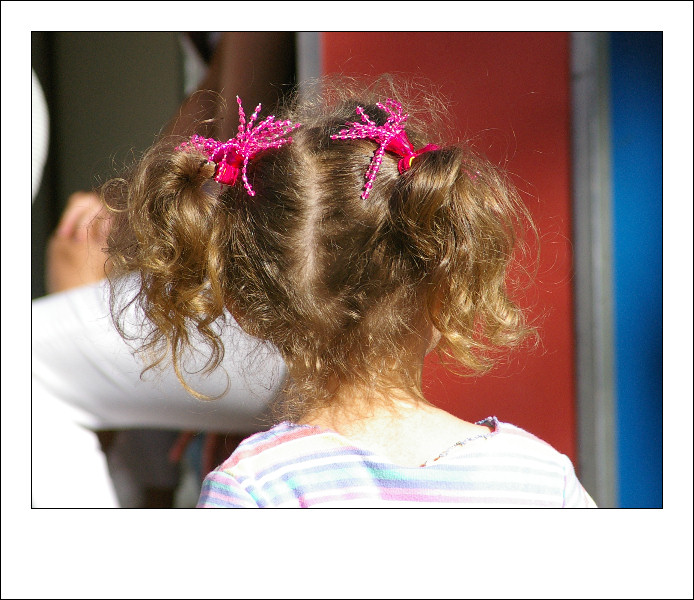
Let loose with a camera at the fair, Brandi was captivated by the little girls and shot some wonderful hair styles and this child being given a ride on Dad’s shoulders.

Kids see the world in a different way to the way we see it. They’re interested in different things and when you put a camera into their hands you end up with images you may not have expected. However, kids and expensive cameras aren’t always a good match so what can you do to protect your investment and, at the same time, encourage artistic exploration?

A few years ago, the camera most of us owned cost less than $100 and was a film camera. Nowadays, most of us have digital cameras that are far more expensive and not something you’ll willingly hand over to a ten year old. However, most kids who are around late primary level at school are well capable of handling a camera and it’s worth taking the time to get them started shooting, particularly as you won’t have to shell out for photo processing – although you might find yourself investing in a second camera!


Brandi captured this colourful photo of her sister who played up for the camera by modelling a feather scarf.

When starting out, I like to spend a little time with a child before I hand over my expensive cameras to them. I cover the basics and the first thing is to insist they use the wrist strap or neck strap all the time – this is my one “not negotiable” rule, and it generally saves the camera from being accidentally dropped.


When he was ten years old, Ben captured this wonderful sunset on holiday with his parents in Hawaii.

I show them how to take a photo, how to preview it and how to zoom the camera. I then stand with them as they take a photo or two of something that doesn’t move like a building or flower. We check the result in the view finder and then talk about how the photo might be taken differently.


Casey had to lie down on the brick path to capture this shot looking up into the flowers and grape vines.

For example, I may encourage them to take the same shot from a different angle or position and to move in closer or further out and see how they like the results. I encourage them to get down low, even to lie on the ground to get an interesting perspective.


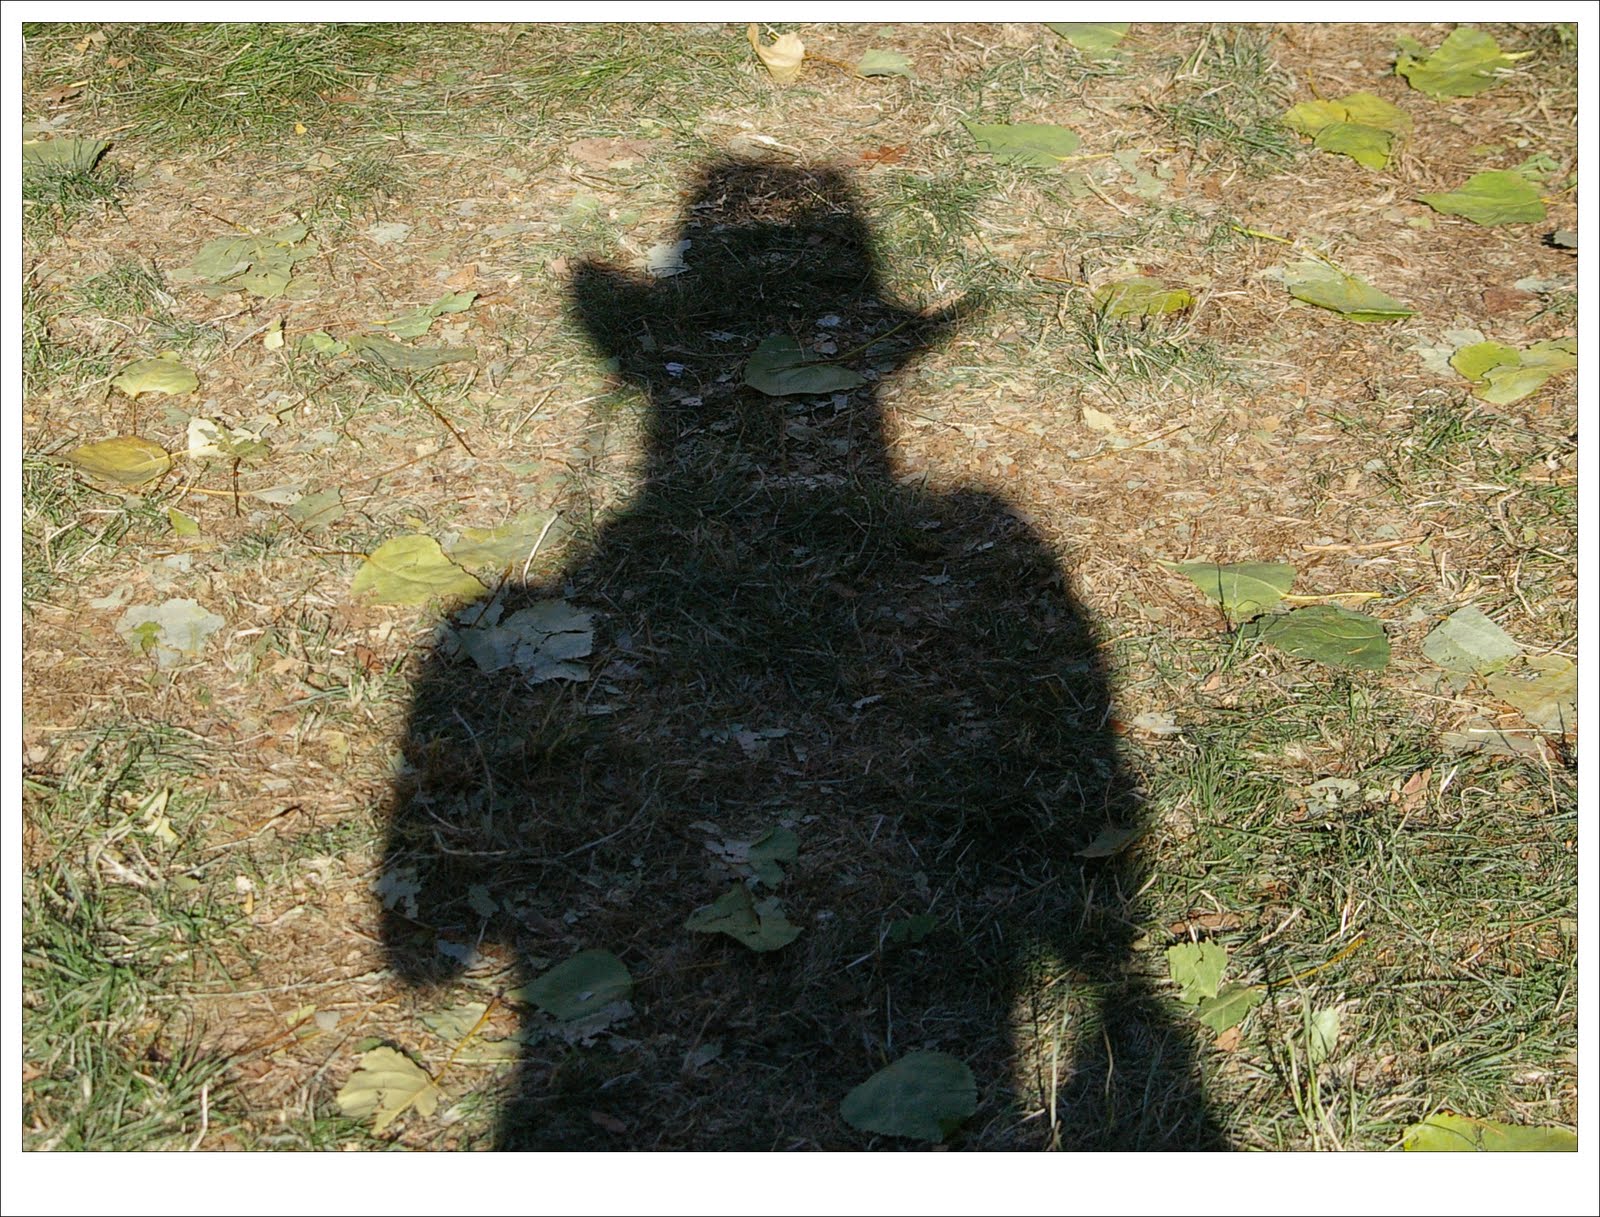
Brandi caught her own shadow in this fun photo.


Buried deep in a large cactus, Casey found this old and pitted leaf which caught her interest.

The message here is that the first shot isn’t always the best and to look at what they’re shooting critically before they put the camera to their eye. It also encourages them to be more mobile when shooting and frees them to sit, squat or lie down to get a more interesting angle without feeling silly for doing so.


I love this portrait that Casey shot of me, posing for her was fun and we had lots of laughs.

Kids learn well when they can see the results of what they’ve done and digital cameras allow them to practice taking multiple shots of the same object and to get immediate feedback.

After they’ve taken a few shots, they’re generally ready to go it alone. Later on, either that day or another day, I’ll show them how to take photos from different angles, such as from underneath a plant, how to pose a friend to take their photo and how to shoot their own reflections.


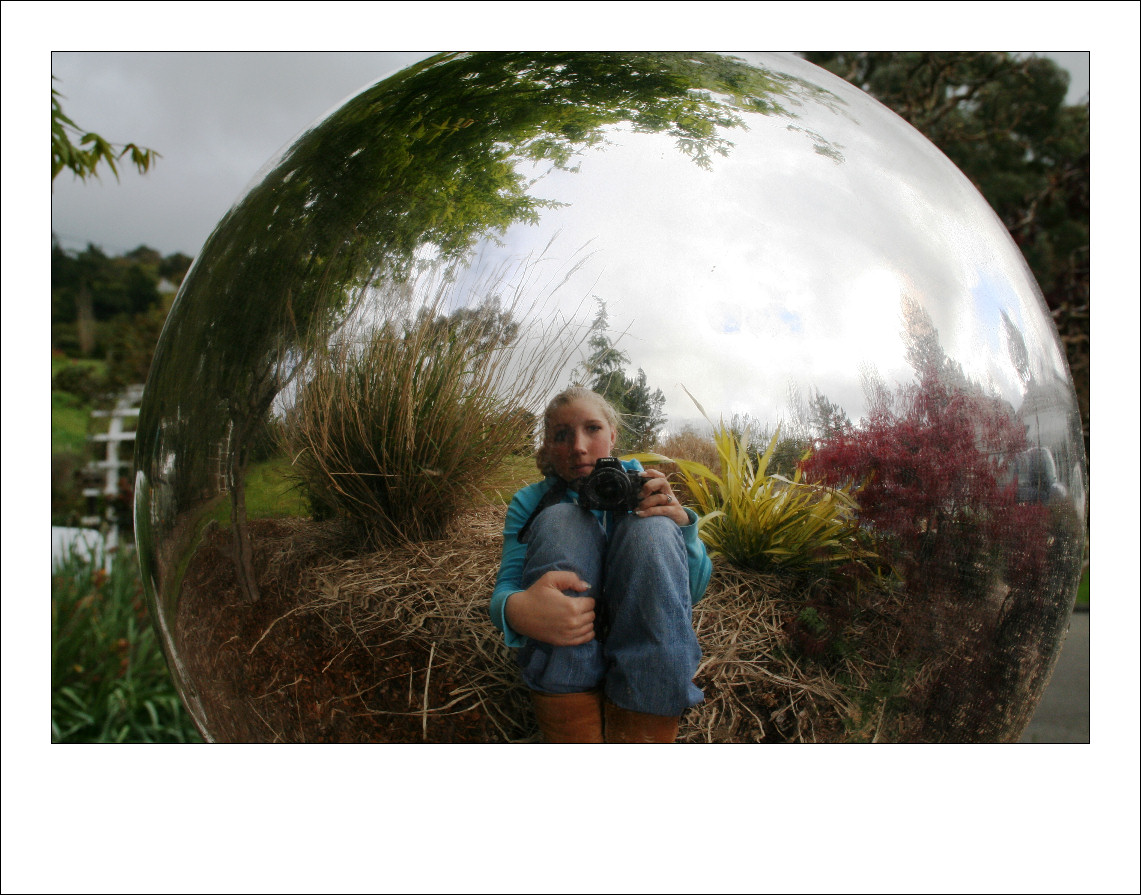
Young Casey found that she could capture her own reflection in a metal sphere for this captivating self portrait.


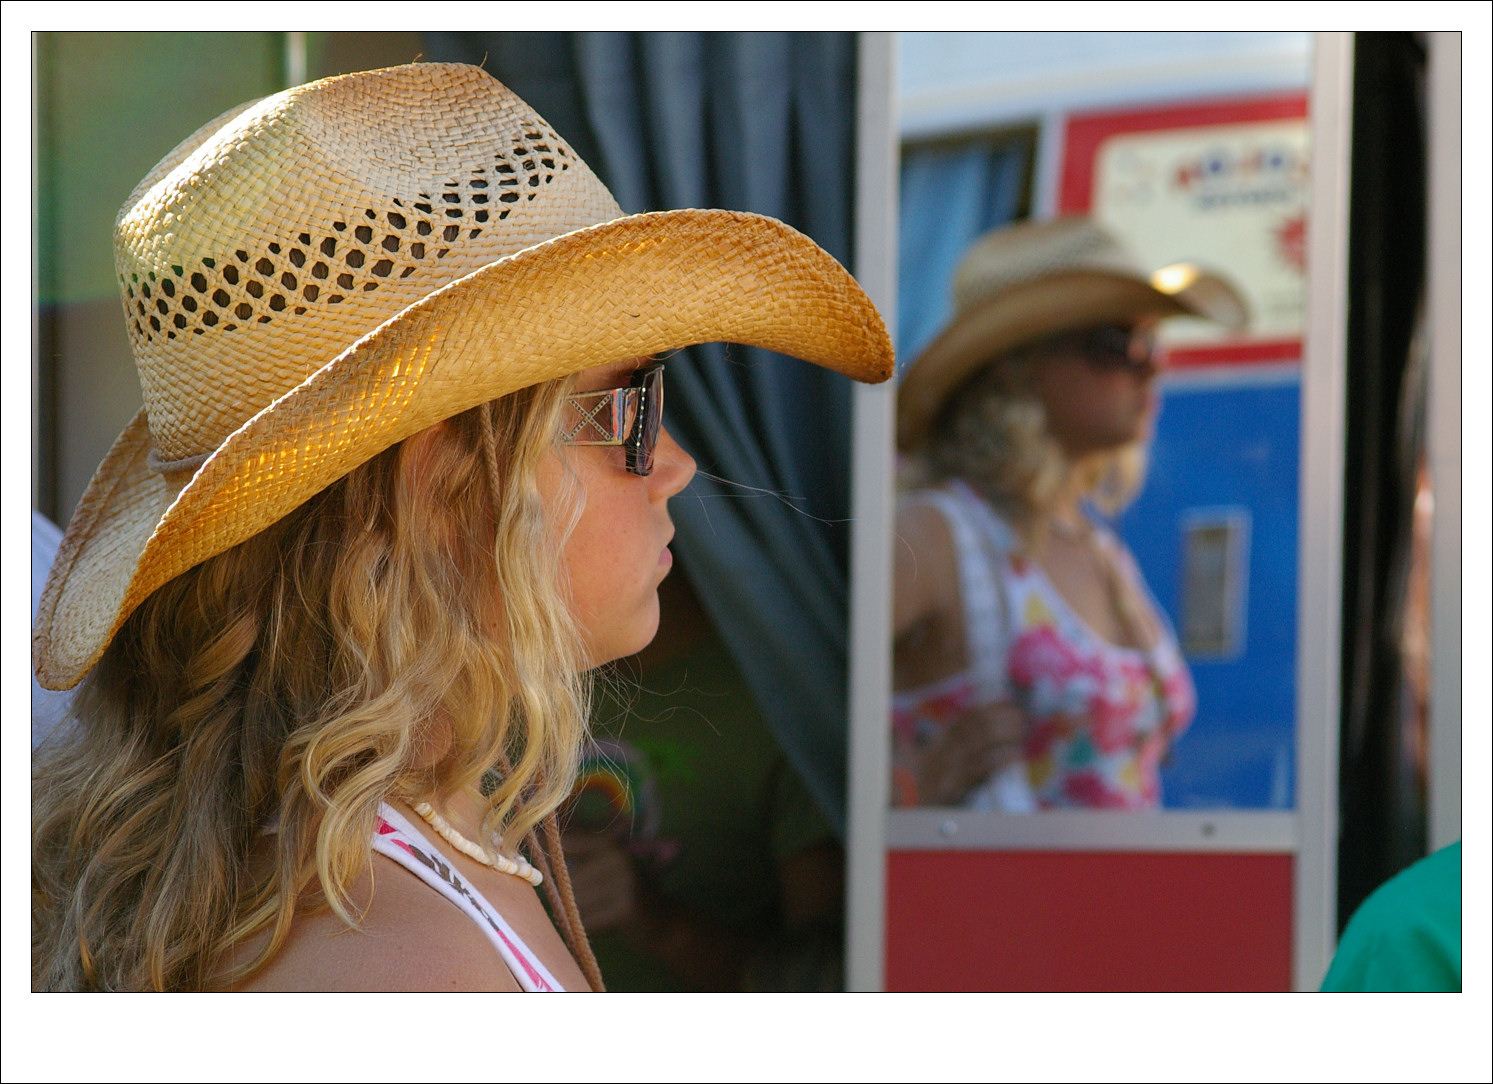
A mirror at a photo booth at the local fair allowed Brandi to capture this candid photo of her sister.

Typically, when teaching kids how to use a camera, I’ll concentrate on making sure they’re comfortable with operating the camera and start them off thinking about what they’re shooting and how to frame a shot. Then I step back and let them capture what their eyes see. That’s about the time they start to surprise me!


The uneven petals on this flower caught Casey’s eye as she wandered the local park.

When you share your camera with a child you’re entering their world. It’s a wonderful opportunity to see the world through their eyes and to see what captures their attention and imagination.

Helen Bradley

Friday, October 16th, 2009

Lightroom – 10 objects you didn’t know could be dragged, clicked or opened

If you’re new to Lightroom, there are a lot of interface options that you may not realize hide must know and handy program features. In this post, I’ll show you some of the buttons, icons, samplers and switches that a knowledge of Photoshop (at least versions prior to CS4) won’t help you identify or locate.


1 Navigator
In the top left corner of the Library and Develop modules you’ll see the Navigator. Beside it are the Fit, Fill, 1:1 and 3:1 options. Click these to resize the image in the current window to various sizes including fitting in the space, filling it and 1:1 and 3:1 resizing options. Other sizing ratios are available from the dropdown list.

The 1:1 ratio is particularly useful when you’re sharpening an image. You may already know that, when you hold the Alt key as you drag on the sharpening sliders the small preview image turns to a grayscale mask showing you the impact of the slider on the image.

If you are in 1:1 preview, the entire image acts as the preview, allowing you to focus in on a much larger area of the image and see the sharpening effect. 3:1 and other larger sizes also work but 1:1 is the minimum size


2 Switches
Switches in Lightroom appear in areas such as the Develop module where they can be used to enable or disable a setting such as the Tone Curve. Switch the switch to the up position to turn it on and to the down position to turn it off.

When using the Adjustments Brush the switch works from left to right to select to work with one fix at a time (Effect Buttons) or to work with multiple adjustments at once (Effect Sliders).


3 Arrows
In the Library > Keyword list panel, you can click the arrow to the right of a keyword to view images that have that keyword associated with them.

These arrows only appear when you are hovering over a keyword in the list.


4 Expand/Collapse Triangles
Throughout the Develop panel, for example, are small triangles beside the various options that you can click on to display or hide that option. For example, when Detail is not visible click its triangle and the detail panel will display.

There is another triangle directly below the Detail triangle which appears only when it is expanded. Click this to display and hide the sharpening preview dialog.

Watch out for these triangles – sometimes they aren’t light gray and are, instead, almost black and difficult to see.


5 Area Picker
Also in the Detail area of the Develop module is a small square icon with lines radiating from it that you can click on and then click on an area of the image to determine what shows in the preview panel for the sharpening process. This icon has a visible tooltip which helps identify what it does – most do not.


6 Eyedropper
In the Develop panel’s Basic module is a white balance selector icon. Click it and click on an area of the image which should be white.

This adjusts the white balance of the image based on that selection. It also displays a small 25 x 25 pixel grid showing the pixels in the general area so that you can be more accurate in your selection.


7 Adjustment Markers
When you use the Adjustment Brush or the Graduated Filter, you will see a marker on the image which, when you click on it turns into a black circle surrounded by a lighter circle.

This marks the adjustment or the filter and you need to click this to select it before you can make alterations to the adjustment or to the filter.


8 Invisible clickable rotation options
In the Print module, watch out for items that don’t even look like they are selectable.

For example, in the Overlays > Identity Plate area when you have the identity plate enabled there is a small indicator to the right of it showing the current rotation in degrees.

If you click it you will see a popup menu offering other rotation options.


9 Way big buttons
Watch out for panels at the top of dialogs which can contain selectable options. For example, a dialog that has a large area like that shown in this image is often selectable offering different options but because it doesn’t look like a typical selectable option, it’s easy to overlook.


10 Direct Adjustment tool
In some areas such as the Tone Curve and Hue/Saturation Lightness in the Develop module you’ll see a small adjustment indicator in the top left of the panel area.

Click it and then drag on the image to change the image at that point.

While in Photoshop CS3 you would drag left to right to alter the sliders, in Lightroom you’ll typically drag up and down with this tool.

While these aren’t all the unusual buttons that you’ll find in Lightroom, it should help you understand that a lot of the features in Lightroom are hidden behind icons and buttons for which even a program like Photoshop is no adequate preparation for locating, understanding and using.

Helen Bradley

Thursday, October 15th, 2009

Outlook 2007- set custom reminder sounds

When an Outlook appointment falls due, by default, Outlook is set up to do something to tell you about it. Exactly what it does depends on how it is setup.

To change the default settings for all new appointments choose Tools > Options > Preferences tab and, in the Calendar area, enable the Default reminder checkbox and set up the amount of time before an appointment that you will receive a warning about it. 15 minutes is the default but, if you prefer it to be 30, for example, then set it to this.
Choose the Other tab > Advanced Options > Reminder Options to set other options such as whether the reminder is displayed by default and whether a sound will be played and, if so, the WAV file that sounds.

Remember too, that you can use the Windows Sound Recorder to record your own custom sound to use.

Helen Bradley

Tuesday, October 13th, 2009

Highlight Color effect in Lightroom


One effect many people like to use with their photos is to remove all the color from the image and leave it in only one place in the image. For example, in a wedding shot you might turn the entire image into black and white leaving just the bride’s bouquet in color.

Here’s how to achieve this effect in Lightroom using the Adjustment Brush.


Start with the image selected in Lightroom and switch to the Develop module.

Click on the Adjustment Brush and make sure you have it set to Show Effect Sliders so that you can adjust multiple sliders at once. Drag the Saturation to -100.


Click the letter O so that you can see as you paint and with a large size hard paintbrush click on the image in an area you want converted to black and white and then paint over the image in all places that it should be turned to black and white.

It will be quicker if you set the feather to a low value, the brush to a large size and disable the Auto Mask option for now.


To work close around the edges of the area that you want to leave in color, set the brush size smaller and work slowly around the edges.

If you go too far, press the Alt key (Option on the Mac) and paint out the overlay color. The Eraser uses a different brush so make sure it too is set to have Auto Mask disabled and a low Feather value.

To zoom in click Z and to move the image, press the Spacebar as you drag on it.


Once you have the area selected that you want to convert to black and white, disable the overlay color by pressing the O key.

This leaves the selected area in black and white and the unselected area in color.

You can now tidy up the edges if necessary by using the Adjustment Brush tool – just make sure that you click on the marker for the Adjustment before you start painting – it should show a black center – if not, you’re making a new adjustment and not editing the existing one.


You can adjust the other sliders, if desired, to improve the black and white portion of the image. For example you can boost the Contrast and Clarity if desired. When you’re done, click the Close option at the foot of the panel to finish.

In this example I added another adjustment using the Adjustment Brush over the top of this one to reduce the exposure and brightness in the sky to add back some of the cloud detail lost in the conversion of the image to black and white.

Helen Bradley

Tuesday, October 13th, 2009

Find a new perspective


While balloons are typically shot from the side, this underneath shot ensures the entire photo is full of rich colour

Most of us learn to take photos from right in front on to our subject. It makes good sense, you want to capture someone’s face or the Eiffel Tower so you stand in front of it, line it up in your viewfinder and, take your shot. The problem is that after a while all your photos begin to take on the same look. When you’re ready to give your photos a shot in the arm, try a different perspective.

Often you can capture a more interesting photograph when you choose a different angle to shoot from. It’s not difficult to do this, move a little to one side or stand higher or lower than your subject and you can turn a ho hum photograph into one which really sings.


The girls were asked to look up as I captured this photo from a vantage point just above them.

So, next time you’re taking a photo of the kids, why not stand on a chair or a fence or find a vantage point higher than they are and shoot downwards towards them? Or get the kids to sit on the ground while you take the photograph from above. If the difference isn’t great enough, get them to lie on the ground while you shoot from above.

You can shoot upwards too. When you’re shooting upwards, put the child on a table (if they are old enough for this to be safe) while you crouch on the ground and shoot upwards at them. You can do this for adults too – lie down on the grass or crouch very low and shoot facing upwards. As you shoot from high or from a low position, you may find some shots aren’t as flattering as they might be. For example, heavier people don’t look so good photographed from below but look good when photographed from a higher position – with a little practice and experimentation you’ll work out what you like and don’t like.


As her mom held young Katyann high above her head for a kiss, I captured this wonderful shot of mother and child.

These same tricks work when shooting buildings and nature. When you’re in a forest, photographing trees try the classic technique used by nature photographers around the world and shoot upwards into the tree canopy. To do this, walk into the trees, get down low, hold the camera towards the sky and take your photograph. The further away the tree canopy is, the better the effect will be as the tops of the trees will bend in close to each other all around the photograph. You can achieve the same result in the middle of a large city and you can do it with a circle of friends – place the camera in the middle and capture the shot.


This high elevation gives a very different perspective on this river and an old broken bridge.


Shooting blind from under this flower, the combination of blue and orange is spectacular.

Some flowers that are semitransparent in the sunlight can be shot from underneath giving not only a different view of the flower head but also capturing a wonderful swag of deep blue sky. When you’re shooting upwards into the sky invest in a polarizing lens for your camera – this filters out a lot of the glare on a bright sunny day and gives the sky a bluer colour. Without a polarizing lens you may find the skies are blown out and an unattractive washed out light colour.


These winter flowers growing between old vines was captured from ground level to create the look of a forest.

If your camera has a swing out LCD screen, you’ll be in luck when shooting from under an object as you’ll be able to see what you’re about to capture. If not, just work on a trial and error basis, take a shot, check it and then resituate the camera and try again.

If your camera has interchangeable lenses, when shooting from underneath an object looking upwards towards the sky, use a wide angle lens for best results. If you’re using a point and shoot camera, back off the zoom so you get lots of foreground interest in the photo as well.

When you are next out taking photos, instead of taking a photo face onto your subject, look around and see if you can find a different and more interesting angle. You’ll find that, with practice, you approach your photo taking in a new way and you’ll see the world in a more interesting light.

Helen Bradley

Sunday, October 11th, 2009

10 Photoshop interface features you didn’t know existed

Here it is, short and sweet. 10 techniques for working in Photoshop that you may not know existed:


1 Open a file without using the menus
Simple. Double click the grey background area of the Photoshop window and the File Open dialog appears – magic!


2 If grey is dull, black is wonderful and any color is better!
To change the grey inside an image window from grey to black (or a color of your choice), Control + Right Click (Command + Right Click on the Mac) on the area surrounding the image and select a color.


3 Sample foreground and background colors
Instead of clicking on the foreground or background swatch to change the color to one sampled from the image, click the Eyedropper tool and click to sample a foreground color – hold Alt (Option on the Mac) to sample a new background color.


4 Position a shape or selection
When you’re drawing a shape or selection and the shape is fine but the position is wrong, keep hold of the mouse button and hold the spacebar as you move the shape or selection into the desired position. Let go the spacebar and continue to make your shape.


5 Get a selection back
If you’ve lost your selection, press Ctrl + Shift + D (Command + Shift + D on the Mac) to get it back. Ctrl + D (Command + D on the Mac) deselects the selection.


6 Hide and keep
If the selection marquee is getting in your way, Ctrl + H (Command + H on the Mac) will hide the selection but still leave it in place. Don’t forget to turn it back on or you might wonder why things aren’t working the way you expect them to work.


7 See what you’re working on
This is my all time biggest time saver! When you drag a large layer from one document to another you can view the entire layer and its sizing handles by Ctrl + Click (Command + Click on the Mac) on the layer thumbnail to select it. Then press Ctrl + T (Command + T on the Mac) to view the transform handles and Ctrl + 0 (zero) (or Command + 0 on the Mac) to shrink the image so the sizing handles are all visible.

8 Stack or line up palettes
To stack palettes side by side in the same dialog, drag one palette over the others until a blue line appears around it and let go. To stack palettes one on top of the other down the screen, drag and drop one palette onto the bar just above another palette’s name.


9 No dialog Reset button? Yes there is!
You can reset most Photoshop dialogs to their original settings or at least some version of the original settings by holding the Alt key (Option on the Mac) when inside the dialog – when you do this, the Cancel button turns into a Reset button.


10 May all your ellipses turn into circles
To draw a circle using the Elliptical marquee or a circle shape, hold the Shift key once you’ve started drawing and the ellipse will become a circle. To draw from the center out, hold the Alt key (Option on the Mac) as you start drawing an ellipse, then add the Shift key to make it a circle – keep holding both keys until you let go the right mouse button.

Helen Bradley

Saturday, October 10th, 2009

Word 2007 DIY Quick Parts

Quick Parts in Word 2007 is the new replacement for AutoCorrect and AutoText from earlier versions of Word.

To add your own text to the Quick Parts gallery, type the paragraph or open a document which contains it and select it.

Click the Quick Parts button and choose Save Selection to Quick Part Gallery and, when the Create New Building Block dialog appears, type a name for the Building Block.

This will be the name you’ll use to identify it in the list so make it self-explanatory of what the Quick Part contains.

Select the Gallery to add it to, in most cases this will be the Quick Parts Gallery.

Select a Category from the list or click the Create New Category option to create your own subcategory of the Quick Parts Gallery. By creating sub categories you can organize your Quick Part entries so that they are easier to find.

Type a description of the Quick Part, if one is needed to identify it, and, from the Save In list, choose buildingblocks.dotx which is the default setting.

From the options dropdown list you can select to Insert Content Only, or insert the content in its own paragraph or its own page depending on how the content should be used. Click Ok when you are done.

In future you can insert the Quick Part into a document by clicking the Quick Part button and then select it from the dropdown list.

If it does not appear in the list, click the Building Blocks Organizer and select the Building Block by name.

You can locate building blocks in the organizer by sorting on the Gallery column and locate the Quick Part area which is where your building blocks will appear. Click the one to insert and click Insert.

Helen Bradley

Friday, October 9th, 2009

How to select and compose a Triptych in Lightroom


In a recent article, I explained how to create a triptych in Lightroom. The solution covered the mechanics of setting up a triptych template in Lightroom.

In this post, I’m going to address the issue of selecting images to use in the triptych. I’ll explain some rules of composition and show how I make a selection of suitable triptych photos.

There are some basic rules of design that will help you layout a triptych and I like best the four rules Robin Williams explained in her wonderful book: The Non-Designer’s Design Book. In it she describes the rules of Alignment, Proximity, Repetition and Contrast and these form the basics of any good design and can be applied to our triptych.

In our template design we already have alignment covered – the photos are positioned so the top and bottom of each image is on the same horizontal line and the spacing between all the images is equal.


We’ve also got proximity covered – the photos are positioned close together rather than scattered in different places on the printed page. The template itself is providing us with some strong design elements and that is, in part, why a triptych looks so good.

As a rule, our eyes like odd numbers of elements so a single image or a triptych often look better than a diptych – two simply is not so pleasing a number of elements to look at.

When selecting images for a triptych, you want three images that relate to each other in some way such as location, people, genre and so on.


I like to start by selecting a five or six images which I think will work well together and then try them out. I assemble a collection of these images (make a collection, not a smart collection) so that I can work with them in the print module and not have other images in my way.

Select three of the images to use to start with. The order that the images appear in the photo strip is the order that they appear in the triptych. If the order isn’t right, drag the images into a different position in the photo strip and the images will be rearranged in the triptych too.

One way to create a safe design is to ensure that the horizons in the images (or each subject’s eyes) are roughly level across the triptych and, when combining different images, look for images all shot at about the same zoom. This doesn’t mean you can’t mix image sizes, it just means that its sometimes easier to get them to look good if they are the same size.


If you have elements that have a strong sense of direction such as the carousel animals in this triptych, place the animals so they face inwards rather than outwards from the design.

If they point outwards the viewer’s eye will follow them straight off the page. If you direct them into the triptych your viewer’s eye will stay there longer.


While this sequence of birds look alright the directions in which they are facing and the fact that the three images are so similar is actually a little distracting.


In this version, I moved the images around and replaced one with an image of two birds which adds some variety to the mix. The result looks better to my eye.


This triptych combining two streetscape images and a door, while all from a similar location, look unbalanced to me. The door doesn’t co-ordinate well with the street images and it is facing out of the image. In addition the door is a little too colorful for the other two images and it doesn’t enhance them. I like the arrangement better when a different image is used and one which is more in keeping with the others like this image:


Developing an eye for what looks balanced and what doesn’t will take time. I highly recommend Robyn Williams’ book as a starting point for understanding basic design and this video may help to understand some of the principles at play: http://www.microsoft.com/video/en/us/details/e1882b7a-5e66-45cd-b5b4-28301c0a747e

If you found this useful, here is the original post on how to create a triptych in Lightroom.

Helen Bradley

Thursday, October 8th, 2009

Fixing Animal Eyes in Lightroom 2


Often when I look at the photographs that I’ve taken at the zoo, for example, the animals’ eyes are underexposed and lifeless.

To fix animals’ eyes in Lightroom so that they look compelling and still realistic, here is my fixing “animals eyes” workflow:


Step 1
Display the image in the develop module in Lightroom. Zoom in using the zoom tools so that you can see the area that you’re working in very clearly.

Click the Adjustment Brush in the top of the Develop module panel and size the brush so that it is the right size to work on the animal’s eye. Click once on the eye and then paint over the area that you want to affect. If you can’t see your paint and want to see it, press the O button to enabled and disable the ruby overlay.


Step 2
Once you’ve painted over the eye, adjust the Exposure and Brightness upwards until you have a highly unrealistic and over fixed solution.

Adjust the Contrast so that you build some contrast back into that area of the eye – this actually darkens some of the areas you have just lightened.

Adjust the Saturation and Sharpness if required.


Step 3
If the effect is too strong around the edges of the eye, click Erase, set the Feather to a high value and paint around the edges of the selection to erase the effect.


Step 4
In this image, I tacked both eyes separately and I did both in two steps. The first fix solved the overall eye problem including the surrounds and then I repeated the process this time focusing only on the pupils to ensure that there was good contrast where the pupil would be expected to have caught the light.


Here you can see the result when steps 1-3 were performed in Lightroom on the lion’s eyes.

Helen Bradley

Tuesday, October 6th, 2009

Outlook Natural language Date Entry

With so many programs requiring you to do things their way, it’s refreshing when you find a program that talks your language. Enter Outlook.

When you are setting up meeting dates in Outlook 2007 and earlier, you can use what is called “natural language” to specify the date.

For example type ‘Friday week’, ‘this Saturday’, ‘Christmas Day’ or even ‘second Monday in December’ and Outlook understands what you mean and sets the appointment date to suit your needs.

This saves you having to know the numerical date or clicking open the calendar especially if you have meetings that are scheduled by the week day rather than by date.

Helen Bradley

Page 2 of 3123