One of the most confusing things for new Lightroom users is understanding how documents get round tripped from Lightroom to Photoshop and back.
Step 1
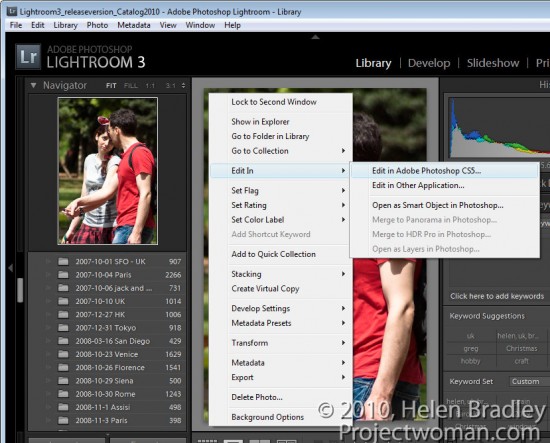
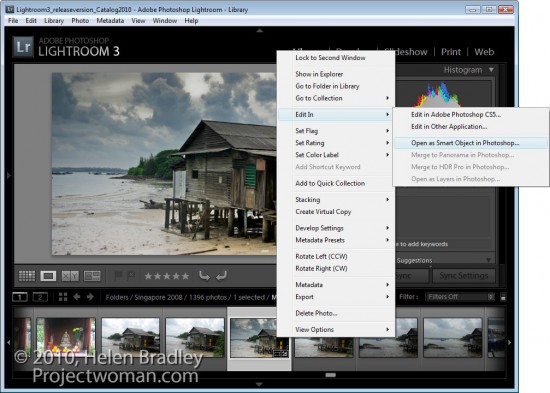
To start, open Lightroom with the image displayed in the Develop, Library, Slideshow or Web modules. Right click the image and choose Edit In > Adobe Photoshop.
If you chose a raw file then the image is sent direct to Photoshop.
Step 2
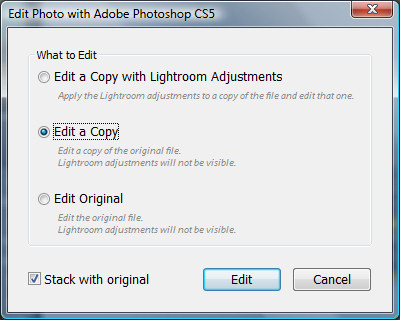
If you chose a jpg or tiff file, then other options are available. You can choose Edit a Copy, Edit Original or to Edit a Copy with Lightroom Adjustments. If you want to take the changes that you’ve made to the image in Lightroom with you to Photoshop, then use the Edit a Copy with Lightroom Adjustments option.
This is exactly what happens if you are working with a raw image – you don’t see the dialog – and the image is sent direct to Photoshop with the Lightroom adjustments in place.
Edit Original ignores any changes that you have made in Lightroom and sends the unedited original image to Photoshop.
Edit a Copy sends the image direct to Photoshop ignoring any changes you’ve made to the image in Lightroom but at the same time it creates a copy of the image so you won’t be editing your original.
Step 3
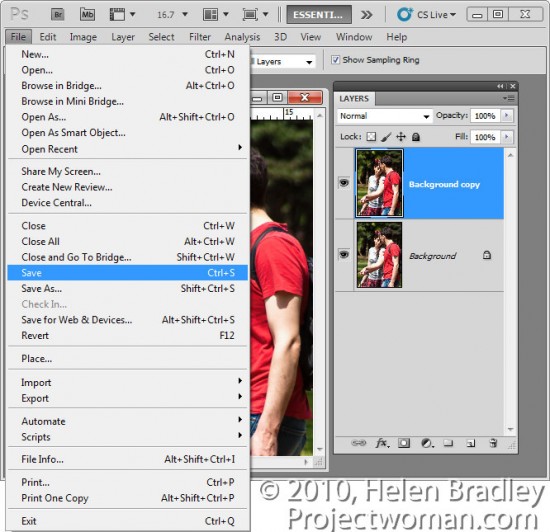
When you’ve finished editing the image in Photoshop, click File > Save to save the image.
The one thing you should avoid when saving a photo that you have taken from Lightroom to Photoshop is to rename it when you save it. If you rename an image by choosing File > Save As then the link between the image in Lightroom and Photoshop won’t be retained and the edited saved version won’t appear in Lightroom catalog. To get the image back into Lightroom you have to find it and then import it into the catalog. This is typically the step where new Lightroom users fall foul of the process and get understandably frustrated.
Step 4
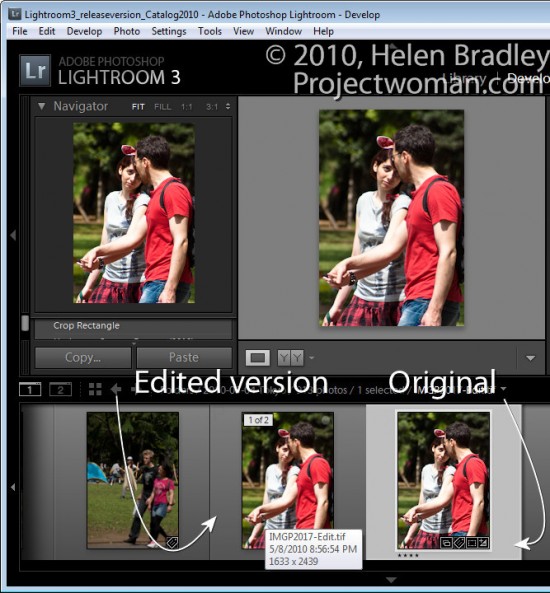
When you return to Lightroom, if you were editing a raw file or if you chose to Edit a Copy, you will find your original file and the edited version in place in the Lightroom catalog. The edited version of the file is stored in the same folder as the original.
The edited version has the same file name as the original but with -edit added to it. In the case of a raw file, the edited version will be saved by default as a tiff file.
If you chose Edit Original then only the original file with its edits will appear in Lightroom.
Step 5
If you wish to do so, you can send also send an image to Photoshop as a Smart Object by right clicking it in Lightroom, choose Edit In > Open as Smart Object in Photoshop.
This opens the document in Photoshop with the image on a layer converted automatically to a Smart Object. You can do this for tiff, raw and jpg images.
When you save the file it is saved as a tiff with –edit added to the filename – the tiff file format supports Photoshop Smart Objects so the Smart Object will be there when you edit the file again.
Step 6
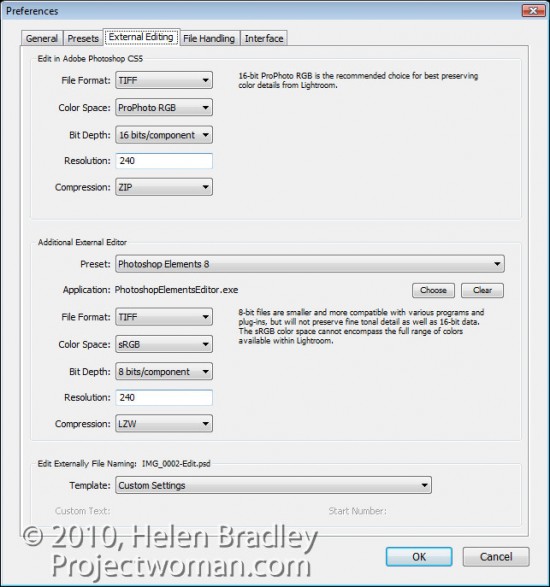
You can determine how Lightroom sends files to Photoshop by choosing Edit > Preferences and click the External Editing tab. Here you can select the file format to be used, the color space that will be applied to the image, the bit depth, resolution and any compression available for the chosen file format.
From the foot of the dialog you can also configure the file naming convention used for files sent from Lightroom to Photoshop. By default, it will be the original file name with –Edit attached to it, although you can change this if desired.
Here too you can add other programs to the shortcut menu so you can take your images from Lightroom direct to programs such as Photoshop Elements or your favorite editor.


Post a Comment
Please feel free to add your comment here. Thank you!