Wednesday, December 5th, 2007

Images in Word tables

It is possible to place an image inside a table cell in Word. To do this, first create a table, click inside the cell and then choose Insert Picture > From File and select the image to insert. You can size the image inside the table cell as requiredby dragging on its sizing handles.

If you set the image’s Text Wrapping to Behind Text or In Front of Text the image will no longer be constrained to the table and will jump out of it and operate independently of it. To wrap text around the image inside the table cell use the Square or Tight options for best results. In Line With Text only wraps one line and it’s pretty awful.

Helen Bradley

Thursday, November 29th, 2007

Help!? WTF?

First up today, a pet peeve of mine. Why do folks head up emails with Help! or Information wanted? It’s so damn inconventient to have to open an email just to know you can’t help. Is it so difficult to say, Chart formatting issue or Contact details for XYZ needed? Obviously it is for some people. Sheesh!

Ok, rant over.

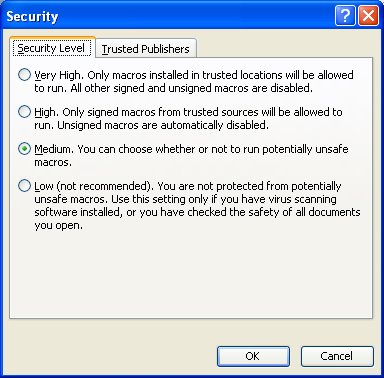
Problem: What do you do if a macro won’t run. You’ve opened a file with a macro in it and you go to run it and nothing happens? Problem is, most likely, that your copy of Word is configured so you can’t run macros. It’s a security thing but it’s no good if you need to run the macro is it?

Solution: Choose Tools > Options > Security, Macro Security and select an option that will let you run macros – go for the most secure option which still lets you do your work. Close and reopen the document and try again. Interestingly enough you might encounter this problem as you’re developing your macros. Word lets you create macros by may not let you actually run them.

Helen Bradley

Tuesday, October 30th, 2007

Making Columns in Word

There are lots of ways to create text in columns in Word but the easiest is to type the text (or at least some of it) and select it or position the cursor where the columns should begin. Then choose Format, Columns and select the number and spacing of columns.

From the Apply To dropdown list choose what to apply the columns to. If you have text selected, you’ll typically select Selected text. If you haven’t selected text you can apply them to the Whole Document or This Point Forward. Using This Point Forward lets you create a heading on the page with the text in columns under it.

Helen Bradley

Sunday, October 21st, 2007

Image Autoentry – Word 2003

If there is an image that you typically use in a document such as your company logo you can create it so that it can be automatically inserted into your documents.

To start, first place the image into the document and size it and format it to suit your needs – this will include setting its Text Wrapping properties.

Now select the image and choose Insert > AutoText > New and type a descriptive word to describe the image such as logo. Click Ok.

In future, type the word logo and press F3 and the image will automatically appear in the document. This saves you from having to insert it and format it manually each time you need it. It’s a big time saver.

Helen Bradley

Tuesday, October 9th, 2007

Quickie calculations in Word 2003

Older versions of Word included a Calculate option on the Tools menu which let you make quick calculations.

If you’re using Word 2003 you can add the tool back by right clicking any toolbar and choose Customize. Select the Commands tab and, from the Categories list choose All Commands and scroll the Commands list to locate ToolsCalculate. Drag this onto the Tools menu and hold your mouse there until the menu opens and then drop the option into place. If desired, right click the new entry and remove the word Tools from its name so it simply reads Calculate.

Now test your new menu item by typing some values eg 24, 25 & 26 and select them. Choose Tools, Calculate and the status bar will display “The result of the calculation is 75”. If you later click Control + V you can paste the result of the calculation (75) into your document.

To sum a column of numbers, hold Alt as you drag over the column with your mouse then choose Tools, Calculate. It also works inside tables and you can type a more detailed calculations such as 25*25 and it will calculate the result for you (answer: 625)

So, put away the calculator and let Word to the work for you.

Helen Bradley

Friday, October 5th, 2007

Toolbar buttons..

Last post I showed you how you can compress the font in a document to give it a classier look. Today, now that you have the font compression value sorted out, I’ll show you how to make a toolbar button for it so you can apply it with a single click.

Right click any toolbar in Word 2003 or earlier and choose Customize then select the Commands tab and, from the Categories list choose All Commands. Scroll to locate the Condensed: item and click it. At the foot of the dialog a box appears from which you can select a point size to adjust to, for example, if you use 0.3 pt the type that. Now drag the Condensed option onto the toolbar and close the Customize dialog.

In future to condense your type, select it and click your toolbar button.

Helen Bradley

Wednesday, October 3rd, 2007

Smaller and better looking fonts

When you’re writing newsletters, company reports and other documents in Word you may find that they look more professional if you condense your font slightly. Even a reduction as small as .3 points changes the look of the font significantly and makes it look, well just a little more classy.

To do this, select the text to alter and choose Format, Font, Character Spacing tab and set the Spacing to Condensed and the By value to, say, .3 points.

If it’s too tight, loosen it up a bit, if not, try a little more compression until you get something you like.

Helen Bradley

Wednesday, September 19th, 2007

Formatting table cells in Word

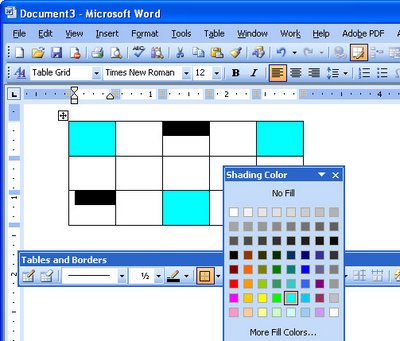
Since Microsoft Word 2002, it has been possible to format a series of cells in a table all at the one time, even if they are not contiguous (a lovely word that means not side-by-side).

To do this, select the first cell then Control + click on the other cells that you want to share the same formatting. Once all the cells are selected you can apply a formatting such as a shading to those cells. Note, that the Shading button on the Tables and Borders toolbar in Word 2002/2003 is the one to use, the one on the Drawing toolbar is the Fill button – it looks the same but doesn’t work the same!

Selecting and formatting non contiguous cells all at ones makes it a quicker process to format a table than it would be if you selected and formatted each cell individually.

However, of course, the F4 key still works in cells in a table so you can, for example, fill a cell with a shading color or a format option and then click in another cell and press the F4 key and have that format applied to this cell too. The F4 key is a repeat key which repeats the previous command and it’s a great key to learn to use anytime you’re working with Word.

Helen Bradley

Wednesday, September 12th, 2007

Watch your language!

I write for magazines and online providers all across the world. One day, I’m typing a Canadian article, another an Australian one and later in the week my work gets sent off to the UK and the USA. I’m constantly juggling color/colour, labor/labour and tricky ones like jewelry/jewellery. It’s confusing to say the least and the last thing I want to do is to miss obvious misspellings. That’s why I rely on Word’s language tools.

Prior to Word 2007 I can set the language for a document by selecting it and choose Tools, Language, Set Language and choose the proofing language.

In Word 2007, of course, everything is different but it’s easy to find – thank you Microsoft!

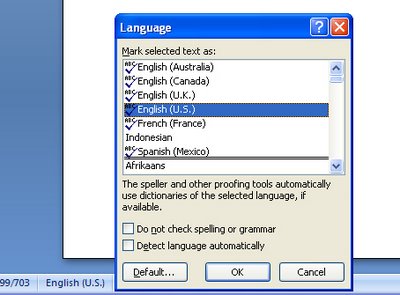
In Word 2007, select your document (Control + A works just fine) and click the language indicator on the Status bar – the Language dialog appears and you can choose the language to use to proof the text.

Helen Bradley

Thursday, August 2nd, 2007

Print in Reverse – Word

Are you one of those people who print long documents in Word and then spend a few mintues reversing the page order because they come out printed back to front? Or do you print multiple copies of a document and then have to collate them by hand?

If you are, it’s probably cause you haven’t read this blog post! You see, life doesn’t have to be this difficult. Word will collate for you and it will print in the order you want and if it’s not doing it right you can change it.

First things first, if you need to reverse your print order, choose Tools, Options, Print and change the setting in the Reverse Print Order checkbox – if it is checked, uncheck it and if it is clear then check it. This setting remains for all documents so now you don’t have to shuffle paper any more.

The collating options are in the printing dialog. Choose File, Print and you can click to set one of two collating options for multiple prints.

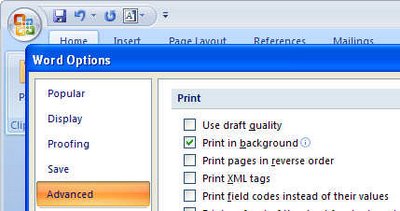
In Word 2007, find the print options by clicking the Office button, choose Word Options, Advanced and scroll down to locate the Print options.

Helen Bradley

Page 3 of 512345