Monday, September 7th, 2009

Centering a layer in Photoshop

Often you will have a layer in a Photoshop image that needs to be centered in the document.

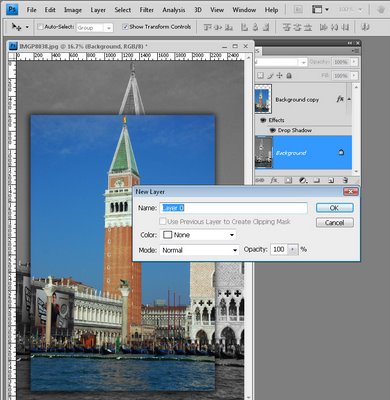
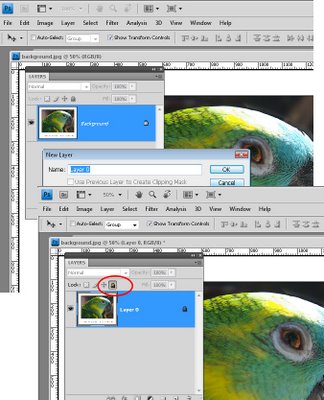
To do this, first make sure that you have a full size layer that is a regular layer, not the background layer. If necessary, convert the background layer to a regular layer by double clicking on the background layer and click Ok.

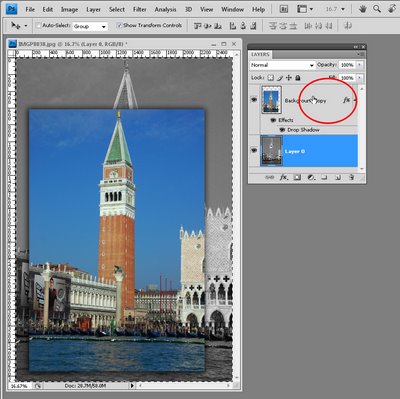
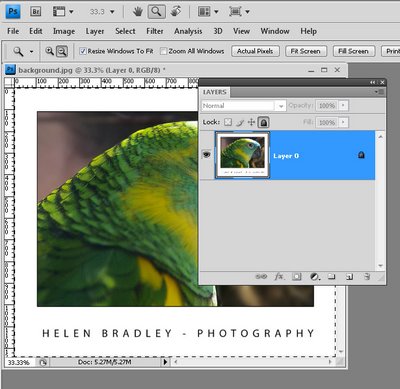
Now Ctrl + Click on the background layer which is the full size of the image. It should have marching ants around it. With this layer selected, click the layer that you want to center. The marching ants should be around the entire image but the selected layer should be the one you want to center.

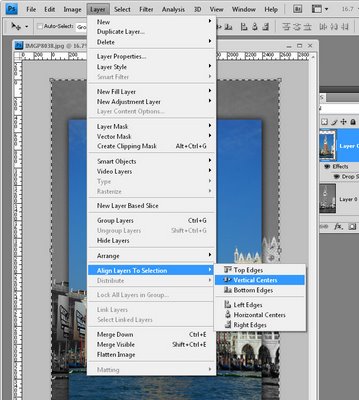
Select Layer > Align Layers to Selection > Vertical Centers to center the smaller layer within the edges of the large one.

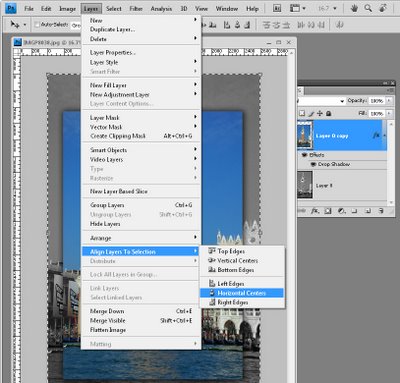
Repeat and choose Layer > Align Layers to Selection > Horizontal Centers to center them horizontally. The second layer is now centered in the middle of the main ima

Helen Bradley

Tuesday, August 11th, 2009

Create A Three Up Photoshop Template

Recently LisaMarie from LisaMarieDiasDesigns.com asked me to look into creating a tutorial for her newsletter subscribers to show how to create a template with a 3 pixel frame around it and openings for three 2″x2″ or 3″x3″ images.

The process of designing a solution is a little complex so I’ve done two things. First of all, I’m giving you the templates as PSD files that you can use to create your own design, but secondly I’m going to show you how to do it yourself. So, if you want to know how to create a reusable design like this or one that can be used with different size photos, here’s how:

I’ll step you through creating a solution for displaying three 3″x3″ images at 72 dpi with a 3 pixel frame around each of them.
Step 1
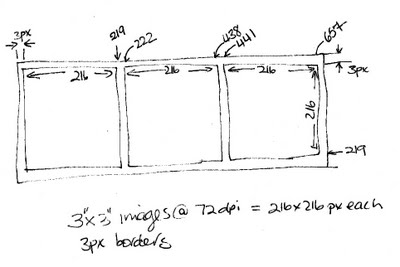
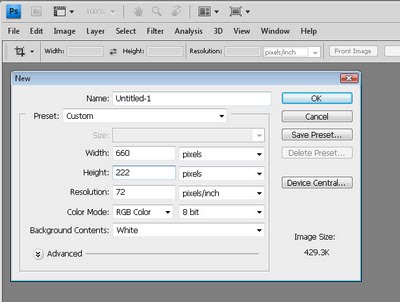
It’s a good idea to sketch the design on paper and work out the dimensions before you start. For three 3″x3″ inch images at 72 dpi the starting image needs to be 660 x 222 pixels and it will look like this.
Step 2
In Photoshop, choose File > New and create an image 660 pixels wide and 222 pixels high with a resolution of 72 pixels per inch.

Set the background to be white and click Ok.
Step 3
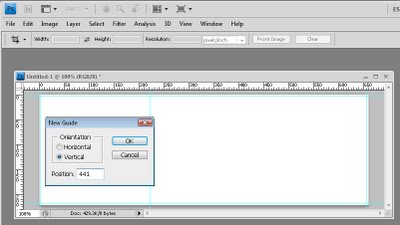
To add the gridlines, choose View > New Guide and create a vertical guide at 3 pixels. Repeat and create a second vertical guide at 222 pixels. Repeat and add a third vertical guide at 441 pixels and a fourth one at 657 pixels.

Add two horizontal guides, one at 3 pixels and one at 219 pixels.
Step 4
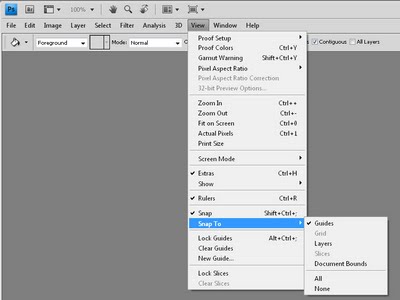
Now choose View > Snap To and select None.

Repeat and choose View > Snap To and select Guides.

Make sure that the View > Snap option in the menu is checked.

Now selections and images will snap to the guides that you have created.
Step 5
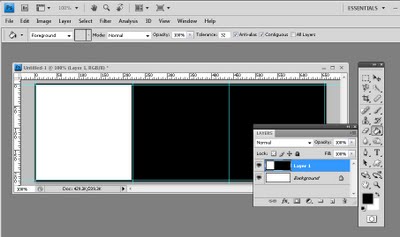
Add a new layer by choosing Layer > New > Layer and click Ok.

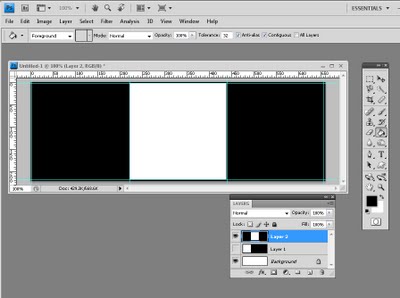
Click the Rectangular Marquee tool and from the tool options area select Fixed Size and set the Width to 216 pixels and the Height to 216 pixels.

Click on the image where the two guides intersect in the top left corner of the image. The selection will snap to these guides.

Make sure that white is selected as your foreground color and press Alt + Backspace on the PC (Option + Delete on the Mac) to fill the selection with white.

Switch to black as your foreground color, press Ctrl + D (Command + D on the Mac) to deselect the selection and, with the Paint Bucket tool, click somewhere in the layer not where you added the white, to fill the remainder of the layer with black.
Step 6
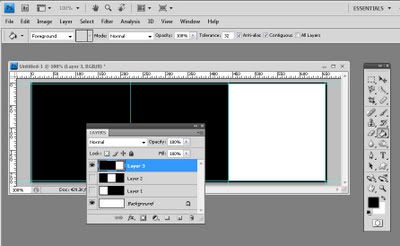
Add a new layer to the document by choosing Layer > New > Layer. Hide the previous layer if desired.

Select the Rectangular Marquee tool and click at the intersection of the second vertical guide and the top guide. Your selection should appear in the middle of the image. Fill this with white. Deselect the selection and then fill the surrounds of that layer with black.
Step 7
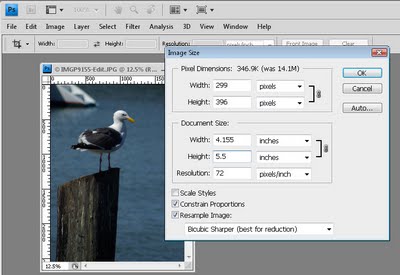
Repeat once more, this time clicking at the intersection of the third vertical guide and the first horizontal guide.

Again, fill the selection with white and then fill the remaining portion of the layer with black.

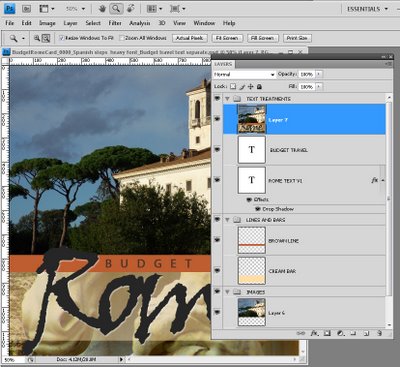
Your layers palette should look as this one does.
Step 8
Now open the images to use. You should size these to a minimum of 3″ by 3″ but the project will work just as well if they are a little bigger.

In fact, you may want to make your images bigger than this so that you can see how the masking process will ensure that your images do not have to cropped to the exact size for this design to work.

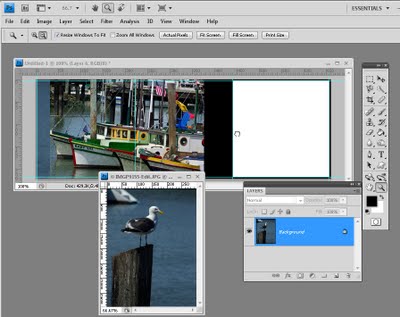
For example, to size an image to around 3.5 x 5 inches at 72 dpi, open the image, choose Image > Image Size. Enable the Constrain Proportions and Resample Image checkboxes and select Bicubic Sharper as the mode for resampling the image. Enter 72 pixels per inch as the resolution and type either the width or height to use such as 5″ – Photoshop will automatically calculate the other measurement. Click Ok to resize the image.
Step 9
Open the first of the resized images and drag its background layer into the composite image that you’re working on.

Repeat for the other two images. It doesn’t matter what the document looks like at this stage.
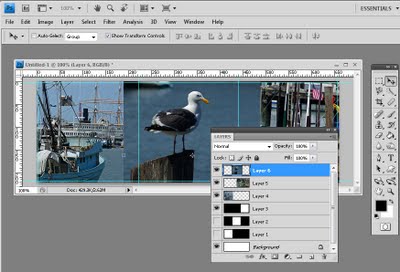
Step 10
Select one of the layers that has an image on it and use the Move tool to drag it roughly into position where you want it to appear in the final presentation.

Do this for the second layer and for the third.

Ignore for the moment that some of the images are overlapped and extend over the borders.
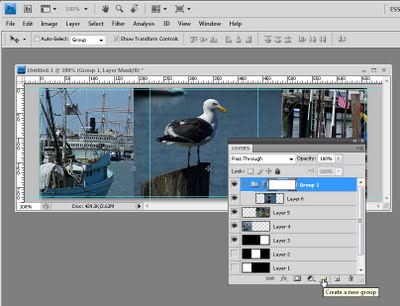
Step 11
Select the first of the image layers and click the Create a New Group button at the foot of the layers palette. Drag and drop the image layer onto the new group so that it is inset underneath it. Click the group layer name and click the Add Layer Mask button at the foot of the layers palette.
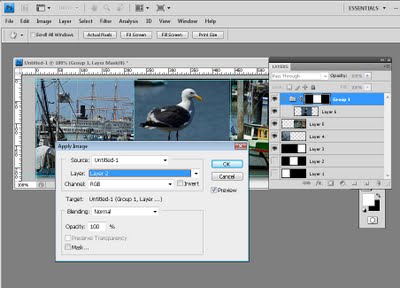
Step 12
Click on the layer mask thumbnail so that it is selected.

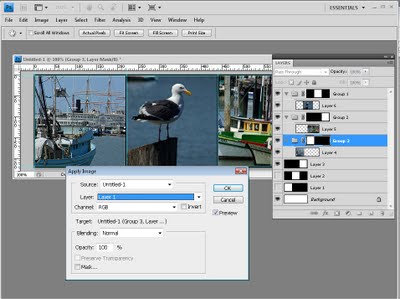
Choose Image > Apply Image and from the layer dropdown list, select the layer in the layers palette that has the white square where this image should be in the design. Click Ok.

This applies a layer mask to this layer masking it to that small square size.
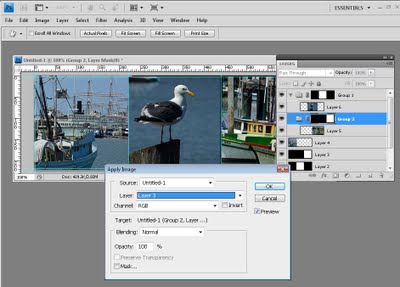
Step 13
Select the second image to work with and click the Create a New Group icon at the bottom of the layers palette.

Drag and drop the image layer onto the new group so that it is inset underneath it. Click the group layer name and click the Add Layer Mask button at the foot of the layers palette.

Click on the layer mask thumbnail so that it is selected.

Choose Image > Apply Image and from the layer dropdown list, select the layer in the layers palette that has the white square where this image should be in the design. Click Ok.

This applies a layer mask to this layer masking it to that small square size.
Step 14
Select the final image to work with and click the Create a New Group icon at the bottom of the layers palette.

Drag and drop the image layer onto the new group so that it is inset underneath it. Click the group layer name and click the Add Layer Mask button at the foot of the layers palette.

Click on the layer mask thumbnail so that it is selected.

Choose Image > Apply Image and from the layer dropdown list, select the layer in the layers palette that has the white square where this image should be in the design. Click Ok.

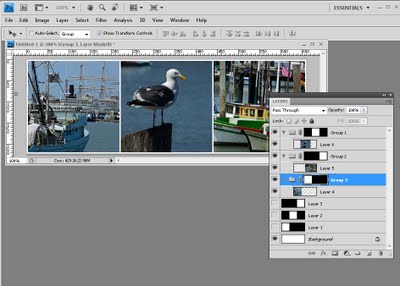
This applies a layer mask to this layer masking it to that small square size.
Step 15
You can now disable or delete the three layers which contain the black and white designs as they are only used to create the masks.

You can also remove the gridlines by choosing View > Clear Guides.

This is your final design.
Step 16
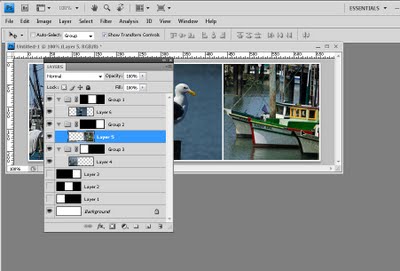
Any of the images in the design can be adjusted by clicking on the image layer, click the Move tool and then drag the image around inside that layer.

Provided the image is larger than 3″ x 3″ you can move it so the piece of the image you want to feature appears in the desired position. The mask ensure the image does not extend over the borders.
Step 17
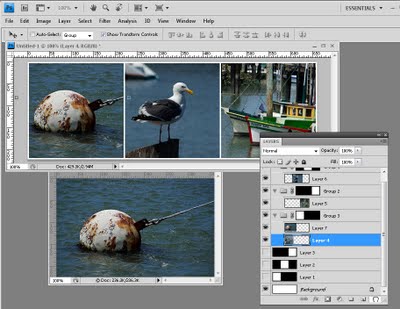
You can also replace the images – this is how you will use the template in future.

For example, open another image to use and resize it as you did the earlier images.

Drag and drop the image into your file as a new layer. Drag the layer into the group for the position it will appear in the design and remove the image that currently occupies that position. As you can see, all you need do is to position and resize your images; none of the rest of the layout needs to be recreated.

Once you understand the basics of creating this design you can mark out and create a display image that will hold 2 x 2 images and even 2 x 3 or other varieties of sizes.

To make it simple for you, here are two PSD file downloads for the 2 x 2 and the 3 x 3 design that you can use yourselves:

2x2layout.psd

3x3layout.psd

Helen Bradley
Saturday, August 8th, 2009

Smarter sharpening with the High Pass filter


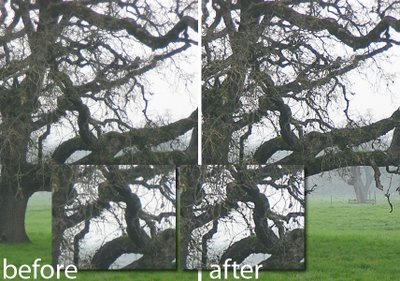
In previous posts I have introduced the basics of sharpening in Photoshop and I also looked at a way to spot sharpen an image in Photoshop Elements using faux layer masks. In this post I want to show you the benefits of using high pass sharpening in Photoshop as an alternative to using the Unsharp mask.

The Unsharp mask has historically been the sharpening tool that most Photoshop users start out using. There are, however, different and better tools to use and one of these is the High Pass filter. One reason for this is that the Unsharp mask operates on the actual image pixels and it makes changes to those pixels. The sharpening process that makes use of the High Pass filter doesn’t operate on the original image so it does not destroy the image pixels – this is particularly useful if you’re using Photoshop CS2 or earlier which doesn’t offer the Smart Objects for Filters option for applying the Unsharp mask filter.

In addition, instead of sharpening the entire image as the Unsharp Mask does, using this High Pass filter process limits sharpening to the edges in the image which is where the most value can be obtained from sharpening the image.

Step 1
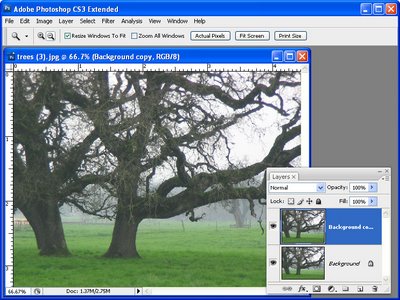
To see the process at work, open an image and duplicate the background layer of the image. If your image has multiple layers, add a new layer at the top of the layer stack, click it to select it and press Ctrl + Alt + Shift + E (Command + Option + Shift + E on the Mac) to fill the top layer with a flattened version of the image – without affecting the other layers.

Step 2
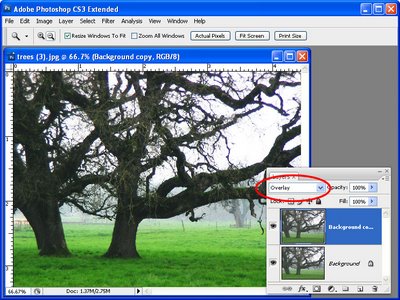
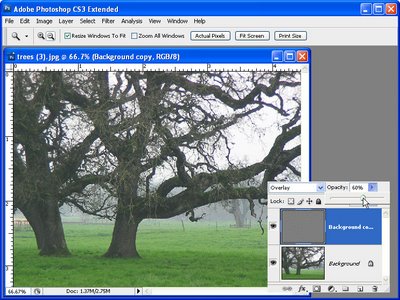
In the Layers palette set the blend mode of the new top layer to Overlay. This will let you see the sharpening results in place on the image in the next step.

Step 3
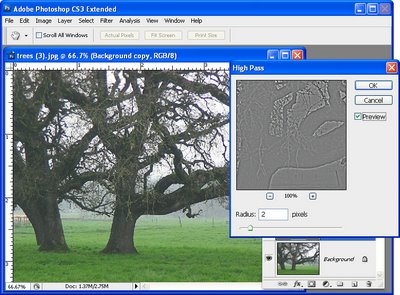
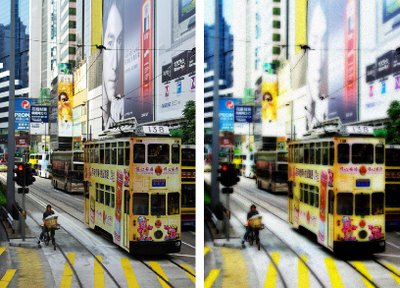
With the topmost layer still selected, choose Filter > Other > High Pass. This filter has one slider to adjust the Radius value. Drag the slider until you see a pretty much gray image in the preview window with the only detail being around the edges of objects in the image. If you can see color in the preview image then the radius is set too high. Typically a Radius value of well under 10 pixels should be sufficient – we used 2. Click Ok.

Step 4
The image is now sharpened – check the original against the sharpened version by clicking the Layer Visibility Icon for the top layer on and off to compare the result.

To finish the effect, adjust the Opacity of the top layer to 0 and then move it back up stopping when you have a good sharpening result. The ideal Opacity will depend on your personal preference.

If desired you can use blend modes other than Overlay, for example Soft Light and Hard Light can be equally as effective depending on the result that you are looking for.

Tip
When you are sharpening an image, adjust the image to the way you want it to look if you’re planning to display the image on the web. If you’re printing it you can (and should), sharpen more aggressively.

Tip

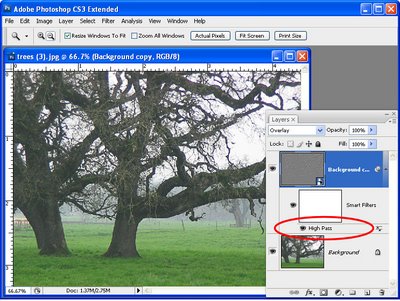
If you are using Photoshop CS3 or CS4, before you apply the High Pass filter to the top layer of the image, convert it to a Smart Object by selecting the layer and choose Filter > Convert for Smart Filters. Then apply the High Pass filter to the new smart object in the same way as I have outlined above. When you apply a filter to a Smart Object you can return later on to edit it – simply double click the filter name in the layer palette and the filter dialog opens allowing you to change the Radius value.

If you’re new to sharpening, check out these recent posts:

Sharpening 101 – Understanding the basics of Sharpening

Sharpening in Lightroom 2

Photoshop Elements, Spot sharpening with a faux layer mask

Helen Bradley

Monday, August 3rd, 2009

How do you Vignette?

Adding a vignette to an image involves adding a subtle (or not so subtle) edge effect to it. A popular vignette technique involves darkening the edges of your image – it gives the image a slight border which helps keep the viewer’s eye in the photo. This is an effect which has been popular for years and which was is a feature of some classic film cameras such as the Holga.

Nowadays many photographers and digital artists use vignettes as a way to finish their images. There are lots of ways to add a vignette to an image and here are some of them. I’ve included methods that work with Lightroom, Photoshop and Photoshop Elements. The latter process will work with most photo editing programs.

Lightroom 2

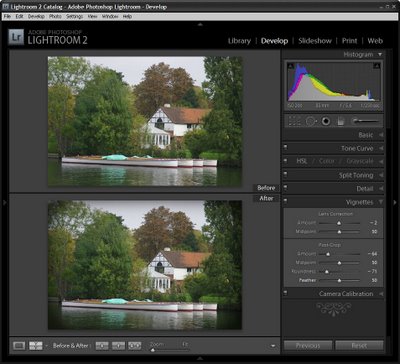
To add a vignette in Lightroom, move to the Develop module and choose the Vignette options. Set the Post Crop Amount value in a negative value to darken the edges. Set the Roundness to a low value such as -70 to get a rectangular vignette and set the Feather to around 50 so it is soft but not too soft.

Photoshop #1

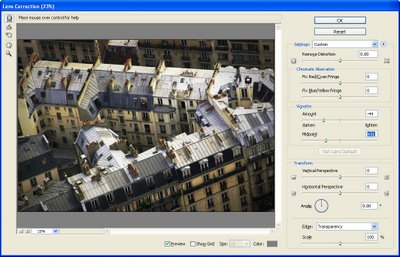
A simple way to add a vignette in Photoshop is to use the Lens Correction filter. Choose Filter > Distort > Lens Correction and adjust the Vignette amount to the Left to a negative value and the Midpoint to the left to bring the vignette into the image more.

Photoshop #2

Another way to add a vignette in Photoshop is to use a Layer style. This has some benefits and one is that the method works on just about any size image and it’s simple to do once you have the Style created.

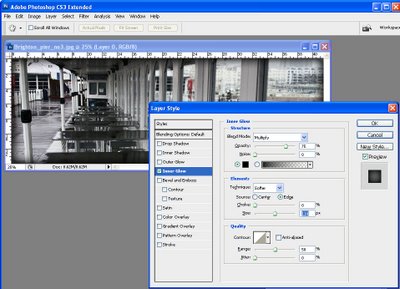
Make the background layer a regular layer by double clicking it and click Ok. Select the Add Layer Style icon at the foot of the Layer palette and choose Inner Glow. Set the Color to Black, set the blend mode to Darken or Multiply and adjust the Size so you can see the edge. You can save this as a style preset and you can then record the process of adding the style to the layer as an action so that you have a one click vignette solution.

Almost any photo-editing software

If your software supports layers and layer opacity then this method should work just fine in most photo editing programs. I’ve used Photoshop Elements and you should check your program’s help if you are unsure how to perform these tasks in your software.

Add a new layer using Layer > New > Layer and use the Rectangular Marquee to select around the inside border of this layer leaving a small margin. Choose Select > Inverse to invert your selection so the border area is selected. Now use the Paint Bucket to fill the area with black or dark brown. Choose Select > Deselect.

Choose Filter > Blur >Gaussian Blur and use a high radius value to blur the edge and soften it. Adjust the Layer Opacity to blend this edge into the image underneath and, if desired, set the Blend Mode to Darken or Multiply.

Helen Bradley

Saturday, July 25th, 2009

Photoshop: Create an overlay of TV scan lines


Photoshop has a great tool for creating patterns which – on the face of it – is of little use to the average photographer. That is, until you begin to explore its creative possibilities and one of these is creating an overlay of lines on your image, much as you might see on a photo captured from a TV.

I’ll show you how to create a line pattern, how to apply it as an overlay on the image and then how to blend it into your photo for a creative effect.


Step 1
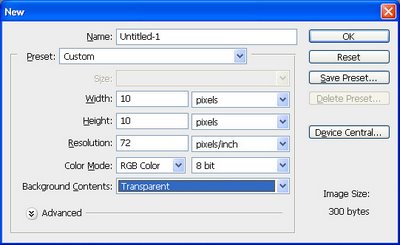
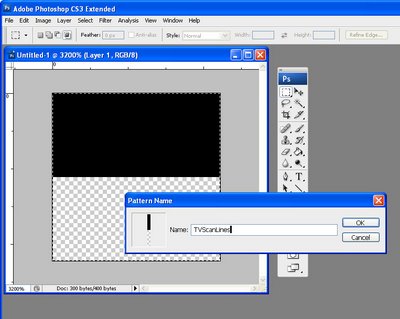
To create the pattern for the lines, start with a new Photoshop document that has a Transparent background and that is, say, 10 by 10 pixels in size.


Step 2
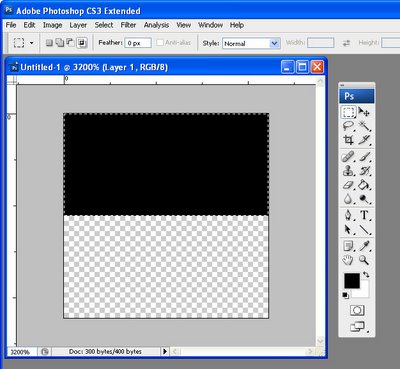
Set the foreground color to black. Zoom in to the image and select the top half of the square. Now press Alt + Backspace (Option + Backspace on the Mac) to fill the selection with the foreground color.


Step 3
Select the image by choosing Select > All – you must select both the black and the transparent portions as together they are your pattern. Choose Edit > Define Pattern and type a name for your pattern – call it TVScanLines or something similar and click OK. Close the image.


Step 4
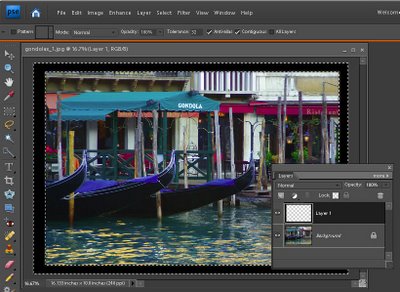
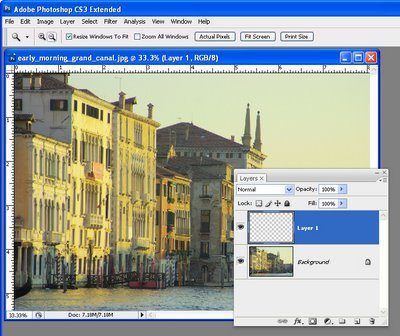
Open the image to add your scan lines to. Add a new layer for the lines by choosing Layer > New > Layer and click Ok.


Step 5
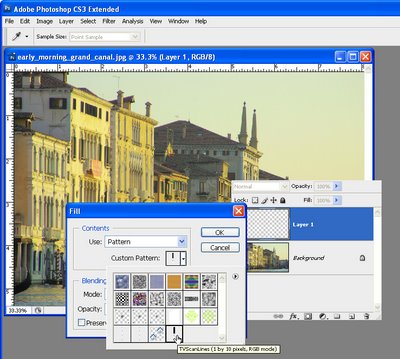
To fill the layer with the scan lines, choose Edit > Fill and, from the Use list, choose Pattern and open the Custom Pattern swatch. Your pattern will be the last in the list so click it and click Ok to fill the new layer with the pattern.


Step 6
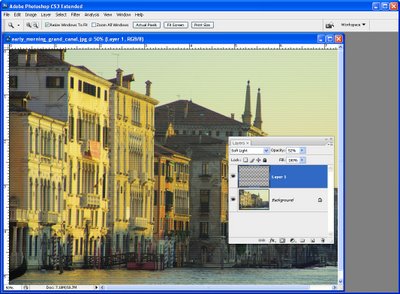
Select a Blend Mode from the Blend Mode dropdown list – something like Overlay or Soft Light generally works well. Reduce the Opacity until you get a result you like.

For this image I chose Soft Light blend mode and set the Opacity to 52%.

Tips
In step 4 you can select an area on the image and then apply the scan lines to only a portion of the image.

While this pattern isn’t so complex that it would be a nuisance to have to recreate it, many of your patterns may be more complex. To save a pattern choose Edit > Preset Manager and select the Patterns from the Preset Type dropdown list. Select the Patterns you have created and click Save Set to save them as a file on disk so you can load them again if you lose them.

Horizontal lines are not the only pattern you can use for this effect – try creating a pattern of diagonal or vertical lines or create a checkerboard one.

This process works exactly the same way in Photoshop Elements.

Ready to learn more? Here are links to two more fun and creative Photoshop tutorials:
Orton Effect in Photoshop

Make your own Photoshop brushes

Helen Bradley

Wednesday, July 22nd, 2009

Photoshop does Merge to HDR

While Photoshop’s HDR merge tools are not as sophisticated as those of, for example, Photomatrix Pro, if you have Photoshop then you can use the merge to HDR option to create an HDR image from multiple exposures that you have taken of a scene.

You’ll need 3 or more images all at different exposures. I used 5 for the example shown here and all were shot using a tripod with IS turned off!.

Here’s how to assemble the images in Photoshop:

Step 1
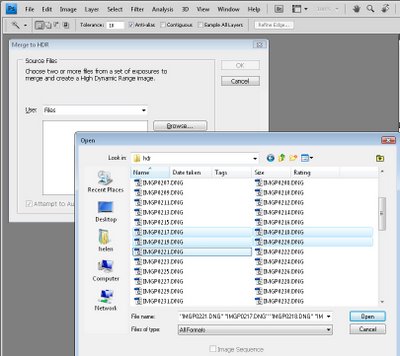
Choose File > Automate > Merge to HDR and click Browse and select the files that you want to merge.

Alternatively, if you have the files open already in Photoshop, select this same option and click the Add Open Files button to add the open files to the list.

Enable the Attempt To Automatically Align Source Images checkbox and Photoshop will align the images if they are not perfectly aligned.

To progress, click Ok.

Step 2
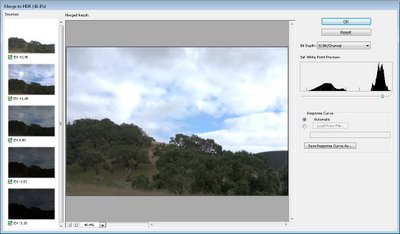
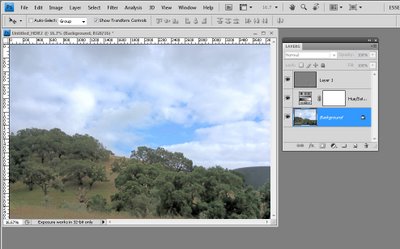
When the images are processed you will see your images combined to a single 32-bit image.

You’ll see a histogram in the top right corner which allows you to preview areas of the image. By dragging on the histogram you can see the lights and darks in the image. Drag the histogram to the far right and you’ll see all the shadow detail; drag it to the far left and you’ll see all the highlight detail.

Position the slider at an average position in the image and click Ok.

Step 3
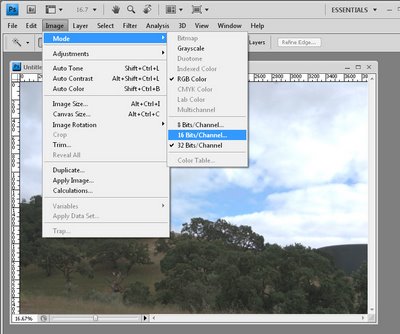
This opens the image as an HDR image at 32-bits per channel inside Photoshop. You can’t actually do anything much with this image as it is so you’ll need to convert it to an 8 or 16-bit image.

To do this, choose Image > Mode > 16 Bits/Channel.

Step 4
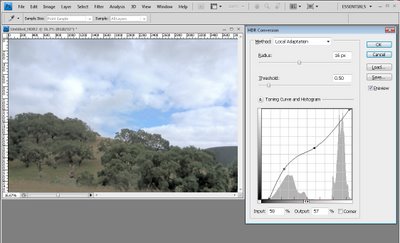
When you do this you will see an HDR Conversion dialog.

From the Method dropdown list, select Local Adaptation and make sure the Toning Curve And Histogram chart is shown.

Here you will fine tune the image. Drag the leftmost edge of the curve line in to the right so it touches the beginning of the darks in the image – this ensures you have some true blacks in the image.

Do this also for the highlights so that you get some true highlight areas.

You can then adjust the curve to your own preferences.

For this image, I wanted more lightness in the shadow areas and not so much in the lighter areas so I dragged the curve to give this result. This results in pleasing detail in the hill area as well as in the clouds.

Your artistic requirements for your own images will be different so adjust the curve until you get the detail in the image that you want to see.

When you’re done, click Ok.

Step 5
You now have a 16-bit image and you can go ahead and make the additional adjustments to it.

For example, I added a Hue/Saturation Adjustment Layer to boost the saturation in the image and then flattened the image to a single layer and applied a High-Pass Filter to it at a low radius to sharpen the image. The high-pass filter layer is set to Soft Light Blend Mode to finish the result.

If you want to save the image as a JPEG you’ll need to render it as 8Bits/Channel now to save it.

Helen Bradley

Tuesday, June 23rd, 2009

10 Ways to Create, Copy, Blend, Merge and Save Photoshop Layers


Layers are a key tool to working successfully in Photoshop. Here are my 10 best tips for working with them:

1 Create a layer in Photoshop
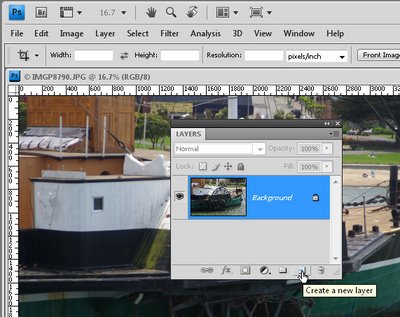
To create a new layer in Photoshop, choose Layer > New > Layer or, better still, click the Create a New Layer at the foot of the Layer palette.

2 Display the Layer Palette in Photoshop
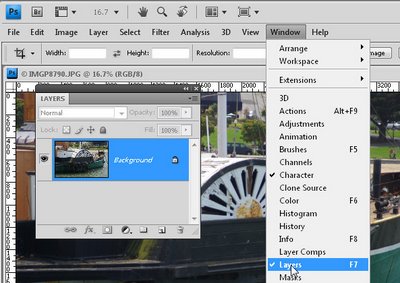
Ok, let’s go back a step first. If you can’t see the layer palette choose Window > Layers and it will show on the screen. Pressing F7 does the same thing.

3 Save Photoshop layers
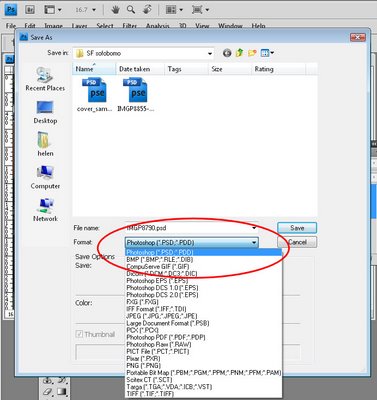
Layers are saved in Photoshop when you save the Photoshop file in a format that supports layers. The simplest format to use is the PSD format. Choose File > Save As and choose PSD from the Save As Type dropdown list.

4 Merge layers in PS
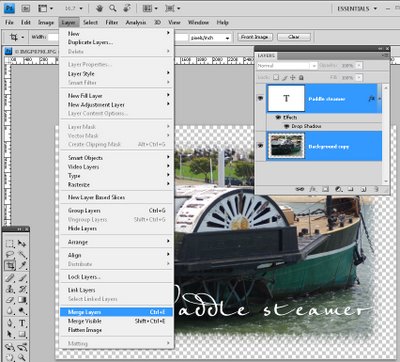
When you have multiple layers in a Photoshop imager you can merge them to flatten the file in a number of ways. You can save the image using a file type that does not save layers such as JPG. You could also use Layer > Flatten Image to flatten the image to a single layer or you can select all the layers by Control + Clicking on them (Command + Click on the Mac) and then choose Layer > Merge Layers to merge them all to a single layer but retain the layer opacity. In this case, you should save your image as a PNG or PSD file or some other format that saves transparency if you want to keep this.

5 Blend layers
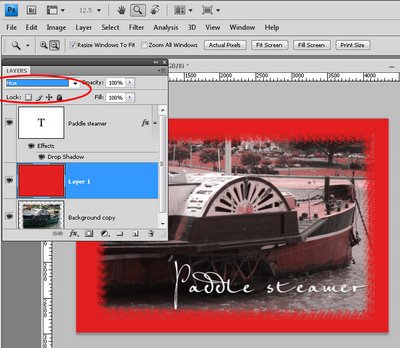
You can blend one layer into the layer below by using the blend modes in the layer palette. Select a blend mode from the blend mode dropdown list to change the way the layer interacts with those below. Some blend modes work when the two layers are the same and some don’t. They also work if you have two different layers.

6 Rotate a layer
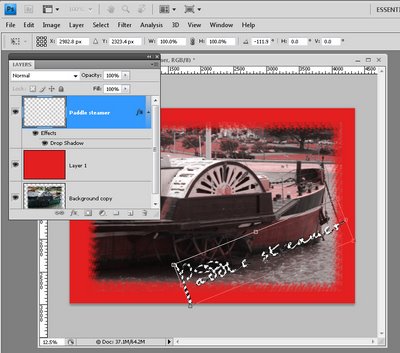
You can rotate a layer inside a Photoshop image by Ctrl + Clicking on the layer thumbnail to select the layer itself (use Command + click on the Mac). Choose Edit > Transform > and choose Rotate 180, Rotate 90 CW or Rotate 90 CCW to rotate in a fixed rotation. Alternatively, select Edit > Free Transform and you can rotate the layer by dragging on it. When you’re done, press Enter to confirm the rotation. To turn off the marching ants, press Ctrl + D or choose Select > Deselect.

7 Unlock a layer
To unlock a layer (provided it is not the background layer) select the layer and click the Lock all Icon in the layers palette – if the layer is locked, this unlocks it.

To unlock the background layer, double-click the layer and press Ok to turn it into a regular layer which unlocks it automatically.

8 Copy a layer
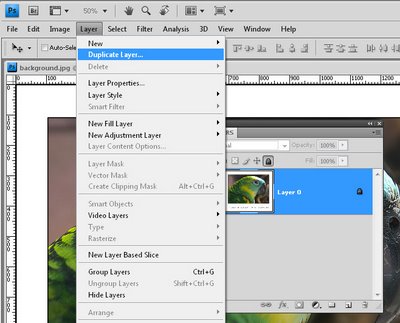
To copy a layer in Photoshop, select the layer and choose Layer > Duplicate Layer and press Ok. Alternatively, working in the layer palette drag and drop the layer onto the Create New Layer icon to create a copy of it.

9 Select a layer
To select a layer in Photoshop, hold the Ctrl key on a PC (Command on the Mac), and click on the layer thumbnail in the layer palette. This selects the layer. You will see the marching ants around the layer.

10 Flatten layers and still keep them
I call this my “have your cake and eat it too” tip. To flatten all the layers in an image to one layer but still keep all the layers intact, click on the topmost layer in the Layer stack and press Control + Alt + Shift + E on the PC or Command + Option + Shift + E on the Mac.

Helen Bradley

Sunday, June 14th, 2009

Orton Effect – Photoshop


Photoshop gives us tools we can use to create effects which previously could only be obtained in the darkroom using images which were captured specially. One such process is the Orton effect named after photographer Michael Orton. This process results in a somewhat surreal image which has a slightly out-of-focus look while retaining lots of edge detail.

In the darkroom this effect is created using two images one of which is slightly out of focus and both of which are slightly overexposed. Sandwiching these together and taking a print yields a photograph similar to the one above.

Thanks to Photoshop we can create this effect from a single well exposed image and create the overexposed and soft focus looks digitally.

Here is how to create this Orton effect on an image from your collection:


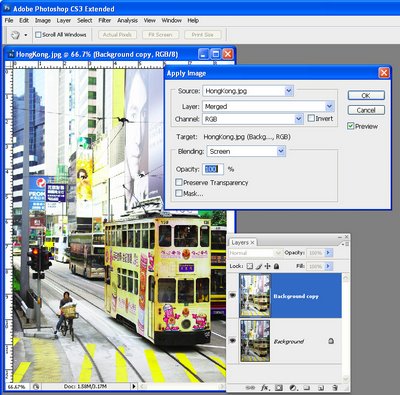
Open the image, right-click the background layer in the layers palette and select Duplicate layer. With the duplicate layer selected choose Image > Apply Image, select the Screen blend mode and click Ok. This applies the image to itself in screen mode which is the same as creating an additional duplicate layer, setting this layer’s blend mode to Screen and then merging the two layers. The benefit to using Apply Image is that you do it all in one step.


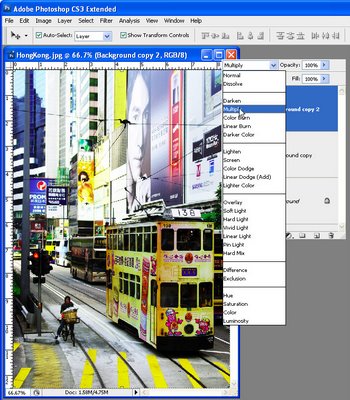
Duplicate this layer and set its blend mode to Multiply. This has the effect of cancelling out the lightening effect from applying the Screen mode.


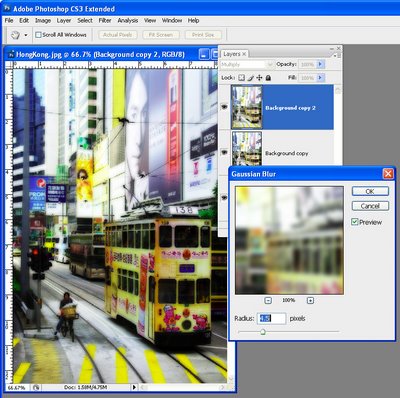
With this topmost layer still selected apply a blur to it using Filter > Blur > Gaussian Blur. Select the Preview checkbox so you can see the result on the image. Adjust the blur Radius to your choice of value – I used 4.5 but choose the best for your image. Notice that, if you create a very large small or very large blur, the effect all but disappears.


If the image isn’t light enough, return to the middle layer and repeat Step 1 to apply the image to itself again in Screen mode.

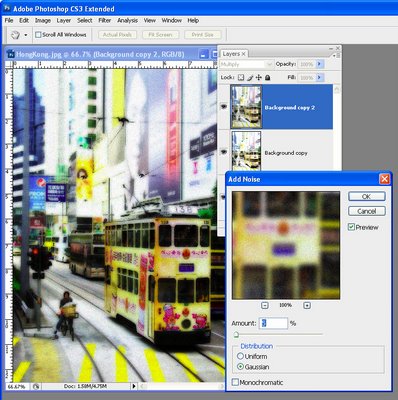
Then, if desired, add some noise to the image to give it a grainy look. To do this, choose Filter > Noise > Add Noise. Disable the Monochrome checkbox, click Gaussian and adjust the amount till you get a slightly grainy feel to the image.

The result is a soft focus image which still has lovely detail in the edges and it is a process well suited to being used with portraits as well as landscapes and cityscapes.

Using Photoshop Elements?
The same effect can be achieved in Photoshop Elements but you will need to perform step 1 the long way. To do this, duplicate the Background layer twice, set the top layer’s Blend Mode to Screen then choose Layer > Merge Down to merge it to a single layer. There is no Apply Image command in Photoshop Elements.

Helen Bradley

Monday, June 8th, 2009

Understanding the basics of Sharpening in Photoshop

Sharpening is one of those everyday tasks that most photos can benefit from. In this post I’ll explain what sharpening is, when you should perform it and how to do it. The information here, although it is explained using Photoshop, is relevant to all photo editing programs.

Sharpening does as its name suggests and sharpens the image making it look crisper and making the edges in the image more distinct.

In the darkroom the process is achieved by taking one negative and a slightly blurred positive image, sandwiching these together and making a very quick exposure of this sandwich. Then the exposure is completed using the negative. The resulting image has sharper and crisper edges than it would have had if the blurry (unsharp) mask image had not been used. The typical sharpening tool used in Photoshop and other graphics programs is named after this traditional darkroom process and is called the Unsharp mask.

In a graphics editor the Unsharp mask works by creating small halos along the edges in the photo. These halos enhance the contrast between the edges and the surrounding pixels making the edges look more obvious and giving the image a crisper and sharper look.

Here’s how to sharpen an image using the Unsharp mask:


Step 1
Sharpening should be done at the end of the editing process so finish doing all your edits to the image before you sharpen it.

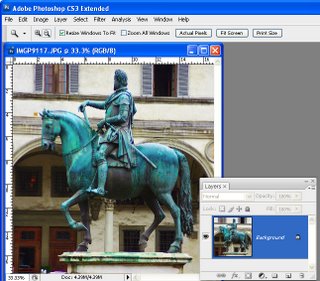
Now create a flattened version of the image either by flattening or merging all the layers or press Ctrl + Alt + Shift + E (Command + Option + Shift + E on the Mac) to create a flattened layer at the top of the image. The Unsharp mask works only on the current layer so you need to have the image on a single layer for it to do its work.


Step 2
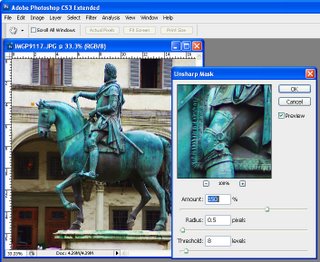
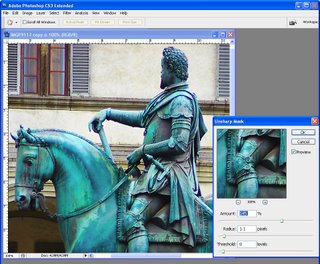
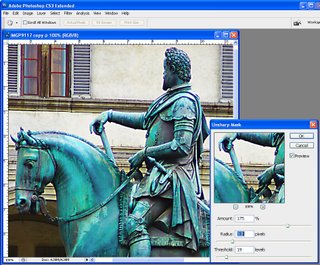
Choose Filter > Sharpen > Unsharp Mask. Set the Radius to somewhere between .5 and 1. This sets the width of the halos which are applied along the edges in the image – the smaller the radius, the smaller the halo and 0.5 – 1 is ideal – this is not always a situation where the more is better!

Set the Threshold to around 10. The Threshold value determines how edges are found – the higher the value, the more different adjacent pixels must be to be considered an edge so less of the image will be sharpened. A small value means that smaller differences in pixel values are considered an edge so more of the image is sharpened. The risk with a small Threshold value is that it can add noise to the image by enhancing edges in places where you don’t want to see them.

The Amount setting controls how much contrast is added to the edges – a higher value means more contrast and a more obvious sharpening. Start by setting this value to around 150.


Step 3
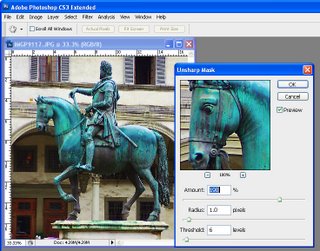
Take a look at your image and adjust the sliders from this starting point until you see more detail in the edges in the image but not so much that you see unattractive halos around the edges.

Typically, if you have an image with a lot of very fine detail you can use a very small radius value (so the halos are small) and a correspondingly high Amount value (so that the halos can be seen to sharpen the image). On the other hand, if you have an image without a lot of fine detail can use a larger radius say, 1 – 1.5 or more (which gives larger halos), and a smaller Amount setting because the halos will be bigger and more visible anyway.

Adjust the Threshold value so you get sharpening in the areas you are interested in being crisper but not so that it results in unwanted noise in the image.


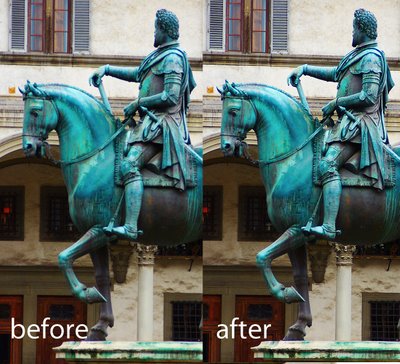
This image is nicely sharpened – you can see the crisper edges.


This image is over sharpened – notice the unsightly halos around the edges.

Tips
It is generally advisable to view the image at 100% when you are sharpening it so you can see the effect on the image. You can do this by sizing the image to 100% before launching the Unsharp mask tool. Alternately, use the 100% preview in the Unsharp mask dialog –click on the preview to see the unaltered image so you can compare it with the preview..

When you are sharpening for printing you can generally sharpen more heavily than you should do for onscreen viewing.

There are other sharpening tools available in Photoshop CS2 and later which do an even better job of sharpening than the Unsharp mask. I’ll look at these tools in a future post. For now, regardless of which graphics editor you use, you should have an Unsharp mask tool and it should work in a similar way to the Photoshop Unsharp mask shown here.

Helen Bradley

Wednesday, May 27th, 2009

CD Inspiration – Police’s Synchronicity album cover

I love to browse the CD covers at my local secondhand music store – the cover images are a great resource when I’m looking for new ways to showcase my photos. As an added bonus, when you copy an effect you’ll find yourself developing new Photoshop skills along the way.

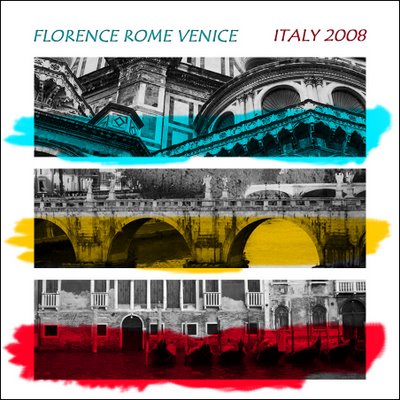
One recent burst of inspiration came from the album Synchronicity by The Police. The album shows three black and white collages stacked down the cover each covered with a splash of paint. Check it out here so you know what we’re aiming for:

While my solution does away with the collages – they really deserve a post of their own – it does mimic the basic design philosophy of the CD cover. Here’s how to create this effect – the key to getting the project done fast is some smart cropping, some layer alignment tricks and the Multiply blend mode.


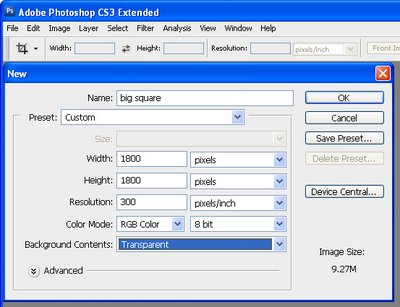
Start by creating a square image the size of the final project. Mine is 1800 pixels x 1800 pixels at 300 pixels per inch in resolution and it has a transparent background.


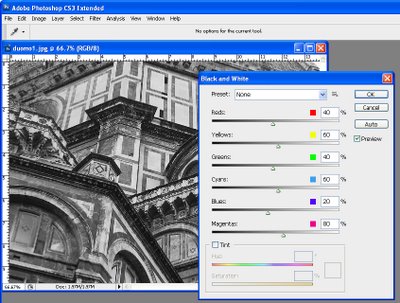
Open the three images to use. You want photos that you can crop to a wide rectangle and which have good detail in the cropped area. Convert your images to grayscale using your favorite tool – I used the Black & White adjustment in Photoshop CS3 – in earlier versions use the Channel Mixer – enable the Monochrome checkbox and adjust the sliders to get a good grayscale.


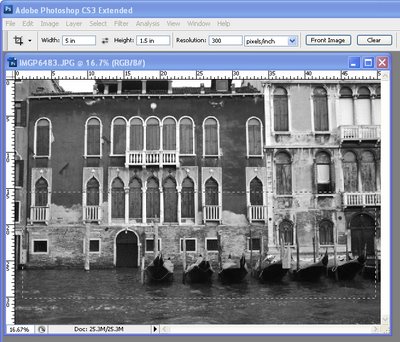
Instead of simply cropping the images to size, we’ll adjust the cropped image resolution to match the final image at the same time. To do this, click the Crop tool and set the width to 5 inches, the height to 1.5 inches and the resolution to 300 pixels per inch. Drag a crop rectangle over the area of image to use and double click to crop it. Repeat for the other two images.


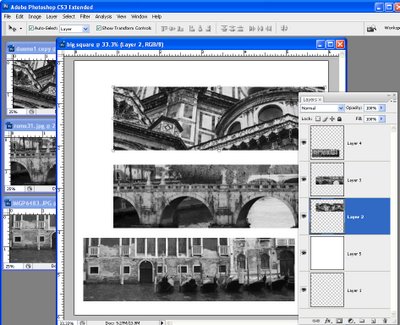
Flatten each image if it is not already flattened. Then drag and drop the three image layers into your main image. Position the layers in roughly in position. Add a new layer, fill it with white and drag it below the image layers.


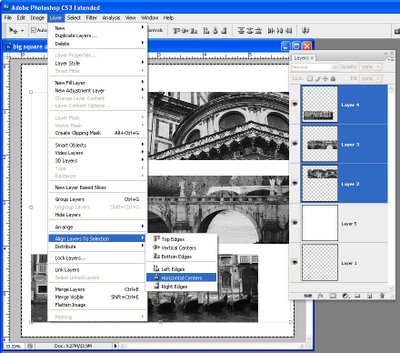
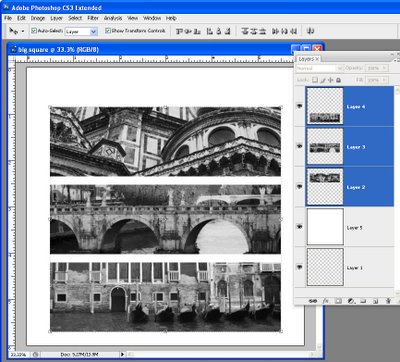
Control + Click (Command + Click on the Mac) on the layer thumbnail for the white filled layer so its contents are selected. Control + Click on the other three layers (not the thumbnails, just the layers) so the layers are selected and not their contents. Choose Layer > Align Layers to Selection > Horizontal Selection – this aligns the layers with the images on them so they are centered in the image.


To distribute the layers vertically, select all three layers that have the images on them and choose Layer > Distribute > Vertical Centers so the spacing between the images is evened out.


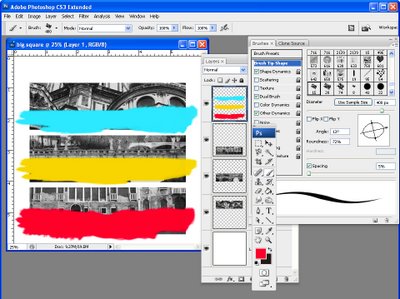
Add a new layer (or drag the empty one from the bottom of the layer stack to the top). Select a bright yellow as the foreground color. Select the Brush too, add the Wet Media brushes and select the Oil Heavy Flow Small Tip brush. Adjust the brush size to around 400 pixels, set the Flow and Opacity to 100 each. In the Brushes palette, adjust the angle of the brush using the Brush tip shape options so it is aligned vertically and not at an angle.

Paint unevenly over the middle image. Repeat and paint cyan on the top image and red on the bottom one.

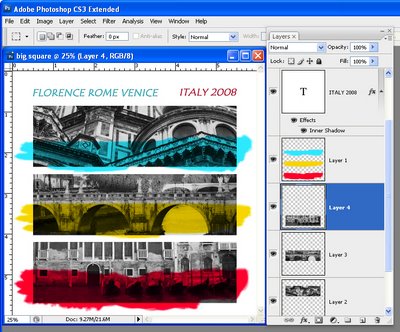
Set the blend mode for the paint layer to Multiply so you can see the image under the paint. Add some text using the same blue and red colors and you’re done.

Helen Bradley