Wednesday, November 13th, 2013

JPEG vs RAW – what’s the difference and what should you use?


Learn the difference between capturing in jpg and raw and when to use each.

One key decision that every photographer needs to make is whether to capture images in jpg or raw formats. With newer and more advanced tools on the market for processing raw images, the incentive to move to capturing in raw is attractive. However, raw images will require additional processing and they are very large so, to help you understand the issues behind the question “jpeg or raw?” I’ll explain the difference between capturing in jpg and raw and why you might choose one over the other and when to do so.

What is in a format?

Before exploring when you might want to capture an image in jpg or raw, it’s worthwhile looking at the differences between these two file formats. The raw file format is a format which is a camera specific so the format of raw images from a Canon camera is different to the format of a raw image from a Nikon camera. The reason for this is that a raw format image contains the data captured by the camera’s sensor and it is unprocessed. Because each camera’s sensor is different, the basic raw format is proprietary to that camera manufacturer and it may even vary from one camera to another within a camera manufacturer’s own range.

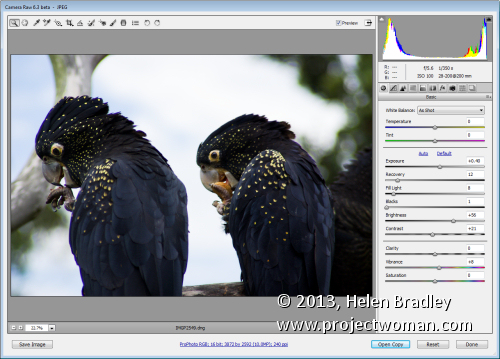
Before you can use a camera raw image in a program such as Photoshop, you need to process it using either your camera manufacturer’s raw processing application or a tool such as Adobe Camera Raw. One downside of  capturing images in the raw format is that you need to do this preprocessing before you can use your images. If you capture in camera raw, you will be reliant on special software to be able to read your raw images in future in, say, 10 or 15 years’ time.

As a move away from the notion of a proprietary raw formats that are created by each camera manufacturer, Adobe recently released the dng or Digital Negative file format. This is an open format which can be used by camera manufacturers as an alternative to their own proprietary raw formats. It frees photographers from being tied to a specific manufacturer’s raw format and offers protection for the future simply because of the sheer number of people who will have images stored in this format. The format’s popularity should ensure that there will be programs available in future for most operating systems that can read and process these files.

Camera raw images, when captured in the camera manufacturer’s own format such as crw, cr2, nef or pef cannot be written to and can only be read from. For this reason, if you make changes to a camera raw image in a program such as Adobe Camera Raw or Lightroom, then the changes that you make to the image cannot be written to the original image file. Instead, they’re written to what is called a sidecar xmp file which stores details of the changes that you’ve made to the image. Camera raw image processing applications read the original camera raw file and the sidecar xmp file and display the image with the changes you have made to it. However you need to be careful that you do not move a raw file to another location and leave its sidecar xmp behind – if you do, you will lose any changes that you’ve made to the image. The Adobe dng file format avoids this problem as it is a file format that can not only be read from but also written to so changes can be stored in the original file.

Differences in data

The advantage of recording all the data captured by your camera’s sensor in a raw file whether it be your camera manufacturer’s own raw format or Adobe dng is that you have a wider range of image data than you would have if the image was saved as a jpg image. When an image is saved as a jpg image by your camera, it is scaled down considerably so that it is no longer a 32-bit image but is now a 8-bit image with only 256 levels of brightness.

Other changes that are made to the image include sharpening the image and the camera will also apply any white balance setting you have selected to the image. If you have other “in camera” settings configured such as variations to the image saturation, contrast and brightness then these adjustments will be made to the image before being saved as a jpg file. In addition because the jpg file format is a lossy and compressed file format you will lose some detail in saving the image even if you opt for saving at the highest quality.

In contrast, a dng or raw image is not adjusted and all the data that was available from the camera’s sensor will be in that file. Situations in which this can save you some grief is where you have under or over exposed the image or configured an incorrect white balance setting. If you capture in a raw format then you have a larger range of exposure adjustments available to be made inside a camera raw processor than you would have with the corresponding jpg image. In addition, because the white balance setting is not applied to a raw image, you can change the white balance setting later on without compromising the image.
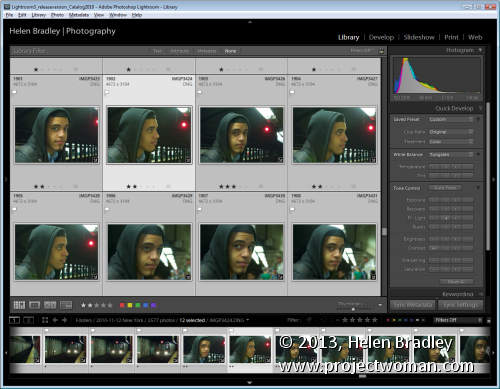
The tools in Lightroom make it easy to apply changes to a range of raw images all at once.

File size differences

Because jpg images include only a subset of the data that the camera captured and camera raw images contain it all, there are significant file size differences between images captured in the jpg and the raw format. For the equivalent pixel size image, a raw image might be around 20MB in size where the corresponding jpg image would be around 5Mb in size. The reason is, of course, that the jpg image has less data in it and the data is also compressed.

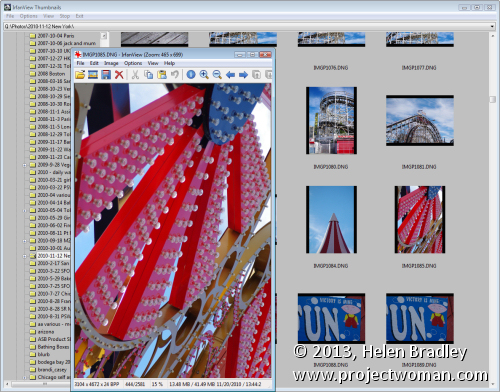
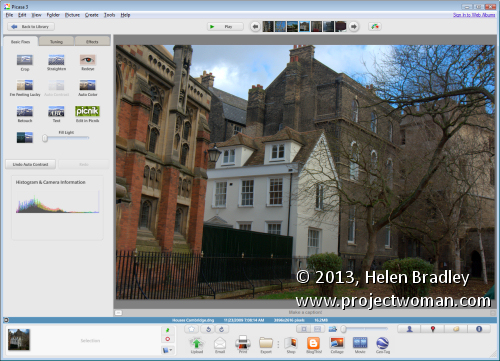
One drawback to capturing raw images in the past has been the difficulty of processing these images. Many programs simply couldn’t read the wide range of raw image formats in use by the varying camera manufacturers. This meant that you were either limited to using your camera manufacturer’s own software to preprocess raw images or you needed to purchase an expensive application like Adobe Photoshop to do so. These days the dng format and many proprietary raw formats can be read by a number of applications including the free applications: Picasa and IrfanView.

IrfanView is one of the popular free programs that can display and edit dng and some other popular raw format images.


However, operating systems like Windows Vista and Windows 7 still do not include native support for dng or other raw formats so, when viewing a folder full of dng images you will see icons instead of thumbnails. There are some downloadable codecs available from http://labs.adobe.com/wiki/index.php/dng_Codec but they have limited application.

When to use which format

Now that we’ve investigated the difference between capturing in jpg, raw or dng, it’s time to look at when you might opt for one in preference to the other. If you already use a program that includes built-in support for camera raw images such as Picasa, Lightroom, Photoshop, Photoshop Elements or Corel Paintshop Photo Pro then you may opt to always shoot in raw or dng because of the ease at which you can work with your images – this is particularly the case with programs like Lightroom and Picasa.

On the other hand, if you typically shoot images to share online on sites like Facebook or Flickr and you don’t usually do much, if any, processing then jpg may be the best option as the files are smaller and you can quickly download them and then get them uploaded to your sharing site. For example, Flickr will let you upload full size jpg images but you can’t upload raw or dng images.

One advantage of capturing in jpg is that you have the flexibility of being able to determine the pixel dimensions of the image you will be capturing in the camera. Most cameras have varying size options available when capturing in the jpg format and also different compression options. If you’re only shooting snapshots for uploading to the web, then you don’t need very big images and you may find smaller jpg format images work as well.

That said, you need to accept that if you are capturing jpg format images you’re reducing the amount of image data that you have available and, if in the future, you decide that you want to do something special with a particular image, you won’t have the full range of image data there to do anything with..

If you’re shooting to sell images for stock, then you absolutely must capture images using the camera raw file format so that you have all the data in the image available to you. Many stock agencies will not accept images captured as jpg images because of the processing that’s applied to those images by the camera including the image sharpening. Stock agencies prefer unsharpened images so that the purchaser can then determine the amount of sharpening they want to apply in each specific case.

There is a way to “have the best of both worlds” and you can capture in both jpg and raw formats. Most cameras can capture jpg and raw or jpg and dng so you’ll get both files for each image that you shoot. You can then download both formats – use the jpg images for your day to day use and store the raw originals in case you ever need to work with those images in future.

 Picasa supports many raw formats so you can view and work with raw images in the same way as jpg images.

Helen Bradley

Thursday, August 22nd, 2013

Lightroom Tip – Sharpen only the edges in the image

How to use the Masking Slider to limit image sharpening to only the edges in the image

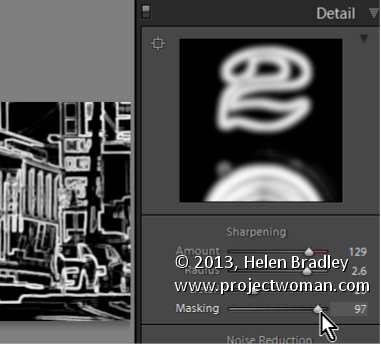
The Masking slider in the Lightroom Detail panel allows you to control the areas of the image that are sharpened and those that are not.

Hold Alt (Option on the Mac) as you drag on the Masking slider. As you do you will see a black and white overlay on the image. The areas that are black are not sharpened, those that are white are sharpened. The farther you drag to the right the more the sharpening is limited to just the edges in the image where you want it to be applied to.

Drag on the slider to control just how much of the image you want to have sharpened. When you’re done, adjust the Amount to a value that makes sense for the image.

Helen Bradley

Monday, August 19th, 2013

Lightroom Tip – How to manage halos when sharpening

Learn how to suppress halos with the Detail Slider when Sharpening in Lightroom

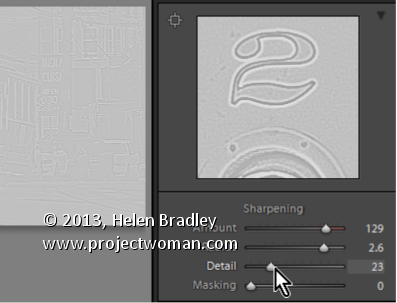
The Detail slider in the Detail panel in Lightroom lets you suppress the haloes you create with the Radius slider.

At zero position you will fully suppress any halos and at 100 you will have no halo suppression so you will see all the halos added using the Detail slider.

This means that a low value for the Detail sider sharpens only the largest edges in the image and a large value for Detail will tend towards sharpening everything.

Hold Alt (Option on the Mac) as you drag on the Detail slider to see the effect on the halos around the edges in the image.

Typically if you use a high Radius value then you will want to use a low value for Detail and vice versa.

Helen Bradley

Wednesday, August 14th, 2013

Lightroom Tip – Using Amount and Radius when Sharpening

Learn how to fine tune sharpening with the Amount and Radius Sliders

The Detail panel in Lightroom controls sharpening on the image. Use the Amount slider to manage the intensity of the sharpening – set this to a high value to begin.

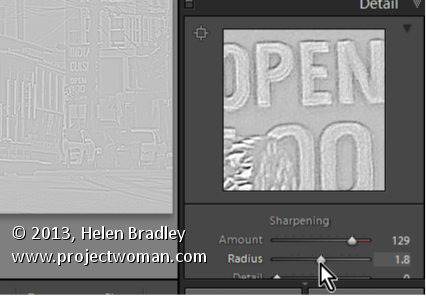
The Radius slider adds halos around the edges in the image which is what gives the sharpening effect.

For an image with lots of fine lines and detail such as a building select a low radius. For a portrait or an image with softer detail, use a high radius value.

Hold the Alt key (Option on the Mac) as you drag on the Radius slider to see the halos.

Helen Bradley

Friday, April 26th, 2013

Lightroom Tip – Discover more options with Alt (Option)

Learn to find some hidden options in Lightroom by using the Alt (Option) key

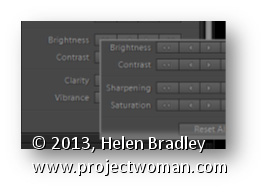
Some buttons and other features in Lightroom change depending on whether the Alt key (Option on the Mac) is pressed. For example in the Quick Develop panel in the Library module the Clarity and Vibrance options change to become Saturation and Sharpening when you hold the Alt (Option) key.

Also in the Library module the Import and Export buttons become Import Catalog and Export Catalog when the Alt (Option) key is selected. As you work in Lightroom, occasionally press the Alt or Option key to see if any useful options become visible when you do so.

Helen Bradley

Sunday, April 14th, 2013

Lightroom Tip – Area Picker

Area Picker – Viewing a Preview Image when sharpening

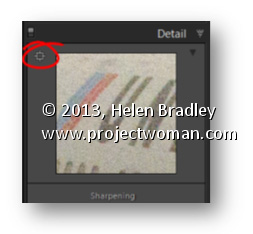
The Detail panel of the Develop module in Lightroom contains the features you need to sharpen an image. In this panel is a small square icon with lines radiating from it. Click this once and now hover over an area in the larger image. As you do this you will see that area of the image appears in the preview panel at 100% magnification. Use this tool to click on an area of interest in the image that you can view in the preview area so you can see how the sharpening is being applied.

If minor adjustment is required, drag the preview image in the preview area with your mouse to fine tune its placement.

Helen Bradley

Thursday, May 24th, 2012

Faux HDR effect in Lightroom 4

I just uploaded a new video tutorial on how to create a faux hdr image in Lightroom. This image really didn’t inspire me when I first looked at it, but clearly at the time I captured it something had caught my eye. When I applied this faux hdr effect to the image it just came to life. The process is very quick and very simple, and the video is very short – only just over 5 minutes and you’ll know all you need to know to salvage your own images.


Helen Bradley

Saturday, June 27th, 2009

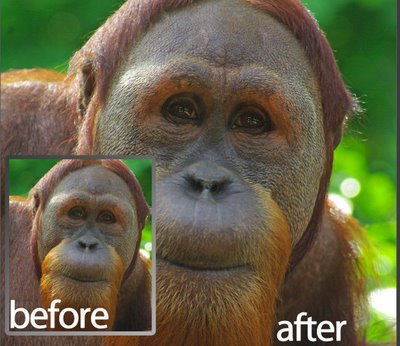
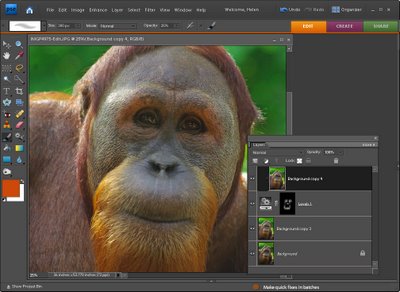
Photoshop Elements: Spot sharpening with a faux layer mask

One of the features on the wish list of most advanced Photoshop Elements users is Layer Masks. It is one of the key features that separates Photoshop Elements from Photoshop – but it doesn’t have to be that way. It is possible to create faux layer masks in Photoshop Elements if you know how – and today, I am going to show you how.

One of benefits of this approach to creating faux layer masks in Elements is that it uses features built into Elements and it doesn’t rely on a third party plug-in so it works with most versions of Photoshop Elements.

A bit of background
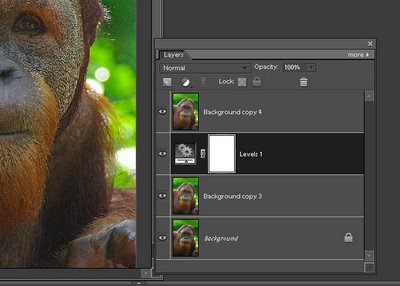
While Photoshop Elements doesn’t support layer masks for regular layers, it does provide them for all its adjustment layers. This faux layer mask solution takes advantage of this by forcing an adjustment layer’s layer mask to behave like a layer mask on a regular layer just as it does in Photoshop. The trick is to apply an adjustment layer to the image which does nothing to the image at all – so you get the benefit of the layer mask but without forcing any unwanted change on the image. Once you’ve done this you have a layer mask you can borrow.

In this step by step example, I’ll show you how to use the mask to paint some additional sharpening onto an image. What I’ll do is oversharpen an image – well beyond the level of sharpening which the image should have and then I’ll remove the sharpening with the mask and paint is back over selected parts of the image – again using the mask.

While this technique is shown using Photoshop Elements you can use the same technique in Photoshop – only in Photoshop you won’t need to use the fake mask as you can add a layer mask to the oversharpened layer itself.


Step 1
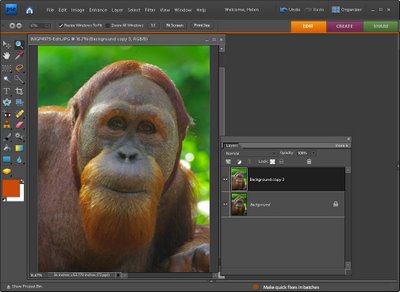
Finish editing your photo. If you have multiple layers, create a flattened version of image by selecting the topmost layer and press Ctrl + Alt + Shift + E (Command + Option + Shift + E on the Mac). This creates a new composite layer without flattening the layers.

Duplicate this layer by right-clicking it and choose Duplicate Layer. You should now have two identical image layers at the top of the layer stack.


Step 2
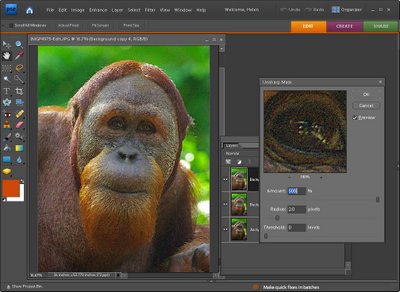
Select the topmost layer and choose Enhance > Unsharp Mask and apply excessive sharpening to the image. What you want is an extremely oversharpened image. You don’t want halos, just very heavy sharpening. In this example, I’ve used a radius of 2, a threshold of 0 and the full amount of 500. Click Ok.


Step 3
Add an adjustment layer by choosing Layer > New Adjustment Layer and choose either Levels or Brightness/Contrast or Hue/Saturation – you need an adjustment layer that doesn’t do anything to the image if you don’t alter its settings. Click Ok and don’t make any changes to the adjustment layer settings. Drag the adjustment layer so it sits between the two image layers.


Step 4
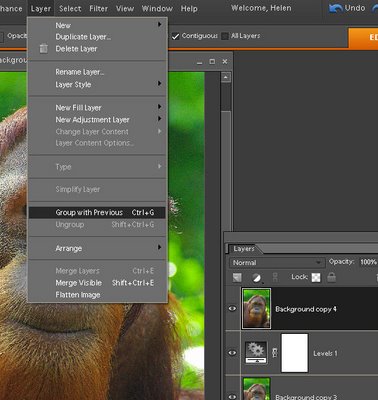
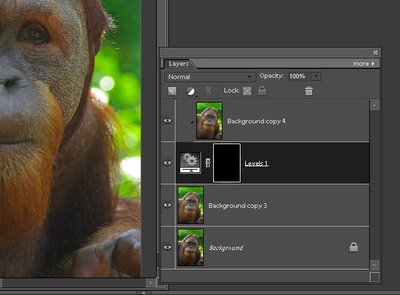
To create the fake layer mask, select the topmost oversharpened layer and choose Layer > Group with Previous. This attaches the oversharpened layer to the adjustment layer below limiting the effect of this layer to the area that is white in the adjustment layer mask – right now that is all the top layer.


Step 5
Click on the adjustment layer and click on the layer mask thumbnail which is the white box on the right side of the layer in the Layers palette. You should see a double border around it indicating that it’s selected. Fill this mask using the paint bucket tool with black. The entire oversharpening effect is immediately removed from the image.


Step 6
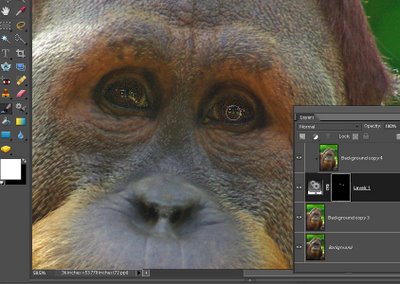
Select the brush tool and select a soft round brush. Adjust the opacity to around 25 percent and select white as the foreground color. With the layer mask thumbnail still selected, paint over the areas of the image that you want to apply additional sharpening to. In my case, I wanted to oversharpen the eyes on the orangutan.


Step 7
As you paint, the sharpening effect will built up – if you paint somewhere by mistake, set black as the foreground color and paint out the mistake. This is how a mask works – you paint with black to remove the effect on this layer (in our case you paint in black to remove the sharpening effect form the layer above because the two layers are grouped together) and you paint with white to reveal the effect.

When you are done, you can flatten the image or save it as a layered PSD file.

In future whenever you need to use a layer mask in Photoshop Elements, simply apply an adjustment layer to the image, drag it under the layer it should control and group the layers together.

Learn more: If you’re interested in learning more about sharpening, check out my very popular post on Understanding the basics about Sharpening.

Helen Bradley

Monday, June 8th, 2009

Understanding the basics of Sharpening in Photoshop

Sharpening is one of those everyday tasks that most photos can benefit from. In this post I’ll explain what sharpening is, when you should perform it and how to do it. The information here, although it is explained using Photoshop, is relevant to all photo editing programs.

Sharpening does as its name suggests and sharpens the image making it look crisper and making the edges in the image more distinct.

In the darkroom the process is achieved by taking one negative and a slightly blurred positive image, sandwiching these together and making a very quick exposure of this sandwich. Then the exposure is completed using the negative. The resulting image has sharper and crisper edges than it would have had if the blurry (unsharp) mask image had not been used. The typical sharpening tool used in Photoshop and other graphics programs is named after this traditional darkroom process and is called the Unsharp mask.

In a graphics editor the Unsharp mask works by creating small halos along the edges in the photo. These halos enhance the contrast between the edges and the surrounding pixels making the edges look more obvious and giving the image a crisper and sharper look.

Here’s how to sharpen an image using the Unsharp mask:


Step 1
Sharpening should be done at the end of the editing process so finish doing all your edits to the image before you sharpen it.

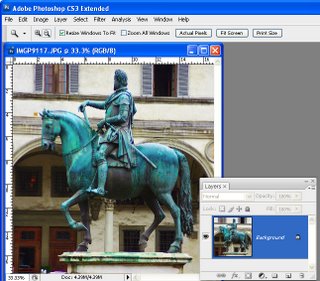
Now create a flattened version of the image either by flattening or merging all the layers or press Ctrl + Alt + Shift + E (Command + Option + Shift + E on the Mac) to create a flattened layer at the top of the image. The Unsharp mask works only on the current layer so you need to have the image on a single layer for it to do its work.


Step 2
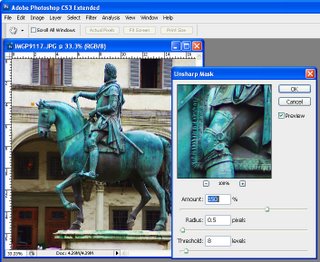
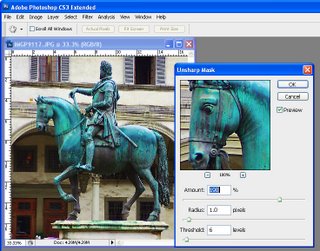
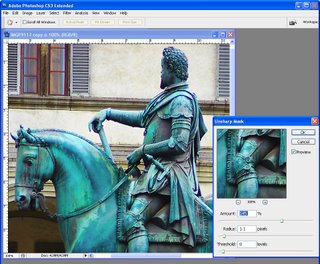
Choose Filter > Sharpen > Unsharp Mask. Set the Radius to somewhere between .5 and 1. This sets the width of the halos which are applied along the edges in the image – the smaller the radius, the smaller the halo and 0.5 – 1 is ideal – this is not always a situation where the more is better!

Set the Threshold to around 10. The Threshold value determines how edges are found – the higher the value, the more different adjacent pixels must be to be considered an edge so less of the image will be sharpened. A small value means that smaller differences in pixel values are considered an edge so more of the image is sharpened. The risk with a small Threshold value is that it can add noise to the image by enhancing edges in places where you don’t want to see them.

The Amount setting controls how much contrast is added to the edges – a higher value means more contrast and a more obvious sharpening. Start by setting this value to around 150.


Step 3
Take a look at your image and adjust the sliders from this starting point until you see more detail in the edges in the image but not so much that you see unattractive halos around the edges.

Typically, if you have an image with a lot of very fine detail you can use a very small radius value (so the halos are small) and a correspondingly high Amount value (so that the halos can be seen to sharpen the image). On the other hand, if you have an image without a lot of fine detail can use a larger radius say, 1 – 1.5 or more (which gives larger halos), and a smaller Amount setting because the halos will be bigger and more visible anyway.

Adjust the Threshold value so you get sharpening in the areas you are interested in being crisper but not so that it results in unwanted noise in the image.


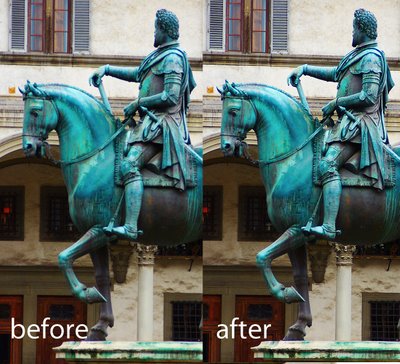
This image is nicely sharpened – you can see the crisper edges.


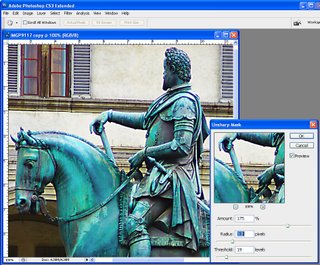
This image is over sharpened – notice the unsightly halos around the edges.

Tips
It is generally advisable to view the image at 100% when you are sharpening it so you can see the effect on the image. You can do this by sizing the image to 100% before launching the Unsharp mask tool. Alternately, use the 100% preview in the Unsharp mask dialog –click on the preview to see the unaltered image so you can compare it with the preview..

When you are sharpening for printing you can generally sharpen more heavily than you should do for onscreen viewing.

There are other sharpening tools available in Photoshop CS2 and later which do an even better job of sharpening than the Unsharp mask. I’ll look at these tools in a future post. For now, regardless of which graphics editor you use, you should have an Unsharp mask tool and it should work in a similar way to the Photoshop Unsharp mask shown here.

Helen Bradley

Tuesday, May 12th, 2009

Lightroom: Spot fixing with the Adjustment Brush

One of the exciting new features in Lightroom 2 is the adjustment brush which lets you to make spot fixes to your image in Lightroom. These fixes apply to only the area you select rather than the entire image. This means you can make local adjustments for contrast, saturation, exposure, brightness, clarity and sharpness without having to take the image to Photoshop to do this.

In this post I’ll show you how to get started using the adjustment brush in Lightroom. 2


Step 1
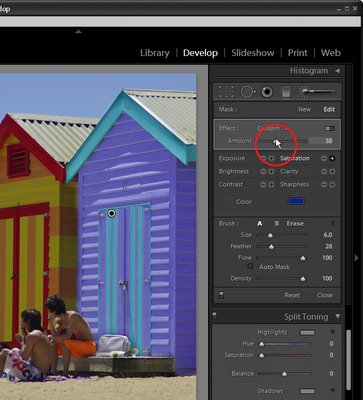
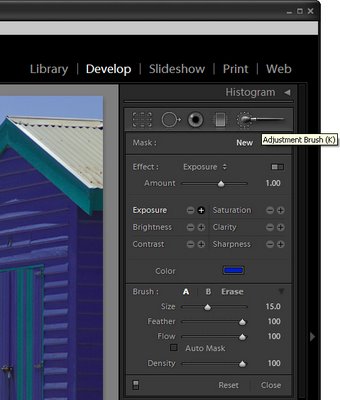
Open Lightroom and click the Develop module. Locate the Adjustment Brush and click it to select it. Hold the brush over the image to check its size. The inner circle is the hard part of the brush and the outer circle shows the edge of the feathering. To adjust the brush size use the [ and ] keys or adjust the Size and Feather using the sliders.


Step 2
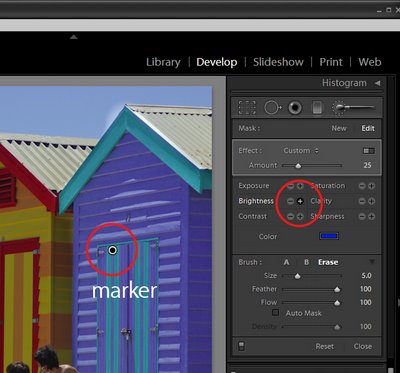
Select the adjustment to make, such as Brightness or Saturation by clicking its + symbol to increase its value or the – symbol to decrease it. Then start painting on the image to adjust that part of the image. When you start painting the effect onto the image, Lightroom places an identifying marker on the screen. Here I have Brightness selected and the marker is visible.


Step 3
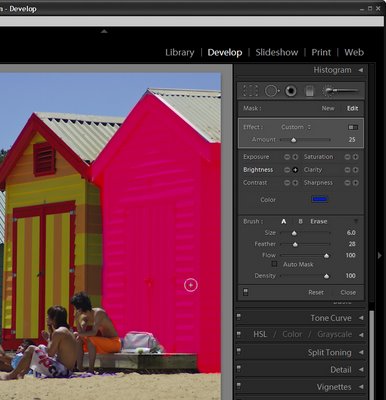
If you don’t know where you have painted – and it’s often very hard to know exactly – press the O key to view or hide a mask which shows the area you have painted on. If you prefer to, you can display the mask as you work. The mask also appears if you hold your mouse over the marker.

To erase the brush strokes, click the Erase option in the brush area and erase over the area to remove the strokes. To return to painting click brush A which is the default brush and continue to paint over the area. You can also use the brush with the Alt (Option on the Mac) to remove the painted areas rather than switching between the brush and eraser.


Step 4
If the effect is too much or too little you can adjust the intensity of the effect using the slider.


Step 5
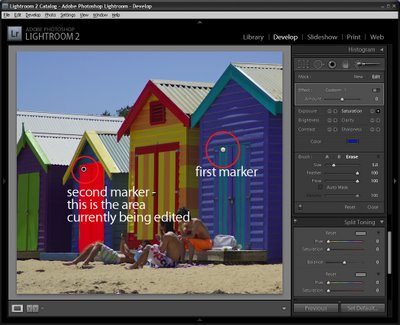
If another area of the image requires fixing, click the New option and then repeat the steps to select a fix and then paint it onto that part of the image. Later on you can adjust either of the fixes by first clicking the Adjustment Brush tool to select it and then click on the marker for the area to change – you will see that the word Edit is now highlighted – and you can now adjust the painted area or adjust the amount of the fix.

In a future post I will look at some more advanced functions of the Adjustment Brush.

Helen Bradley

Page 1 of 212