Thursday, May 8th, 2014

Photoshop Basics: Learning About Layers

image credit © 2008 lockstockb, freeimages.com
Guest post

Understanding how layers work is crucial to being able to work effectively in Photoshop and in this post I will cover everything related to Layers including,

How to Create a New Layer

How to Duplicate a Layer

Add a Layer style

Using Adjustment Layers

How to Merge Layers

CREATE A NEW LAYER:

This is a very basic function in Photoshop which is elaborated further in this Photoshop tutorial. On the menus choose Layer > New > Layer to create a new empty layer right above your image. On that brand new layer, you can paint, create shapes, etc… all in a non-destructive way. This means that if you don’t like what you just did, hide or delete that layer on your image underneath will still look like it did at the start.

DUPLICATE A LAYER:

To duplicate a layer click on the layer you want to duplicate then go to Layer > Duplicate Layer and voila, you now have two identical layers!

ADD A LAYER STYLE:

Say you added a button or some text on your image and you’d like to add a shadow to it. To do this, choose Layer > Layer Style and choose Drop Shadow. Other popular options are Inner Shadow, Outer Glow, Inner Glow and Bevel & Emboss. I suggest you play with each of them to really understand how they can benefit you.

USING ADJUSTMENT LAYERS:

Adjustment layers are one of the most powerful tools in Photoshop. Use these to change the look of your image in a non-destructive way by, for example, adjusting the colors as well as the shadows, highlights and contrast. To add an adjustment layer to any image, go to Layer > New Adjustment Layer and choose the type of adjustment layer. Here is a list of the adjustment layers I use most frequently:

Brightness/Contrast: This lets you make simple adjustments to the tonal range of your image. In layman’s terms, when you move the Brightness slider to the right your image gets brighter, when you move it to the left the image gets darker. If you move the Contrast slider to the right, your image becomes more contrasty, you move it to the left, contrast is reduced and the image becomes more grayish.

Levels: A Levels adjustment allows you to adjust the intensity levels of shadows, midtones, and highlights in your image. Drag the slider on the left inwards to darken the shadows and drag the slider on the right inwards to brighten the highlights. If you drag the middle slider to the left you will brighten the midtones and drag it to the right to darken the midtones in your photo.

Curves: Use can use Curves to adjust the image tonality with more precision than by using Levels. By adding points on the curve, you’ll be able to adjust the brightness or darkness of the Highlights, Midtones and Shadows.

Hue/Saturation: This one is really helpful for adjusting colors. You can either adjust the saturation of all colors at the same time (this is the default and occurs when the Master channel is selected) or select individual colors from the dropdown menu to adjust the saturation of that color and also its Hue and Brightness.

In adjusting the hue you can, for example, with red selected, drag the slider to bring the red towards either pink or orange. The Brightness slider will either brighten or darken specific colors or the entire image – depending what you have selected in the dropdown menu.

Color Balance: Perfect for color correction, Color Balance changes the mixture of colors in a photo. You have the option here to adjust the colors in the Midtones, Shadows and Highlights. Let’s take the color blue for example, if you want to adjust the color of a blue sky, choose Highlights, a blue shirt, choose Midtones, a blushish shadow, choose Shadows. To color correct an image, I suggest you try each slider and move to the next slider once you like the look of the image.

Selective Color: This is another powerful tool for color correcting or color grading. Selective color will allow you in a very precise way to fine tune color. For every color (Reds, Yellows, Greens, Cyans, Blues, Magentas, Whites, Neutrals/Gray, Blacks) you’ll be able to fine tune them by adjusting the Cyan/Red, Magenta/Green, Yellow/Blue, Black/White found in each of those colors.

MERGING LAYERS:

Sometimes you want to duplicate a layer, other times you want to merge them together. To do this, from the Layer menu choose Merge Layers, Merge Visible, or Flatten Image:

Merge Layers: Use this option when you want to merge layers you have selected.

Merge Visible: Use this when you want to merge all the visible layers.

Flatten Image: Use this when you want to flatten the entire image/all the layers.

Helen Bradley

Tuesday, September 3rd, 2013

Photoshop – Craft a custom Black & White Photo

Learn how to craft a custom black and white image in Photoshop using the Black and White adjustment layer and a curves adjustment. The process also includes adding a simple vignette effect.

Transcript:

Hello, I’m Helen Bradley.

Welcome to this video tutorial. In this tutorial I’m going to show you how you can create a custom black and white conversion for your images in Photoshop.

Before we get started with this process let’s have a look and see what it is that we’re aiming at. Here is just a standard conversion to black and white of an image and I just used the desaturated command to get this image. And here is a more crafted version.

Here I’ve been able to make choices about exactly how my black and white image looks. And I like this one a whole lot better and I’m going to show you how you can create this affect yourself. And what we do is use a black and white adjustment layer to do it. So first of all I’m going to take all these layers and just trash them.

And let’s get started with this image which of course was originally a color image. Now one thing I did do to this image is I cropped the beam across the top of the image out of the way because I didn’t think that helped it at all. And now instead of doing a desaturation which you might do by choosing Image > Adjustments > Desaturate, which gives you this sort of flat conversion into black and white, we’re just going to undo that and we’re going to choose Layer > New Adjustment Layer > Black and White.

Now this allows us to craft a black and white and what you get is a series of sliders. And you get a sort of standard black and white adjustment. But with these sliders you can determine how individual colors in the image are converted. Now right now I want you to look at this Konica Minolta sign here and it was originally blue.

Now you can see that if I take the blue slider towards the left it becomes very dark. If I take it towards the right we actually lose that sign completely. And this is the way that we craft our black and white image. All we need to do is to bring the sliders to where we want them to be to get the effect that we want on the image.

Now for me I wanted my greens to be a big lighter. So I’m going to take my greens to the lighter side of the slider and I’m testing each slider individually to see which gives me the effect that I’m looking for. And I’m looking for a bit of a moody image here.

So everything is going to be towards the darks for this image. But I might kick the occasional color up to light to that I get a little bit of variety in the image. And I’m just going to craft that until I get what I want and close the dialog.

Now the beauty of using an adjustment layer by choosing Layer > New Adjustment Layer is that this is now editable so I can double click on this adjustment layer at any time and I can redo the adjustment. I can tailor it again to my specific needs.

Having done this I wanted to really give this image a kick so I also added a couple of adjustments to it and these were curves adjustments. I chose Layer > New Adjustment Layer > Curves and I did this twice because I wanted to use standard curves adjustment. So from the presets the first thing I did was I chose a strong contrast because I really, really wanted a contrast here.

But then I realized that that was over darkening it so I added another adjustment layer and this time I went for a lightening curves adjustment layer. So I just went straight back into Curves and this time chose Lighter because that gave me a lighter but still very strong contrast image. And I finished off with a vignette.

Now with the vignette I added a new layer so Layer > New Layer. And then I chose the Rectangular Marquee tool here on this brand new layer and I just selected inside the image, sort of around I guess about half an inch inside the image. Then with that selection in place I chose Select > Inverse so that now I have this very edge of the image selected.

And you can see that I made a really poor job of this so let’s go back and I missed the top of the image. Let’s try that again, select Inverse. Now it looks pretty even all the way around. I have a sort of brown selected here but it could be black. It could be anything. I’m going to press Alt Backspace or Option Delete on the Mac just to fill the selection with that color and then I’m going to deselect the selection with Select > Deselect.

I’m going to blend it in using a multiply blend mode because the multiply blend mode darkens everything. And you can see the darkening effect around the edge of the image when I turn it on and off. Of course it’s not only way too much but it’s also a really hard edge. So with this layer selected I’m going to choose Filter > Blur > Gaussian Blur.

Gaussian Blur is my sort of go to blur because what it allows you to do is to really heavily blur the edges. Now I’m down at the very bottom of the image so that we can see the edge that we’ve got. This is it with a zero radius blur but as soon as I start increasing the blur you can see that it softens out nicely. So I’m just going to make it nice and soft and then bring down the opacity of it until I get what I want. So this is the original image and this is our new crafted black and white version.

And I think that for me is a lot more interesting than this particular version that I got by just choosing to desaturate the image. If you like this sort of dark, grungy sort of version or if you want to be able to craft your black and white images with a bit more control than just a one-step click select option then this is the tool you need to do it. Use the black and white adjustment layer and craft your own images.

I’m Helen Bradley.

Thank you for joining me for this video tutorial. Look out on this YouTube channel for more of my video tutorials.

And subscribe so that you’ll be advised when new tutorials are launched and also visit my website at projectwoman.com where you’ll find more tips, trick and tutorials on Photoshop, Photoshop Elements, Lightroom, Illustrator and a whole lot more.

Helen Bradley

Tuesday, March 12th, 2013

Play time with Photoshop Gradient Map

Playing with color using a Gradient Map Adjustment Layer

I’ve been fiddling around with halftones and grayscale posterized images lately – partly for a magazine project and partly for some things I am designing. Sometimes, however, I just play for the sake of it and today’s post is all about that playtime.

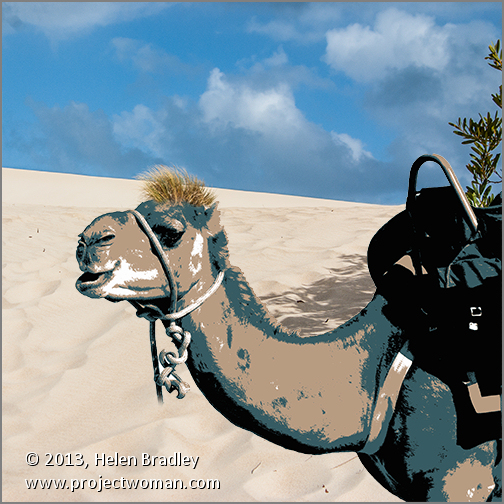
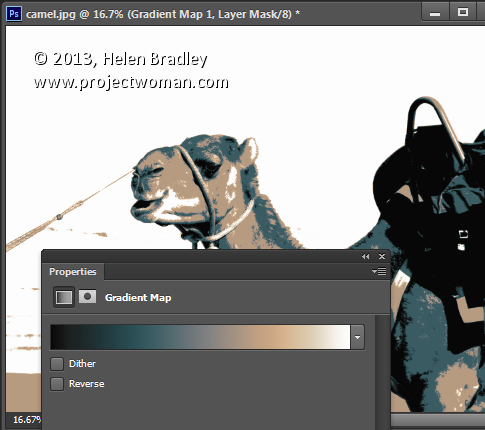
Posterized images have a flattened color look – the entire image is flattened to a few bands of color and I was interested to see what color variations I could get with a Gradient Map over an image. Gradient maps work by mapping a color onto a tone in the image and, with a regular image, the colors sort of blend across the image. However, posterized images are different – they have flat areas of color so the Gradient Map will not be seamless and instead it is going to recolor the posterized image in great big solid blocks of color.

Here is the image I started with:

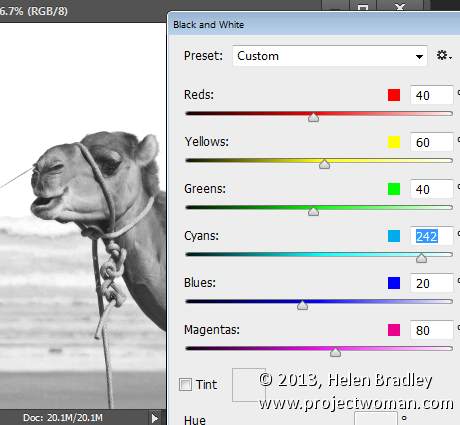
To see this at work, first convert the image to black and white using Image > Adjustments > Black & White and create a nice contrasty black and white.

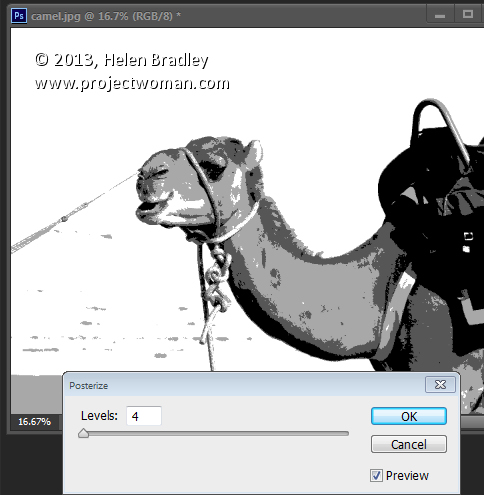
Then add the posterized effect by choosing  Image > Adjustments > Posterize and set the Levels to 4 or 5 – this makes the image into one that has 4-5 tones only in it.

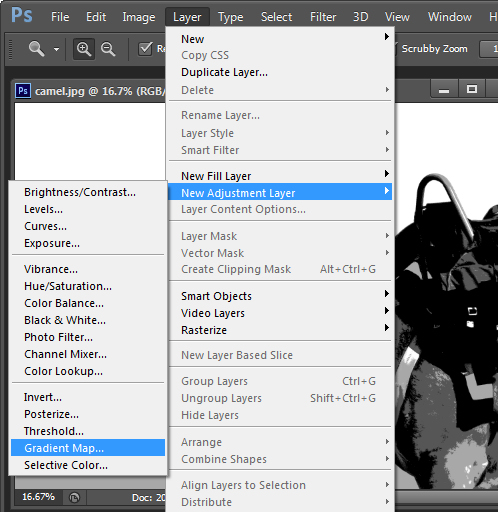
Now to recolor the image with the Gradient Map choose Layer > New Adjustment Layer > Gradient Map and click Ok.

From the dialog select a color scheme to use. The new photo filters which are included in Photoshop CS6 are a great choice but absolutely anything will give a great result. The colors are mapped on to the image according to the light and dark tones in the image. If you click Reverse you’ll get a negative effect. Find the color to use and close the dialog.

Because you’re using an Adjustment Layer you can change the colors anytime by just double clicking the adjustment layer and choose a different color combination.


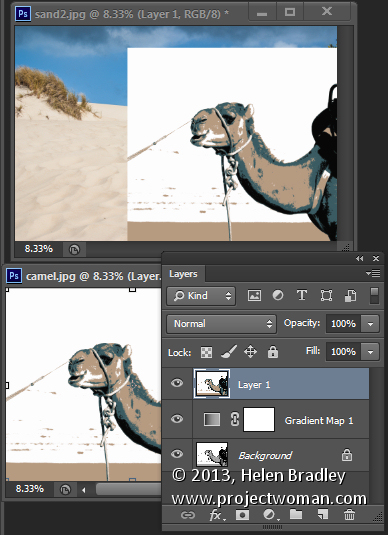
I finished off by finding an image to use with this one. I flattened the camel to a single layer by pressing Control + Alt + Shift + E (Cmnd + Option + Shift +E on the Mac) and then dragged the flattened layer into a second image.

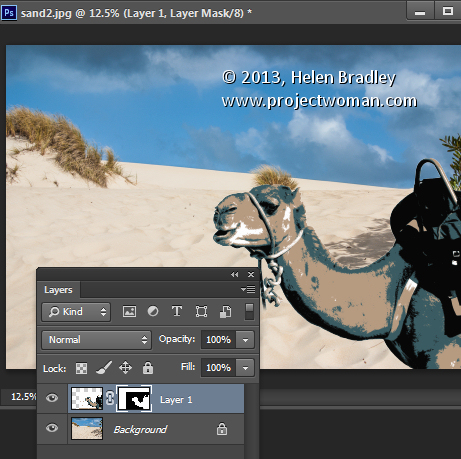
Then I used a mask on the camel layer to select and remove the background. I positioned the camel in an interesting place and cropped the image to square. I added a small vignette around the image too.

Helen Bradley

Monday, December 3rd, 2012

Photoshop Quick Fix for dull foggy images

Photoshop Levels offers is a simple way to fix dull, lifeless images. Learn how to apply a Levels Adjustment layer to an image, how to read the histogram chart and how to use it to fix your image in seconds.


Transcript:

Hello, I’m Helen Bradley. Welcome to this video tutorial. Today I’m going to show you a quick fix for a dull or muddy looking image. This is an image that lacks tonal range. It lacks contrast and we’re going to give it a punch and we’re going to do it quickly and easily. In this video tutorial I’m going to show you how you’re going to fix an image that looks a bit like this. This image is what I would call muddy. It actually lacks tonal contrast. There no blacks in this image. We’ve got some light pixels around the sky area but there are no blacks. And the result is that the image looks a bit foggy, a little muddy, a little lacking in tonal range, lacking in contrast and the color is a little bit flat as well. And this is the fix that we can apply to the image extremely quickly and Photoshop will actually tell us how to make the fix. It will tell us what’s wrong with the image and how to fix it. So let’s have a look and see how we’ll do this.

To start off with, with the image open in Photoshop I’m going to choose Window and then Layers because I want to see this layer’s palette. Now we’re going to choose an adjustment layer. It’s exactly the same as making an adjustment except this time it is editable, and we would like to get you started using adjustment layers because it gives you a little bit more power in Photoshop. So we’re going to choose Layer, New Adjustment Layer. And the one that we’re going to use is called levels. So let’s just click on Levels and see what we get. We get offered to add a new layer so I’ll click Ok to say yes. And then we get this dialogue here. Now this might look a little bit confusing but it’s actually Photoshop telling us what’s wrong with the image and giving us a chance to fix it. This is the pixels in the image. It’s a histogram. And what Photoshop has gone and done is it’s had a look at every single pixel in the image, how light or dark it is, and it’s counted up how many really dark ones it has and how many middle tone ones and how many light ones. And it’s done that for all the 255 tonal ranges in this image. So we got from 0 to 255. And it’s telling us how many pixels are in each of those ranges of tone. And this is black and this is white. So you see that we’ve got a few pixels very, very white and then a lot of pixels in that sort of light white area which is of course all around in the sky.

But see here, this is the problem in this image. There are no blacks. There’s nothing in this black area of the histogram. And so levels is not only telling us that but it’s also giving us a chance to fix it. So what we can do is we can drag on this slider here, the one under the chart. I want you to ignore these ones all the way at the bottom. It’s these under the chart that you’re interested in. And when you see the chart doesn’t make it all the way to either end of this histogram you’re just going to drag in until it does. And look what happens to the image as we do that. We’re just going to drag in to give ourselves some black pixels in the image, and then we can adjust this mid tone point as well. We’ll go to the right to darken the image or to the left to lighten the image. And you just need to choose for your image where the best point for that is. And we could come in a little bit here on the whites, perhaps. And certainly if the chart didn’t reach the edge then we would drag in on those whites. So you just need to read your chart and then just drag these little sliders into position. And when you’re done you can just close that dialog.

And there’s our fix. This is the before and this is the after. Photoshop showed us what was wrong with the image and gave us the chance of fixing it. Let’s have a look at another image that also has a similar problem.

This was captured in London on the London I through a fair bit of Perspex glass I should imagine. And also given that London tends towards being a little bit cloudy and gray I think that’s probably not helped this image either. So again, with the layer’s palette visible we’re going to add an adjustment layer, Layer, New Adjustment Layer, Levels, click Ok. Here’s our levels dialog, not unsurprising that we have no black pixels in this image. And in this image we have practically no white ones either. This one is a little bit different. So if we want to perk up the whites we can just bring in this slider here to lighten the whites and stop them being gray and make them white, things like the clock face here and some of the areas around here, this white building probably here. And now let’s drag in on the black slider to get some blacks and then we could adjust the mid tone if we wanted to darken the image or to lighten it and again, it’s to your taste. When you’re done, click the Close button. This is how the image started out and this is how it looks now. And that fix will take you 30 seconds.

Now the benefit of using adjustment layers, if I double click on this you’ll see that it opens up again. And if I think that I haven’t darkened it enough I can darken it up now and close it. So I’m not bound into this fix. I can remove it if I want to or I can double click it to adjust it and just improved it a little bit if I think I haven’t got it perfectly right.

I’m Helen Bradley. Thank you for joining me for this video tutorial. If you liked the video please click the Like button. Consider subscribing to my YouTube channel to be advised when new videos are released. And visit my website at projectwoman.com for more tips, tricks and tutorials on Photoshop, Photoshop Elements, Lightroom and other applications.

Helen Bradley