Sunday, March 25th, 2012

Use Lightroom Presets in Adobe Camera Raw

If you’re like me, you have some presets that you’ve created in Lightroom that you would like to use in Adobe Camera Raw. Unfortunately the format of the preset files in each program is different so you can’t just install a Lightroom preset in ACR. However you can make an ACR preset from a file that has had that same preset applied to in Lightroom. Here’s how:

Apply the Preset

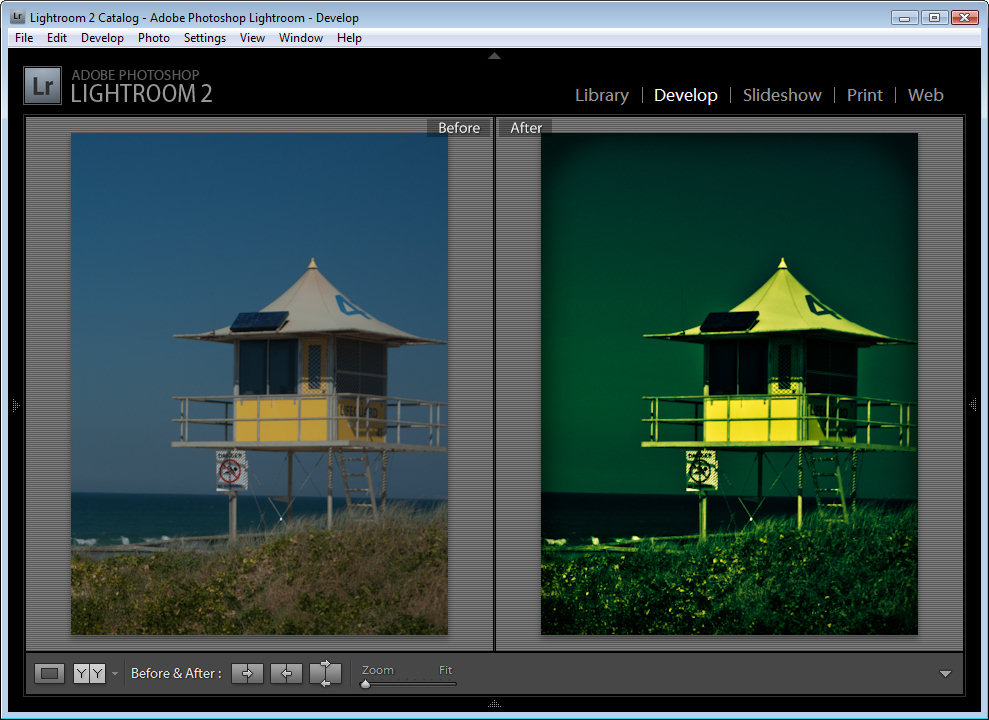
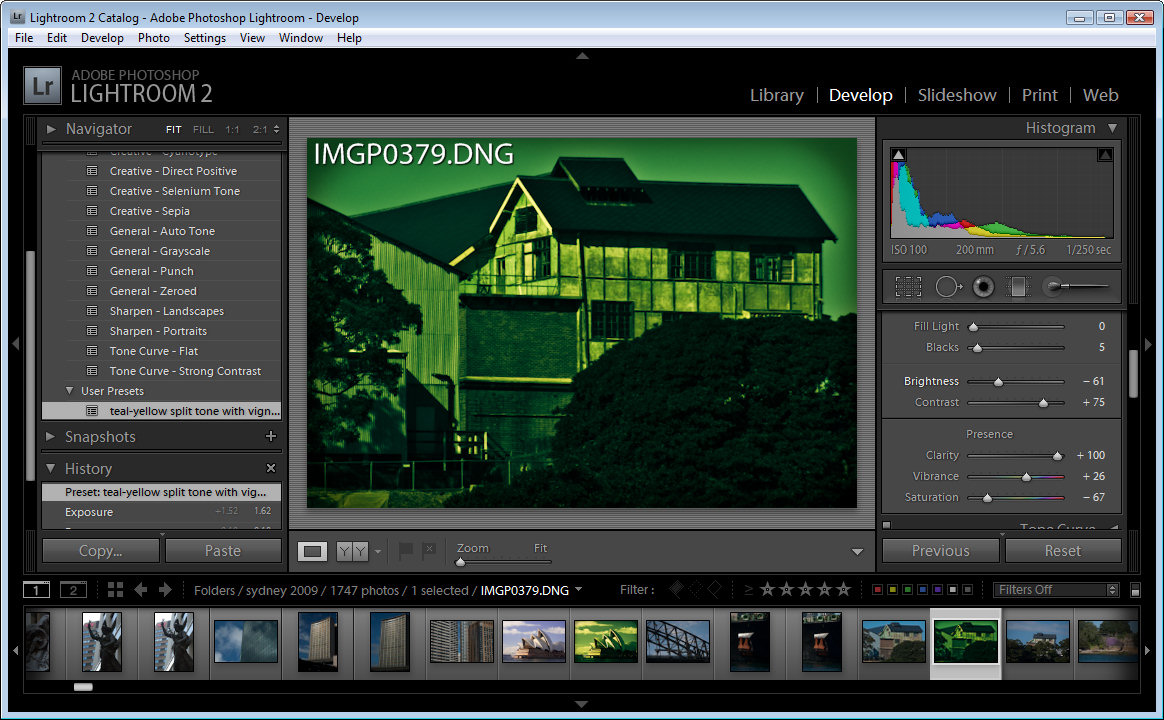
To begin, open an image in the Develop module in Lightroom. Without applying any other changes to the image, apply the Preset that you want to take to ACR. Here I have applied one of the free Wonderland presets from wonderlandpresets.com.

Export the Image

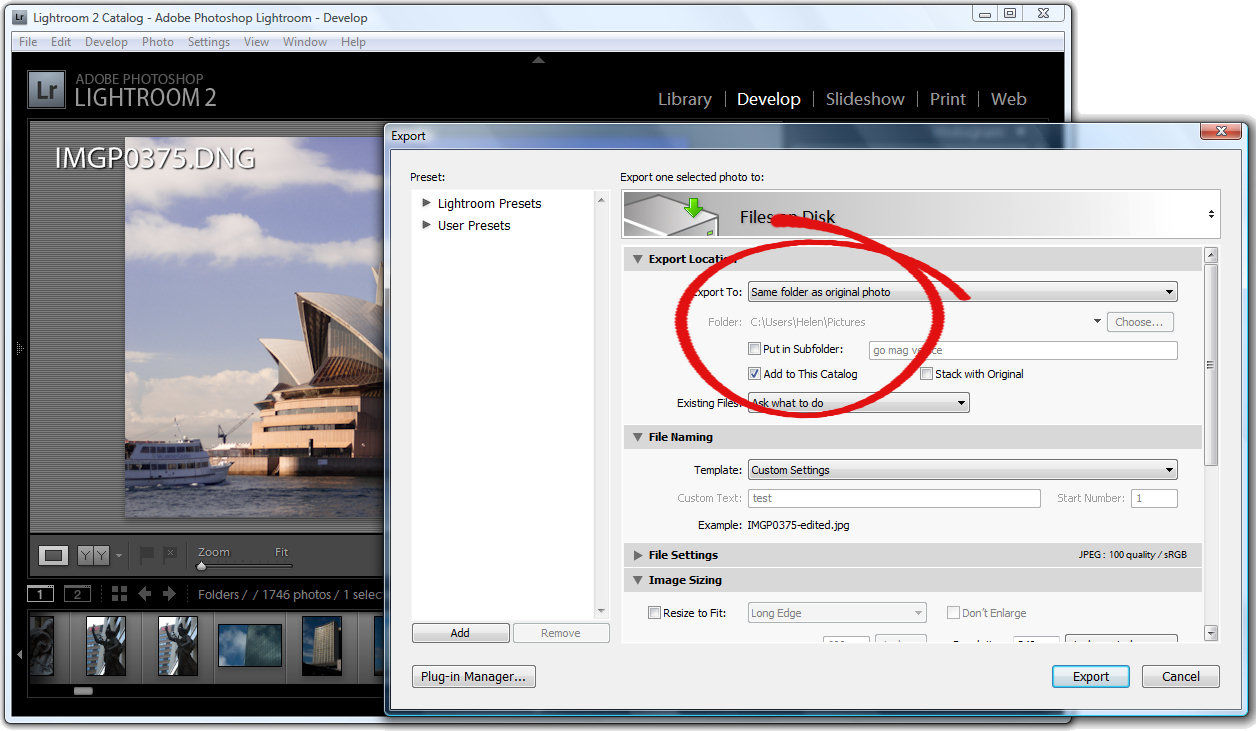
Now export the image as a DNG file so that the changes will be written to the file. To do this, right click the image and choose Export > Export to DNG and export the image to folder of your choice.

Open in ACR

Launch Windows Explorer and locate the image on disk. Right click it and choose Open With > Photoshop CS5. Because it is a DNG file, it will open automatically in ACR.

Create the Preset

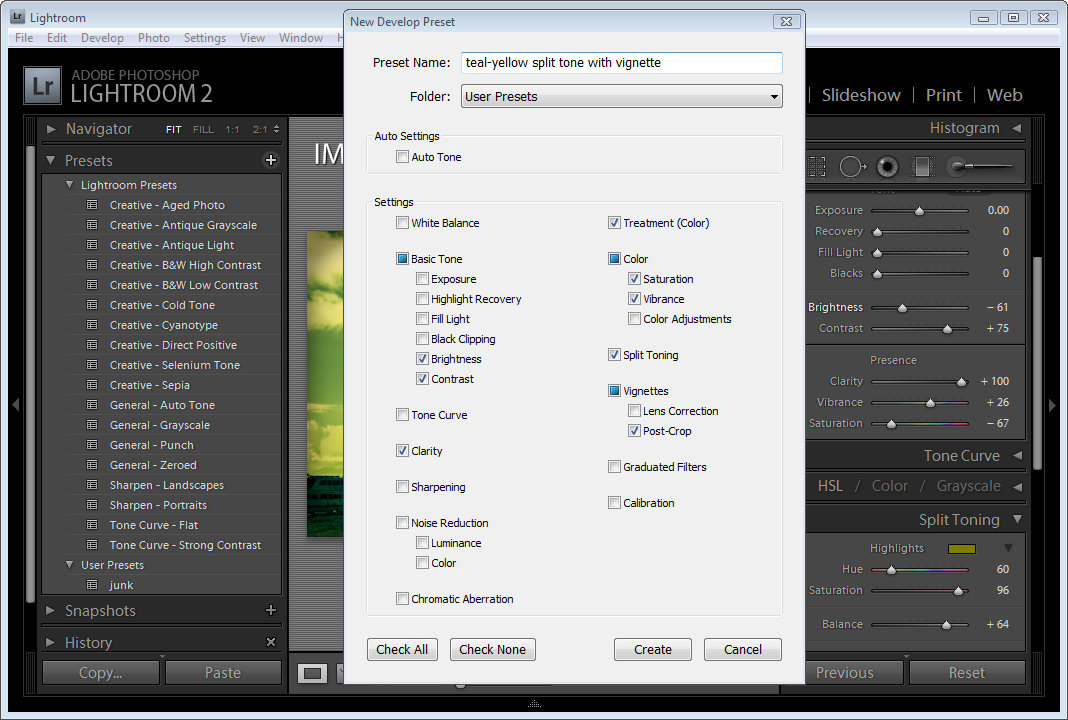
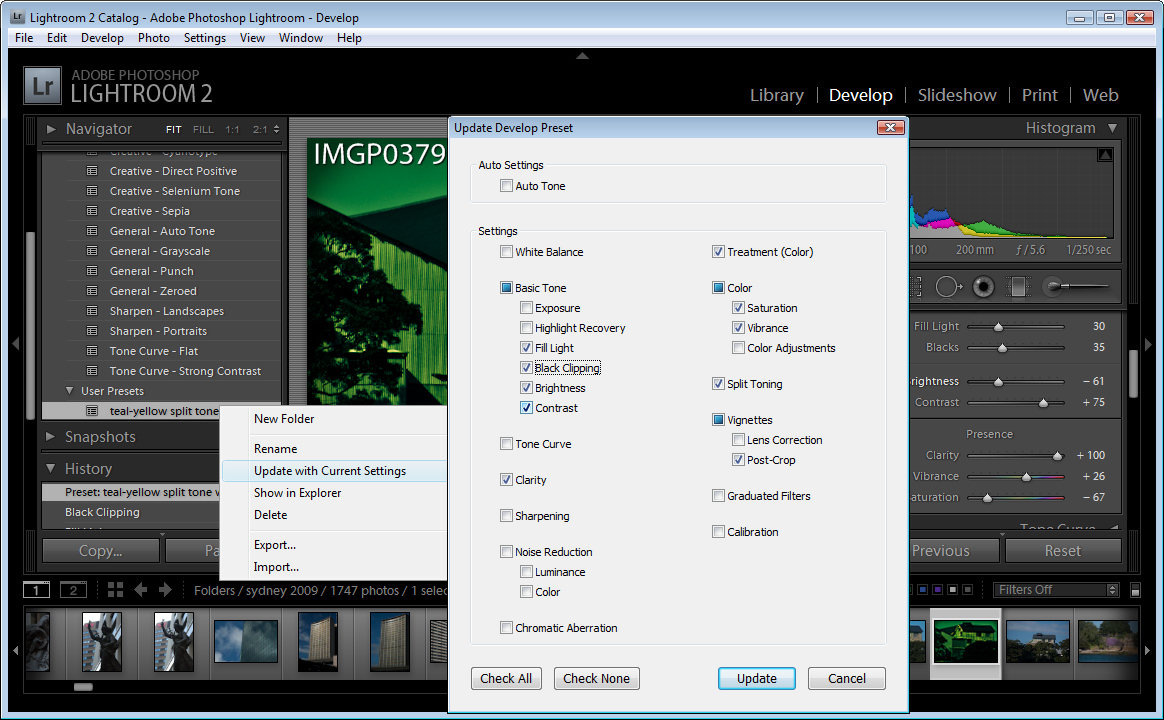
Click the Presets tab and click the Create New Preset option at the foot of the Presets panel. Type a name for your preset and then select the options that you want to include as part of the preset. Type a name for the preset and click Ok.

The preset will now be available from the Presets panel in ACR and will be able to be used to adjust any image.

Features not included

You should note that while most of the Lightroom adjustments that can be stored in a Lightroom Preset can also be saved as an ACR Preset, one exception is any Graduated Filter adjustment.

In Lightroom any adjustments you make using the Adjustment Brush cannot be saved in a Lightroom preset and in ACR those made using the Graduated Filter cannot be saved either. You will see the Graduated Filter adjustments that you made in Lightroom in ACR if there are any but you cannot save them in your preset as a Graduated Filter adjustment. What you can do however, is to save the settings for the Graduated Filter but not its placement as a separate setting. To do this, click the Graduated Filter icon in ACR to select the tool then click the Graduated Filter to save the settings for. Click the icon in the top right of the Graduated Filter panel and choose New Local Correction Setting and save it giving it a name.

You can apply this to an image in future using the Graduated Filter tool – just select the setting to use from this menu and drag to create the Graduated Filter for the image. The solution isn’t perfect but it can save you some work as shown here with the two Graduated Filters which are part of my Orton Preset for Lightroom. I can apply the preset then switch to the Graduated Filter and quickly apply the two Graduated Filter adjustments with their individual settings.

Advantages of taking Lightroom presets to ACR

One of the reasons you may want to take presets from Lightroom to ACR using this process is to take advantage of the free presets available for Lightroom. There are lots more of these than there are presets for ACR. If you use ACR as well as Lightroom then having your favorite presets available in both program will be useful.

Helen Bradley

Thursday, April 1st, 2010

Create a Lightroom Slide Show


One of the really handy features of Lightroom is its ability to create web slideshows quickly and easily. There are various options you can use and I’ll show you how to use the SimpleViewer slideshow which is good looking and very functional.

Step 1
To get started, prepare all your images and save them as a collection. Use a Collection rather than a Smart Collection so you can arrange the images in the order that you want to see them in the slideshow by dragging them into position using either the grid or the filmstrip.

To create a collection, select the images to use, click the (+) plus symbol to the left of the Collections panel and choose Create Collection. Type a name for it, enable the Include Selected Photos checkbox and click Ok. You can then drag and drop additional images into the collection and order them as desired.


Step 2
In Library view add a caption to each image so you can include the caption in the SimpleViewer slide show. To do this, open the Metadata panel and locate the Caption box. Type a caption for the first image, move to the next image and type a caption for it and so on.


Step 3
Click to open the Web module and, from the Engine options in the top right of the screen, choose Airtight SimpleViewer. This is an attractive and functional slideshow tool. From the options across the bottom of the screen choose All Filmstrip Photos.


step 4
In the Site Info area type the title to use for your slideshow, this is the page title and it appears in the browser title bar. In the Color Palette options, set a background color and border color for your images and a text color. In the Appearance Options select the position of the thumbnails and the number of rows and columns of thumbnail images. You may find that by increasing the number of rows beyond 3 you will lose the captions so it is best to use a smaller number of rows so you have the benefit of including captions.

Step 5
In the Image Info panel select the Caption checkbox and then from the dropdown list, select what you will use as captions. If you followed step 2 and typed caption information in the Metadata then chose Caption for this option.

Step 6
In the Output Settings panel, specify the size of the larger images which is the size of the selected image in the slideshow. You can also specify the quality of that image. The Photo Borders option controls the size of the border around the images, which by default is set to 20, but which you can increase or decrease as desired. The Padding Value controls the offset of the image from the remainder of the page. You can enable or disable the option to allow the viewer to right click to view a photo.

Step 7
In the Upload Settings area select the FTP server dropdown list click Custom Settings > Edit and enter the details for the ftp account for your website. You must type your server name, your user name and password – you can, if desired, include the password in the preset so that you won’t have to type it each time. Include the server path for storing the files and, if necessary, adjust the protocol port and the mode used for data transfer although these defaults should work in most circumstances.

Once you have created your settings, from the Preset dropdown list, select Save current settings as new preset so that these will be available next time you use the program.

Step 8
By selecting a subfolder, you can separate the slideshow and its files from other files on your server. This is a good idea as it will eliminate any possibility that files that you upload will overwrite or conflict with files used elsewhere on your website.

Step 9
Click Preview in Browser in the bottom left of the screen to preview the slideshow or simply click the Upload button and upload the files to your server.

Step 10
When the upload is complete, launch the slideshow by pointing your browser to your website to the folder that you created and to the file index.html.

Step 11
Once you have checked your slideshow and if it is all working correctly you can save the template by clicking the plus sign opposite the Template Browser and create a new template in your User Templates folder. This will automatically give you access to your preferred slideshow setup at any time in the future. All you will need to do is to change the Slide Title and the Folder in which the images should be saved on your server.

Helen Bradley

Tuesday, January 12th, 2010

Lightroom Presets

One of the cool things about Lightroom is its ability to store develop settings as Presets so you can use them again later to edit other images.

In addition to creating and saving your own presets, you can also download presets from the web and use them in Lightroom.

In this post, I’ll show you how to create a Lightroom preset and in a future post, I’ll show you how to download and install Lightroom presets you find on the web and also explain how you can share your own presets with others.

To get started with presets in Lightroom, select an image in the Develop module which is ready for some creative attention. Just be aware of any settings you have already applied to the image as these will be included in the preset if you don’t specifically exclude them. If you have done a lot of work to get the image to this stage, export a copy and re-import it back into the catalog – there’s an option that does this in one step in the Export dialog. If you now select and work on the edited version, only the upcoming changes will be included in your preset.

Now you’re ready to work creatively on the image. For example, to split tone the image, start by increasing the Contrast in the image and reduce the Brightness a little to compensate. Adjust the Clarity to a high value so you get more sharply defined edges.

In the Split Toning options, for the Shadows click to select a dark blue/teal color and adjust its Saturation to suit. For the Highlights, select a mustard yellow and adjust its saturation to suit.

Adjust the Balance slider to favor the shadows or highlights as desired.

You may want to decrease Saturation and Vibrance or tweak other color settings to get the result you want. Here I added a Vignette too.

To save the settings as a preset, locate the Presets panel on the left of the Develop panel. Click the plus sign to the right of the word Presets to open the dialog.

Give the preset a name that describes what it does, in this case I called mine, ‘teal-blue split tone with vignette’. Disable any options that you don’t want stored with the preset – leaving selected only the options you have configured and want to use on every image.

For example, I set a Split Toning, added a Vignette and adjusted Brightness, Contrast, Clarity, Vibrance and Saturation.

When you’re done, click Create.

You’ll now find your preset in the User Presets collection and you can click it to apply it instantly to any image in future.

In some instances you may need to edit the image after applying the preset to it to fine-tune the effect for that image.

If you find that your Preset isn’t working quite as well as you imagined it would and if, for example, you always seem to make a particular change to the image after using it such as brightening it a little you can save an edited version of the preset without having to create it from scratch.

To do this, apply the preset and make your change. Then right click the preset and choose Update with Current Settings.

Select the settings to save in the preset and click Update. In future when you apply this to your images it will be applied using these new settings.

You’ll also find that a number of Presets ship with Lightroom. These are in the Lightroom Presets list. Click on any of them to apply it to your image. To see how the image might look with a preset applied, make sure that the Navigator is visible so you can preview the effect without actually applying it to the image.

In later posts, I’ll look at downloading, installing, exporting and sharing Lightroom presets.

Helen Bradley