Saturday, April 22nd, 2017

What size can I make my Lightroom Identity Plate – the Definitive Answer

lightroom identity plate optimal image size

Just how big an image can and should you use as an Identity Plate

I’ve just sat through a presentation by a very well known Lightroom trainer/expert and they were asked what size the ID plate image can be for it to appear (uncropped) in the top left corner of the Lightroom screen. Well they had an answer that “worked for them” but it wasn’t right! Yikes. Noooooo!

Their image was a particular size but, because it was a png file and has transparency they were ignoring the fact that their ID details didn’t fill the image so it “looked” ok in place but, if your image is full of ‘stuff’ from top to bottom with content then their dimensions were out by a whopping 4px!

So, I checked and tested this. I made an image in Photoshop and tested it to the exact pixel – top to bottom and right to left. Here are the proven dimensions:

360 wide x 42 tall

However, be aware, that at 42px tall the bottom pixel of your image sits slap bang on the top of the Lightroom interface so you might want to make it 40 px tall so you leave some breathing room – just saying – but it can go up to 42px before anything gets cut off.

Oh, and the width size needs some explanation too. You can make the width much wider but, if you do, the little disclosure triangle in Lightroom CC2015 appears slap bang on top of the image. So, think of 360 px as a good setting which leaves a few pixels between your ID plate and the disclosure triangle – enough for some breathing space so it all looks neat and tidy.

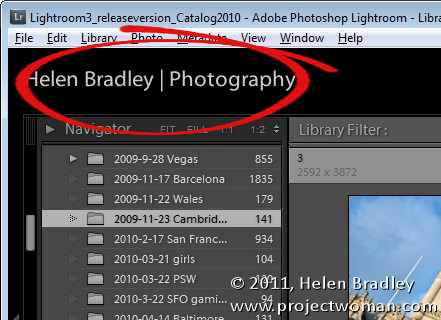
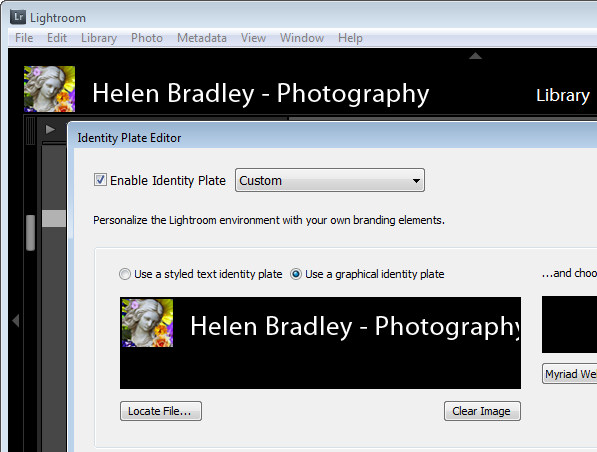
In the image above and below my document is 360 x 40 which works really well. If you are using a less wide image, make sure to add some space to the left of your logo to give it some breathing room – otherwise if you crop really close to your logo in your png file you’ll jam your logo up against the left side of the screen really unattractively.

Also – my logo was created in Illustrator so when I exported it as a png file I made sure to choose the black matte option so it looks just wonderful on a black background – if you don’t do this it will look just horrible with a white fringe around it. Oh! and I added my text in Photoshop – below was my first try – just saying it looks a lot better above where I smoothed the text and resaved and added it to Lightroom. Don’t say you haven’t been warned!
Lightroom CC identity plate size example image

Saturday, April 20th, 2013

Lightroom Tip – how to find Invisible Clickable Rotation Options

Invisible Clickable Rotation Options

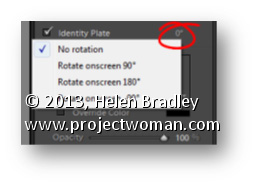
In the Print module, watch out for items that don’t even look like they are selectable. For example, in the Page panel’s Identity Plate area, when you have the Identity Plate check-box enabled you will see a small indicator to the right of it showing the current rotation in degrees.

When you click this you’ll see a popup menu offering other rotation options to choose from.

Helen Bradley

Saturday, January 19th, 2013

Output from Lightroom to your blog

I use Lightroom to prepare the images ready to upload to my blogs so it’s critical that I can get them out of Lightroom all ready to upload without having to do any more work on them.

On one blog I use framed images and therein lies a problem – the images need a thin keyline around them so you can see the edge. Without an edge the image would just blend into the surrounding white background of the blog page.

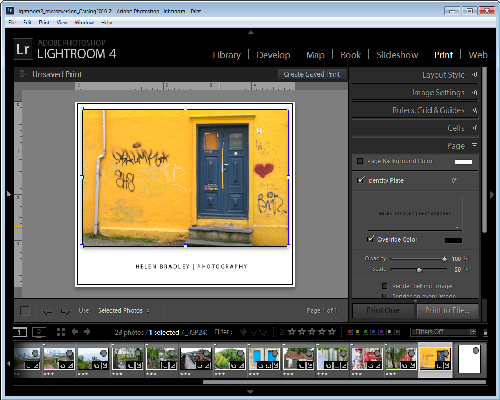
So, here’s how to create a frame effect in Lightroom – the images will be sized for the web with the appropriate resolution, they will have a frame around them, together with my name, and they will have a keyline around the image and around the page itself. And, to finish, it will all be saved as a reusable template.

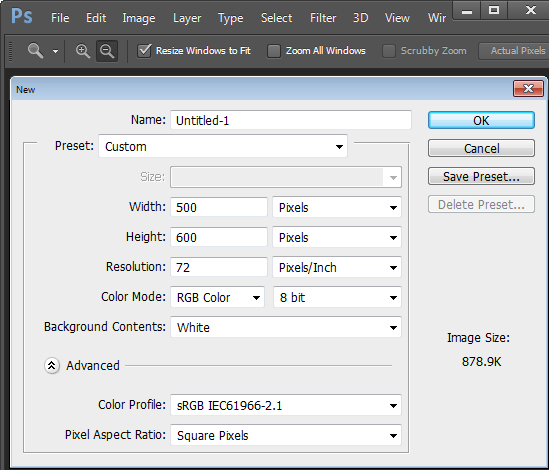
Start outside Lightroom in any graphics or photo-editing program and create an image 500 x 600 pixels in size and filled with white. Save it as a jpeg format image and import it into Lightroom – place it somewhere easy to find.

Then, in Lightroom place the images for the blog post into a collection and add the empty image you just created to the same collection. For convenience I use a single collection for the images destined for my blog – it makes them easier to find and it simplifies the output process.

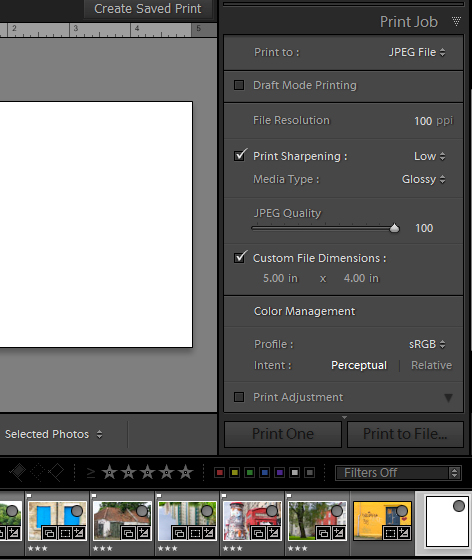
Switch to the Print module and select the collection. To configure the document size, from the Layout Style panel select Custom Package and from the Print Job panel set Print To to read JPEG file. Set the File Resolution to 100 ppi and select the Custom File Dimensions to 5 in x 4 in to make a landscape orientation image which will ultimately be created as a 500 x 400 pixel image. Set Color Management Profile to sRGB.

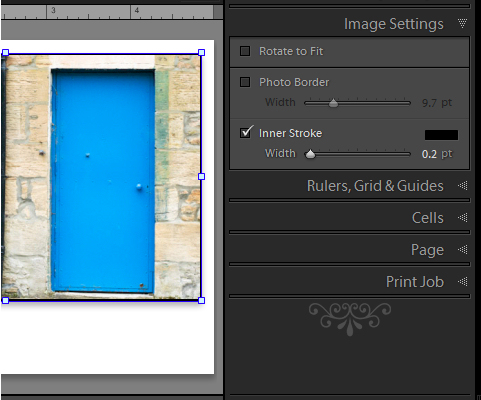
Now, drag and drop the first image into the work area and size it to suit. Choose Image Settings > Inner Stroke and then set the width to 0.2 pt black line. This will appear around the image.

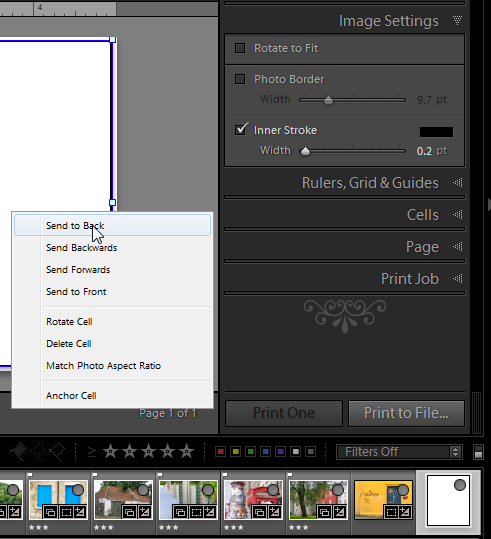
Now drag the empty white image into an empty place in the work area and then size it to just smaller than the size of the work area. It will automatically have a line around it – the Inner Stroke setting is applied to all the images. To place this image behind the first image, right click it and choose Send to Back.

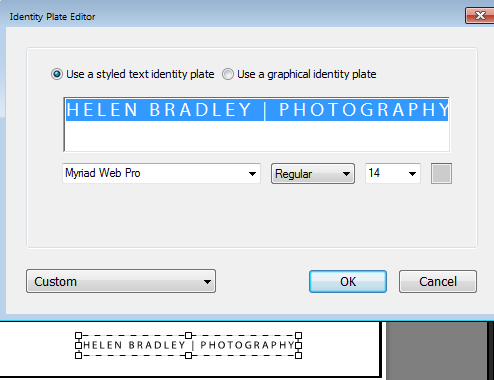
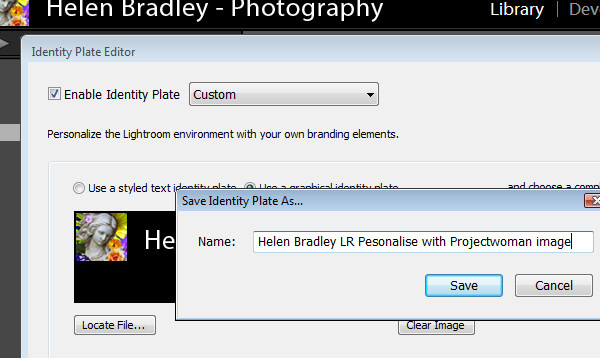
The text is added using an Identity Plate. To make one, click the Page panel and enable the Identity Plate checkbox. Click the small triangle in the Identity Plate box and click Edit and then click Use a styled text identity plate.  Type the Identity Plate text – for example, mine reads Helen Bradley | Photography – select and format it as desired. Click the Custom button, click Save As and type a name for it, click Save and then Ok to add it. Move it into position and size it to suit.

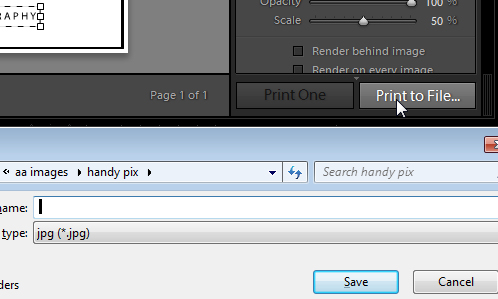
When you’re done click Print to File to print the image.

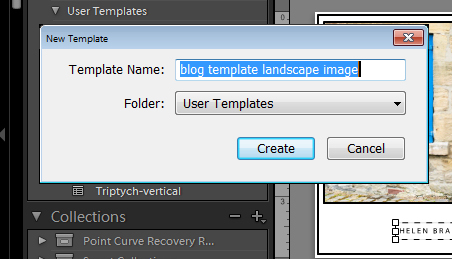
To save the design as a template you can use over and over again, click the + opposite Template Browser in the left panel. Type a name for the template.

In future you can select this template and use it to print another image. Before you do so, you will need to drag and drop an image into the image placeholder and add the empty image to the larger  placeholder. If you want to be able to print portrait orientation images, repeat the process to create a second template – you can reuse the empty image and the Identity Plate.

Helen Bradley

Sunday, December 9th, 2012

Create an HTML web gallery in Lightroom

With the increasing popularity of the iPad and iPhone it’s no longer appropriate for most of us to create Flash based web galleries – they just can’t be easily viewed on these devices. If you want almost everyone to be able to see your galleries then you need to create them as HTML galleries and not Flash.

Lightroom has a range of HTML Templates you can use to create a reasonable looking gallery in a very short time.

To make your web gallery in Lightroom start by placing your images in a Collection. This makes it easier for you to work with the images and you can save the gallery so you can edit it in future if needed.

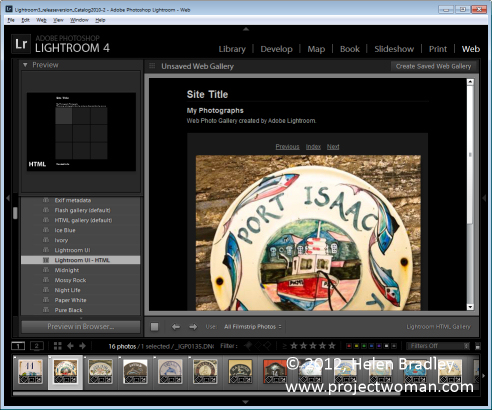
Select your Collection and switch to the Web module. From the Layout Style options, you can select Lightroom HTML gallery or, easier still, from the Template Browser panel on the left of the screen, select a gallery that is HTML based. If you look in the preview area the HTML gallery templates all have the letters HTML in their bottom left corner. Select a template to use.
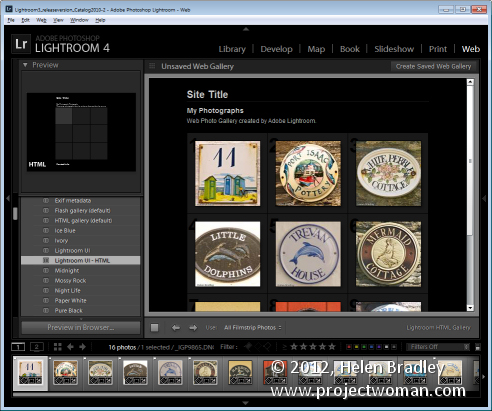
From the toolbar (press T if it isn’t visible), choose All Filmstrip Photos if you have a Collection selected and this will add all the images to your gallery. What you see on the screen in the editing area is a live version of your web gallery. You can click on any image to view it as it will look on the web.
Open the Site Info panel and type a Site Title, a Collection Title and a Collection Description. If you don’t want to use all of these simply delete the placeholder text for those items you don’t want to use and the space they take up in the template will be freed for use for your images.

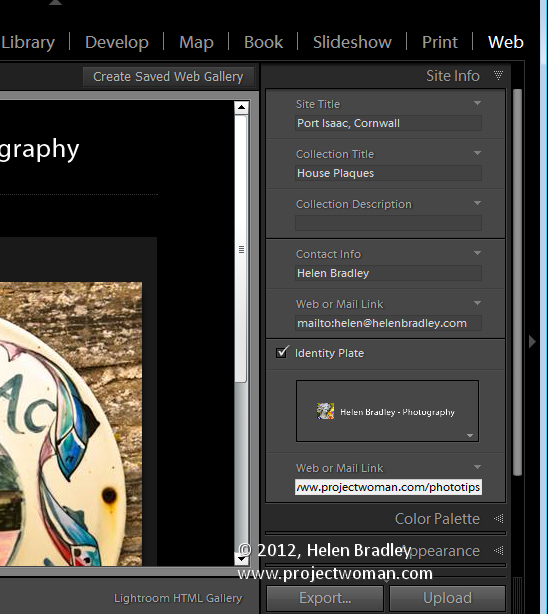
For the Contact Info, type your contact name if desired and then complete the Web Or Mail Link and this will be linked automatically to the contact name in the web gallery.
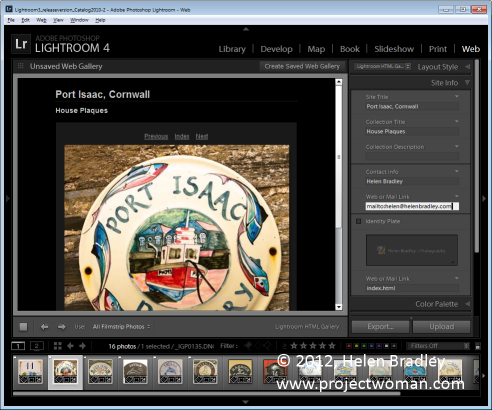
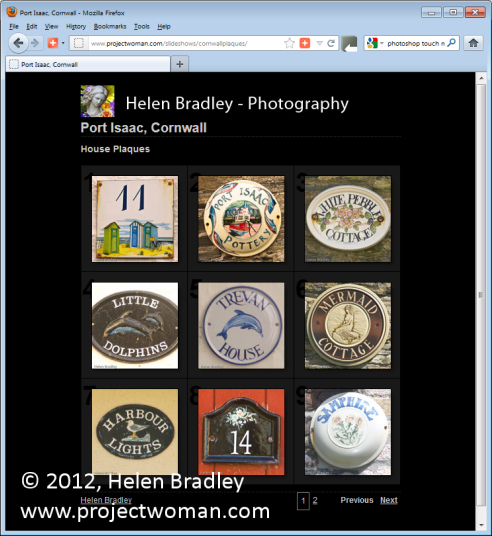
You can add an identity plate to the gallery, if desired, it will sit above the Site Title. You can link it back to your site if desired by completing the Web or Mail Link box.
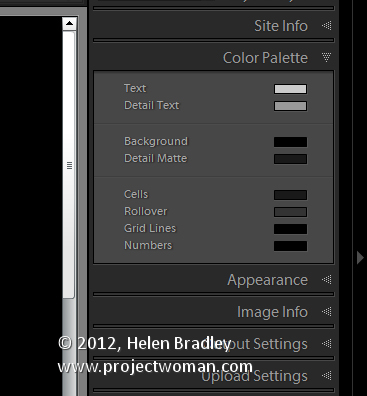
The Color Palette options let you change the colors for the various elements in the website template.

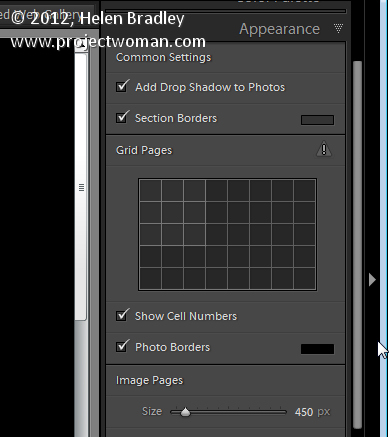
In the Appearance panel you can set the thumbnail image grid size – it defaults to 3 x 3 and cannot be any smaller but it can be considerably larger. If you want to show cell numbers over the images you can do so – this is useful when you need to give viewers an easy way to identify images they like. Images are numbered sequentially and if you have multiple pages the images on the second page continue sequentially from the numbering from the first page.
You can control the size of the full size image on the Image Page by adjusting the Size slider. You can also add Photo Borders to the images in the Image Pages. Note that the Appearance panel is divided into Common Settings, Grid Pages and Image Pages allowing you to make change that effect the entire gallery, only the grid pages or only the image pages.
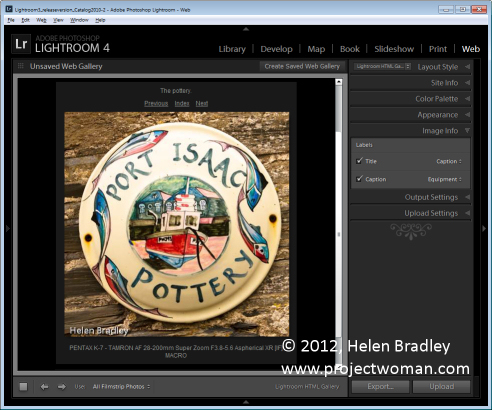
In the Image Info panel you can select to add labels to your images. These appear on the Image Page only. You can select a Title which appears above the image and a Caption which appears below the image. For each you can source the text from the image metadata and there is no reason why you can’t set the Title to be the Caption metadata and the Caption to be your Equipment metadata, for example.
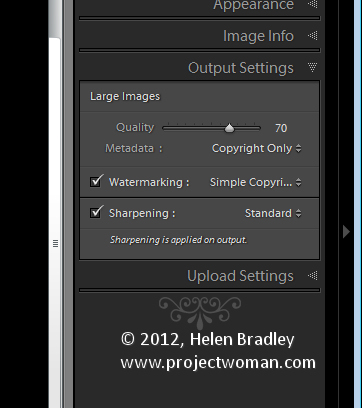
In Output Settings select the quality of the larger size JPG images – 0 is low quality and 100 is high quality. If you want to include Metadata with the image select what to include – your choices are Copyright Only or All.

Also add a Watermark if desired. If you select to add a watermark, you’ll see it on the image page and the index pages so you can check to see that it’s what you want.

Select whether or not to sharpen the images – this sharpening is only applied as the images are output so you won’t see it on the screen. If you’re unsure what to use, enable Sharpening and set it to Standard.
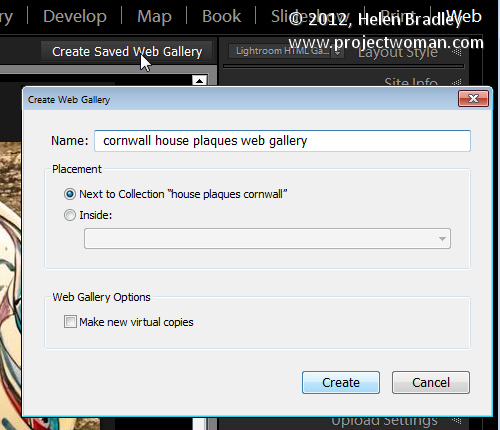
When you’re done, click Create Saved Web Gallery – this is a new option in Lightroom 4 and it appears to the top right of the main editing area. Type a name for your web gallery and click Create. Doing this ensures that the gallery is saved and once you have done this, Lightroom will track your changes from now on.

In future you can come back to the web gallery by clicking the special collection that Lightroom creates for you.
If you want to upload your gallery to the web later on, click Export to export it to disk. Otherwise you can upload it direct to your website by selecting the Upload Settings panel and configure your FTP server. For this, you’ll need your server details, user name and password. You’ll also need the server path although you can click Browse to browse your server to find it if desired. Type a subfolder in which to place the gallery – you’ll need to do this if you plan to have multiple galleries in the server folder you are using. Each gallery needs to be placed in a different subfolder or it will overwrite the previously uploaded gallery.
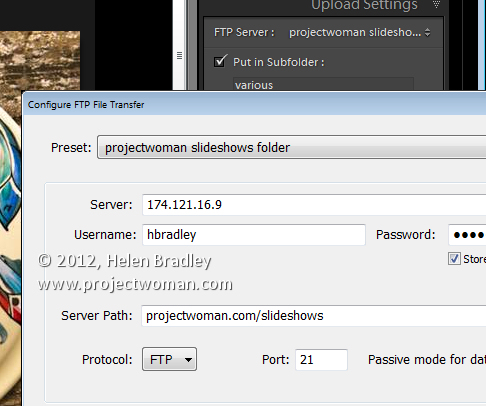
When you have everything configured click Upload to render the gallery images, create the necessary html code and upload it all automatically to your server.
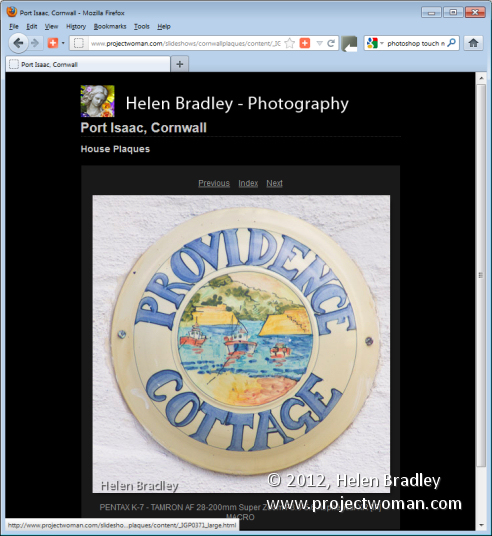
The HTML galleries in Lightroom aren’t the best looking galleries in town but having a gallery accessible to almost any device is definitely and incentive to use them in place of Flash galleries.

Helen Bradley

Friday, May 25th, 2012

Add a Photo Border in Lightroom

One hidden feature of the Lightroom print module is the ability to add a frame to an image. In this post I’ll show you how to add a frame to an image before exporting it as a JPEG image ready for uploading to the web or printing.

In Lightroom 3 you can create an image and export it as a JPG image from the Print module – however before you set this up, it’s a good idea to create a frame to use. I’m going to use a hand drawn border but you can use anything of your own design.

Step 1

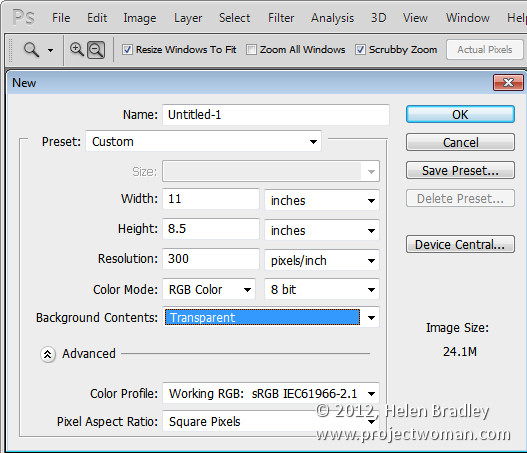
Start in a program like Photoshop and create a new image the size that you want to print from Lightroom. This is a critical step because the border image that you’re about to create cannot be resized any larger in any dimension than the Lightroom file dimensions that you plan printing to.

So, for example, if you want to print a landscape image on letter paper you need to create a frame image of the exact dimensions (or at least the exact ratio of dimensions) of an 11 x 8.5 inch sheet of paper. If you do this, the frame can be sized to the full size of the image in Lightroom.

Set the resolution of the new image as desired – I do this so it matches the resolution that I want to print from Lightroom at – so I use 300 dpi

Step 2

Design your frame making sure the inside of the frame is transparent if you plan for your frame to be placed over the image in Lightroom.

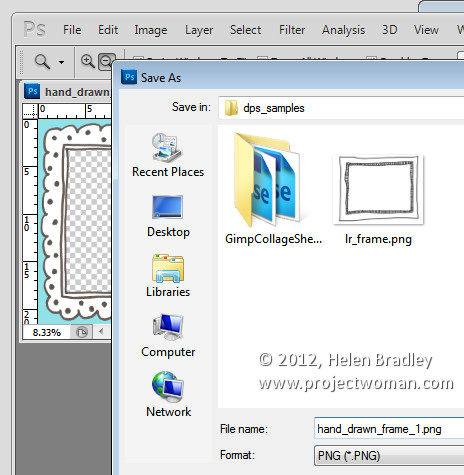
When you are done, choose File > Save As and save the image as a PNG format file so that the transparency information is retained – the JPEG image file format doesn’t support transparency.

Step 3

Close Photoshop, open Lightroom, select the image to print and click to open the Print module.

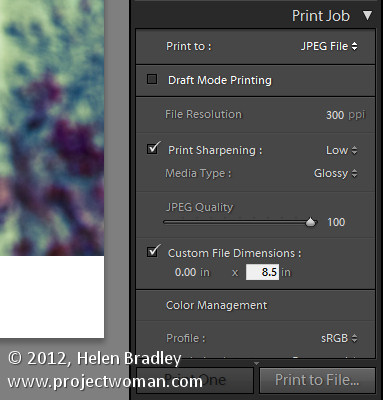
From the Layout Style panel select Custom Package. In the Print Job panel select Print To: JPEG File. Select Custom File Dimensions and set the size to the same 11 x 8.5 inches that you set the frame to be.

Set the File Resolution to the desired resolution – I’ve used 300 dpi.

Step 4

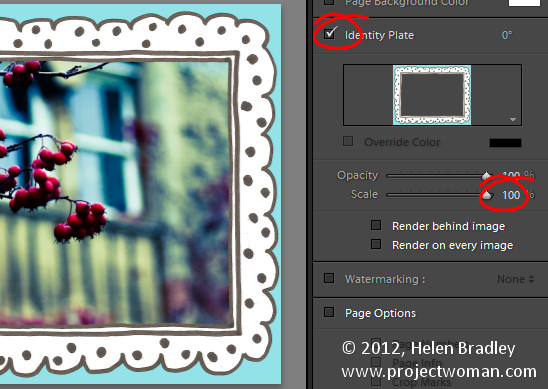
You will add the frame as a graphical Identity Plate. So open the Page panel and select the Identity Plate checkbox. Click on the identity plate box and, from the menu which appears, choose Edit then select the Use a Graphical Identity Plate option button. Click Locate File, select the frame png file you just saved and click Choose. You will most likely be warned that the file is very large – if so, click Use Anyway and click Ok.

The frame will appear as an Identity Plate over the top of the image. Adjust the Scale slider to size it up to 100 percent which should ensure the frame fills the page size that you are working with.

Step 5

As the middle of the frame image was created as transparent, the image underneath it shows through it.

You can use the Render Behind Image option to place the frame under the image if that’s the way you have designed it to work.

Once you’ve added your identity plate select to print to file and the framed image will be printed to a new file.

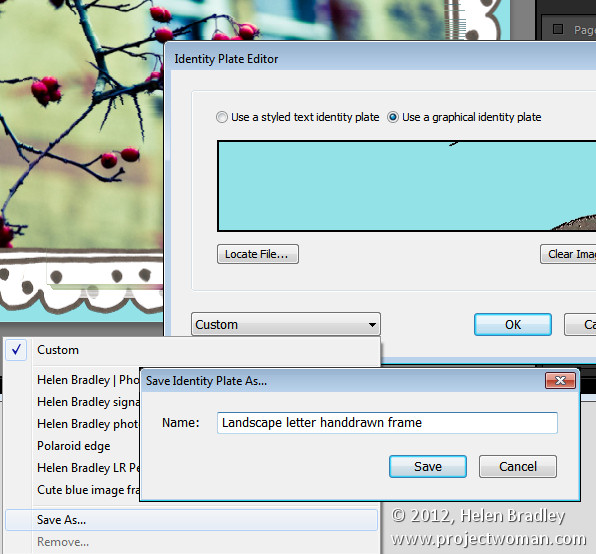
Before I am done, I click the Identity Plate box again and choose Edit and then from the Custom dropdown list I choose Save As to save the graphic frame as an Identity Plate I can use at any time in the future.

Armed with Photoshop you can create any sort of frame and import it as an identity plate to add a border to an image in Lightroom.


Helen Bradley

Saturday, February 4th, 2012

Slideshow Titles with Identity Plates in Lightroom

Identity plates are one of the best kept secrets in Lightroom. There are lots of ways that you can use Identity Plates in Lightroom not only to customize the interface as I discussed in this post: http://projectwoman.com/2011/11/personalize-lightroom-with-identity-plates.html but also customize your print, web and slideshow applications.

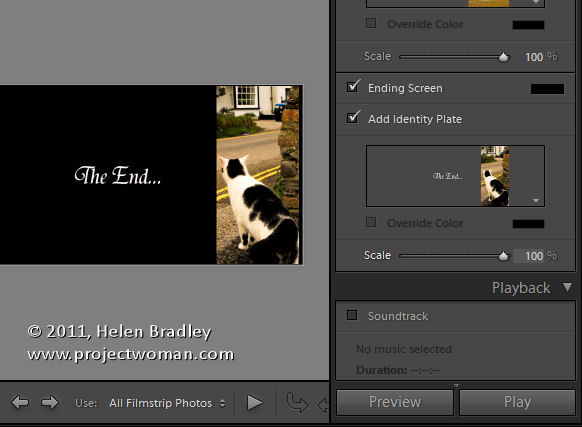
In this post, I’ll show you how to create and use identity plates to create custom title and ending slides in the Lightroom Slideshow module.

Create a slideshow

For a slideshow, it is a good idea to start by placing all the images in a collection – then select the collection and switch to the Slideshow module.

From the toolbar choose All Filmstrip Photos to set up the slideshow with all those images.

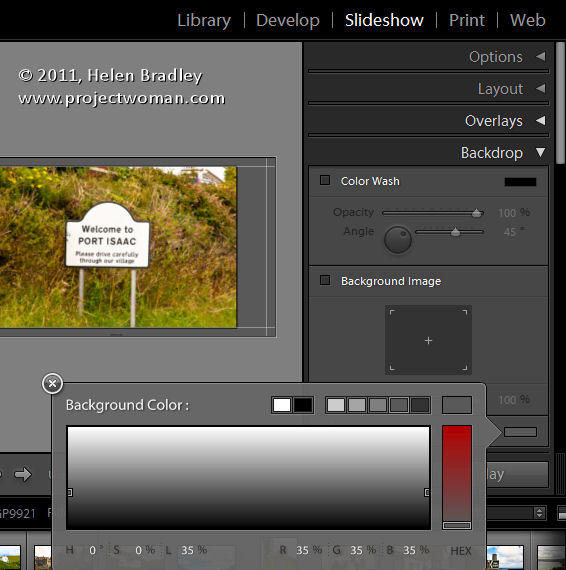
From the Template Browser choose the Default template. Chose a background color by opening the Backdrop Panel and choose Background Color and sample a color to use.

You can add a background color with or without a color wash. You can also set a background image – for example use an image from your slideshow with a reduced opacity as the background.

Here I have settled for a plain dark gray background.

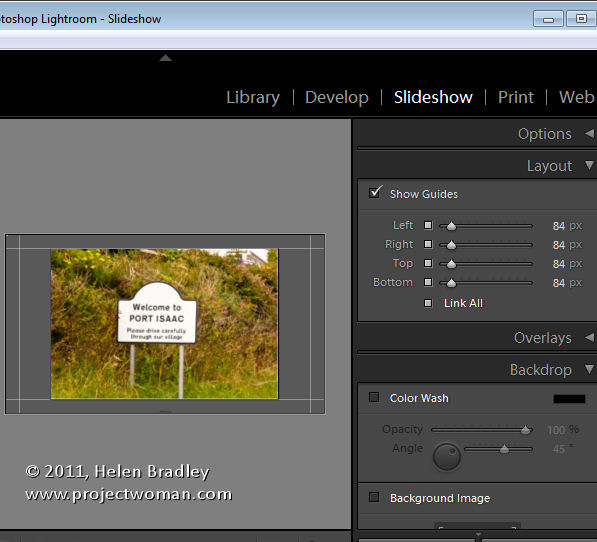
From the Layout panel select Show Guides and make sure Link All is selected and then drag in on the guides so you have some space around the images.

By unlinking the guides, you can set one guide to be smaller than the others – I like to make the top margin smaller than the others to push the images higher on the screen.

Use your Identity Plate

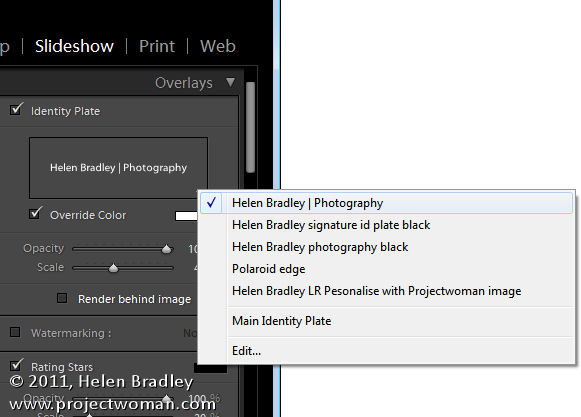
The first place you can use an identity plate is in the Overlays panel. This Identity Plate will sit on each slide and it will show as the slideshow plays. For this, I like to use a plain text identity plate so make sure Identity Plate is checked and then click the down-pointing arrow and select an identity plate that you’ve already created.

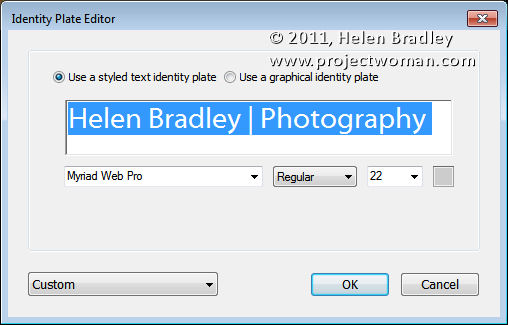
Alternatively, click Edit and type identity plate information into the box and then select it and select a font, font size and color. When you’ve done this, click the Custom button, click Save as and give your identity plate a name.

It doesn’t matter what color you have selected for the Identity Plate text because you can select the Override Color checkbox and select an alternative color for your text identity plate. Adjust the scale to a large value so that you can see the identity plate text on the screen, drag it into position and then fine-tune the scale and opacity to suit.

Identity Plate for a Title

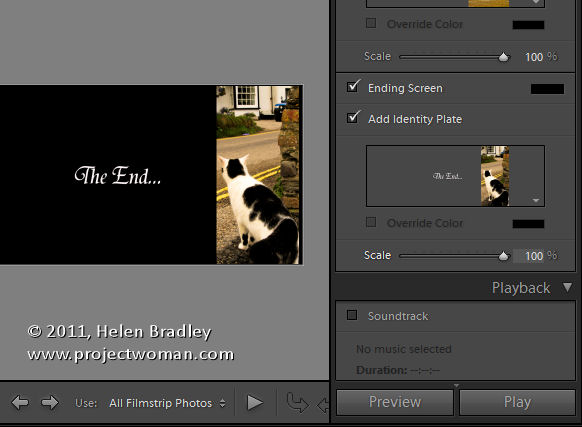
Another place you can use an Identity Plate is the Titles panel. Here you can add an Intro and Ending screen to your slideshow. While you could use a simple identity plate configured for the purpose, you can also use an image.

Here I have taken one of the images from the slideshow into Photoshop by right clicking it and choose Edit in Photoshop.

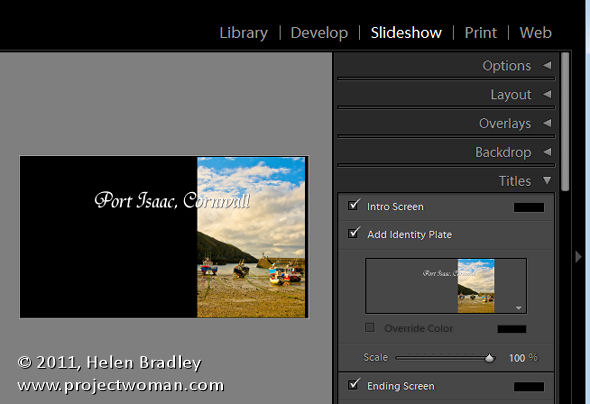
I cropped a portion of the image and used it to create an interesting starting slide for the slideshow. Here I added some text to the image to introduce the slide show. Where possible, it’s a good idea to leave as much of the image transparent as possible so you keep the file size small.

Size the image to approximate the size of the slideshow window – I used 1408 x 800 pixels.

Save the image in Photoshop as a PNG file so it retains its transparency. Later you can control the background color for the title slide by selecting a color from the Intro screen color selector rather than having the color already in the Identity Plate image.

Now, back in Lightroom, in the Title panel click Add Identity Plate and select Edit and this time select Use a Graphical Identity Plate. Click Locate file and either drag and drop the image into the window or find the image on disk. Click Ok to load it as an identity plate – you may be prompted that it is very big – click Use Anyway to continue.

The image will appear for a second or two on the title slide and it will then disappear from the main screen but you will see it in the Titles panel. It will probably be too small so adjust the Scale slider to increase its size.

You can go ahead and create a similar graphical identity plate if desired for the ending screen.

By creating a second Photoshop image in the same way and importing it as a Graphical Identity Plate you can have a different and custom ending screen for your slideshow.

To view the slides and your new titles, click the first image in the slideshow and click the Play button.

Helen Bradley

Wednesday, November 9th, 2011

Personalize Lightroom with identity plates


If you’re a professional photographer, teacher, someone who routinely shows off images in Lightroom or if you just like the personal touch, why not personalize your Lightroom interface? The Lightroom branding which appears in the top left corner of the screen is customizable using the Lightroom Identity Plate feature. Identity Plates are usable throughout Lightroom to brand your prints, slideshows and some web sites but what suits one of these modules won’t necessarily work for customizing the interface.

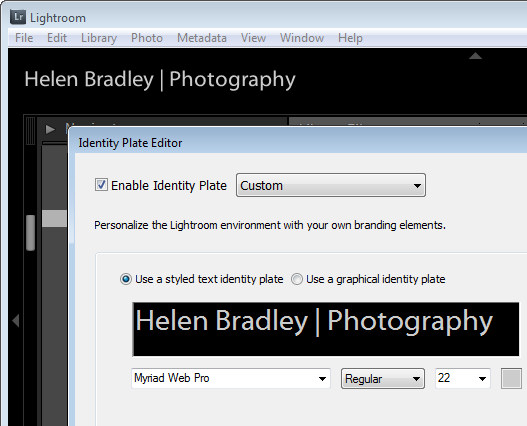
The Identity Plate that appears in the top left of the Lightroom screen is configured by selecting Edit > Identity Plate Setup (on the Mac choose Lightroom > Identity Plate Setup).  To create a simple Identity Plate, choose Use a Stylized Text Identity Plate and type the text into the text area. You can select and format the text in the font, font size and color of your choice. Click the Enable Identity Plate checkbox and the changes you make will appear in place so you can check how they look. You may need to size the text to fit the space – Lightroom won’t scale it to fit automatically.
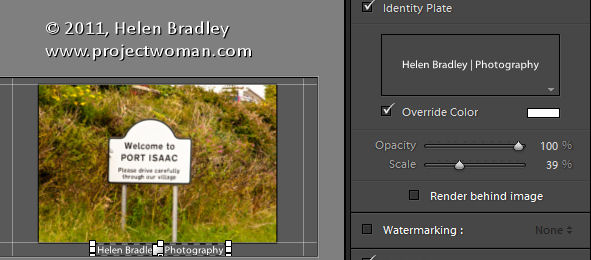
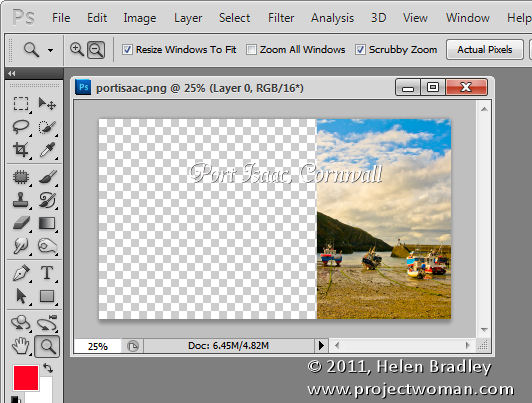
To save the Identity Plate, choose Save As from the dropdown list and type a name for the Identity Plate. You can then select and use it in one of the modules later on – for example you can add it to a print layout.

If you prefer to use graphics in your design such as your signature or a graphical design element you can create a graphical Identity Plate in another application such as Photoshop. The file you use should be no more than 60 pixels in height so it fits in the space available – there is no option to scale it to a smaller size, for example. For this reason, if you plan to use a Graphical Identity Plate such as this for more than just customizing your Lightroom interface you will need two of them – one small image for customizing Lightroom and another one sized appropriately for printing at a high resolution.

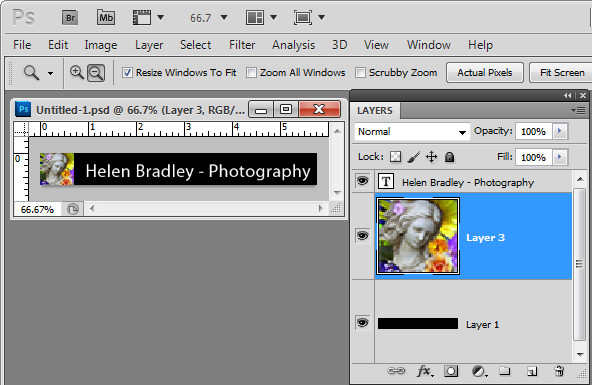
When creating your Identity Plate in an application like Photoshop, build it in a layered file and make sure the bottom layer of the document matches the color of the Lightroom interface – ie make it black. This way you test the Identity Plate to make sure it will look good when placed on a black background. Then turn off the visibility of the black background layer and save the file as a .png, .psd or another format that maintains transparency (not jpg). If you save as a .jpg image the transparent background will be white and you will probably also have small unsightly artifacts in your design.

Back in Lightroom, open the Identity Plate Editor and choose Use a graphical Identity Plate, click Locate File and browse to find the file on disk.

Save this Identity Plate so you can always reuse it if you change the Identity Plate in future.

You can use this same process to create a transparent image in your graphics program to use as a graphical Identity Plate for the other modules. In that case make sure that the Identity Plate is created at an appropriate size for printing. Crop closely around the image so that it can be easily sized and moved into position later on. You need to do this because it is not possible to size an Identity Plate any larger than the screen or page size and you cannot skew an Identity Plate out of shape when resizing it – its proportions will be constrained as it is sized up or down.


Helen Bradley