Thursday, March 14th, 2013

Photoshop Collage with Textures, Masks, and Fractal Trees

Learn how to make a collage or montage in Photoshop using fractal trees, a texture image and some masks.

The images used in this video are free to download and an earlier video shows you how to make fractal trees so you can make the collage yourself. The tutorial covers beginner level masking to help make the collage and two pieces are created from the same basic elements.

This is the link to the video that shows how to create fractal trees to use in Photoshop collages: http://www.youtube.com/watch?v=_hTWkhHI90s

Transript:

Hello, I’m Helen Bradley. Welcome to this video tutorial. In this tutorial we’re going to look at using masks, textures and some fractal trees to create composite images in Photoshop. In this video tutorial I’m going to show you how you can create a couple of interesting effects just using images that you can find online.

The background image here is from Flickr and details are in the end of the video. And the house image is actually from sxc.hu, and again I’ve got details at the end of the video. The tree is a fractal tree and you can see one of my other video tutorials for how to create fractal trees. And this is just done with my masking so that’s one of the images we’re going to create. We’re just going to reverse the mask here to create this image. So let’s see how we would do that and I’m going to start by showing you the two images we’re going to use. This is the one from sxc.hu which is free for download online and this is the background from Flickr.

The first thing I’m going to do is just to bring this image in so I’m just dragging on the background layer and just bringing the image into my sort of collage area. Now what I wanted to do was actually line up this background and it actually worked perfectly. These images haven’t as far as I’m aware actually been adjusted from their downloaded original. But the horizon line just works perfectly on the back of this texture image so I’m just going to do that and then we’re going to mask the house. Now the easiest way to mask this house is probably to grab the quick selection tool. And with the quick selection tool you can select over those areas of the image that you want to select. And if it’s not perfect you can just go back with the Alt key and just drag over the areas that you want to take out of the selection. But it does a reasonably good job. And because we’re doing masking anyway it’s a little bit forgiving. So having done that we can choose Select and then Refine Edge. And Refine Edge will allow us to refine the edge of this and we can do this with marching ants or on black or whatever.

Now I’m going to ask Photoshop to have another look at some of these edges here because it hasn’t done the world’s best job of getting them right and particularly these edges around the bottom here. And once we’re happy with that if we are happy with it we can just make this into a selection or a new layer with layer mask. So I’m going to choose New Layer with Layer Mask and just click Ok. And that has created the image here this house image as a new layer with its own layer mask. And I can determine how much of this inside that I want to bring in.

So I’d actually thought in the past that actually bringing these windows in would be attractive and perhaps a little bit more worked on the door. And now I want to fill these areas with black in the mask. So I’m going to select or target the mask layer, black is my foreground color so I’ll do Alt Backspace and that allows me to see through the building to what’s behind. And then I’ll just go and open one of my trees. And I have some trees here and I’ll just grab one of my fractal trees, drag it into the image here.

I’ll make sure I’ve got the tree layer selected and drag it into position here. And when we were looking at these fractal trees we determined that actually using the darker blend mode or darken blend mode blended the trees into their background a little bit better because that meant that any residual white in the tree that was left over from the process of bringing it into Photoshop would be eliminated that way. So there’s the first of our images.

So having completed our first image the second one is done in a very similar way. In fact we can borrow the first to make the second. So I’m just going to make a duplicate of the image layer here. And what I’m going to do is just invert the mask so I’m just going to press Ctrl I on the mask and effectively that was pretty much the beginnings of this image. I then brought in the tree so it would be a little bit over the edge and then we’re going to create a shadow for the tree. So the first thing I’m going to do with that is on the tree layer once it’s already set, I’m going to add a drop shadow. And I’m just going to go with whatever I get here because I’m actually not going to use it exactly as it is here so I’m just going to click Ok.

And now I want to take the drop shadow layer off onto its own layer so I’m just going to click Create Layer and click Ok. And that takes the drop shadow back onto its own layer which means I can do things with it such as sizing it down, putting it in position and then rotating it so it becomes more like the kind of drop shadow that it should be. And I want it to come over the background there so I’m just going to click Ok and actually position it a little closer and perhaps even kill down its opacity a bit, multiply blend mode is what I wanted there.

Now on this layer too I had a drop shadow so let’s just go and add a drop shadow to this. Yes, it was a drop shadow but it was a lot smaller than that. So I just gave it a little bit of a softening effect that I wanted, not quite as harsh as it had been. And we could change the color of that if we want to. But I’ll just click Ok.

So there are the two possible effects that we can create using this particular image. It’s just done through layer masks and you can create all sorts of fun collage effects using layer masks in Photoshop. And I’ve combined these with nice textures and these fractal trees. And the beauty of all of this is that these images can be grabbed online. So you can go and create these image effects if you want to yourself by grabbing the images and playing around with these effects.

I’m Helen Bradley. Thank you for joining me for this video tutorial. Look out for more tutorials on my YouTube channel and visit projectwoman.com for more tips, tricks and tutorials for Photoshop, Lightroom, Illustrator, Photoshop Elements and more. And if you liked this please click Like and comment on it and think about subscribing to my YouTube channel.

Helen Bradley

Tuesday, December 18th, 2012

Photoshop – Make more canvas

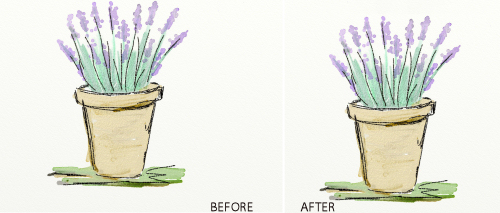
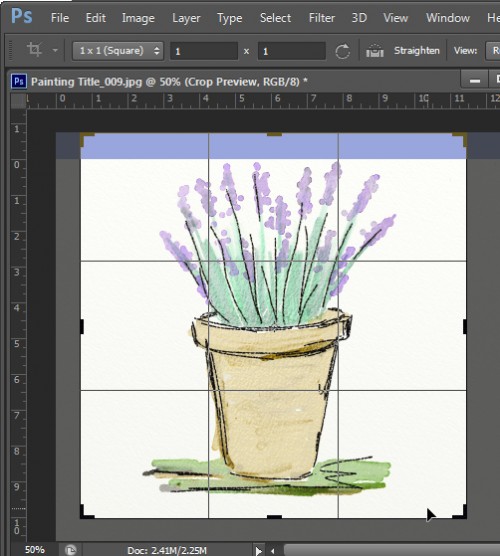
One of the issues that I’ve had with painting on the iPad is I quite often run into the top of the canvas leaving the image no breathing space.

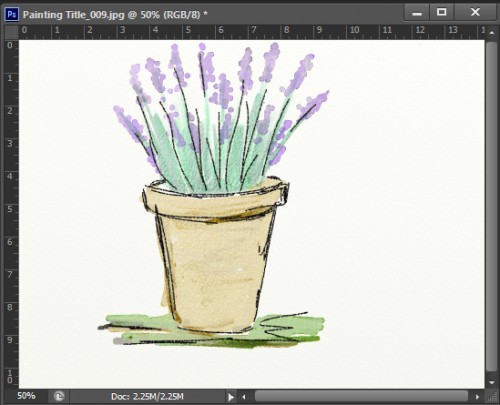
For example this image created in Art Rage tips the top of the canvas with plenty of spare room at the bottom.

The simplest solution is to email the image to myself on my desktop computer and then open the image in Photoshop.

To begin I cropped this image to a 1 x 1 ratio by clicking the Crop Tool, set the ratio to 1 x 1 and then drag on the image. Once I let go the Crop Tool I can then drag outwards on it to add some extra canvas at the top of the image.

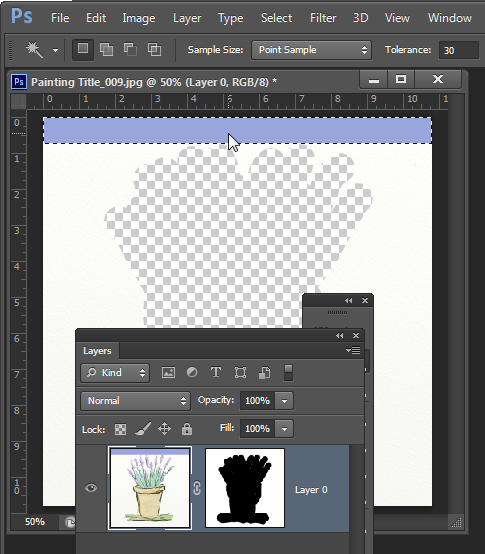
Right now I’m looking for a smart crop plus some extra room at the top that I will fill with canvas shortly. So the blue area in this image is the bit I need to “manufacture” to get the result I want.

Once the image is cropped I’m ready to get rid of the blue and create some canvas from it.

One issue with this particular image is that the canvas itself has a texture in it so just filling it with white or a plain color won’t work.

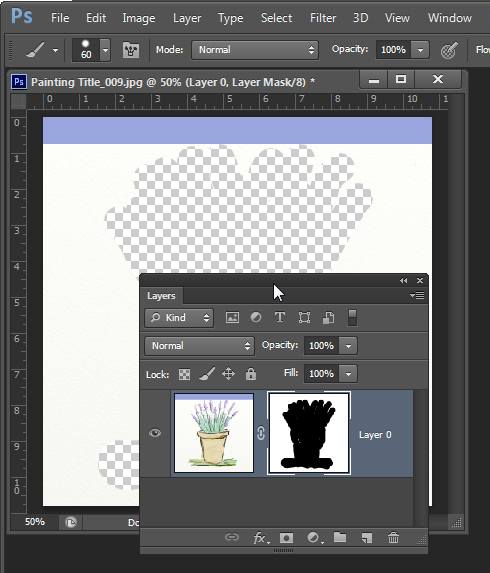
So, with the Layers palette visible I’ll click on the Add Layer Mask icon to add a layer mask to the background.

Then I select black as my foreground color, a solid round brush with a hard edge and with the mask targeted I’ll paint out the entire painting, leaving only the textured canvas visible. It’s really important to get rid of all the original painting.

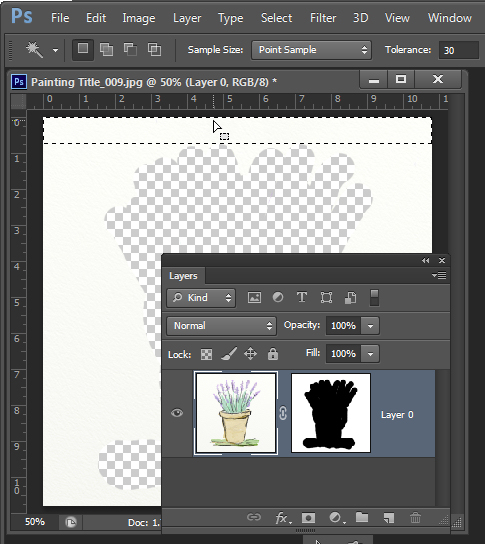
Because this is just a mask the image hasn’t actually been removed, it’s just been hidden for now. Grab the Magic Wand Tool, click on the image layer itself and make a selection of the area you want to remove.

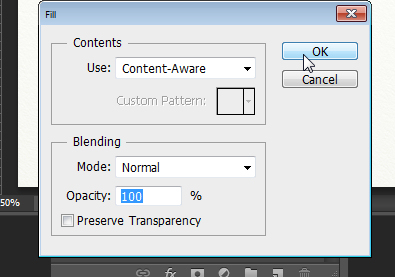
To fill it with texture, choose Edit > Fill, set the Use list to Content Aware and click Ok.

The colored area will be removed and will be replaced with a texture matching the remainder of the image.

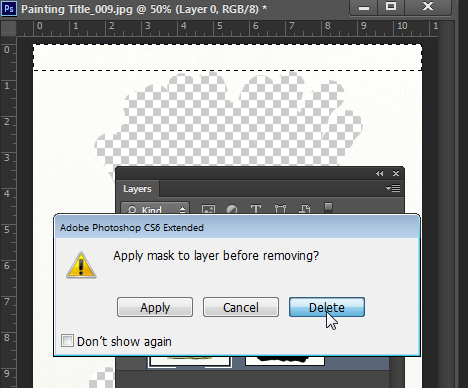
To finish, drag the Layer Mask onto the trashcan. When asked whether you want to apply the mask before removing click Delete and the mask will be removed leaving the image in place.

Choose Select > Deselect to remove the selection and then save the image.

Helen Bradley

Monday, November 26th, 2012

Photoshop – Quick Portrait Makeover

Touch up your portraits with this quick video tutorial. I’ll show you how to remove blemishes and soften skin tones.


Transcript:

Hello, I’m Helen Bradley. Welcome to this video tutorial. In this tutorial I’m going to show you how you can do a quick and easy portrait makeover.

Let’s have a look and see before we begin exactly what we’re going to achieve. So this is the starter image that I started off with. And I did some spot fixing on it to make sure that I had removed the skin blemishes and then I brought out the detail from the shadows. And this is the starting point that I then had and this is the effect that we’re going to look at creating. We’re going to soften the skin and brighten the eyes in our model. So let’s have a look and see how we would start off with spot fixing this image.

I would go into this image and then I would start by selecting the spot healing brush tool here because this is a tool that you can simply just paint over problems on the skin and it will fix them. So I went over this image really, really carefully. I zoomed in and I got every single one of the blemishes on this model’s skin and it’s probably a five minute job to just neaten the image up and just to get a really good starting point for it. And then having done that I did a shadows and highlights adjustment to bring some detail out of the shadows. So I’ll choose Image, Adjustments, Shadows/Highlights. And the default setting is 35. Now I used that. It was probably a little bit high. So you could probably bring it down a little bit perhaps to around 23 or 24, but there’s a good starting point for your image. And from there you’re ready to go ahead with the softening effect.

So let’s go back to the image that I’ve spot fixed and now let’s get rid of the two layers that are the fixed layers. And we’re just going to work from the point at which we opened up some of the shadows and highlights. So the first thing that we’re going to do is to create a duplicate of this background layer, just duplicate it and then we’re going to blur it. So I’m going to choose Filter, Blur, and then Gaussian Blur. I’m going to set the blur value to sort of a lowish sort of value. What I want to do is blur the model’s skin and use that in a minute to paint over her skin. So I want something that’s sort of a little bit over what I want my final effect to be but not totally over. So I’m thinking here about 9 or 10 pixels will be a good amount for this image, so I’ll just click Ok.

And having blurred that layer a little bit I want to add a bit of noise into it and I’ll do Filter, Noise and then Add Noise. And we want to bring in monochromatic noise and we want it to be Gaussian. Gaussian noise applies more noise to the lighter areas of the image and less to the darker areas. And we want probably somewhere between 5 and 10 percent noise. And this slider is really hard to adjust at that level so I’m just going to type in 7.5 percent and that’s giving us a nice little bit of noise in her skin tones, so I’ll click Ok.

So we do not want the image to look exactly like this. We just want that to be a starting point. So let’s add a mask to this layer. I’m going to Alt or Option click on the Add Layer Mask icon. And what that does is removes the blur. it will remove the entire effect from the model. And we’re going to paint on this mask to bring back in the softening where we want it to be. So I’m going to select my brush tool and select a nice soft brush, this one’s a good brush to use, and I’m going to paint with white. I’m just going to size the brush up a little bit. Now you’ll be a bit more careful than I am being, but what I’m doing is selecting over all the areas, painting over all the areas that I want the skin to be softened. So that is basically everywhere but her nose and mouth and eyes. Although I want the skin on her nose to be softened, I don’t want to soften this detail around here. And I may want to soften this area, but I don’t want to soften her eyebrows themselves. So very carefully softening by painting on the image with white in the areas that you want it to be softened. And you can see on the mask here the areas that we’ve got and perhaps any areas that we might have missed out on at this stage. Again, I don’t want to soften that jaw line too much. that’s a nice strong line and I want to keep that there.

Now that I’ve done that I can adjust the opacity of this layer a little bit. I’m going to adjust it down to zero which is totally removing the sharpening effect. And now I’m just going to march it up using the scrubby slider until I get the amount of softening that I want. So I really want a subtle softening, not totally obvious but just subtle softening of the skin. And I think probably about 30 percent is a good value for this image.

Now I’m going to make another duplicate of this background layer and drag it to the top because what I want to do now is to fix her eyes. So all I’m going to do is focus on this top layer and I’m going to look for some stronger color and contrast in her eyes. So I’m going to choose Image, Adjustments, Curves. Curves is a good adjustment for this and again I’m going for slightly more than I need. So there is some more whites in her eye. Now I know that the blue color of her eye is in this area, so let’s add a bit more contrast through that area.

So let’s see. That’s the before and that’s the after on her eye. So I’m just going to click Ok to accept that, but of course that’s not the image effect that we what. We want more of this effect, but we’d like to borrow some of the eyes from this effect. So again I’m going to Alt or Option click on the Add Mask icon to add a layer mask. And again with my paintbrush which is already preset and my white paint I’m going to target the mask and paint over her eye. Now again this is probably going to be too much, but we can tone it down a little bit by again adjusting the opacity of the mask. So we’ll just take it up to what we want it to be. I am thinking it’s probably going to be a little too much, maybe about 50 percent.

So let’s have a look at the starting point for the image. This is post having been spot fixed and post having had shadows and highlights applied to it. Then we added the skin softening and finally we added a little bit brighter eyes in our portrait.

I’m Helen Bradley. Thank you for joining me for this video tutorial. If you liked the tutorial please click to like it on YouTube. Consider also subscribing to my YouTube channel. You’ll be advised when new videos are launched and right now that’s about twice a week. You can also visit my website projectwoman.com where you’ll find more tips, tricks and tutorials on Photoshop, Photoshop Elements. Lightroom, Illustrator and more.
Helen Bradley

Monday, October 22nd, 2012

Photoshop Heart Shape Crop

Crop an image to a heart shape or any other shape in Photoshop. Uses a filled shape and a clipping mask.

Check out all our tutorials on our YouTube channel.

Complete transcript of this video:

Hello, I’m Helen Bradley. Welcome to this video tutorial. In this tutorial I’m going to show you how to crop to a heart or any other shape in Photoshop. Before we get started on this technique let’s just have a look and see what the end product is going to be. You can see here that I have an image of my cat. And what I’m going to do is to cut her face out in a heart shape. Now in Photoshop Elements this is relatively easy to do because there’s a cookie cutter tool that you can use. In Photoshop it’s not that easy. So we’re going to go through this step by step so that you know exactly how to do it. So let’s get started. I’m going to open up a duplicate of this image. And the shape that we’re using is a heart but this could be any shape at all. So it doesn’t have to be a heart and this process is going to be the same for any shape. The first thing we’re going to do is convert the background into a regular layer. And do that your favorite way. I’m just going to double click the layer and click Ok. And now I’m going to go and get my heart shape. So I’m going to click on the custom shape tool here, and I’m going to select a shape. Now I’ve already selected the heart I want to use but let’s have a look and see. There’s a couple of hearts here. There’s one in the sort of card collection, but I don’t actually like that very much. It’s a really sort of weird shape that one. I prefer this one here so I’m just going to select it, and then let’s go and add a new layer. So I’ve just added a new layer. And let’s go and select a color. Now it can be any color at all, and I’m going to make it this sort of black. It doesn’t matter what color it is. And we’re going to use pixels so this is really important this bit, the pixels bit. In earlier versions of Photoshop there’s actually three icons here and you want to select the one that is pixels. And I’m just going to draw my heart shape. And if it’s not in the exact right position I’m just got a hold the Spacebar as I draw the shape so that I can move it around. And this is actually a nicer shape so once I’ve finished drawing and I’m just going to let go. And now I have a black heart shape right over the top of my cat. It doesn’t matter what this color is because it’s about to disappear. It does matter that the order of these two layers is the wrong way around. So I’m just going to drag the bottom layer up over the top layer. So the photos are on top and the heart is underneath it. And what we’re going to do is we’re going to cut the photo to the heart shape and we do that using a clipping group or clipping mask. So with this layer selected I’m going to choose Layer, Create Clipping Mask. You see here that there is a keystroke that’s Alt Ctrl G. That’s something we could use as well. But what this does is it cuts the photo into the shape of the shape below. So if this were a star than we’d have a star shape. So essentially that’s all you need to do. If you’re already to go, go now because you know how to create a heart shape from an image. If you want to finish it off nicely than hang around and we’re going to finish it off. The way we’re going to finish it off is by adding yet another new layer, and we’re to drag it to the very bottom. And what we’re going to do here is to fill this with a nice color. So I’m going to choose a color of pink because this is a sort of Valentine theme. My foreground color is pink. I have the bottom layer selected. I’m going to Alt Backspace on the PC, Option Delete on the Mac, to fill it with pink. Now we have our heart shape image over pink we can crop it. So I’m just going to crop it to size. And we’ll come in a bit on the edge here too. And now we want that nice finishing touch that we had on the original image. Let’s go and see the original image. You can see that this one’s got dimension and ours is very flat. If you want that dimensional look what we’re going to do is we’re going to add a drop shadow. And we’re going to do it to this heart layer because we want to the drop shadow to follow the heart shape. Here is the layer effects tool, the layer style tool. I’m going to click here and choose Drop Shadow Now my drop shadow at the moment is black. I would prefer a color that is similar to this pink but perhaps a bit darker than it. So let’s just go and get a darker version of our pink. We’re on multiply blend mode which is a good blend mode. I don’t like the angle of light. I prefer my light to be cast in this direction. And you can see that I can now drag my drop shadow around to place it where I want it to be. It’s a bit harsh so I’m going to soften it. Now this is where Photoshop is a little confusing. I think they’ve labeled these really wrongly because size actually adjusts the feathering and spread really adjusts the size. So we don’t want it to have a very big size or spread, but we do want it to have a nice feathering so I’m going to adjust the size to suit there. And on the other one I added an inner glow so I want to grab inner glow here. I again changed the color, this time sampling the pink from the image and going for a lighter pink for my inner glow. And then we’ve got it screen blend mode so that’s going to work nicely. But we do need to increase the size here and probably increase the choke a bit. And we just wanted to blend that around the edge and click Ok. So this is an effect that you can create with any shape in Photoshop. You can put any shape in here. You can put your photo on top. You’re going to add a clipping mask or create a clipping mask with Layer. And this will say Create Clipping Mask. At the moment it says Release because that’s what we would be doing at this point because we already have clipping mask created and we’re just dropping a filled layer below it. I’m Helen Bradley. Thank you for joining me for this Photoshop video. If you liked this video please would you give it a thumbs up so that others know that it’s a good video. Look out for more videos on my YouTube channel and look at projectwoman.com for more tutorials about Photoshop.

Helen Bradley

Helen Bradley

Saturday, February 25th, 2012

Photoshop – Replace a Face

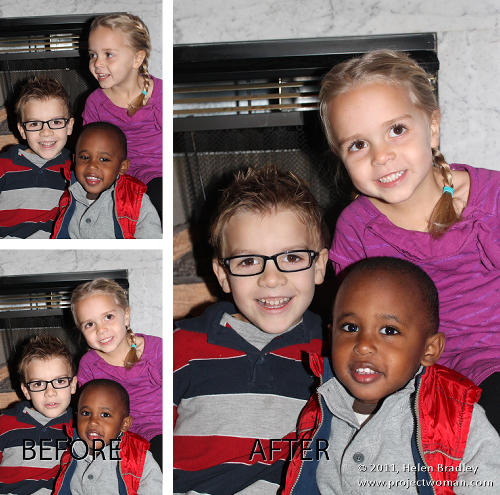
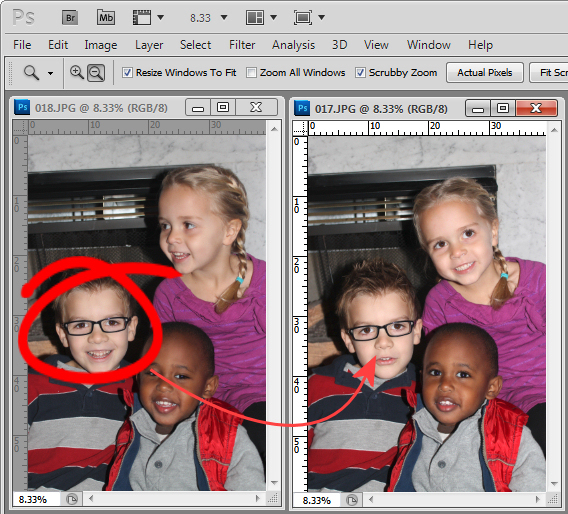
A reader recently emailed me a couple of photographs of her children. Unfortunately, as often happens with small children, one image had two of the three children looking at the camera and smiling and the other image had the exact opposite combination – only one child looking great. Her question was – could she take the good face from one of the images and paste it into the second image.

The answer is yes, and here’s how to do it in Photoshop without any need to cut and paste:

Step 1

Open both images in Photoshop. Drag the background layer from one image onto the other – in my case I dragged the background layer from the image with two out of the three faces correct and dropped it into the image that has only one good face.

You will have an image with two layers – the top has two good faces and the one below has the other one. Close the other image.

Step 2

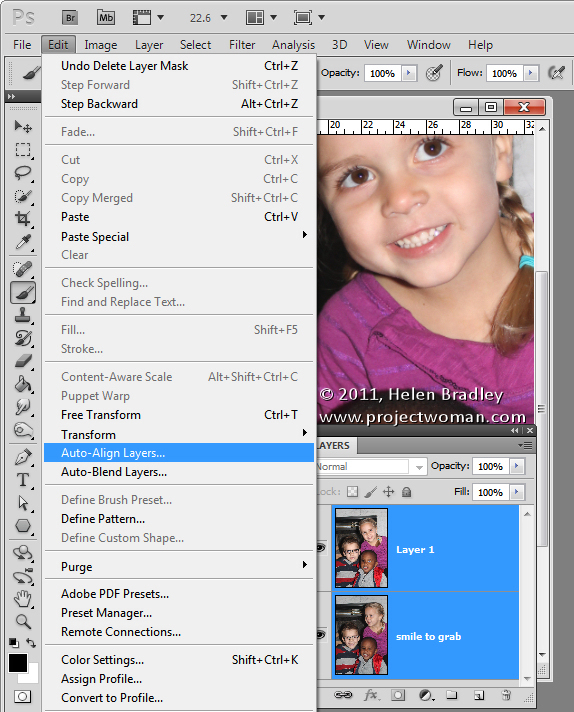
Select both layers in the image that you’re working on and choose Edit > Auto-Align Layers and select Auto.

Photoshop will now align the two layers so that the faces in both layers will be aligned on top of each other. To do this you need to have two images with very little difference between them and this image lined up pretty well as a result.

Step 3

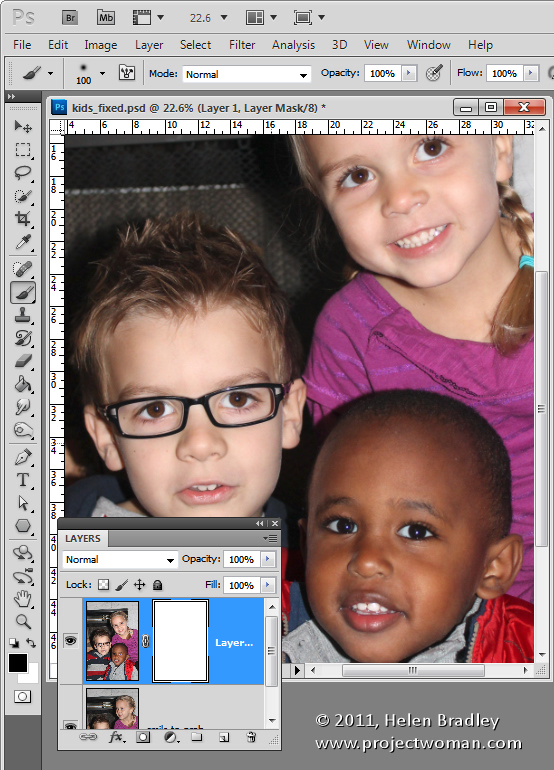
Click on the topmost layer and add a layer mask to it by clicking the Add Layer Mask icon at the foot of the Layers palette.

The mask is filled with white by default which means that the entire contents of the top layer is visible and the bottom layer not visible at all.

Step4

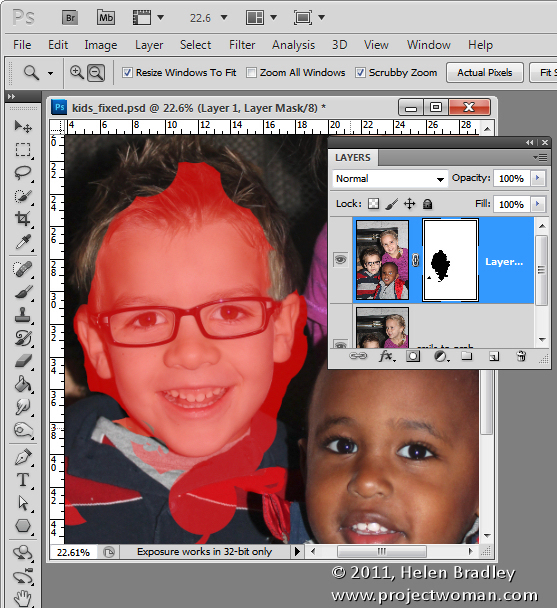
Select black as your foreground color and choose a soft edge brush. Target the mask by clicking on it so you’re painting on it and then paint over the child’s face in the image to reveal the face from the layer image below.

Step 5

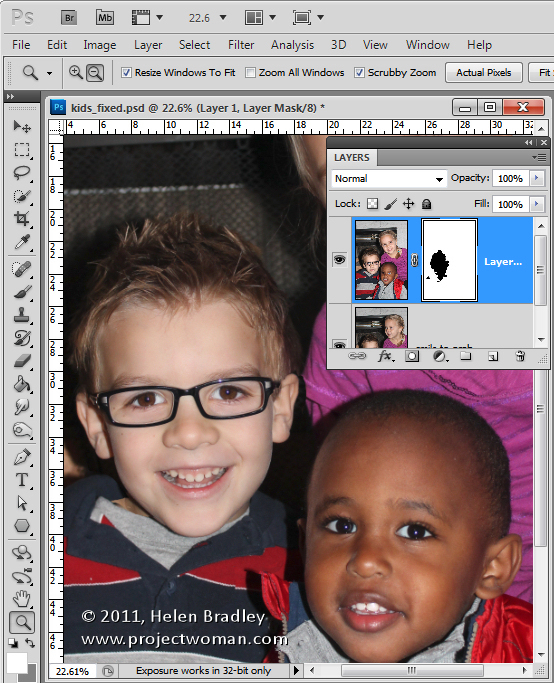
You’ll need to make some small choices about how much of the layer below you reveal with the mask – if you take too much you can paint back on the mask with white to reveal the top layer again.

I made some small adjustments around the child’s collar to hide the fix. The red portion of the image shows the mask – I turned this on – it won’t typically be visible to you as you work.

Step 6

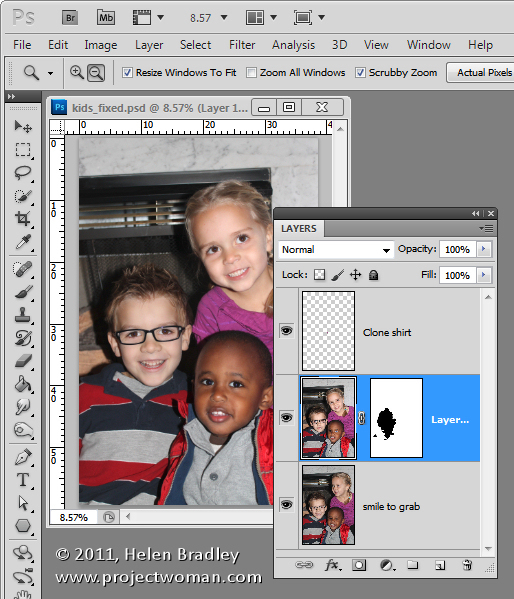
Finish by taking a critical look at the final image and, if necessary, adjust the mask or add a new layer and clone elements from the layers below to fine tune the image.

I had to do a small amount of cloning of the little girl’s shirt to fix a small problem and then I cropped the image and it was complete.

The entire process took all of around ten minutes.

Photoshop Elements

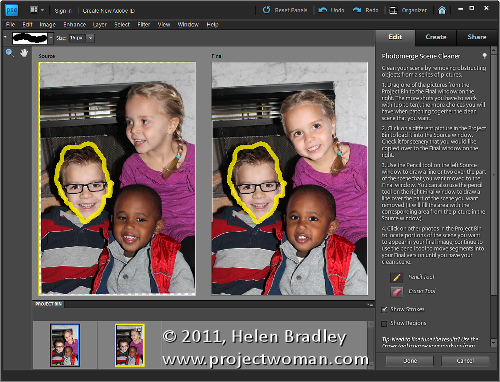
You can get similar results in Photoshop Elements 7 and above by opening the two images and choose File > New > Scene Cleaner and follow the instructions there.

Helen Bradley

Monday, August 2nd, 2010

Photoshop – invert a path

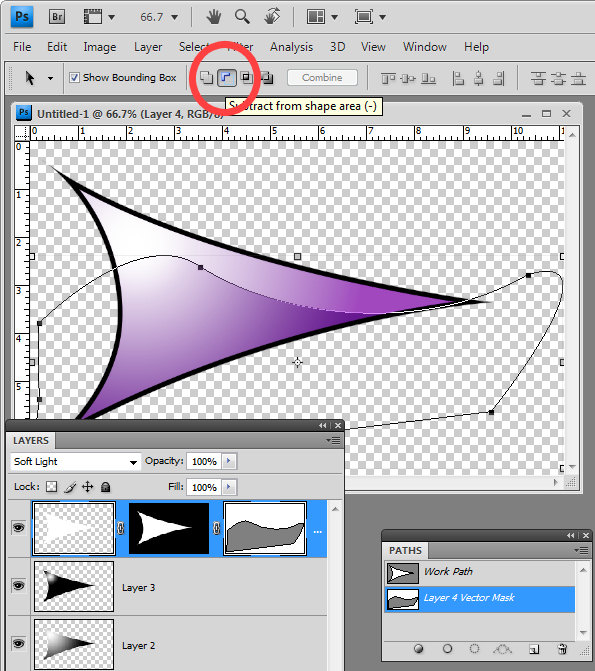
When you use a Vector Mask in Photoshop you can use the pen tool to create your path. All you need to do is to close the path and you will have a custom editable vector mask. However, if your mask is white where it should be not be selected and you need to invert it you need to invert the path.

To do this, click the Path Selection tool and target the Vector Mask and click on your path. On the tool options bar you will see an icon called Subtract From Shape Area – click it and the path will be inverted so anything which was masked before will not be now and vice versa.

Helen Bradley

Page 2 of 212