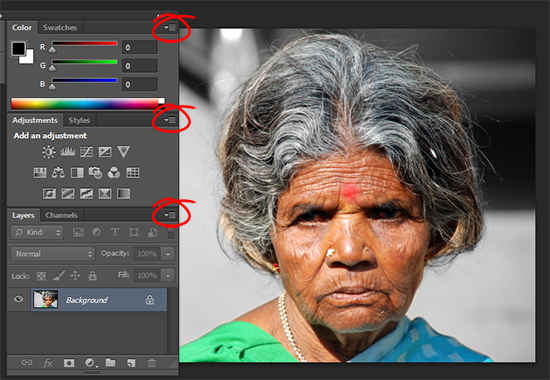
 (photo by: Vivek Chugh)
Almost every palette in Photoshop has a drop down menu in its upper right hand corner – click it to find options and tools for that palette.
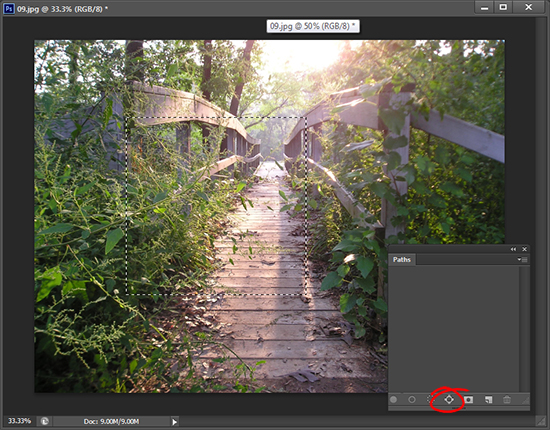 (photo by: kslyesmith via www.sxc.hu)
Looking to make your own paths? Start with a selection that you want to turn into a path. From the foot of the Paths palette click on the Make Work Path from Selection.
Labels: how to, path, Photoshop, selection, tip, tip of the week, trevor adobe, trevor payne
Categories:photoshop, trevor tip
 (photo by: Amy Burton)
Paths can be a very helpful tool when editing and can be saved along with your image in .jpeg files. To do this create a path in the desired location on your image. Go to File > Save As choose JPEG as the file type. Name your image and save it. When you open it next the path will be accessible in the Paths palette.
Labels: jpeg., path, Photoshop, save a path, saving, tip, trevor adobe, trevor payen
Categories:photoshop, trevor tip
Learn how to use Photoshop to prepare an image for tracing and painting in Illustrator with Live Paint. Shows how to make a selection on an image, how to use the Refine selection tools to refine a selection then how to convert the selection to a mask. See how to paint on the mask to fine tune the selection. See how to touch up the image to remove white by painting over it and then how to flatten and save the image as a jpg file to take into Illustrator.
The full text from the video:
Hello, I’m Helen Bradley. Welcome to this video tutorial. This video tutorial is part of a series and it’s involving using Live Paint in Illustrator. But we’re going to start in Photoshop because what we’re going to do in Photoshop is to isolate the image and get it all ready to take to Illustrator where we can trace it and apply live Paint to it. In a minute we’re going to take the image of this bathing box into Illustrator and recolor it using live paint. But before we do there’s a fair bit of work that we can do on this image to prepare it in Photoshop. The first thing I’m going to solve is the fact that this image is crooked so I’m going to select the Ruler tool. And from experimentation I already know that this image is going to look better if I straighten it based on the horizontal lines in the image so I’m just going to select that horizontal line and click Straighten Layer. And the image is now straightened and I can just crop it to get rid of the worst of the excess. The next thing I’m going to do is to isolate this bathing box. And to do that I’m going to start with the quick Selection tool because it’s just a very easy tool to use. I’m just going to click and draw on the image. And you can see that it’s jumped a little bit and gone in places that I didn’t want it to go and it hasn’t gone in places that I do want it to go. So I’m just going to drag over the bits that I want to expand it into. And in the places that I don’t want it to be I’m just going to hold the Alt or Option key down to turn it into an eraser so that we’re erasing that area from our selection. That’s a pretty good selection so I’m going to sit with that right now and choose Select and then Refine Edge because this allows me to refine the edge. I’ve got a few problems down this edge here and this edge here and there’s a bit of an issue where the tree line was. So I’m going to have Photoshop have a better look at this image and I’m going to choose the Refine Radius tool. At the moment I’m viewing the selection against white but I could see it as a black and white image. I could see it on black. That’s not actually helping me a lot. I could see overlay or marching ants. But I’m pretty happy with on white. I’m just not totally happy with my selection so I’m going to paint over the areas that I think Photoshop needs to have a better look at. And it needs to have a better look at there although that wasn’t a particularly good result so I’m just going to Ctrl Z to undo that fix and see if I can do a better selection. I think there’s a bit of a fix needed there and a bit of a fix needed down this edge here as well. It wasn’t a very good line so we’ll just undo it and try again. And this is particularly useful when Photoshop hasn’t done the best of selections. You can get it to fine-tune that selection and see if it can do a little better job. I’m relatively happy with that but I’m going to see if contrast will help me. And it seems to firm up that edge a little bit so I’m going to apply some contrast and I could see if radius is going to help. Virtually what I’m looking for here is a pretty good selection that I don’t have to do much with in a minute. I’m going to output to a New Layer with Layer Mask because that will give me a bit of flexibility and I’ll just click Ok. This is now a new layer in the image. It has a layer mask on it. I can zoom into any areas that need some more fixing such as this corner here. I’m going to bring in my tools, select the letter D for default colors, select a brush, I’ve got a fairly hard edge brush, make sure I’m painting onto the mask itself and just paint out any of these areas that I think need fixing. If I want to paint in white I’ll just press the letter X to bring that color back in and press X again to remove the color. And I’m just going to tidy up a couple of little bits here. I want to paint with white. I’m going to click and then Shift Click to paint a line to bring in this roof a little bit better. I’ll just zoom out again and just check around the image to make sure that everything is looking pretty good. I’m still not convinced that this image is straight but we’ll worry about that in just a second. I’m going to add a new blank layer to this image and I’ll press Ctrl Alt Shift E, that’s Option Shift Command E on the Mac, and that will give me the isolated image on its own layer. Now I can straighten it again if I think it needs a bit of straightening. I’m still convinced this is crooked so let’s see if this fixes it. We’ll just straighten this layer. That looks a little better to me. And I’m just going to apply an adjustment to this layer. I’m going to use Levels because this image is extremely dark and it will behoove us to lighten it a little bit before we head to Illustrator. So I’m just going to fix it a little bit. What I am a little concerned about here is these white areas so let’s just click Ok and let’s zoom into those white areas. And I’m going to select these with the Quick Selection Tool or with the magic Wand. Actually I’m thinking Magic Wand will be better here so let’s get the magic wand. It’s got a tolerance of 30. I’m just going to click on that area, click on this line here, this bit here, and there’s another bit over here. I need to Shift Click on those because they’re not being added automatically. Let’s just add them automatically so we don’t have to keep holding the Shift key down. Now that I’ve got those all selected I’m going to enlarge the selection a little bit because it’s a little on the small side. I’ll choose Select Modify Expand and Expand it by just 2 pixels. Now I’m going to add a new layer to this image, go and grab my paintbrush, I’m going to Alt Click on some paint that I’m going to copy and now I’m just going to paint over these areas on a brand new layer. Now this is just flat paint going in but that doesn’t matter because that’s just going to fix this area for us. And now I can select a blend mode and I’m thinking that darker color will be a good one, that we’ll only use the green when it is in fact a darker color. And I can just drag down the opacity of this layer a little bit too because it was a lighter area of the image. But I don’t want it be pure white because I just don’t want white in my image when I get to Illustrator. So Ctrl D to deselect the selection. And let’s just zoom out again. And that’s my finished image and it’s ready now to head to Illustrator to actually do something about recoloring the image. This is the image that we started off with here and this is the one that we’ve ended up with here. So I’m going to save this, choose File, Save As and I’m going to save it as a JPG image. And then we’ll come back in a next video in Illustrator and do something with this image.
Go and see all of our video tutorials on our YouTube channel
Labels: Helen Bradley, isolate an object, part1, Photoshop, Tutorial, video tip, YouTube
How to use a Selective Color adjustment in Photoshop to recolor part of an image.
Come see all of tutorials on our YouTube channel.
Labels: color, Helen Bradley, how to, Photoshop, Selective color, video tutorials, YouTube
Learn how to selectively recolor a portion of an image using the Hue/Saturation adjustment layer and to do so without having to make a complex timeconsuming selection to do so.
See all our video tutorials on our YouTube channel
Labels: Helen Bradley, how to, layer adjustment, Photoshop, video tutorials, YouTube
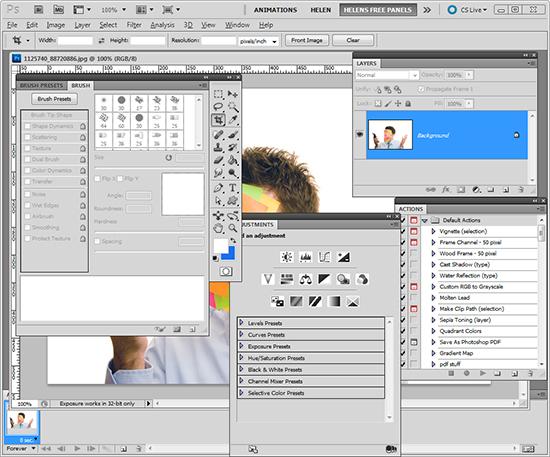 (photo by: Piotr Bizior)
If your work space is feeling cluttered with palettes you can press the Tab key on your keyboard to hide them all or Shift + Tab to hide all but the tools palette. Want them back? Press Tab again and there they are.
 (photo by: Piotr Bizior)
Labels: palettes, Photoshop, tip, trevor adobe, trevor payne, work space clean up
Categories:photoshop, trevor tip
How to convincingly replace a poor sky in Photoshop. You’ll need your photo and nothing else – we make the blue sky in the tutorial.
See all our video tutorials on our YouTube channel.
Labels: cs5, fix a sky, Helen Bradley, how to, Photoshop, replace, technique, video, video tutorial, YouTube
Categories:video
 (Photo by: Jorge Vicente)
Change the size of your brush, eraser, or any tool that is brush based quickly by press the ] key to increase the size and the [ key to decrease the size.
Labels: brush, brush size, Photoshop, shortcut, size change, tip, trevor adobe, trevor payne
Categories:photoshop, trevor tip
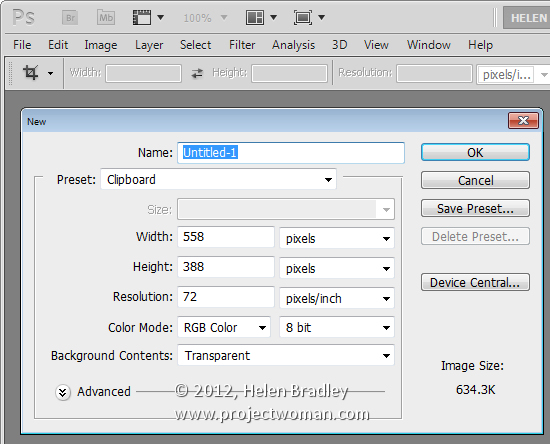
It is easy to save an image copied from the web to a Photoshop file. To do this, first copy the image to the Windows clipboard then choose File > New and press Ok.
The Photoshop file will be sized automatically to exactly the same image size as the image on the clipboard.
Now choose Edit > Paste to paste the image into position and you are ready to save it.
Labels: Clipboard, copy image, file size, helan bradley, how to, image, paste image, Photoshop, tip
Categories:photoshop