

Thursday, March 17th, 2011
Excel Convert dates from MDY to DMY

Today I encountered a problem when downloading some data from an Australian bank. Australia uses the DMY date format whereas the US uses MDY, my computer is set to use US as its region which means Excel expects dates to be entered using MDY format. Excel gets its country information which affects dates, in particular, from the setting you have for your Windows Region.
So, I had a .csv file in which all the dates were entered wrongly – they read 22/11/2010 instead of 11/22/2010, for example. When the dates are typed incorrectly for the country you are currently set to use, you can’t simply apply a format to them to fix the problem because there is no such date as 22/11/2010. And worse still a date like 2/1/2011 which is 2-Jan-2011 in Australia will be formatted as 1-Feb-2011 in my US Excel – throwing all my data spectacularly out.
So what to do?
The simplest solution is to use the Excel data parse tool. Select the column of dates and choose Data > Text To Columns. This opens the Convert Text To Columns Wizard which is the old way of parsing data into Excel.
In Step 1 select either option as you only have one column of data selected anyway. Click Next twice. Now in step three of the wizard, select the Date option and select the formatting for the displayed data. So if the data has been typed in DMY format, select DMY. If it has been typed in MDY format, choose MDY. Click Finish.

The date data will be automatically converted to match the correct date syntax for your version of Excel. In short this converts all my Australian dates to US date format so they are correct in Excel. Select the column of dates and you can now format the dates using your preferred format.
It’s a simple but effective solution that avoids the necessity of retyping the date data.
Labels: convert, data, Dates, DMY, Excel, Excel 2010, MDY, parse
Friday, February 25th, 2011
Scale a font’s height but not width in Word 2010
 I call this post – one step forward, two steps back. It’s a funky solution but it rocks and that’s why it’s worth today’s post.
Ok, you are in Word and you want to make a great title for a document. But it’s a little long so you can’t make the font really big cause that stretches it too wide. Hmm..
Ok, there’s a setting for scaling font width but not height – so what do you do? Well, with a little ingenuity you can solve the problem by scaling the width – in the reverse direction.
Select the text to alter then click the small icon in the bottom right of the Font group on the Home tab of the ribbon and click the Character tab. Set the Scale of the font to around 50% to shrink its width. Now, back in the Home tab, size the font up so it is nice and big. The ‘big’ font setting gives you the increased font height – which is what you want, and the small Scale value gives you the narrow width which solves the “too wide” problem.
Labels: increase font height, scale font height, scale width, Word 2010
Tuesday, February 22nd, 2011
Excel – copy a chart or worksheet as a picture

Sometimes you need to place a copy of a worksheet or a picture of an Excel chart onto your website or into a document. When you need only the image itself (not the link or an embedded version of the worksheet) you can make a copy of the area or graph as a picture.
So, with the worksheet open, select over the area that you want to convert to a picture. Or, if you need a picture of a chart select the chart. Now, from the Home tab, click the Copy dropdown list and choose Copy As Picture.
From the dialog which appears, choose Bitmap if you want an image the same size as you see it on the screen. To get an image you can make larger than this, choose Picture as this creates an image which scales well.
Then select either ‘As shown on screen’ or ‘As shown when printed’ as required. Click Ok and the picture will be copied to the Windows Clipboard. You can now paste the image into another application using that application’s Paste tool.
Labels: 2007, 2010, convert chart to image, copy as picture, Excel

Friday, February 11th, 2011
Excel 2007 & 2010 – Hidden add-ins

Excel 2007 & 2010 come with a number of add-ins that you can get to by choosing the Options button (File in Excel 2010) and choose Excel Options (Options in Excel 2010) and click Add-ins. From the Manage dropdown list choose Excel Add-ins and click Go.

A list of available Add-ins appears in the list. Any that don’t have their checkboxes checked aren’t enabled right now.
One you might want to enable is the Analysis Toolpak – this gives you access to functions like RANDBETWEEN and NETWORKDAYS. There’s also possibly a Lookup Wizard (in Excel 2007 only – it was discontinued in Excel 2010) and a Solver add-in in the list.
Click on any of the Add-ins to add them to Excel. Once you do, they’ll be available every time you launch Excel.
RANDBETWEEN is a handy function for filling cells with a random value. It’s syntax is RANDBETWEEN(startvalue, endvalue) so to fill a range with values between 100 and 200 use =RANDBETWEEN(100,200) then copy it to the range to fill. You can read more about the function here: Random numbers in Excel.
NETWORKDAYS will calculate the number of working days between two dates. You can read more about this function here: Excel – calculating workdays with Networkdays.
Labels: 2010, Add-ins, analysis toolpak, Lookup Wizard, Microsoft Excel 2007, NETWORKDAYS, Randbetween, Solver add-in
Tuesday, February 8th, 2011
Straightening an image in Word 2010

While Word 2010 has no tool for straightening an image, you can create the same effect.
step 1
To do this, I’d suggest you start with a new drawing canvas which is Insert > Shapes > New Drawing Canvas to draw a canvas on the screen.

step 2
Adjust it to just larger than the image that you want in your document and then click inside the canvas and choose Insert Picture to select an image to insert.
Size the image once it’s placed inside the drawing canvas.

Step 3
Now with the canvas selected but not the image, choose Insert > Shapes and select a rectangle shape.
Draw the rectangle shape over the top of the image.
From the Drawing Tools> Format tab, set the Shape Fill to No Fill and the Shape Outline to White and set the Outline Weight to a large weight. To do this, you’ll probably need to select the format shape options so that you can set the shape outline to something like 40 points. You need something that will cover the edges of the shape that you are about to crop.
In this image, I’ve set the outline of the rectangle to a light grey so you can see what you’re aiming to achieve:

Step 4
Now with the image selected rather than the shape, rotate the image until it is straight. Select the image and click the Crop button crop away a little bit around the edges of the image. You don’t need to crop too much but you might need to crop a little bit.
Click outside the image and now adjust the shape itself the white border you created so that it covers the area of the image that you want to hide because you’ve rotated the image.

In some cases, you may still not have enough border so you can adjust it to make it wider or narrower as required not by selecting the rectangle and choose Drawing Tools > Format tab > Shape Outline > Weight> More Lines and now increase the size of the line until you have enough border to hide the outside of the image.
The border grows from the middle out so you need to add about half as much extra border than you think you need.
Once you’ve added the extra border, click on the border and drag it outwards until it covers the uneven edges of the image.

Essentially what you’re doing here is rotating an image then using a white frame with no fill placed over the top of the image to mask out the area of the image that is on an angle and that you don’t want to see.
When you’re done, you can resize the drawing canvas until it fits closely around your image. It should not extend over the image or you will distort the frame.
Placing the image and frame inside a drawing canvas means that you can just click and drag on the drawing canvas edge and it will move both the frame and the image in your document.
Labels: drawing canvas, rectangle, straighten an image, Word 2010
Wednesday, February 2nd, 2011
Section Breaks in Word 2007 & 2010

I love working with Microsoft apps and finding cool things to do with them. I hate it when Microsoft messes with my head.
While I love Microsoft Word 2010, Word 2007 was never my favorite application so I didn’t use it as my day to day tool preferring to stick with Word 2003 which really was a great program.
Now that Word 2010 is here, I have bitten the bullet and I’m turning all my production work over to Word 2010 – it is just such a wonderful program and a fitting successor to Word 2003.
But, wonderful as it is, it has some annoyances. One is when you come to insert a section break into a document. For years I’ve used the Insert menu in Word 2003 to add Breaks of all types to my documents. In Word 2007, 2010 – no go! You can insert a cover page, a blank page or a page break and any other number of smart document objects from the Insert tab – but you can’t insert a section break.
Instead the Breaks feature has been moved to the Page Layout tab – select it and then choose Breaks. Why it wasn’t placed on the Insert tab along with page breaks or why page breaks was added to the Insert tab and also duplicated in the Page Layout tab, I don’t know, but there it is.
So, when you need to add a section break to a Microsoft Word 2007 or 2010 document use the Page Layout tab, select Breaks and then, for example, Next page to create a section break that immediately opens a new page in the document.
You may not like it, but if you’re using Word 2007 you have to accept it’s Microsoft’s world and we just get to live in it.
If you’re using Word 2010 – Yeah! life is good. Thanks to the new customizable ribbon you can add your own Group to the Insert tab, move it up so it’s alongside the built-in Pages group then add the Breaks command to it – it’s a great solution and quick and easy to do and it makes such good sense.

Labels: customizable ribbon, customize the ribbon, insert page break, Page Layout, section break, Word 2007, Word 2010
Thursday, January 27th, 2011
Help! Windows can’t find my Camera Card

Lately I have been having all sorts of problems with my camera card in multiple computers in that the computers couldn’t (or wouldn’t) recognize a card when I put it in the card slot.
It got to the stage where it was fairly obvious that the problems were less an issue with the camera cards themselves and more a problem with Windows.
So, if your SD, XD or compact flash card isn’t being recognized by your computer, don’t blame the cards or yourself and, instead blame Windows! And then step through this process to fix the problem:
Step 1 Click the Start button and choose click Settings > Control Panel and open the Device Manager. On Windows Vista you’ll need to have admin status to do this.
Step 2 Locate the Universal Serial Bus Controllers option and open it.
You’ll see some USB mass storage devices listed and these control your USB Mass Storage Devices. You need to disable them so right click each USB Mass Storage Device and choose Disable. Repeat this for all the devices listed – only disable the USB Mass Storage Devices – not anything else and don’t Uninstall them – just disable them.
Step 3 When you do this, you’ll be warned that you need to reboot your computer so do this and Windows will automatically find your mass storage devices when it boots.
In future, it’s best not to use the option to Safely Remove a Storage Device and instead open up My Computer, locate the drive, right click it and choose Eject. This safely ejects the card so that you can remove it and ensures that the storage device isn’t clobbered so it doesn’t work any longer.
Labels: camera cards not recognized, sd card failure, Windows 7, windows Vista
Monday, January 24th, 2011
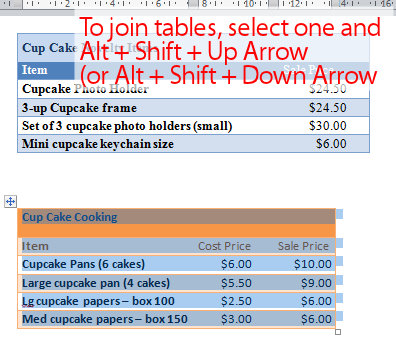
Join two tables together in Word

Quite often you’ll find that you have two tables in a Word document and you want to join the two together to make just one table. The solution is simple but way from obvious.
To do this, first select over all the cells in one of the two tables. If the table is underneath the one you want to join it up to, then press Alt + Shift + Up Arrow to move the table up the document so that it joins the bottom of the table before it. Keep pressing the key until the top row that you have selected joins the bottom border of the one above.
If you have selected the topmost table, then press Alt + Shift + Down Arrow until the top table locks onto the table below.
You can also drag one table up or down until it joins but this method is very slick. It also works on a single row so you can take one row from one table and move only it to join up with another table or to become a table all of its own. Experiment with this key combination – I’m sure you will love it.
Once you’ve done this, the tables will be joined to make one single table. If desired, you can then adjust the positioning of the columns so that the columns match between the two tables – this isn’t required but you may want to do it if the columns are supposed to be the same throughout.
Labels: join two tables, shortcut keys, Word, Word 2003, Word 2007, Word 2010
Thursday, January 20th, 2011
Word – place a table over newspaper columns

Sometimes you’ll need to include a table in a document but place it so that it’s placed over a series of columns rather than inside the column itself.
To do this, click where you want the table to appear and insert the table at this point.
Hold your mouse over the table and you’ll see the table selector above the top left corner of the table. Click it to select the table and drag the table into position.
The default text wrap settings for a table in Word is that the text wraps around the table so there’s no special option to set to make this happen.
You can widen the table cells as large as necessary. If desired, the table can be sized so it fits the full width of the page or you can make it any size that you want.
To adjust the wrapping of text around a table, right click the table selector (the little square above its top left edge) and choose Table Properties > Table tab. Here you can select how text flows around the table or you can make it not flow around it if you want the table to push the text completely out of its way.
Here too you can alter the alignment of the table – by choosing Left, Center or Right.
This table behavior is consistent across Word 2007, 2010, 2003 and earlier versions.
Labels: columns, table over columns, Word, Word 2003, Word 2007, Word 2010, Wrap text
Tuesday, January 18th, 2011
Word: Inserting a line Between Columns

One of the features of Microsoft Word is the ability to insert a line between columns in a Word document.
In Word 2003 and earlier choose Format > Columns and there is an option for Line Between in the dialog. Select it and click Ok and a line will appear between the columns.
In Word 2007 and 2010 the option is harder to find. You need to select the Page Layout > Columns > More Columns Option. This opens the Columns dialog, which gives you the opportunity to select the Line Between checkbox.
If you want to disable this feature, go back to the columns dialog and disable the checkbox.
Labels: line between columns, Word, Word 2003, Word 2007, Word 2010
Saturday, January 15th, 2011
Create and Undo Columns in Word

Continuing the short series on working with columns in Word, here’s how to create a column layout in Word.
Create two columns
To turn an entire document into columns in Word 2007 and 2010 click the Page Layout tab and select Columns > Two. This immediately formats all the text in your document into two columns.
In Word 2003 you’ll choose Format > Columns, select Two (or Three etc.,) and click Ok.
Remove two columns
To undo the change and set your document back to one column in effectively undoing the two columns, repeat the process. In Word 2007 or Word 2010, choose Page Layout > Columns > One. The default for any document is one column so all you’re doing is going back to the default. In Word 2003 choose Format > Columns > One.
Make only part of the document into columns
If you want only part of a document to be in columns then select that part of the document first. For example, you may select all the content after the heading, leaving the heading unselected so it will be full width of the page. With that content selected, choose Page Layout > Columns and then select the number of columns.
This will make just the selected text into columns, leaving everything else full width of the page.
Again, if that piece of text ever needs to be returned to a single column just click inside it, choose Page Layout > Columns > One and it will be restore to the way it used to look.
So, that’s how to make text in columns in Word, how to delete columns and how to make only part of a document into columns.
Labels: create text in columns, delete columns, Page Layout, Word, Word 2003, Word 2007, Word 2010
Thursday, January 13th, 2011
Moving between columns in Word

One of the most difficult things that people find with working with columns in Word is moving between the columns.
The reason is that the process itself is anything but easy.
The Tab key, which will move you between cells in columns in a table, doesn’t work inside newspaper style columns in Word so that key is out.
Instead, to move or jump from one column to the next you’ll press Alt + Page Down to go to the column on the right (the second column) or Alt + Page Up to move to the first column.
When you click Alt + Page Down, if you are in column 1 you’ll go to the very top of column 2. If you keep pressing the key you’ll flip between the top character in each column.
If you’re somewhere in column 2, when you press Alt + Page Up you’ll go to the top of column 1.
These are the only specialist keys for moving or switching between columns – we could use more – like jumping from a line in one column to the same line in the one next to it – but nada! Sorry!
Labels: columns, jump, move between columns, shortcut keys, switch, Word, Word 2003, Word 2007, Word 2010
Tuesday, January 11th, 2011
Who StumbleUpon Me?

If you have a website or blog you will find that, if you’re lucky, you get StumbleUpon from time to time by someone. StumbleUpon is a good long tail link – if you get some positive feedback to the stumble you can get a lot of traffic over a long period of time – really good stuff if you’re tying to build your blog traffic.
I sometimes wonder just who ‘stumbled’ my sites by adding them to their StumbleUpon account. So I want to find out the person who first found the link, how many views it has had and what folks think of it.
Here’s how to find who StumbleUpon your site:
First get the full URL of the page of your site that got stumbled – you’ll find this in your stats – you have to know what page people are stumbling or you won’t find the initial stumbler.
Then type this into your browser toolbar:
http://www.stumbleupon.com/url/<type your url in here>
In place of the <type your url in here> type the full url with or without the http:// part of the url – just don’t use the < or > characters.
Provided the person hasn’t set their page to private you can find the person who stumbled your site. It’s great information and a good way to track what folks think of your posts.
Labels: stumbleupon, tracking, who stumbled me, who stumbled my post, who stumbled my site, Who StumbledUpon my site
Tuesday, January 11th, 2011
Typing in the second column in Word

Ok, so you’ve formatted your text to be two columns in Word and you’ve typed something in the first column. You haven’t filled the first column because you don’t want to. Fair enough – it’s your document – your choice.
But you do want to type something in the next or second column but however hard you try – Word won’t play nice. It wants you to fill column one before you get to fill column two – you don’t want to – so you’re at a stalemate.
The solution is to force Word to the top of the second column and you do this by inserting a break. In Word 2002/2003 choose Insert> Break > Column Break.
In Word 2007 & 2010 choose Page Layout tab> Breaks > Column.
Now you can type at the top of the second column. Yeah!
Labels: columns, Type in second column, Word, Word 2003, Word 2007, Word 2010