Saturday, March 23rd, 2013

Photoshop – Masking 101 for Use in a Collage

Learn to use Masks in Photoshop. Here we look at how to collage a series of images together, using masks in Photoshop.

Transcript:

Hello, I’m Helen Bradley. Welcome to this video tutorial. In this tutorial we’re going to look at Masking 101. So we’re going to get you started with masks in Photoshop.

In this introduction to masks I’m going to show you how you can use masks to create images like this collage image. This collage image has been built up from a number of images and they’ve all been masked so that everything can appear nicely on top of each other.

The first image was the tail end of some cows and then I added an image of a tree. And this image has been masked so that we can see part of the cows’ tails behind it. But you can see that these two images are sort of blending into each other with this mask effect. Then we have the cow by herself and again we’ve masked her so that we can see the image of the tree behind her. And then we’ve added an image of some hay over here, and again added a mask to the hay image around the edge of the cow so that we’re getting this sort of almost seamless blended effect all the way across the image. And then we’ve got some milk cans and then finally we had some different effects that sort of tied the whole thing in together. But we’re going to have a look at masks and we’re going to have a look at it doing the last three images in this particular collage, just seeing how that would have been put together.

So I’m going to open the images. I’ve got a couple here open already. I’ve got the milk cans and the hay and let’s just go and get the cow. And I’m going to create an image that these will all going into. I think a thousand pixels is a bit too big so let’s try 800. And to start off with I’ll just drag and drop these images in. But this cow needs to be flipped first of all because I had her flipped in the original. So I’m going to flip her there and then just drag her in here. I’m just dragging on the layers and then just pressing V for the move tool so that I can move her into position. I’m holding Shift as I scale her up to full size. I don’t want to save the cow image. I want the hay image now so I’m going to drag and drop it into position. And I’m going to make sure I’ve got a fairly hefty overlap here because the overlap is going to allow me to blend these images together. And finally the milk cans and drag and drop them into position. And that’s a pretty big image too. I think actually it’s much bigger than the others. I’m pressing Ctrl T and then Ctrl 0, that’s Command T, Command 0 on the Mac, to just re-size these milk cans and just drag them into position.

So I’ll start off with a collage like this by just grabbing my images and just pulling them into position with a nice hefty overlap. And in this case I’m going to crop these images so that we don’t have anything extra hanging around. And now let’s go ahead and do the blending. And I’m going to do this by first looking at this layer here the cow and the hay. So I’m going to zoom into this area so that I can see what I’m doing, move the image across, and I need to mask this hay layer.

So to do that I’m going to click the Add Layer Mask icon here and that adds a mask to the hay layer. I need to have that mask selected. I need to select a brush to use. I’m just going to make sure that I have a brush here. I’m looking for a sort of solid-ish brush. This is a hard mechanical 38 pixels. Now it’s too hard but I can soften it by just taking down its hardness to make it nice and soft. And then I’m going to make sure that my mask layer is targeted and I’m going to set these colors here to their defaults by pressing the letter D.

Now we can already see that if this mask is white we’re seeing the hay. So that means if I want to see the cow I need to paint on it with black. So I’ve got black paint now. I’ve got the mask targeted and I’m painting on the mask where the cow is to bring the cow back in through the grass. Now I’m not going to be a 100 percent fussy at this stage because one of the benefits of using masks is that we can come back later on and edit it. So I’m looking for the edges of the cow but I’m not worried that I’m getting a bit of extra green here because I want to know where her edges are so then I can get a little bit closer to her in a minute. So I’ve got her pretty much there.

Now I just need to neaten it up. And to neaten it up I’m going to switch to white being my foreground color. I’m going to get a much, much smaller brush, make sure I’ve got my mask targeted and I’m going in close to the cow’s face here to make sure that I get an edge that gives me none of this green because it’s a really, really bright green that she’s standing on. And it’s not really doing a lot. The hay image I think is the prettier image. So again I’m just going to get close in to her here. Now this might take me half an hour to do to get a really nice result and the sort of result that I want. And I can also start working with a larger softer brush so I can make sure that I have it even softer. And I can work with a lower opacity if I want to and I can even paint in mid gray because with masks you can paint in black or white or any shade of gray because a mask is a gray-scale image. Now I’m just having a look at these milk cans. And I think that probably there’s one too many. So before I go much further I’m going to select the milk can layer and get rid of this first one because I don’t really like it that much. Now I’m going to grab the next three, I’m just going to move them over a bit.

There’s a bit of excess image hanging around but I’m not too worried about that. I’m going to add a layer mask to this layer. So now we have the overlap. And I want to bring the grass through the milk can so I’m going to paint on this layer again in black and white. So again a nice big brush, I’m going to switch colors by pressing the X key because I want to blend these images in together. I want to sort of suggest that there’s a seamless transition from one image to the other. And I’ll do that with a very soft edge so we almost can’t see where the grass image ends and the milk cans begin. And with this particular image I found that there was enough shine on the milk cans that we could perhaps even suggest that the grass image was showing through the milk cans. And I’m doing that by just adjusting down the opacity of the brush. So I’m not painting it full opacity and I’m just tapping where I want perhaps a little bit of the grass image to appear, again to really blend these images together. And if I’ve made a mistake and if I want to go back then all I need to do is change my paint colors and I can go back and paint out the effect that I’ve just painted in. And I can do this over and over again until I get the exact effect that I’m looking for.

Masks are a handy way of blending images in a way that allows you to come back later on and make changes to it. If I were saving this masked image because I want to make changes to it later, I want to come back and work on it a little bit later, I would do so by saving this as a PSD file. So I’d choose File and then Save As and make sure that when I’m saving it, it’s being saved as a PSD image. That will ensure that the masks and the layers are all there when I come back next time. The biggest mistake you’re going to make when you’re working with masks is when you actually work on the image instead of the mask itself. So if you start seeing that you’re painting in black, that’s telling you that you have the image layer selected not the mask layer. If you’re working on a mask you really need to have that mask layer selected.

I’m Helen Bradley. Thank you for joining me for this video tutorial. Look out for more video tutorials on this YouTube channel and visit my website at projectwoman.com for more tips, tricks and techniques with Photoshop, Photoshop Elements, Lightroom, Illustrator and lots more.

Helen Bradley

Tuesday, March 19th, 2013

Recolor Line Art in Photoshop

Learn how to recolor line art in Photoshop and how to change the colors very easily.

This video shows the use of the Lock Transparent Pixels option in the Layers Palette in Photoshop and also a Hue/Saturation adjustment layer.

Transcript:

Hello, I’m Helen Bradley. Welcome to this video tutorial. In this tutorial I’m going to show you how you can recolor your art in Photoshop. In this video tutorial we’re going to have a look and see how we could recolor this car and how we can do it in a way that would allow us to perhaps change the colors later on.

I’ve got the car on one layer here and the background which is white on another layer. So I’m going to add a layer between these two layers where I can start painting my colors. I’m going to select one of these color schemes that in an earlier video I created from Kuler and I’m going to just grab my toolbar here so that I can grab a paintbrush and a relatively hard paintbrush, not totally hard but relatively hard. I think I’ll just back it off a little bit here to about 84 percent. And on this layer I’m going to start laying down paint. I’ve got my opacity right down from another job that I was doing so let’s just kick that up.

Now I’m just going to paint over the areas where I want the paint to be. And how detailed you are with this and how accurate you are with it depends on just what sort of effect you want. Now I don’t want it to be quite so accurate so while I am going to erase a little bit of this I’m not going to erase all of it because I do want some over-painting. Now I could leave this layer underneath but you’ll see that there is a little bit of white there that’s showing through. I can get rid of this by going to this layer here and setting its blend mode to darken and that will darken the areas but will let the white pixels blend in with the layer below. I think that gives me a better result.

So let’s go now and let’s get another color in this color palette and let’s just go and paint here. And I’m just going to pick the paintbrush up rather than the eraser and let’s Just paint in these areas. Again depending on what sort of effect I want I may be more or less accurate and I can always come back with the eraser and just tidy up if I want to. Most of these areas of the image are also trapped so if I wanted to I could just make a selection from the original image and pour paint into them. But I don’t really want that effect for this image. I just want it to be a little bit more organic than that. And I’m going to add the orange to various portions of the image but I’m going to do it all on this one layer. So that means that later on I can come back and replace the orange with another color and every element that was orange will be replaced accordingly. So let’s just go here. I think I’ve got a slight problem with my green. So I’m just going to continue until I have my car painted to my satisfaction and then we’ll come back and see how we would recolor it.

Now I’ve finished painting the car and I’m ready to go ahead now and have a look at my options for recoloring it. One of the ways I can change the color of this image is to click on the topmost layer and choose Layer, New Adjustment Layer, Hue/Saturation. And this allows me to recolor the entire image just using a single adjustment layer. So I’m just going to drag here and then if I drag around on this color selector here you can see that all of the colors bar that sort of gray color are now changing. And they’re changing in the same relationship to each other. So that’s one of the options I have for recoloring this vehicle is to just adjust the hue/saturation of the entire image using a hue/saturation adjustment

layer and just stopping when I get to the color scheme that I want to use for example.

Now another alternative is if I want to just selectively recolor areas because I put each of these colors on a different layer I can then just change those layers. So for example let’s go and pick up another Kuler color scheme. I’m in beach ball but that doesn’t really matter too much. Let’s go and get this beach combo color scheme from Kuler. And if you haven’t yet watched my Kuler video and if you want to know how to do this then I suggest that you go and have a look at it.

http://www.youtube.com/watch?v=Ec2JOWUjr3E

Now my mouse and my video tool aren’t running very well together right now so I’m having a bit of trouble selecting this. Ok, it’s now in the Swatches panel. So I’m going to go ahead and select this blue color as my foreground color. And I want to replace this color green with the blue. Now what I’m going to do is because there’s a lot of detail on this layer and I want to replace the whole lot, I’m just going to lock the pixels on that layer. And what happens when I lock the pixels is if now I press Alt and Backspace, Option Delete on the Mac, what I’m doing is flooding just the filled pixels on this layer with that Color and so now that layer has been recolored. I’m going to select this layer and lock the pixels on it and pick up a color to use for it and then I’ll Alt Backspace, Option Delete on the Mac, to change its color.

And finally I’m going to lock the pixels on this layer and let’s go and get a color to use for that. We’ll choose this darker blue, Alt Backspace, Option Delete. Of course these layers are now locked so if I want to be able to edit them for example erasing any excess paint or making any changes to them, I’ll need to unlock them. But this Lock Transparent Pixels tool allows you to quickly isolate the contents of a layer, select a color to use for it and just Alt Backspace, Option Delete on the Mac, to immediately select and refill all the pixels on that layer.

I’m Helen Bradley. Thank you for joining me for this video tutorial. If you liked this tutorial please give it a thumbs up and feel free to comment on it. Please consider subscribing to my YouTube channel and visit me at projectwoman.com for more tips, tricks and tutorials on Photoshop, Photoshop Elements, Lightroom, Illustrator, GIMP and a whole lot more.

Helen Bradley

Thursday, March 14th, 2013

Photoshop Collage with Textures, Masks, and Fractal Trees

Learn how to make a collage or montage in Photoshop using fractal trees, a texture image and some masks.

The images used in this video are free to download and an earlier video shows you how to make fractal trees so you can make the collage yourself. The tutorial covers beginner level masking to help make the collage and two pieces are created from the same basic elements.

This is the link to the video that shows how to create fractal trees to use in Photoshop collages: http://www.youtube.com/watch?v=_hTWkhHI90s

Transript:

Hello, I’m Helen Bradley. Welcome to this video tutorial. In this tutorial we’re going to look at using masks, textures and some fractal trees to create composite images in Photoshop. In this video tutorial I’m going to show you how you can create a couple of interesting effects just using images that you can find online.

The background image here is from Flickr and details are in the end of the video. And the house image is actually from sxc.hu, and again I’ve got details at the end of the video. The tree is a fractal tree and you can see one of my other video tutorials for how to create fractal trees. And this is just done with my masking so that’s one of the images we’re going to create. We’re just going to reverse the mask here to create this image. So let’s see how we would do that and I’m going to start by showing you the two images we’re going to use. This is the one from sxc.hu which is free for download online and this is the background from Flickr.

The first thing I’m going to do is just to bring this image in so I’m just dragging on the background layer and just bringing the image into my sort of collage area. Now what I wanted to do was actually line up this background and it actually worked perfectly. These images haven’t as far as I’m aware actually been adjusted from their downloaded original. But the horizon line just works perfectly on the back of this texture image so I’m just going to do that and then we’re going to mask the house. Now the easiest way to mask this house is probably to grab the quick selection tool. And with the quick selection tool you can select over those areas of the image that you want to select. And if it’s not perfect you can just go back with the Alt key and just drag over the areas that you want to take out of the selection. But it does a reasonably good job. And because we’re doing masking anyway it’s a little bit forgiving. So having done that we can choose Select and then Refine Edge. And Refine Edge will allow us to refine the edge of this and we can do this with marching ants or on black or whatever.

Now I’m going to ask Photoshop to have another look at some of these edges here because it hasn’t done the world’s best job of getting them right and particularly these edges around the bottom here. And once we’re happy with that if we are happy with it we can just make this into a selection or a new layer with layer mask. So I’m going to choose New Layer with Layer Mask and just click Ok. And that has created the image here this house image as a new layer with its own layer mask. And I can determine how much of this inside that I want to bring in.

So I’d actually thought in the past that actually bringing these windows in would be attractive and perhaps a little bit more worked on the door. And now I want to fill these areas with black in the mask. So I’m going to select or target the mask layer, black is my foreground color so I’ll do Alt Backspace and that allows me to see through the building to what’s behind. And then I’ll just go and open one of my trees. And I have some trees here and I’ll just grab one of my fractal trees, drag it into the image here.

I’ll make sure I’ve got the tree layer selected and drag it into position here. And when we were looking at these fractal trees we determined that actually using the darker blend mode or darken blend mode blended the trees into their background a little bit better because that meant that any residual white in the tree that was left over from the process of bringing it into Photoshop would be eliminated that way. So there’s the first of our images.

So having completed our first image the second one is done in a very similar way. In fact we can borrow the first to make the second. So I’m just going to make a duplicate of the image layer here. And what I’m going to do is just invert the mask so I’m just going to press Ctrl I on the mask and effectively that was pretty much the beginnings of this image. I then brought in the tree so it would be a little bit over the edge and then we’re going to create a shadow for the tree. So the first thing I’m going to do with that is on the tree layer once it’s already set, I’m going to add a drop shadow. And I’m just going to go with whatever I get here because I’m actually not going to use it exactly as it is here so I’m just going to click Ok.

And now I want to take the drop shadow layer off onto its own layer so I’m just going to click Create Layer and click Ok. And that takes the drop shadow back onto its own layer which means I can do things with it such as sizing it down, putting it in position and then rotating it so it becomes more like the kind of drop shadow that it should be. And I want it to come over the background there so I’m just going to click Ok and actually position it a little closer and perhaps even kill down its opacity a bit, multiply blend mode is what I wanted there.

Now on this layer too I had a drop shadow so let’s just go and add a drop shadow to this. Yes, it was a drop shadow but it was a lot smaller than that. So I just gave it a little bit of a softening effect that I wanted, not quite as harsh as it had been. And we could change the color of that if we want to. But I’ll just click Ok.

So there are the two possible effects that we can create using this particular image. It’s just done through layer masks and you can create all sorts of fun collage effects using layer masks in Photoshop. And I’ve combined these with nice textures and these fractal trees. And the beauty of all of this is that these images can be grabbed online. So you can go and create these image effects if you want to yourself by grabbing the images and playing around with these effects.

I’m Helen Bradley. Thank you for joining me for this video tutorial. Look out for more tutorials on my YouTube channel and visit projectwoman.com for more tips, tricks and tutorials for Photoshop, Lightroom, Illustrator, Photoshop Elements and more. And if you liked this please click Like and comment on it and think about subscribing to my YouTube channel.

Helen Bradley

Tuesday, February 19th, 2013

Photoshop Masks 101

When it comes to fixing images in Photoshop or Photoshop Elements the ability to use masks to do your edits is invaluable. By using a mask instead of, for example, the Eraser you get an edit which can be changed or even removed any time in the future.

However masks aren’t easy to use or even understand when you first get started. In fact they can be downright scary. To help you get started here is a quick and easy technique that can be achieved using masks. Doing it will show you a situation in which a mask is a good editing choice. You will see how to add a mask to a layer and how to use it to edit the image. By the end of the process you will be on your way to understanding how to use masks in your photo editing workflow.

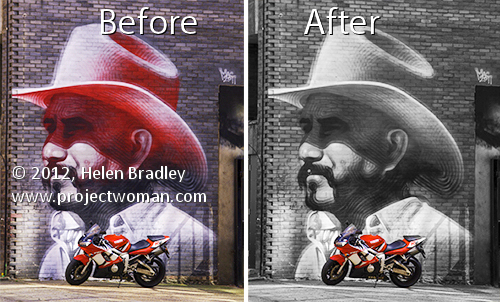
The effect that I’ll be creating is one that you see in a lot of wedding albums and advertisements. It is an element of color in an otherwise black and white image. It can be achieved using masks and that’s what we’ll do here.

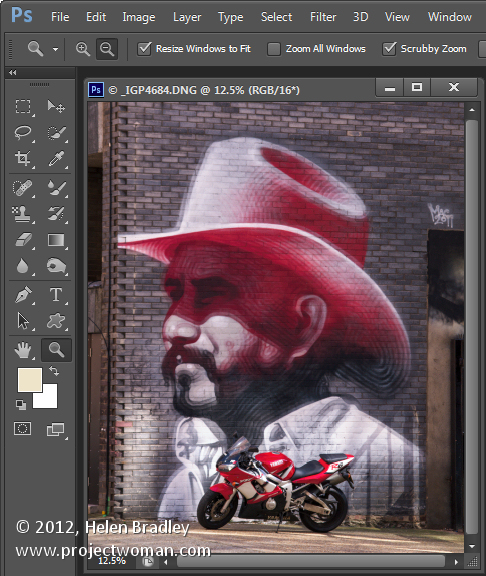
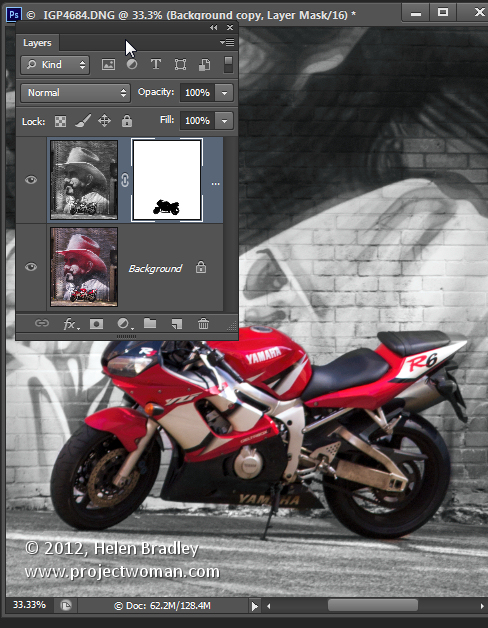
Start by opening an image that has some colorful element of interest that you can show in color while you turn the remainder of the image into black and white. Here I’ll turn this graffiti image black and white and leave the bike in color.

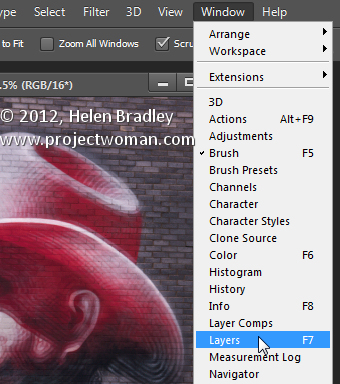
Make sure your Layers palette is visible. If not, choose Window > Layers to display it.

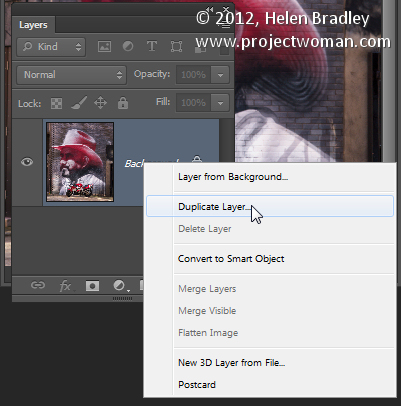
Right click the Background layer in the Layers palette and choose Duplicate Layer and click Ok. This makes a duplicate of the image layer.

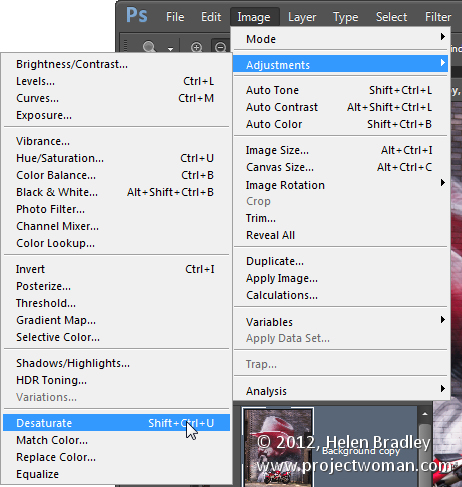
With this layer selected, choose Image > Adjustments > Desaturate to turn the image into black and white.

Notice that the Layer palette contains a black and white layer and a color layer. The black and white layer is at the top of the stack which is why you are seeing a black and white image.

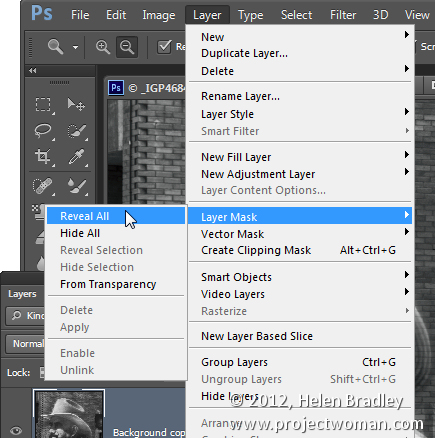
At this point we’ll add the mask so we can use it to bring back the color in a specific are of the image. To do this with the Background Copy layer still selected choose Layer > Layer Mask > Reveal All.

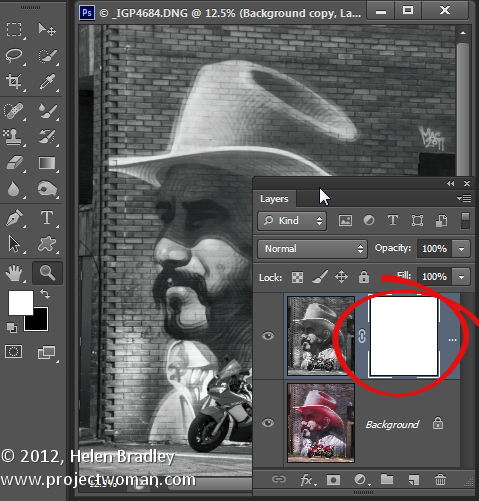
This adds a white filled layer mask to the layer – notice the white box which appears in the layer palette next to the image thumbnail – that’s the mask.

A word about masks

Right now all you need to know about masks is that you can paint on them with black, white or shades of gray.

When you paint with white on a mask you reveal any content on the current layer – in our case that is the black and white layer.

If you paint with black you’ll reveal the content on the layer below the current layer – in this case the color layer. You might like to think of it as poking a hole in the top layer so that you can see part of the layer below.

If you paint with a shade of gray you’ll be seeing part of the layer below and part of the current layer. The hole that you’re punching through the top layer will be semitransparent.

Bring back the color

To work on this image, select the brush tool and select a small brush with a hardness of around 75%. Make sure black is set as the foreground color and click on the white mask thumbnail in the Layers palette to target the mask. It should have a border around it as in this image:

Now paint on the photo over the areas that you want to bring back color in. Instead of seeing black paint on your image as you might expect to see, you will see the color coming back.

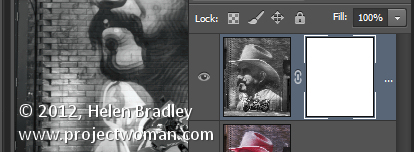
Look at the mask thumbnail in the Layers palette and notice it has some black markings in it where you painted on the image.

If you make a mistake and paint back too much color, switch the paint color so that you are painting with white and paint out the areas that you want to return to black and white.

Oops!

If you are working with a mask and find that the brush is painting black or white paint on your image it is because the image thumbnail is selected in the Layers palette and not the mask thumbnail. When you select the mask thumbnail it will have a small white border around it so you can tell it is active and selected.

The benefit of using a mask for this type of effect is that you can paint the effect on or off the image as desired. This gives you a lot more flexibility in editing your image. While this is a very simple example it does give you a starting point for learning to use masks in your photo editing.

When you save this photo, save it as a psd format file if you want to be able to come back later and adjust the mask – the psd format saves layers and layer masks.

If you are familiar with using Adjustment Layers in Photoshop you could apply this effect using an adjustment layer to desaturate the image and paint on the Adjustment Layer’s mask to bring the detail back. If you are not familiar with using Adjustment Layers then the process that I have outlined will give you the same results but just a different way of achieving it.

Helen Bradley

Wednesday, January 30th, 2013

Copy a Channel to a Layer in Photoshop

Want to take a channel and make it into a layer in Photoshop – Easier than you might think, and here’s how…

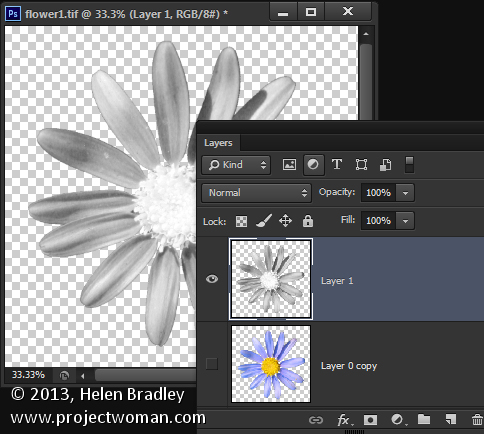
Sometimes you want to get a high contrast version of your image as a new layer in the image and sometimes the channels palette has just the layer you want. Luckily it is easy to make a channel into a layer.

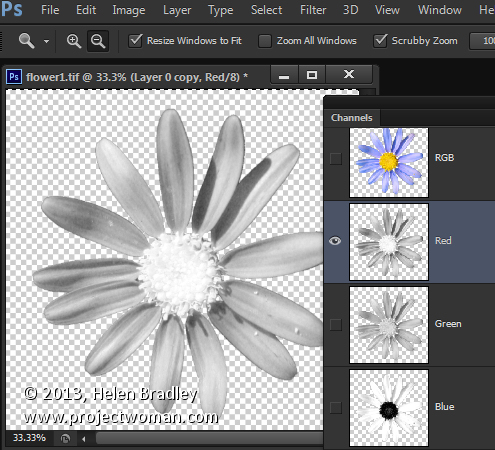
To see this at work open an image – flowers are great for this. Choose Window > Channels and click a channel – typically the Green channel is the best (although for this blue flower red is the best – but that’s unusual). You should see a black and white image.

Press Control + A (Command + A on the Mac) to select the image and press Control (Command) + C to copy it.

Now reselect the RGB channel in the channels layer so you see your image back. This is critical and also the most overlooked step.

Add a new layer to the image by selecting Layer > New > Layer. Click in it and press Control (Command) + V to paste the selection back into the image – it comes in as a new layer. Simple when you know how.


Helen Bradley

Friday, December 7th, 2012

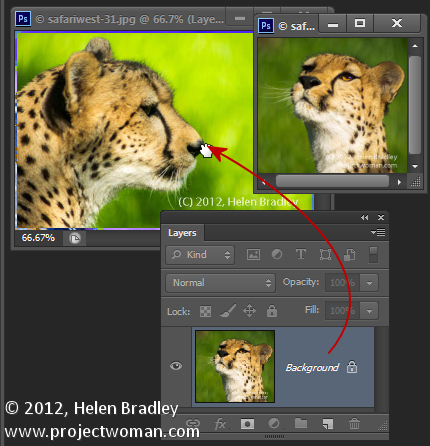
Trevor Quick Photoshop Tip – Duplicate a Layer

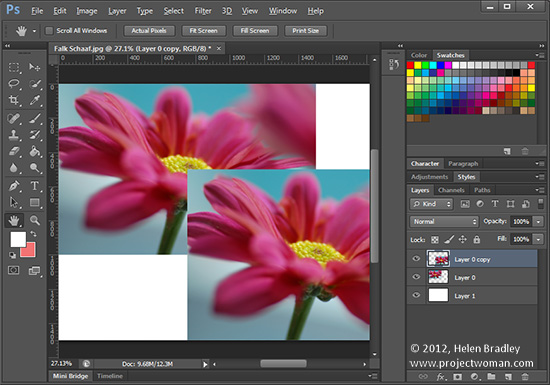
Original photo by: Falk Schaaf
Need an exact copy of a layer? Select the layer – click the layer in the Layer palette – not the thumbnail and press Ctrl + J on a PC and Command + J on a Mac. The new layer will appear above the original layer and will have “copy” added to the original layer name.

Helen Bradley

Monday, November 12th, 2012

7 Cool Photoshop Layer Tricks

When you’re using layers in Photoshop for photo editing and composting you can speed up the process of working with them if you know these cool layer tricks.

1          Unlock the Background

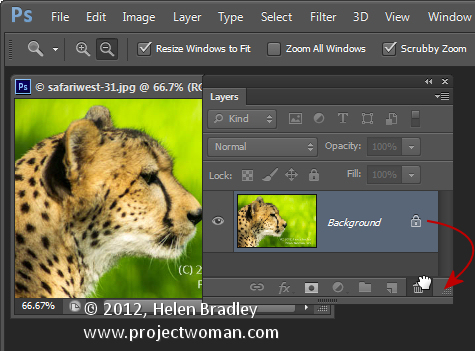
You will already know the Background of any photo is locked and you can’t do anything much with it until you unlock it. The quickest way to unlock a background layer is from inside the Layers palette. Drag the lock icon to its right and drop it in the Trash and the Background layer will be automatically converted to a regular layer.

2          One click add a Layer

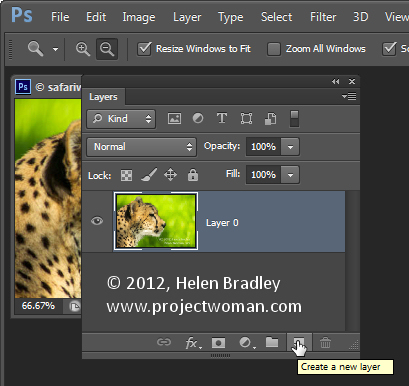
To create a new layer above the current layer click the Add New Layer icon at the foot of the Layer palette.

To add a new layer directly below the current layer Ctrl or Command Click on that icon. Both options add a layer but without displaying the Layer dialog.

3          Merge Everything to One Layer but Keep the Layers too

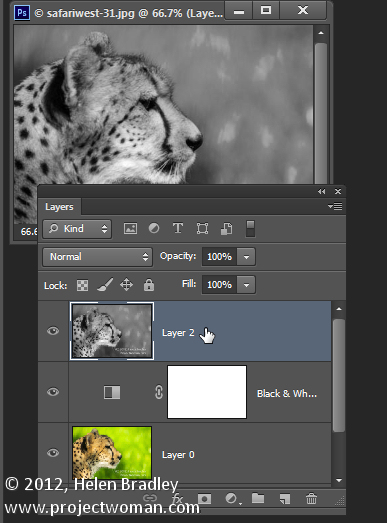
To merge all the current layers in the document to a single layer and at the same time to keep all the layers intact below it, click the topmost layer of the document and press Ctrl + Shift + Alt + E (Command + Option + Shift + E on the Mac). In case you are curious – it’s called Stamp Visible.

4          Select the Content on the Current Layer

To select everything on the current layer Ctrl + Click on the layer thumbnail in the Layers palette.

5          Copy a Layer to Another Document

To copy a layer from one document to another drag the layer from the Layers palette in one document and drop it into the other document. If you hold Shift as you drag the layer will be centered in the middle of the second document.

6          Quick Layer Moves

To quickly move a layer up the layer stack press Command + ] and to move it down, press Command + [.

7          Instant Delete a Layer

To instantly delete a layer, click the layer and press Delete.

Bonus Layer tip

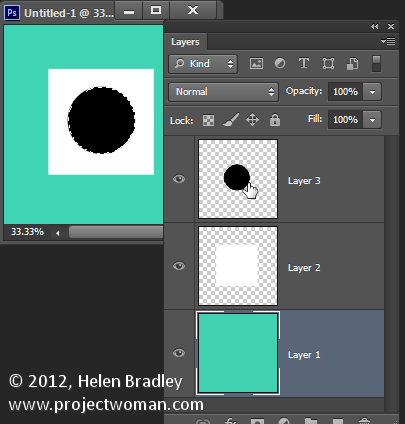
To fill a layer or a selection with the foreground color press Alt + Backspace (Option + Delete on the Mac). Use Control + Backspace (Command + Delete on the Mac to fill the layer or selection with the Background color.

So, over to you now… what are your favorite Layer tips and tricks?

Helen Bradley

Monday, September 10th, 2012

Photoshop – make a Kaleidoscope

Learn how to create a Kaleidoscope in Photoshop. Video includes tips for a shortcut for copying and rotating a layer.

Check out all our video tutorials on our YouTube channel and subscribe to receive all of our tutorials as soon as they come out.

Transcript for video:

Hello, I’m Helen Bradley. Welcome to this video tutorial. In this tutorial I’m going to show you how to create quick and easy kaleidoscopes in Photoshop. Before we begin let’s have a look at the sort of thing that we can create. This is the kaleidoscope I created earlier from the image that we’re actually going to use. And as you can see I’ve layered various copies of the same kaleidoscope on top of it, changed some of the colors to create an even more distinct pattern effect. This was my original kaleidoscope. This is a second version of it on top and this is another version of it in the middle. So let’s get started with our image. This is an image I shot at the Neon Bone Yard in Las Vegas. The first thing I’m going to do is to convert this background layer into a regular layer just by dragging and dropping the lock icon into the trashcan. Then I’m going to move this image. So I’m going to first of all zoom out a little bit so I can see where I’m going. Then I’m going to select the Move Tool and I’m going to start transforming this shape. And what I want to do is to transform it through 60 degrees, some sort of 60 degrees, minus 60 plus 60. And what I’m going to do is drag this shape over the edge of the image here. I can resize it if I want to but I want it to only go over two edges of this image because I want to use the 60 degree angle that we have. So I’m going to save it. That’s good because I’ve got some nice texture in here and I’m just going to click the checkmark. So if we had a really good look at this we would see that there’s some anti- aliasing down here on this edge. So to get rid of it I’m going to click the Magic Wand Tool here. I’m going to click on this side of the image. And you see perhaps even on the video that there’s a little bit of a gap between the selected area and the image itself. So I’m going to choose Select Inverse to inverse the selection so I have only my corner piece selected and then I’m going to bring it in by choosing Select Modify Contract. And I’m going to bring it in one pixel and that should make it just a little bit smaller. And then so that I get just that piece I’m going to choose Image and then Crop. And this is the piece that I’m going to use to create my kaleidoscope from. So we have it on its own layer. But we need a bit more area to work in. So I’m going to select the Crop Tool. And if you didn’t know that you can do so you’re going to find out now that you can actually crop in a negative direction. So you can use the Crop Tool to add space to your image. So I’m just going to add a little bit of extra space around my image so we have a bit of a better area to work with. I’m going to select my layer with my shape and I want to flip it. So I’m going to choose Layer New Layer via Copy. And with this shape I’m going to transform it. So I’m going to choose Edit and then Free Transform. And I want to transform it around this side. So I’m just going to click on this side so it’s anchored here so that when I flip it over it doesn’t move. And I want to flip it over so it’s exactly mirrored which means that it’s negative 100 percent. So I’m just going to make that negative 100 percent and then I have an exact duplicate of this shape. And this is the piece that I’m going to rotate around to create my kaleidoscope so I’m going to merge these two layers together. I can do that by selecting both layers and choose Layer Merge Layers or Merge Visible, either of those would work. So too would Flatten Image or I could just press Ctrl E. But let’s choose the menu option. Now that we have our basic shape I’m ready to rotate it. And I’m going to do this the smart way so I don’t have to do every single one of them. I just want to do it once, Layer New Layer via Copy, Edit Free Transform. I’m going to anchor it at its bottom center point. And I’m going to rotate it around 60 degrees, and I’m going to click the checkmark here. And having done that once I’m now going to get Photoshop to do it automatically for me. And all I need to do to do that is to press these keys, Ctrl Shift Alt T, and that’s Command Option Shift T on the Mac. So I’m going to press all these keys and every time I do it Photoshop duplicates the layer and rotates it. So with four keystrokes I’ve now got the rest of my kaleidoscope. Again I’m going to select all these layers and Ctrl or Command E to merge them into one. And now I’ve got one layer I can make a duplicate of it. And then I can size it as we saw earlier. If I want to size it around its center point I’m going to hold Alt and Shift as I resize it. And now I can also rotate it. So I might rotate it for example 15 degrees. And then I might make another duplicate of this and do something similar to this duplicate layer, again holding down the Shift and Alt so I’m rotating or sizing around the middle point, place my shape in and then rotate it. This time I might choose say let’s go 30 degrees. And then for each of these I could add a hue/saturation adjustment. And that will allow me just to recolor the shape and perhaps get a more interesting effect in doing so. I’ll do that and just click Ok. So there is the basics of creating a kaleidoscope in Photoshop. Now you could use a different measurement than the 60 degrees that I used. You might want to try it with 30 degrees to get a more complex kaleidoscope. But basically once you get your flipped shape and you merge it you can get Photoshop to do all the copying and rotating work for you. I’m Helen Bradley. Thank you for joining me for this video tutorial. Look out for more of my Photoshop video training on my YouTube channel.

Helen Bradley

Monday, March 5th, 2012

Templates in Photoshop

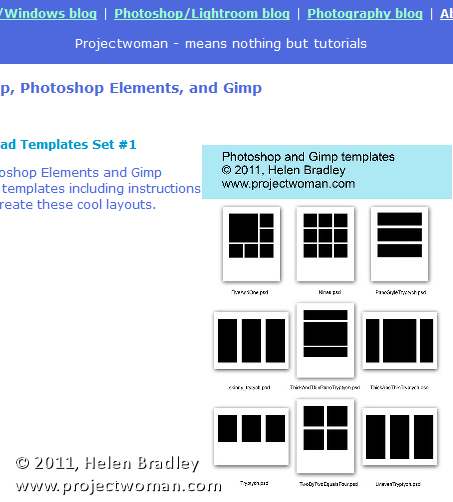
A short while ago I wrote an article on using templates to create a collage or montage of images in Gimp. Sometime after, the templates that I suggested you  could use were taken down from the original website.

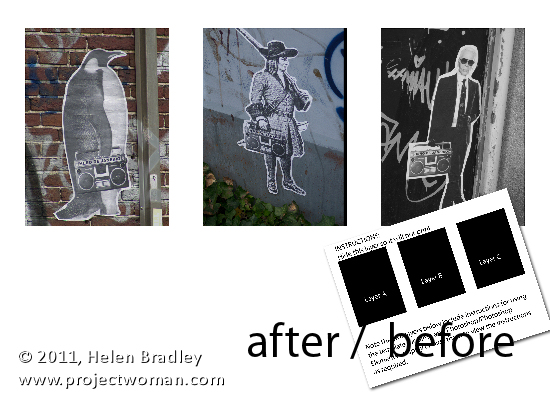
To help out our Gimp readers, I created a new set of templates and as I was making them, it seemed like a good idea to include instructions for Photoshop and Photoshop Elements as well as for Gimp. Here, therefore is how to use a downloadable template to create a montage of images:

Start by visiting this site and download the template zip file: http://projectwoman.com/articles/45PhotoshopTemplates.html

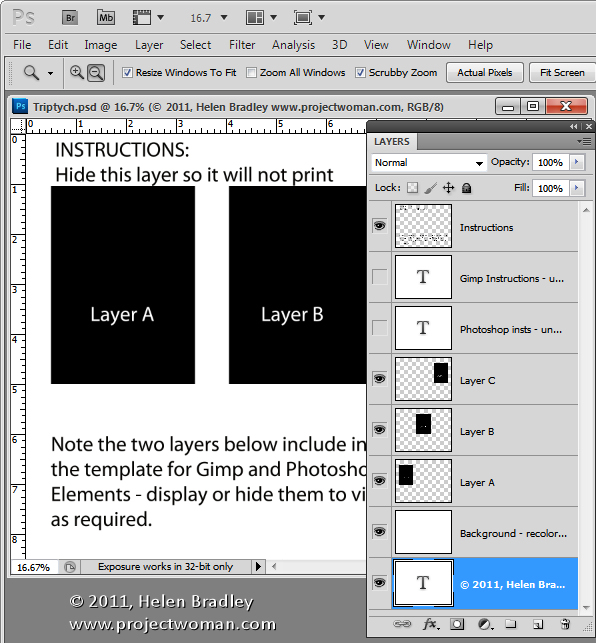
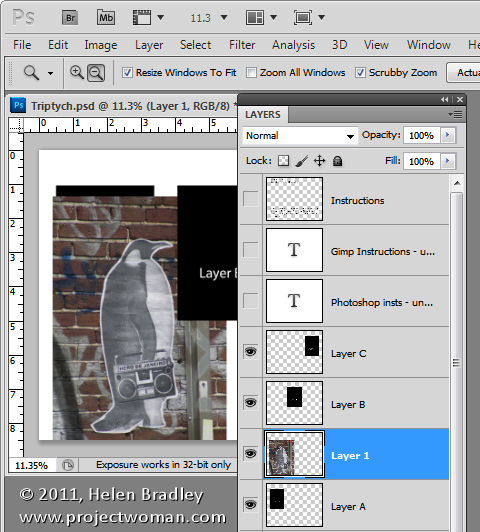
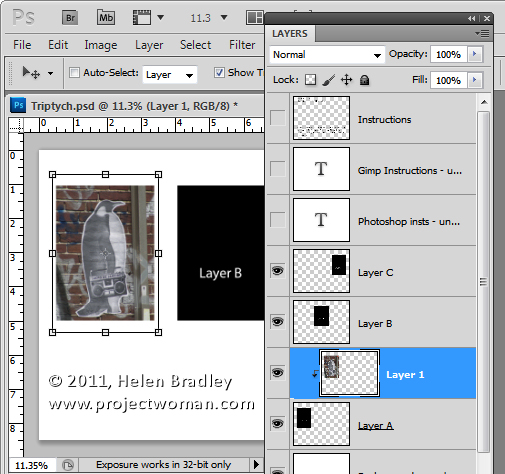
Then unzip the templates, save them where you can find them when you need to use them and open one of them. I’ve used the template triptych.psd.

When you open it, you’ll find that there are a series of layers. The top layer can be disabled or deleted at this point. The next two layers are instructions for Gimp and Photoshop users. Again, you can discard these two layers.

Open up the three images that you plan to use for this triptych. Images that are in portrait orientation will look best but you can use anything that you like – just be aware that you’re going to take a portrait orientation slice of the image.

In the template, click on Layer A and then click on the first of your images and drag and drop the background layer from the first of your images into the main image.

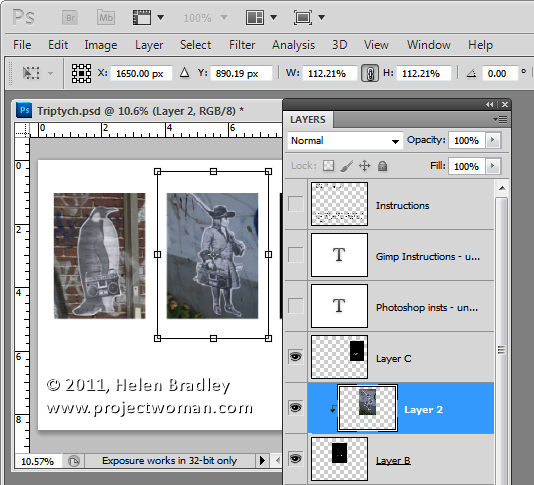
Click on the Move tool and size and position the image so that the interesting portion of it is over the black background. Click to accept this size and positioning and then with the new layer still selected, choose Layer > Create Clipping Mask. You’ll see that your layer is clipped to the size of the underlying shape.

You can fine-tune the placement and sizing by moving the contents of the new layer.

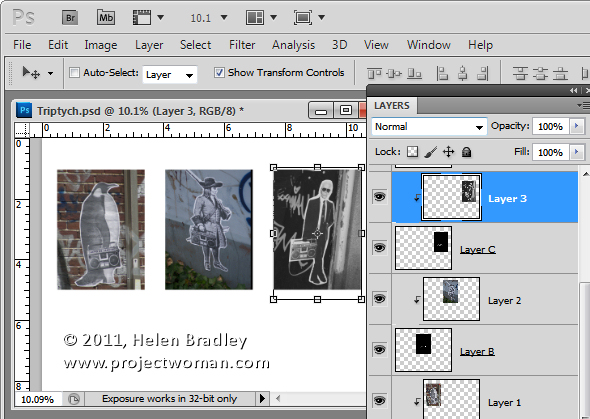
Now click on Layer B and again drag and drop the background layer from the second image into this template. Again, position the interesting portion of the image over the underlying background, sizing the image if desired. Create the clipping mask for that layer by selecting the image and choose Layer > Create Clipping Mask.

Repeat this for Layer C using your third image.

When you’re done, you can adjust the background of the image if desired by recoloring the layer marked background recolor if desired. You can now save and print the image or upload it to the web.

This same process can be used in Photoshop Elements.

Helen Bradley

Saturday, February 25th, 2012

Photoshop – Replace a Face

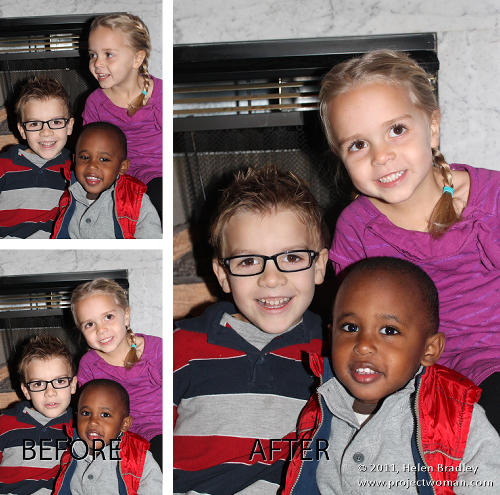
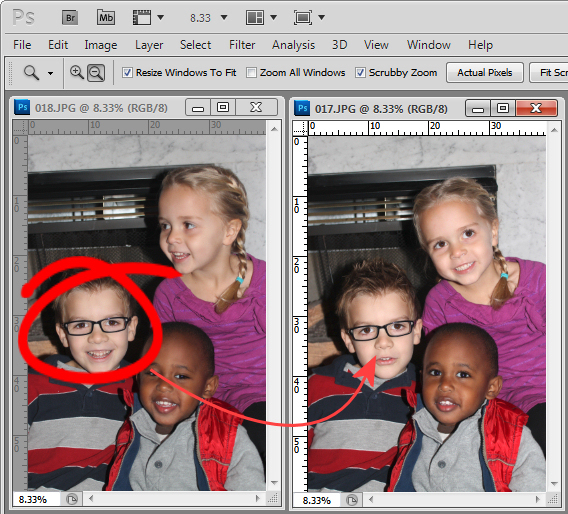
A reader recently emailed me a couple of photographs of her children. Unfortunately, as often happens with small children, one image had two of the three children looking at the camera and smiling and the other image had the exact opposite combination – only one child looking great. Her question was – could she take the good face from one of the images and paste it into the second image.

The answer is yes, and here’s how to do it in Photoshop without any need to cut and paste:

Step 1

Open both images in Photoshop. Drag the background layer from one image onto the other – in my case I dragged the background layer from the image with two out of the three faces correct and dropped it into the image that has only one good face.

You will have an image with two layers – the top has two good faces and the one below has the other one. Close the other image.

Step 2

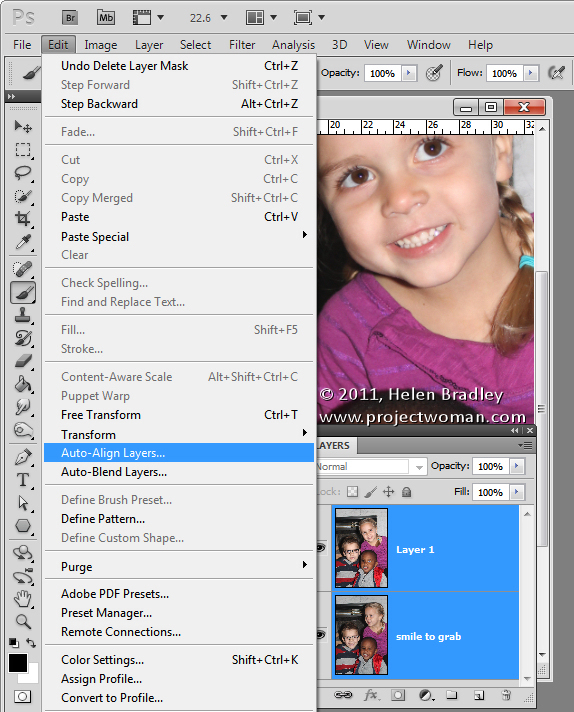
Select both layers in the image that you’re working on and choose Edit > Auto-Align Layers and select Auto.

Photoshop will now align the two layers so that the faces in both layers will be aligned on top of each other. To do this you need to have two images with very little difference between them and this image lined up pretty well as a result.

Step 3

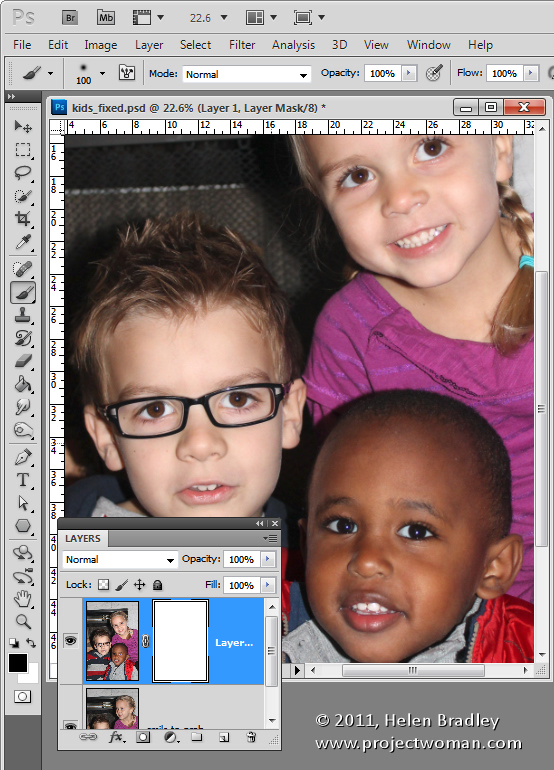
Click on the topmost layer and add a layer mask to it by clicking the Add Layer Mask icon at the foot of the Layers palette.

The mask is filled with white by default which means that the entire contents of the top layer is visible and the bottom layer not visible at all.

Step4

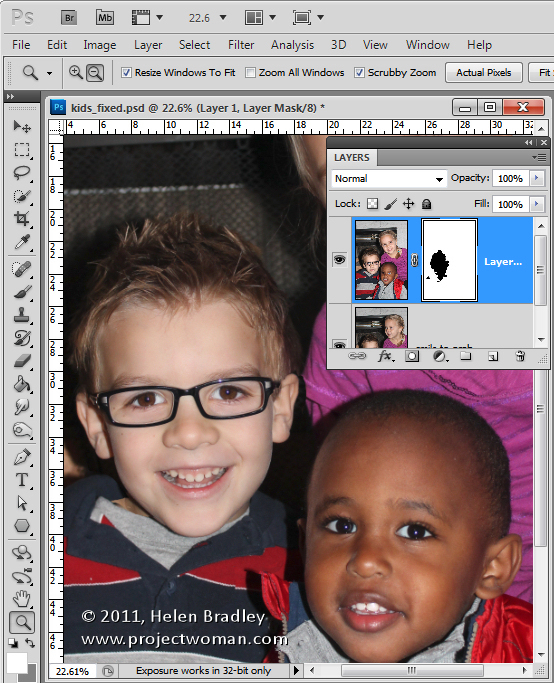
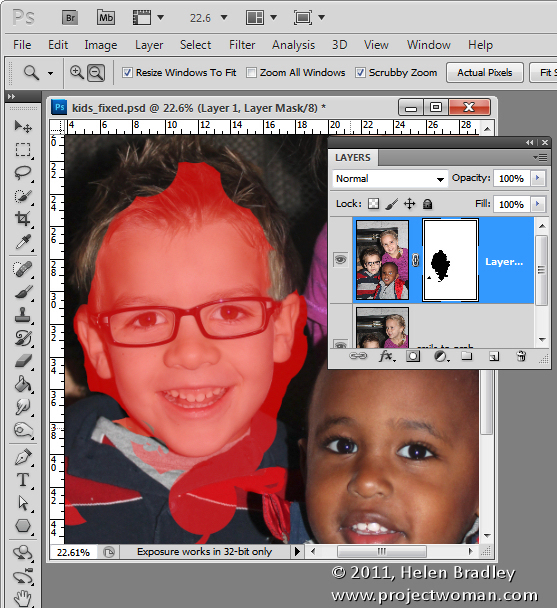
Select black as your foreground color and choose a soft edge brush. Target the mask by clicking on it so you’re painting on it and then paint over the child’s face in the image to reveal the face from the layer image below.

Step 5

You’ll need to make some small choices about how much of the layer below you reveal with the mask – if you take too much you can paint back on the mask with white to reveal the top layer again.

I made some small adjustments around the child’s collar to hide the fix. The red portion of the image shows the mask – I turned this on – it won’t typically be visible to you as you work.

Step 6

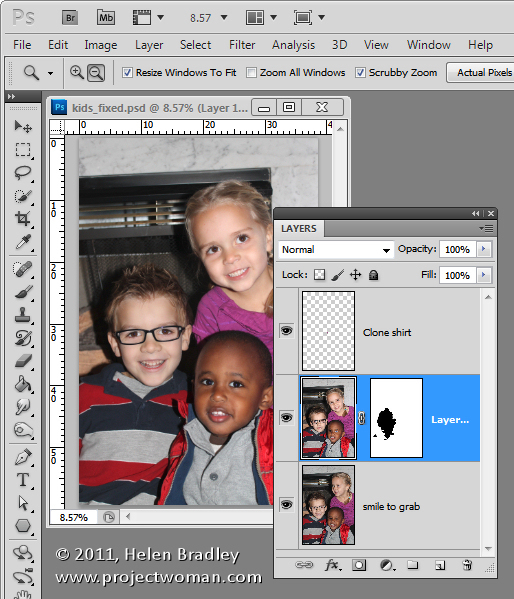
Finish by taking a critical look at the final image and, if necessary, adjust the mask or add a new layer and clone elements from the layers below to fine tune the image.

I had to do a small amount of cloning of the little girl’s shirt to fix a small problem and then I cropped the image and it was complete.

The entire process took all of around ten minutes.

Photoshop Elements

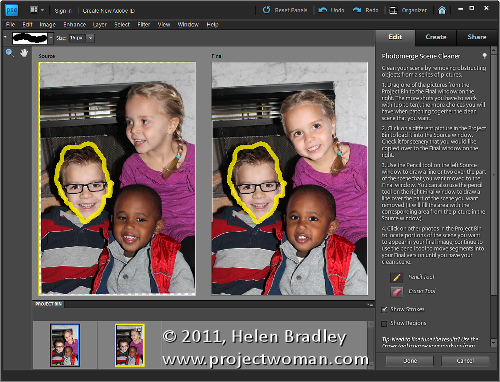
You can get similar results in Photoshop Elements 7 and above by opening the two images and choose File > New > Scene Cleaner and follow the instructions there.

Helen Bradley

Page 2 of 212