Wednesday, July 30th, 2014

Thank You Texture Creators!

Recently I made a post giving thanks to the wonderful font creators who distribute their work for free. Today I’d like to thank the image and texture artists who are doing the same and making my life in Photoshop so much easier. If you are looking for texture resources then I cannot give any higher recommendations than these. The links provided will take you to specific textures, but each author’s entire portfolio is worth exploring.


Skeletal Mess – A brilliant independent image and texture author.


FreeImages.com – A massive archive of free images and textures.


TextureKing.com – Another great texture resource.


Mayang.com – Many useful day to day surface textures.


Thursday, June 12th, 2014

Thank You Font Creators!

Free fonts for commercial use – thank you!


I’m making this post in celebration of the wonderful typographers who have made their fonts available for use in my projects. Creating an elegant and legible font can be very difficult; giving it away for free must be even harder. I would like to present some of my favorite fonts to help give them the exposure they deserve and pay the authors back for all of their hard work (and so you can enjoy them too!). These fonts are all free and take seconds to install. They’re also really really great.


Chalk Hand Lettering Shaded Font

Scrappy Looking Font

Cutie Patootie


Wednesday, March 26th, 2014

Play and Burn DVDs in Windows 8

© ugaldew, sxc.hu

If you’re using Windows 8 or 8.1 you can play videos and movie files you have stored on your computer but you can’t view DVDs using Windows Media Player—this feature was removed from Windows 8 along with the Media Guide.  If you want to be able to play DVDs in Windows 8 you will need to download and install a DVD player. If you’re using Windows 8 Pro then you can download and install Microsoft’s Windows Media Center which costs $9.99 – this site will step through the process. If you’re not using the Pro version then you would need to upgrade to Pro to use the Media Center, which ends up being a $100 upgrade  just for the ability to play a DVD. Instead, I recommend you use the free VLC Media Player.

If you need to burn DVDs you will need a DVD burner to do so. Windows 8 doesn’t ship with a DVD burner but that doesn’t mean that the manufacturer of your computer hasn’t provided one. Check the Start screen and see if there’s a DVD burner already installed. If not, here is a round up of some of the DVD burning tools around which are Windows 8 compatible. The good news is that most have free trial versions so you can test them out and see how they perform:

Wondershare DVD Creator — $39.95

Ashampoo Burning Studio Free — upgrade to full version for $49.99

Aimersoft DVD Maker for Windows – $39.95

Nero Burning ROM 12 – $49.99


Helen Bradley

Helen Bradley

Friday, December 20th, 2013

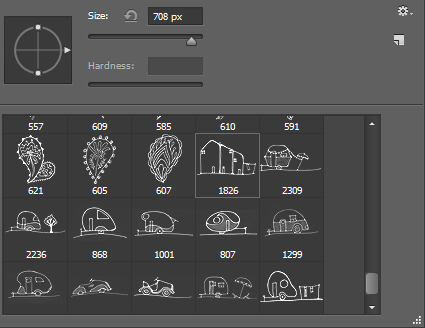
Where to Install Photoshop Brushes on the PC and Mac

Curious or confused about where brushes go? Here’s the info you need and how to do it

It’s pretty easy to find the wrong place to install brushes on the PC and the Mac. The Adobe program file folders are more accessible than the user areas where you really should be installing your brushes. So, to help you out, here is where the brushes should go and a couple of tips for showing the hidden and hard to find folders on the PC and the Mac:

In Mac OS X:

Photoshop CS4
~/Library/Application Support/Adobe/Adobe Photoshop CS4/Presets/Brushes

Photoshop CS5
~/Library/Application Support/Adobe/Adobe Photoshop CS5/Presets/Brushes

Photoshop CS6
~/Library/Application Support/Adobe/Adobe Photoshop CS6/Presets/Brushes

Photoshop CC
~/Library/Application Support/Adobe/Adobe Photoshop CC/Presets/Brushes

The tilde (~ ) indicates your hidden user library.

You can open it this way:

1 Launch Finder
2 Choose Go > Go to Folder
3 Type ~/Library and click Go
4 This opens the ~/Library folder and you can now navigate to the appropriate folder listed above.

On a Windows PC:

Follow these instructions to install the brushes where they can be found by both 32 and 64 bit versions of Photoshop (this is the prefered method of installing downloaded brushes):

Photoshop CS4
C:\Users\<your name>\AppData\Roaming\Adobe\Adobe Photoshop CS4\Presets\Brushes

Photoshop CS5
C:\Users\<your name>\AppData\Roaming\Adobe\Adobe Photoshop CS5\Presets\Brushes

Photoshop CS6
C:\Users\<your name>\AppData\Roaming\Adobe\Adobe Photoshop CS6\Presets\Brushes

Photoshop CC
C:\Users\<your name>\AppData\Roaming\Adobe\Adobe Photoshop CC\Presets\Brushes

To locate your c:\users\<your name>\AppData folder, launch Windows Explorer and type this in the address bar :

%USERPROFILE%\AppData

This automatically opens the AppData folder for you so you can now navigate to the desired folder as detailed above.

Helen Bradley

Wednesday, March 13th, 2013

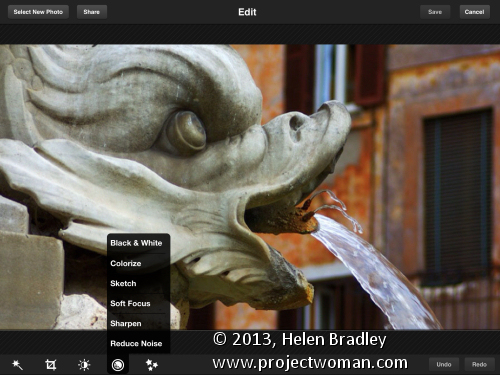
Updated review – Photoshop Express for the iPad

I’ve been revisiting some of the apps I’ve previously reviewed to see what changes have been made to them recently and how they have developed. One of these apps is Adobe Photoshop Express for the iPad. This app is free but it does have some in app purchases – one of which – the Camera pack that includes Noise removal – you can safely ignore. I think it is expensive and not worth the $4.99 that Adobe charges for it. However, ymmv.

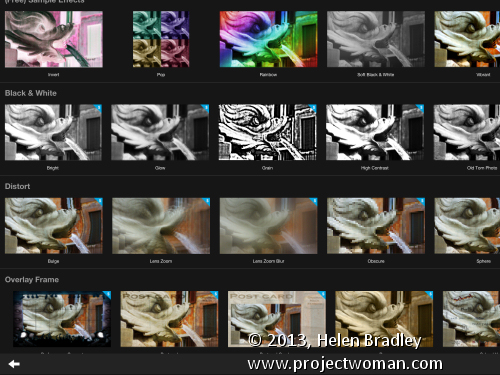
The free Effects in Photoshop Express are pretty limited and there are just nine of them so unless you buy the add on Effect Pack ($2.99) you won’t have a lot of creative options. That said, the Effect Pack has a lot of fun effects in it. You could get access to similar effects for free in other apps, but if you want everything in one place you might consider this pack worth shelling out for. There is also a Border pack for 99¢.

Like many free apps the add on borders and effects are shown in the app so you can see them but not use them unless you buy them. You can’t hide them either so this might be a bit off putting – personally I’d rather not see what I don’t own, but that’s my take on it.

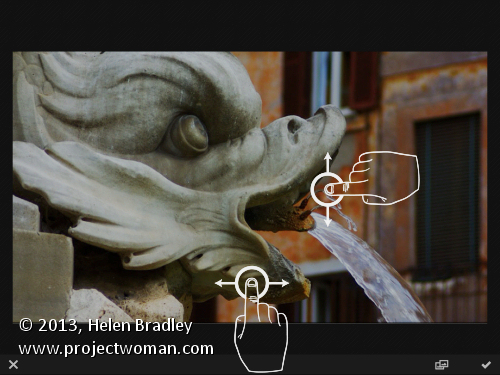
One change to the app that I like is the on screen prompts showing you how to use the app. This was a huge complaint that I had initially with the app as it had no indication as to how you made your adjustments. I thought at the time that this made it very hard for inexperienced users to use the app as it wasn’t clear how to do so. In a free tool aimed at beginner users I thought this was inexcusable.

Now the first time you choose an option like Brightness and Contrast an overlay appears showing you how to adjust these options. It’s much less confusing and a whole lot easier to work with. So much so that I’d wholeheartedly recommend this app for beginner to intermediate users.

In Photoshop Express you can edit images from your Camera Roll or capture images using the app. What you cannot do is upload images to Adobe Revel – the new online replacement for photoshop.com (and which was previously called Adobe Carousel – have I confused you yet?). You can also not download images from Adobe Revel to edit them in the app. Since Adobe owns all these sites and apps it would be nice if all its apps and storage locations talked to each other instead of operating in isolation.

Other changes I noticed is that the feature for adding effects and borders has been revamped allowing you to see the full range of effects and borders in one large screen already in place on a small version of your images. Those that are not enabled have a blue mark on the corner and there is a shopping cart link in the bottom right of the screen that you can use to buy add on packs, if desired.

So far as sharing is concerned, Photoshop Express is light on options when compared with some other apps. You can share to Facebook, Twitter, Tumblr and email images but that is all. You can also save images to your Camera Roll.

In all, the changes to Adobe Photoshop Express are welcome and make the app a lot more usable for its target audience. I now actually like this app and would heartily recommend it particularly for beginner to intermediate users looking for a simple and easy to use photo fixing tool.

Helen Bradley

Friday, February 8th, 2013

Free Valentine’s Day Bunting Brushes for Photoshop


Just in time for Valentine’s Day is a fresh batch of heart-warming love-themed bunting brushes. The brushes are all hand drawn, making them perfect adornments on your card for that special someone.  They are free to download and all licensing information is included, so don’t miss out!

Download 9 Free Valentine’s Bunting Brushes Here!

Helen Bradley

Saturday, December 1st, 2012

Free Hand Drawn Christmas Tree Brushes for Photoshop

Just in time for the holiday season, I’ve updated the Photoshop brushes page with a brand new set of Christmas tree brushes. Dress up your greetings cards and gifts with 32 hand drawn trees of all varieties. Best of all, it’s completely free! Happy holidays!

Download the free Christmas Tree brush set here!

Helen Bradley

Wednesday, November 21st, 2012

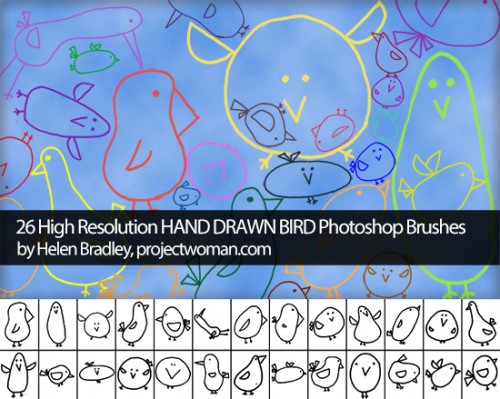
Free Hand Drawn Bird Brushes for Photoshop

Some of you may already know that I’m a bit of a brush junkie, and hopefully you’ve checked out Project Woman’s brush collections before. If not, now is the perfect time! I’ve recently updated the page to include a new collection of adorable hand-drawn bird brushes. The set is entirely free and all pertinent licence information is included.

I update the collections regularly, so make sure to keep an eye out for any new brushes!

Download the bird brush set here!

Helen Bradley

Thursday, October 18th, 2012

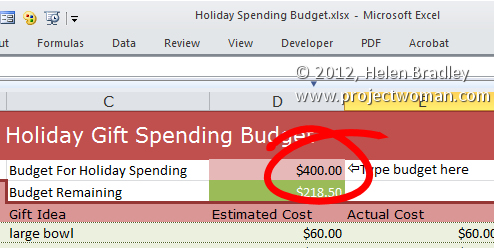
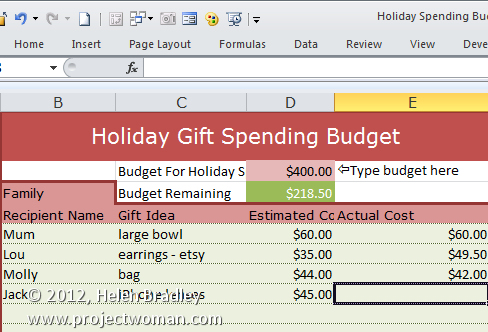
Holiday Gift Budget Worksheet

Don’t blow the budget this holiday season!

Our holiday gift buying budget worksheet will help you avoid a Yule tide spending blow out.

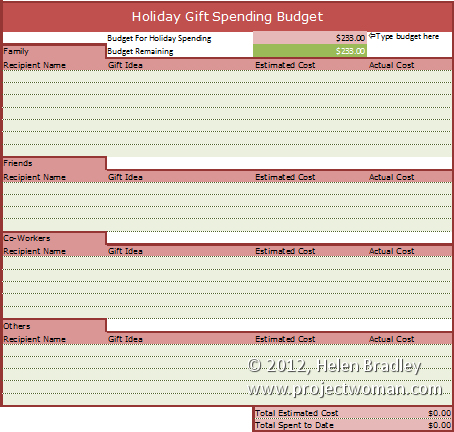
In the interests of helping you better control your spending this Holiday Season we have a free spreadsheet download in the form of a Holiday Gift Spending Budget.

Grab this version for Excel 2007/2010/2013 – gotta love the formatting available in those versions.

If you’re stuck in the land of Excel 2003 and earlier (or want to use it in Zoho, Google Docs, OpenOffice.org or anything else that can read Excel files), then grab this plainer but still fully functional version.

The worksheets are protected against wiping out key formulas and entering data in the wrong cells but there’s no password there so you can easily unprotect if you desire.

To use this worksheet, download the one for your Excel version, open it in Excel (or another compatible program), and then, in cell D2 type the amount you can afford  to spend.

Then add entries for family, friends, co-workers and others – determine what you will get them and  how much you are budgeting to spend. At this stage you can see if you are on track or already over budget.

As you buy presents, fill in the actual amount spent and in cell D3 you will see what you still have to spend of your budget amount or if have spent all you have allowed for.


Helen Bradley

Friday, May 11th, 2012

5 top tips for working with Gimp

I know that a lot of you use Gimp and, in the interests of taking a step away from Photoshop for a minute, here are 5 of my top tips for working with Gimp.
Rounded corners

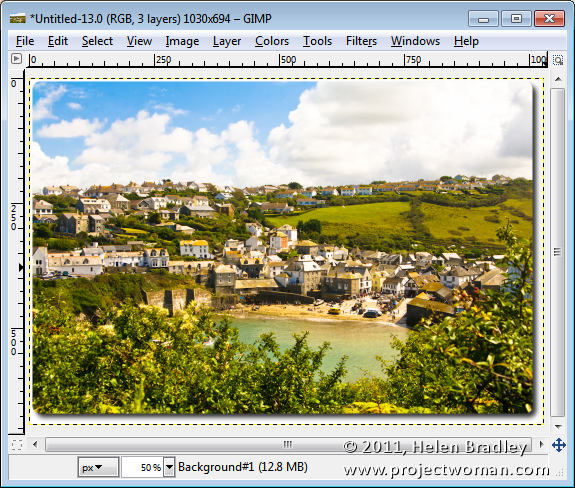
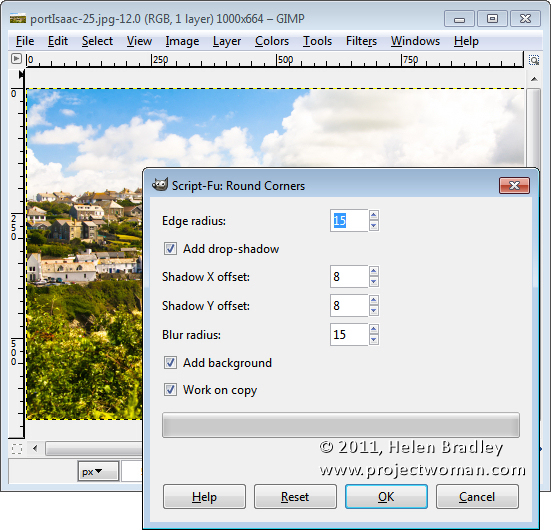
Gimp makes it dead simple to round the corners of an image. To do this, choose Filters > Décor > Rounded Corners. A dialog will open. Select the Edge Radius, which is the amount of curve, and if desired, click to add a Drop Shadow and then set the Shadow Offset and Blur Radius. You can select to work on a copy of the image (rather than the original), and select whether or not to add some background behind the curved corners – the current background color is used for this. Click Ok to round the corners of the image.
Reassign keys

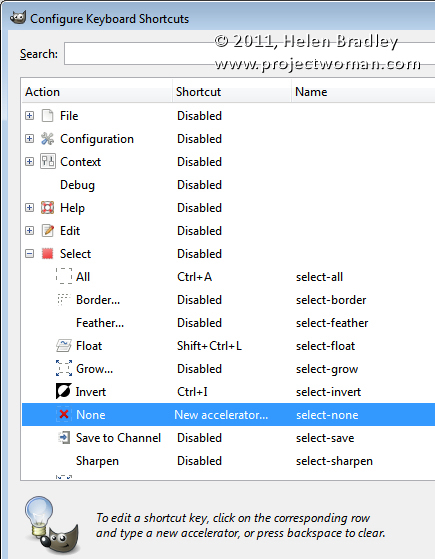
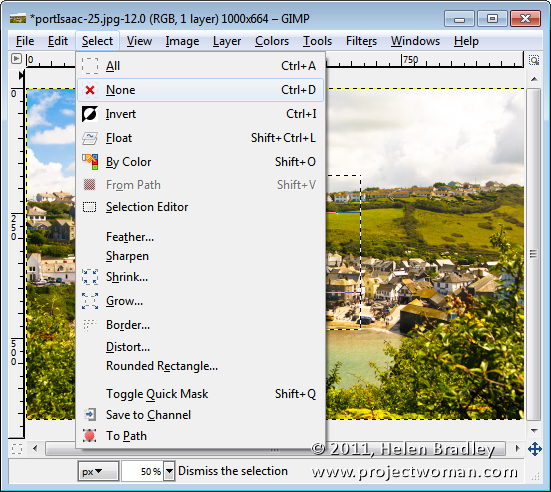
When I use Gimp, I sometimes forget and use Photoshop keys for things like deselect. Unfortunately in Gimp, the Photoshop deselect keystroke duplicates an image! You can, however, remap your keyboard shortcuts by choosing Edit > Keyboard Shortcuts. So, for example, to map the Ctrl + D keystroke to the Select > None option, click to open the Select menu, locate the None option and click it so that the words New Accelerator appear in the Shortcut column. Then press the keystroke to use – I chose Ctrl + D, which is the Photoshop equivalent. Because this key combination is already used a warning appears – if you are ok with replacing the shortcut, then proceed to assign the new shortcut key.
When you change or reassign a shortcut, Gimp is smart enough to add the new shortcut to the appropriate menu so the Select menu here shows the newly assigned shortcut.
Move the selection mask

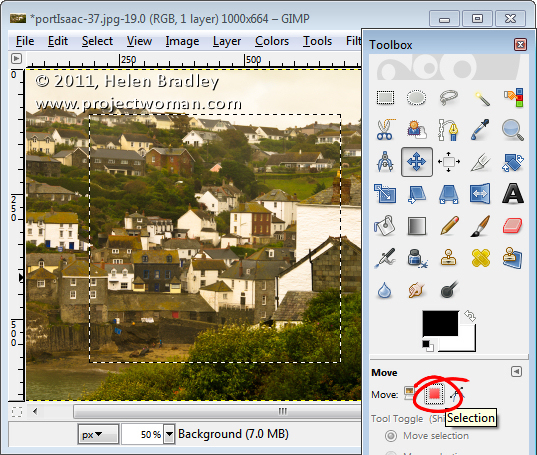
It is so much easier in Gimp than in Photoshop to move the actual selection marquee once you have made it. To see this at work, make a selection, then click the Move tool. Make sure that the Move option is set to Selection in the panel and you can now drag the selection into a new position. This works for circles, rectangles as well as selections made with the free select tool. Once you’re done, return to the tool to perform another task such as Ctrl + Alt + drag to move the selected area or Shift + Alt + drag to copy it.
Merge to a new layer (and keep the original layers)

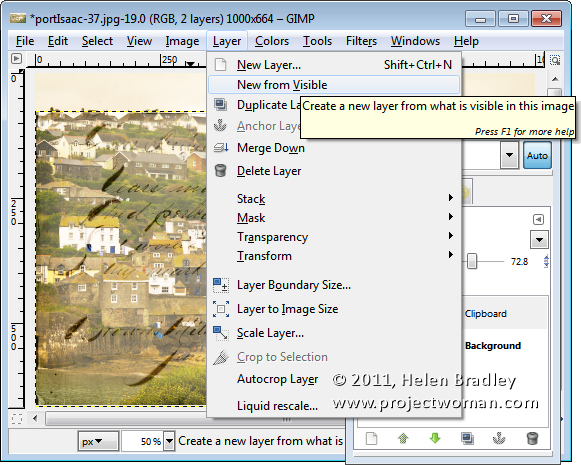
One command that is useful when you need to flatten an image but where you don’t want to lose the layers you have already created is the one which flattens the visible portions of an image to a new layer. This layer is at the top of the stack but is created in a way that leaves the original layers still in place. In Photoshop you do it by pressing Ctrl + Alt + Shift + E. In Gimp, choose Layer –> New From Visible. Now you can, for example, sharpen the image but, if you need to make changes to the image, you can delete the top merged layer, adjust the image on the layers below and then remake the new merged layer and sharpen it.
Crop Tool Smarts

The Crop tool in Gimp includes a range of cool options. When you select it, check out the panel options. You can, for example, crop just the current layer (or all the image) or you can select the crop area from the middle out (rather than drawing from one corner). You can crop to a fixed aspect ratio or a fixed width (height is variable), fixed height (width is variable), or set both height and width. From the list which shows No Guides, you can choose to display a Rule of Thirds overlay, Center lines or Golden Sections to help you create a well composed image. Enable Highlight to see a dark border around the area you plan to crop to.
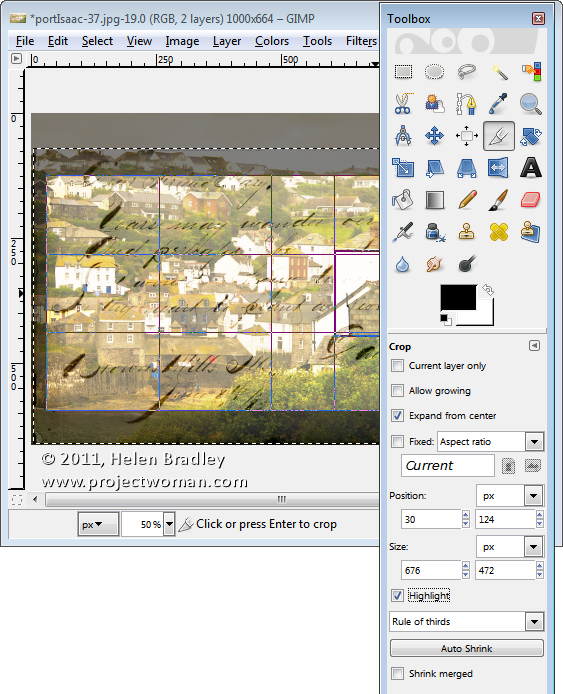
So, there are my 5 top Gimp tips. It is over to you. What is your favorite Gimp tip to share with others?

Helen Bradley

Page 1 of 212