

How to use Live Trace to trace an image and how to recolor it once traced and how to harness the power of Kuler to recolor it with a color scheme.
Check out the rest of or tutorials on our YouTube channel.
How to use Live Trace to trace an image and how to recolor it once traced and how to harness the power of Kuler to recolor it with a color scheme.
Check out the rest of or tutorials on our YouTube channel.
Labels: color, colour, cs5, cs6, Helen Bradley, how to, Illustrator, kuler, live trace, tracing, Tutorial, YouTube

In Windows 8 Metro you can name groups of tiles so they have headings on the Start screen and you can drag groups around. Pity that nothing on the screen makes it clear that this is something you can do.
To do this, first use the semantic zoom to shrink the start menu tiles so they are very small.

Then right click a tile in the group of tiles you want to name.

A dialog pops up where you can type the group name. This only appears when you are zoomed out making it hard to find.

When you’re done, zoom out and you’ll see the group named. You can now drag and drop tiles into the group to help keep things nicely organized on the Windows 8 Metro Start screen.
Labels: groups, Helen Bradley, how to, Metro, name a group, naming groups, semantic zoom, start menu, start screen, tip, trick, Tutorial, Windows 8
Categories:Uncategorized

Every digital camera user will have confronted or will confront one day the issue of sensor dust. Every time you change the lens on your SLR there is a chance that dust will enter your camera. Some of this dust finds its way to the camera’s sensor with the result that you see unwanted and distracting spots on your images.
Most cameras have some sort of dust removal feature built in. For example, my Pentax K7 has one that applies (according to its manual) “ultrasonic vibrations to the filter on the front surface of the CMOS sensor for approximately one second”. Sometimes this is all it takes to remove the dust. Just as often, however, the dust remains stuck fast.
This isn’t unusual because there are different ways dust can get to the sensor area and not all of it is ‘loose’ in the sense that it can be shaken off. Some particles can actually become stuck to the sensor.
Also, just to be clear, when I am talking about dust on the sensor, it isn’t really on the sensor itself but rather on a thin glass plate that is on top of the sensor. It’s just easier to call it sensor dust and to talk about cleaning the sensor than talk about cleaning the glass filter on top of the sensor.
If your camera’s on board dust removal feature fails, the recommended solution is to send your camera to a service center that is authorized by your camera manufacturer and to have them clean it.
Because this is a service, you’ll be charged appropriately for it. You’ll also be without your camera for the length of time it takes to get it cleaned. Inspite of these issues, for most camera owners this is the safest and best solution.
Another option is to utilize the cleaning services provided by your local camera store. However, this is not without its risks – if the service technician isn’t authorized by the camera manufacturer to clean the camera then the cleaning could void your warranty -even if the cleaning doesn’t cause damage to the camera.
However, for a lot of photographers these options are just plain expensive and inconvenient.
For me, the issue is just that – cost and convenience. To get my camera cleaned at the local camera store costs $75 a time and it involves a one week turnaround – the service technician picks up and delivers to the store only on Tuesdays. In addition I have two one-hour round trips to drive to the camera store to drop it off and pick it up and I have to strip everything off the camera including the camera strap before it goes out and then put it all back together when it is done. All of this I was content to do until Mike from my local camera store suggested an alternative – cleaning the sensor myself.
On Mike’s recommendation, I bought a sensor cleaning kit which included a vacuum, wipes and cleaning solution as well as a magnifying light all packaged in a padded toolkit. The cost of the kit was a little more than one cleaning so on my second cleaning I stood to be ahead on cost.

I’m not recommending self-cleaning to anyone. It is a decision each camera owner needs to make themselves. You need to do as I did and ask yourself if you are prepared to shoulder the cost if you damage your camera and void your warranty? If not, then pay your money and leave it to the professionals.
I accepted I would be up for the cost of a new camera body if I damaged it because that’s about what it would cost to fix the damage I would do if the cleaning went wrong. I also acknowledged that I have probably voided my camera warranty by cleaning the camera myself even if it isn’t damaged by the cleaning. However, for me it made sense to see if I could save some time and effort by doing my own cleaning.
Here is what I suggest you do if you plan to clean your own camera:
However you behave and whatever you do in any other aspect of your life this is the one time you should read the manual for your camera and your cleaning kit before you get started. In fact, read it four or five times until you’re completely familiar with what you’re about to do and the risks.
I also found a good deal of useful information at the Cleaning Digital Cameras website (http://www.cleaningdigitalcameras.com).
In short the better informed you are the more likely you are not to fail. And if it all sounds too risky and beyond your skills, then don’t do it – after all that’s why they have service centers that do it for you!
If your camera has an AC connector, connect it to the AC so that you won’t run out of power in the middle of the cleaning. This is an extremely dangerous situation as lack of power will cause the camera to shut down and if it shuts down on your cleaning tool then you are almost guaranteed to damage something.
If you don’t have a mains power connector for your camera, make sure to charge a fresh set of batteries and put these in the camera before you begin.
This probably should really be step 1 – you need to make sure you have a problem before you start. If your camera is not dirty then don’t clean it.
Many cameras will have some form of dust alert system that will show you dust on the sensor. For the Pentax K7 there’s a dust alert setting that requires you to set the camera in C or AF.S shooting mode and point at an evenly lit even color subject such as a white wall or an empty word processing document on a computer screen and take a shot. The resulting image shows you if there is dust and where it is.
You will need to read your camera’s manual to see if you have a similar system and how to capture an image of the dust.
Of course, some of us will be in no doubt that our camera needs cleaning because we can see the dust on our photos. My own cleaning efforts were driven by a particularly large gob of dust stuck in the middle of the sensor which showed up on nearly every image I shot and which just wouldn’t move inspite of numerous attempts to vibrate it free.
Check your tools before you begin making sure that you have everything that you need arranged on a clean work surface in a clean environment. Because you’ll be removing the lens from the camera you don’t want to risk getting dust into it while you are cleaning it.
Your camera will have a sensor cleaning feature in it. You use this to raise the mirror so you can access the sensor to clean it. Check your camera’s manual for instructions as to how to access this feature and how to return the camera to its usual setting when you are done. On my camera, simply powering it off resets it – so I have to be very careful not to touch the power button while cleaning it and that’s why freshly charged batteries are critical.
Clean your camera following the instructions in your camera’s manual and those in your sensor cleaning kit (all the time having regard to the terms of your camera’s warranty).
Take care – this is a delicate piece of equipment and needs to be cleaned with a light and steady hand. A half cleaned sensor in a camera that still works is better than a squeaky clean sensor in a broken camera.
When you have finished cleaning, check the results to make sure the dust is gone.
Now for the good news
The good news is that many people do clean their sensors successfully.
If you do it yourself and if you do it right, you will find the cost of sensor cleaning is much less than sending the camera away to be cleaned. It’s also very convenient because you don’t have to be without your camera for a period of time and it feels good to know you can deal with a dust problem yourself.
For me, it will be a task I’ll always approach with some trepidation and mindful that it’s one that needs to be done carefully and not hurriedly or under stress. It does however give me a new sense of freedom particularly when traveling. With my cleaning kit I’ll never be caught on day one of a two-week trip with a nasty gob of dust on the sensor and no way to remove it until I get home.
Labels: cleaning kit, how to, mirror up, sensor, Sensor cleaning, tips, tools, Tutorial
Categories:Uncategorized

In Lightroom 3 the Import dialog was updated and there are heaps of cool tools here to speed up and make the import process more efficient.
Here are five things that you should know about the import dialog.
In the Import dialog’s File Handling panel you can select to make a second copy of your images upon import to another folder. This option is available provided you are using either Copy as DNG, Copy or Move as the option for importing images into your catalog – if you have Add selected this is not an option. This is a quick and no fuss way to ensure you always have a backup of your photos.
You should be aware that if you chose Copy as DNG the backups will be in the original raw image file format and they won’t be converted to DNG.

In the Apply During Import panel is a Develop Settings option. Here you can select from any of the Develop Presets that you have in your Develop Module. If there is not a preset for a fix that you want to apply, create a preset with those fixes that you want to apply to all your images on import. Once saved as a preset you can then apply those fixed automatically using this option. The presets are shown in alphabetical order and no distinction is made between yours and those shipped with Lightroom.
For example, for one of my cameras, I prefer to set the Profile to Camera Standard in the Camera Calibration panel of the Develop module. By creating a Preset for this, I can apply it to all images as they are imported whenever I download from that camera.

Also in the Apply During Import panel is a Metadata option. Here you can create a copyright preset and apply it as images are imported. Typical copyright presets will include IPTC Copyright and IPTC Creator data. You should also include IPTC Status: Credit Line. The remainder of the IPTC information is generally added on an image by image basis but you can, at the very least, apply basic copyright information on import.

If you prefer to rename your files to something other than what they are named by the camera open the File Renaming panel and choose a template to use. Where a template includes a custom name, shoot name or sequence you can type the relevant data into the boxes in this panel. The files will be automatically renamed as they are imported. If you are making a copy of the images at the same time as importing them, the backups will be renamed too.

In the Destination panel you can select to create a subfolder for the files as you bring them in and, if desired, organize this by date and then select a date format to use. So you can, for example, create a subfolder such as Rome Trip and have various additional subfolders added automatically for each of the days that you captured images during that trip.

If you scroll down in the folder system, you will see the intended folder structure with the numbers of images listed. This allows you to check the folder structure is correct before committing to importing images.

If you already have a folder that you plan to use then don’t select the Into Subfolder checkbox and instead select just the folder that you want to import into.
Once you have the Import dialog set up as you want to use it most of the time, create an Import preset using the Import Preset option at the foot of the dialog. This allows you to select the preset any time to set up the dialog the way you usually want it to look. You can then make changes to it to suit a particular import and click to Import your images.

If you always use a standard importing process you can shrink the Import dialog to a small bar by clicking the Show Fewer Options button in the bottom left of the dialog. This bar still shows the settings you have in place – but it is more compact – and these settings too can be altered if needed.

Labels: backup, import dialog, Lightroom 3, metadata, presets, tips, tricks, Tutorial
Categories:Uncategorized
The new SmartArt feature in Word 2007 and 2010 helps you create timelines very easily:
Step 1
Choose Insert -> SmartArt -> Process and select one of the process options such as Basic Timeline and click Ok. Type the text into the textboxes in the SmartArt object. Alternately, click the arrows at the far left of the object and add text via the dialog.

Step 2
To format the timeline SmartArt, select the object and choose Format -> Design on the Ribbon and then select one of the SmartArt Styles. Click Change Colors to alter the colours used in your SmartArt object.

Step 3
From the Shape Effects list you can customise an effect such as reflection or shadow for the art. In addition, as the look of a SmartArt object is controlled by the document theme you can choose Page Layout -> Themes and select an alternate theme for your document.

Labels: how to, Microsoft Word, smart art, SmartArt, timeline, Tutorial, Word 2007, Word 2010
Categories:Uncategorized

Spiral shapes are simple to create in Illustrator using some of its built in effects.
To get started, create a new image and select the rectangle tool. Hold Shift as you drag to create a small square on the artboard. Set the stroke to around 2 pixels, set black as the stroke color and don’t apply any fill.

With the shape still selected, choose Effect > Distort & Transform > Pucker & Bloat. Enable the Preview checkbox and drag the slider to create an interesting shape. Here I dragged it to 200, which gives an interesting floral shape. Click Ok to confirm the transformation.

To create the spiral, with the shape still selected choose Effect > Distort & Transform > Transform to open the Transform Effect dialog. Enable the Preview checkbox. Set the number of copies to, for example, 75 and then experiment with various settings of the various sliders.
Changing any of the sliders will alter the shape significantly. Here I set Scale: Horizontal and Vertical to 90% so the shape gets incrementally smaller each transformation. I set the Move: Horizontal and Vertical to 72 pt so the shape moves both horizontally and vertically a small increment each transformation and the Rotate Angle to 325 degrees so each shape is rotated as it is transformed.
Once you have a shape that you like, click Ok.

If necessary, use the Selection tool to move the shape back so it sits within the artboard.

With the shape still selected, set the Stroke to a color of your choice. Select Fill and select a gradient such as the built in Green, Yellow, Orange gradient. By changing the angle of the gradient, for example, you can change the look of the filled shape.

In an up coming blog post I’ll show you more about working with Gradients in Illustrator.
Labels: gradient fill, how to, Illustrator, pucker & bloat, repeating shapes, spiral, spiral shapes, transform, Tutorial
Categories:Uncategorized

I recently got asked how you make a photo flip book – you know one of those little books you flip the pages from and something happens?
Well as luck would have it those cool folks over at O’Reilly used to have a magazine called Craft! and they asked me to write an article for them on just this very topic. So, click this link and you will see how to create your very own photo flip book.
I used clips from a movie file for this flip book so there’s lots of fun for everyone involved from writing the signs to making the film and then the tech side of extracting the frames and making the book.
It’s a great snow day/rainy day project.
Labels: flip photo book, flipbook, how to, movie, Photo flip book, Tutorial
Categories:Uncategorized

I was recently asked by photographer Rhonda Pierce to look at an image that she’d taken and to suggest how the background could be lightened to white in Lightroom.
This image raises an interesting question for anyone involved in postproduction and trying to understand when to use Lightroom and when to use Photoshop for editing.
Ultimately, if this image is to be printed at a large size then Lightroom really isn’t the tool for the job. There is too much wispy hair, particularly on the left side of the model’s face just opposite her mouth, which is cumbersome to work with in Lightroom. Selecting around the hair and doing a detailed job really isn’t possible or feasible in Lightroom. Ideally, Photoshop and a good extraction tool such as Vertus Fluid Mask would be the best combination to use.
However, if the image is not going to be printed at a large size and, for example, it’s destined for the web or if it is a preview image for a client where they’ll choose their favorite image from a series, then Lightroom is a good tool for the job. While Lightroom won’t do such a good job, it will do it very fast and, at the resolution we’ll be using the image we probably won’t see any real difference anyway. For this use, we can compromise on quality and harness the superior speed of Lightroom.
Later on, if this is the image the client chooses and if it will be printed at a large size, then we can wind back the Lightroom changes, export the image to Photoshop and do a proper job. We’ll only be spending time fixing those images that the client is actually paying for and that need a quality fix applied.
Lightening the background in Lightroom
So, assuming this image is destined for the web or for client preview purposes, let’s go back to the original question as to how the background can be lightened in Lightroom.
Any solution will require us to isolate the background. It’s not possible to lighten the background in Lightroom without affecting everything else in the image and that will destroy the rest of the image. The Adjustment Brush is the obvious solution.
Step 1
Click the Adjustment Brush in the Develop module and size Brush A so it is big enough to paint over the background. Add a small feather, and for this job, enable Auto mask so Lightroom will do most of the selection work for us. Set Density to 100.
Click and paint over the background with the brush. When you lift the brush you’ll see the Adjustment Pin. Make sure the cross hair in the middle of the brush stays on the background and then the Auto Mask feature will ensure that the brush doesn’t paint over anything but the background.

Step 2
To see the painted area, press the O key and a red overlay will appear. This makes it easier to see where you are working.

Step 3
To get the background behind the very fine hairs you might be tempted to select a very small brush and try to isolate the areas manually. However, to do the job fast, it’s more efficient to size the brush very large so the center can be positioned over an area of the background and the rest of it extends over the wispy hair area. It might help to significantly decrease the density at this point to around 30 so that you only partially select the background in the wispy hair area.
Position the brush over an area of the background so the rest of it extends over the wispy hair area and click once.

Step 4
Return to 100% density and continue to work in the other background areas making sure to avoid the wispy hair.
When the area that you want to effect are selected, press O to hide the mask.

Step 5
Now adjust the settings for the Adjustment Brush. Increase the exposure and brightness until the background is white.
Click Close to close the panel and deselect the Adjustment Brush.

Step 6
Check the wispy hair area and you’ll see that not all the grey has gone but, when viewed in context of the remainder of the image the results are acceptable.
Press the backslash key (\) to see the image before and after the fix.

Labels: Adjustment brush, background, Develop, how to, lighten, Lightroom, Tutorial
Categories:Uncategorized
I recently posted a movie I had created in Photoshop CS4 Extended and I mentioned I’d do a post on how it was done. Here is the result. It is a video showing step by step the process of assembling the layered Photoshop file. How to clip the flash to the image, how to move the image using the 3D tools in Photoshop and then how to create the animation and render it as a mov file. It’s a pretty simple process once you know how and if you’ve had experience with making movies or animations before much of it will be familiar to you.
Click to go to Vimeo to view the movie
If you tried to view the video previously this is a replacement – the first version didn’t convert properly when uploaded to Vimeo.
Labels: 3D, amiation, movie, Photoshop CS4 Extended, Tutorial
Categories:Uncategorized
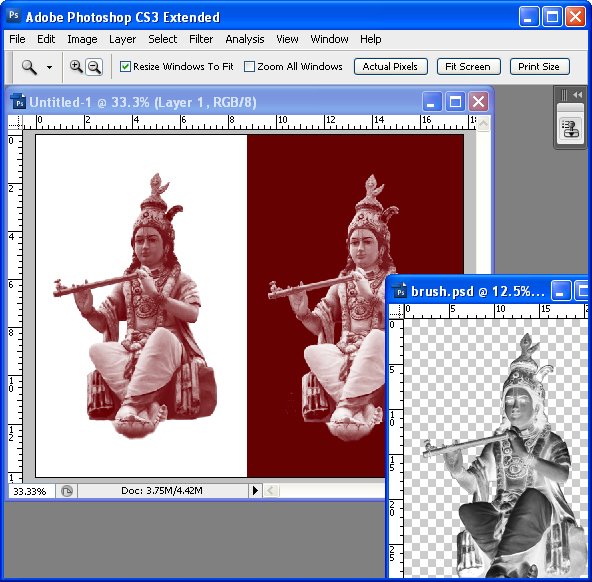
One of the most popular searches involving Photoshop on the web is, perhaps not unsurprisingly, for free Photoshop brushes. Photoshop brushes can be used for a range of editing and creative tasks and while it’s fun to find and download great looking brushes it’s also possible to create them yourself and to do this very easily.
Here’s how to create your own Photoshop brushes from your photos:
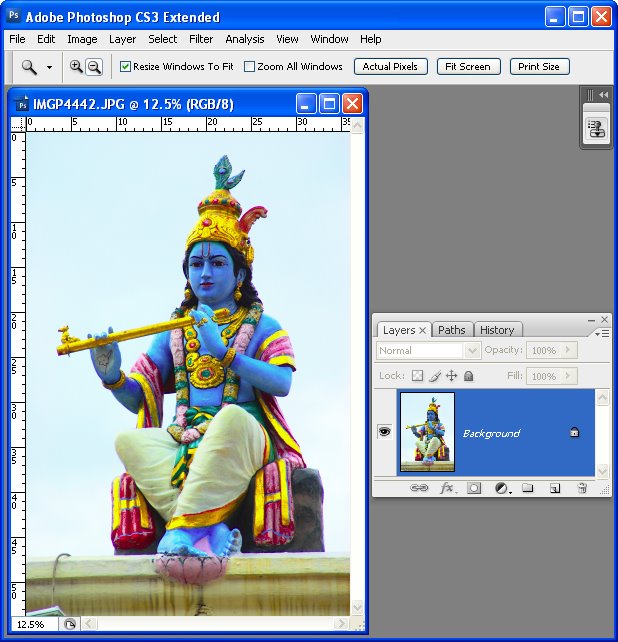
Step 1
Open an image that contains something that you want to create as a brush. It can be something as simple as a coffee stain on a piece of paper or a photograph that you’ve taken of a texture, statue, graffiti or other shape. The best brushes are made using high quality images so plan your brush to be around 1,000 to 1,500 pixels in width and height. The maximum allowable size is 2500 x 2500 pixels.
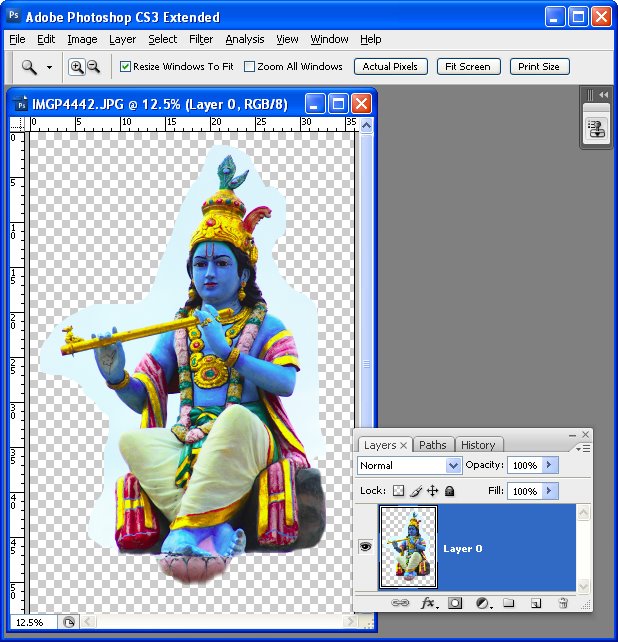
Step 2
To make your brush you’ll need to isolate the area that you want to turn into the brush. So start by double clicking the background layer and click Ok to turn it into a regular layer. Make a selection around the area to make a brush from, choose Select > Inverse and press Delete.
Step 3
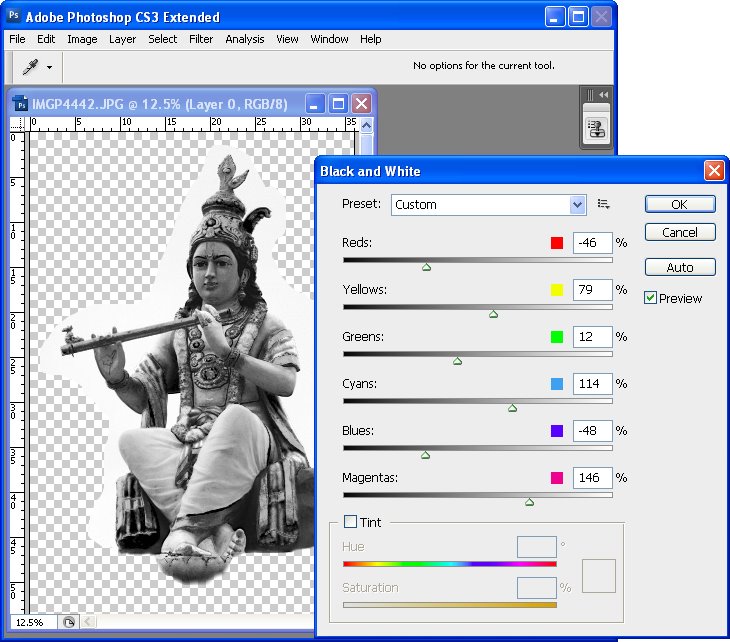
Brushes are grayscale images so you can control the contrast and the look of the brush by converting the image into black and white using your preferred method of doing so.
Here I have selected Image > Adjustments > Black & White. This adjustment lets you tweak the black and white result to get the desired amount of contrast in the brush and to determine which colors are taken towards black and which are taken to towards white.
Step 4
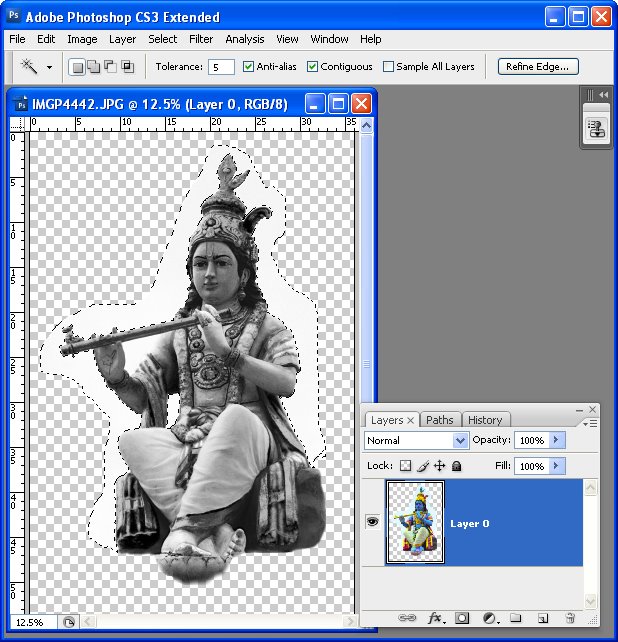
Select any light areas around the image that aren’t to be included in the brush and remove them. If you don’t do this, anything that isn’t white will actually pick up paint when you use the brush later on. I selected these areas using the Magic Wand tool with a Tolerance of 5 to get everything which was white or nearly white.
Step 5
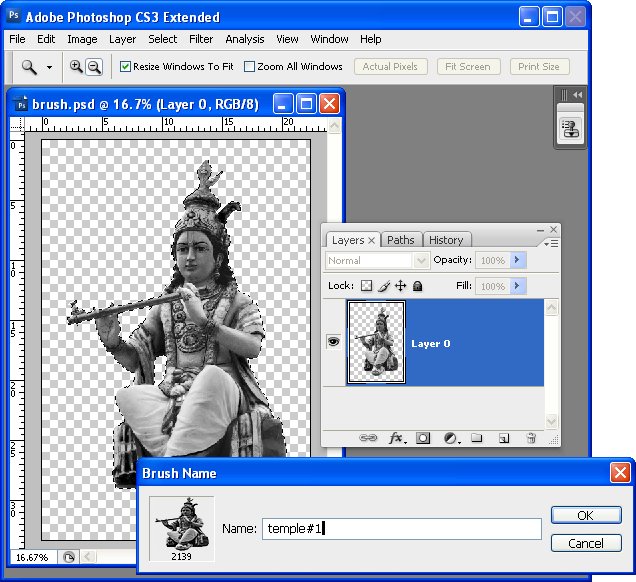
Select the area to include in the brush. If you have removed from the image everything except what you want to include in the brush Control + click (Command + Click on the Mac) on the layer to select the image.
Choose Edit > Define Brush Preset, type a name for the brush and click Ok. If the option doesn’t appear in the menu, your proposed brush is too big so size the image a little smaller and try again.
Step 6
Create a new image and test your brush. It is the last entry at the foot of the brushes palette. It’s a good idea to test it at 100% Opacity using black or dark “paint” on a white background and “white” paint on a black or dark background. If it needs fixing, return to the brush image, make your changes and select and create the brush again. You will need to reselect the new brush in the Brushes palette – it is always the last one in the list. Even if you name the two versions the same name the second one doesn’t overwrite the first.
For brushes like this which has a photographic quality, select the image layer, press Control + I (Command + I on the Mac) to invert the image, select it and make a second brush that you can use to paint with white.
Step 7
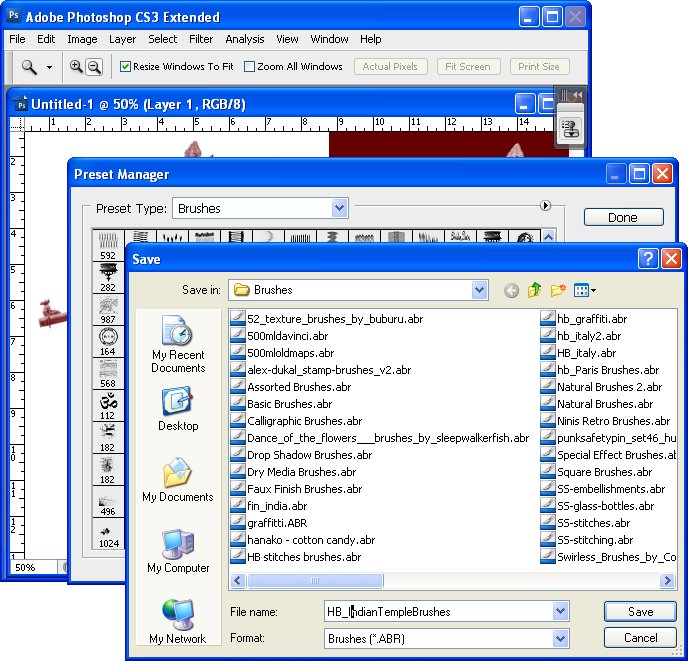
When your brushes are complete, save them to a file so you have them on disk. If you don’t do this, you will lose them if you replace your brushes. Choose Edit > Preset Manager and select Brushes in the Preset Type list. Select the brushes to save, choose Save Set and type a name for the set.
Labels: Photoshop brushes, presets, save brushes, Tutorial
Categories:Uncategorized