

Thursday, January 9th, 2014
Format Painter missing in Word on the Mac

It’s actually not missing but it’s not where you expect to find it either.
I use Word on the PC every day and on the Mac only when I am traveling – I love my MacBook Air with its solid state drive – it’s light and an easy traveling companion.
What I don’t like is having to work out all the curly questions you have when things work differently in one operating system to another. Cue today’s issue. I was copying and pasting content from my website into Word on the Mac and I needed to remove the formatting – well I found the Clear Formatting button sort of where I expected it to be on the ribbon.
But when it came to copying a format from one piece of text to another I got stumped. You see the Format Painter isn’t on the ribbon where you expect it to be if you’re used to using Word on the PC. In fact Word on the Mac is a totally different animal.
To find the Format Painter look upwards – up from the ribbon, up from the ribbon tabs and up to what we Windows folk would call the QAT or Quick Access Toolbar. On that toolbar of tools in Word on the Mac is the Format Painter. Click the text to copy the format from, click the Format Painter and then click the text to paint it onto. It’s a simple process BUT you have to find the Format Painter button first!
Hopefully this helps you!
Labels: copy formats, format painter, mac, Microsoft Word, missing icon, ms word, osx, Ribbon, Word
Sunday, December 1st, 2013
Google Kills Spreadsheet Gadgets

This is the old map gadget from Google – it doesn’t exist any more and the maps created using it won’t exist soon either.
If you’re asking yourself: What happened to Google Docs Gadgets? – the answer isn’t anything you want to hear
I loved Google Drive (formerly Google Docs) gadgets. These were advanced options you could use with Google spreadsheets.
There was a Motion Chart gadget which helped you to create a great looking motion chart. You could set it up the way you wanted it to look and save those settings to the defaults. Click Publish and you’d get the code for the chart and you could embed it into a blog or website. Now it’s gone and the alternative is pretty awful by comparison. You can’t preset the motion chart settings – well you can try – but they aren’t saved with the worksheet and you can’t configure it and then put it on your website or blog. The chart keeps reverting to the default settings making it a whole lot less useful than it used to be.

This and other old Gadgets either don’t exist in Google Drive or they have a really reduced functionality.
Don’t get me started on the Map Gadget
Please don’t ask me about this one. This is so totally totally sad! The map gadget let you type a series of addresses into a Google Drive spreadsheet and you could select them and add the map gadget and it would plot the locations on a map.
It was A W E S O M E. And you know what? Google killed it – D E A D.
There is no map gadget – not even one which works horribly(like the other charts that replace deprecated gadgets) – it’s all gone. The only saving grace is that some folks have created apps to fill the gap and MapAList.com does a good job of taking the data from a Google Drive spreadsheet and plotting it on a map. Only I wish I didn’t have to use it – the old Google Gadget was a heap easier to use. To help you get started with MapAList I created a Youtube video that goes through the process.
This is why I hate the cloud
Yep.. there are things I hate about the cloud. Before the cloud took over our lives we bought software and it worked. If a developer made a new version of the software with new features – of if they removed old ones, we could decide to upgrade or not.
The cloud changed all that. Now Google makes changes and not only can we not do what we want to do but things we made don’t work anymore. The map gadget is being deprecated – for that read folks who used it in the past will find their published maps won’t work in the future. Don’t you hate that?
So what other bad news is there?
Sadly there is a lot. Google not only killed gadgets but it made a half hearted attempt at mollifying us with some new charts. Problem is that they suck – really, in contrast to what we had, they are pretty awful. They don’t have headings – so you can’t add a heading to charts like the motion chart, table chart, organization chart etc. So, if you post a chart to your blog you’ll have to find another way to title it – really! Table charts used to be able to filter data – now they can’t – the list goes on.

This is the new Organization chart – it is horrible, no title, buttons that don’t work and limited customization options – Shame Google Shame!
So, what can you do?
Bellyache about them – like I am.
Realize that all those blog posts out there that talk about Google Docs Gadgets are now wildly out of date – they are mostly useless as the charts don’t work like they use to.
Learn JavaScript – Google has a developer tool that you can use to make charts for web pages – but it is all done using JavaScript and the instructions and the examples on the Google site lack any real detail so, unless you really know what you are doing – they are hard to follow. Expect to put in a lot of trial and error to get it all working – and, to add insult to injury, you have to test your code online – the scripts won’t work on a local machine.
Hope someone creates better solutions. The folks at MapAList.com have done a good job of simplifying map creation. Hopefully other developers will create solutions that give us the functionality that Google saw fit to remove.
Stop talking about the cloud as being the panacea of all ills – it too often sucks and it disadvantages users when companies like Google take away functionality from their products.
OK.. rant over..
… for now 😉
Labels: chart headings, gadget, google docs, google drive, map gadget, motion chart, organization chart, spreadsheet, table chart, where did gadgets go
Thursday, November 28th, 2013
Word tables – one click insert

Learn to insert a table in a Word document with a single click
When you need to repeatedly create the same type of table in a Word document you can do so using the new Word Quick Part feature.
This technique works well when you use the same table layout repeatedly. Your inserted table will be the same size, have the same number of columns and rows and contain any preset formatting that it had when you created it as a Quick Part entry. Once created, you can insert it quickly whenever you need it.
To do this:
- Create a new table with the number of rows and columns you want all your tables to have.
- Include any text in the table that needs to always be in this type of table – if there is none, leave the cells blank.
- Format the cells in the way you wan them to be formatted every time – including text formats and cell background colors and borders.
When you are done, select the table by clicking in it and choose Table Tools > Layout > Select > Select Table.

Choose Insert > Quick Parts > AutoText > Save Selection to AutoText Gallery.

In the Create New Building block dialog set the Gallery to Tables and type a description of the table and click Ok.

In future, to create a table to these exact specifications choose Insert > Tables > Quick Tables, locate the table in the list and click it to insert it into the document.
This feature is the successor to the AutoText feature in earlier versions of Word. It looks a little more cumbersome but it is more easily discovered so you don’t have to remember where the table was saved as it appears automatically on the Insert Table menu.
Labels: Auto Text, AutoText., Building Blocks, gallery, insert table, Microsoft Word, table, Word 2007, Word 2010, Word 2013
Monday, November 25th, 2013
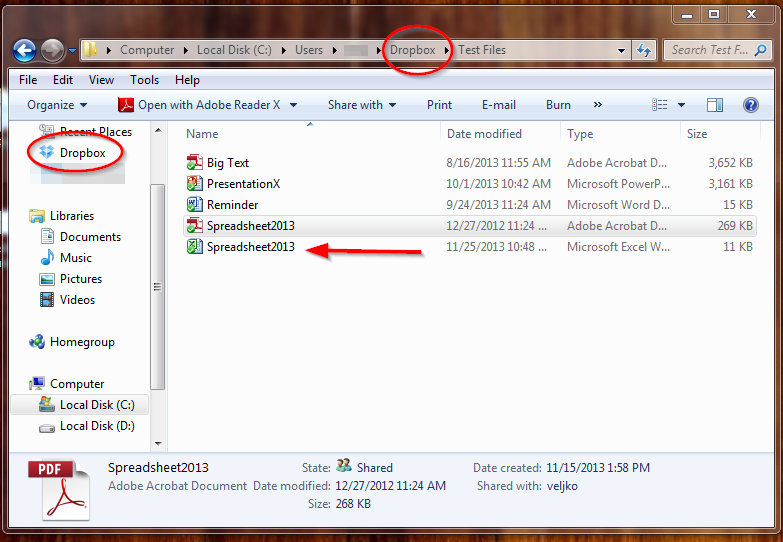
Cometdocs – A smarter file converting tool

Learn how to convert files directly from Dropbox and Google Drive
Needing to converted a document from one file type into another is very common today, which is why online file conversion services have become so popular. One service that has made a name for itself by offering free high-quality file conversion capabilities is Cometdocs. Cometdocs is a document management service that also offers cloud storage and file transfer options, the website is still primarily used by people who need fast and accurate file conversion online.
The service has unveiled a bunch of updates recently, one of them being integration with popular cloud storage services such as Dropbox and Google Drive. Even though Cometdocs offers free storage to its users (2GB worth), there is no denying that there are many much more popular cloud storage competitors out there.
Thanks to this new update, Cometdocs users can convert files directly from their Google Drive or Dropbox accounts in two different ways – via their browser or using Cometdocs’ new desktop app.
Of course, in both instances you need to sign up for a free Cometdocs account first. Once you have signed up and logged in, here’s how to integrate Google Drive and Dropbox with the online service.
Right at the top of Cometdocs’ online interface, you will see a button that says “Import file from.” Click on that button and choose to synch either Dropbox or Google Drive with Cometdocs.

Once the synch has been completed, a window will open up listing all of your Dropbox or Drive files. Click on the file you want converted and then click “Choose.”

The file is now sent to your Cometdocs clipboard from where you can drag it to the Convert tab and choose your conversion option. Cometdocs allows users to convert PDFs into a large number of different file formats including MS Excel, Word, PowerPoint, HTML, Text, AutoCAD formats and more. You can also convert these files types and more into PDF with Cometdocs. It’s safe to say that the conversion options are plentiful.


Integrating Cometdocs with your favorite cloud storage service is even easier when using the desktop app. Once you have downloaded and installed the app and you have signed in to your Cometdocs account through it, the conversion process can be completed in just one step.
Simple open your cloud storage folder of choice. When using the desktop app, you are no longer limited to Google Drive and Dropbox integration. You can open up the folder of any cloud service you prefer to use.
Now simply right-click on the file that you want to convert. Find the Cometdocs logo in the menu and select your conversion type.

And that’s all there is to it. The app sends the file off to Cometdocs’ server for conversion, and once the process is complete, the newly converted file is downloaded automatically into your cloud storage folder and synched.

If you are looking for a faster and easier way to convert files from within your cloud storage conveniently, Cometdocs’ integration features are hard to beat.
Go to: http://www.cometdocs.com/ or http://www.cometdocs.com/desktopApp
Labels: cometdocs, Excel, file convert, free file conversion site, google docs, google drive, PDF, PowerPoint
Wednesday, November 20th, 2013
Force Chrome to refresh a page

How to Make Chrome display your new web page content without emptying your cache
I use Dreamweaver for my sites and Chrome as my preferred browser but I came close to throwing Chrome out the window these last few days.
You see, Chrome doesn’t like updating your pages which means that if you’re revamping pages as I have been it is perilously slow in delivering the new content to you. In fact, today I checked out a page I edited 4 days ago and while the text is up to date the images were not.
Trying the regular keyboard shortcuts just didn’t work – any key with F5 such as Shift + F5, Control + F5, the reload button Shift + R etc, etc.. I tried them all and nothing works.
I don’t particularly want to have to empty my cache to see the new content – it’s like throwing out a heap of good stuff just to display a page – it shouldn’t have to be done. This browser should work better!
Turns out it does…
….when you know how!
So here’s 2 ways to force Chrome to refresh a page:
1 Click on the page and press Control + Shift + I to display the Developer Tools. Now, instead of clicking the button to the left of the address bar – right click it to open the menu. Choose Hard Reload – that should ignore the contents of the cache and reload page content and images from the server. This menu only appears if DevTools are enabled.
If that doesn’t work:-
2 Go to the DevTools panel at the foot of the screen and, in the bottom right corner, locate Settings (the gear icon) and click it.

Now check the Disable Cache (while DevTools is open) checkbox and reload the page – voila! too easy! Yeah… your page appears.

Leave the panel open while you work.
Close it when you’re done.
There… you knew there was a secret to it – and now you’re in on it, but please, don’t keep it to yourself – spread it around, tweet it, share it!
Labels: chrome, devtools, load page without emptying cache, page won't reload, refresh, reload page
Friday, November 15th, 2013
Google Drive Spreadsheet Notifications

Google Drive’s spreadsheets are liable to be shared and edited by many people.
This can potentially compromise the integrity of their data, so it’s a good idea to keep track of the changes made. Fortunately, Google provides a notifications service so the spreadsheet’s owner can do just that.
To access the notification rules, open the spreadsheet you want to track and select Tools > Notification Rules…. The resulting dialogue allows you to choose what changes to track. If only some data is critical, you can choose to only track a specific sheet or cell range. If you’ve set up a form to feed its result into your spreadsheet, you can choose to be notified whenever somebody submits the form. Choosing email – daily digest will add the notification to a daily email that contains all of your notifications that have this rule selected. Email – right away immediately sends the specific notification to you.
Click Save when you are done. Your new notification rule will be the first on a list of all the notification rules for that spreadsheet. From the list you can add new rules, or edit or delete an existing one.
Labels: change, form, google docs, google drive, notification, shared, spreadsheet
Wednesday, November 13th, 2013
Add Spacing to Word Table Cells

Learn to quickly add extra spacing above and below the contents of a Word table cell
When you enter text in a Word 2013 table you may want more space above and below your text than appears by default.
While you can make the table cells larger and vertically centre the text in the cells this is a cumbersome solution and there is better and faster way.
To add extra spacing you can change the table’s cell spacing values.
To do this, first select the table, right click choose Table Properties.

Click the Table tab and click Options.

Here you can set the Top, Bottom, Left and Right cell margins for all cells in the table. Set the Top and Bottom values to 0.25″ to add a little extra space above and below the text in the cells.
Labels: cell spacing, space, table, vertical and horizontal space, Word 2007, Word 2010, Word 2013
Wednesday, November 13th, 2013
Google Drive Change File Ownership

So you’ve decided of your documents is better of in somebody else’s hands. Maybe you prepared the document for a colleague with the intention of handing it off to them later, or maybe you’re just offloading some of your work. Whatever the case, Google makes transferring ownership of your files extremely simple.
To begin, you must first share the file with its new owner. Either click the blue share button in the top right corner of the document, or select File > Share…. When the share menu appears, enter the new owner’s email address and press Share & Save to share the file with them.

Their address should now be listed in the share menu. Click the can edit box next to their name, select is owner, then click Save Changes. The new owner will be notified by email about the ownership change, and you will still have editing privileges as long as the new owner allows it.
Labels: change, google drive, owner, share, transfer
Sunday, November 10th, 2013
Google Docs Search the Menus

Sometimes you know what you want but you don’t know where to find it. Google Docs’ menus are pretty simple, but the Search the menus tool can make menus entirely obsolete. You can find this search tool under the Help menu, but it can be more easily reached by pressing Alt + /.
This search tool is extremely powerful. Type anything related to what you want and it’s almost guaranteed to appear, from basic settings to specific font settings. Search “math” and you’ll see the option to insert a new a equation, “double” will yield the double line space setting, “list” will provide many different types of lists you can insert.


Almost every setting can be tweaked from this search menu. Next time you’re lost in the settings menus, just pressing Alt + / and find what you want in seconds.
Labels: document, Find, google docs, google drive, menu, search
Thursday, November 7th, 2013
Convert text to a Microsoft Word table

Quickly turn text into a Microsoft Word table
It is possible to convert text from a Word document into a table.
However, to do so requires the text to be correctly laid out – if it is not, it is worth a few minutes work to reformat the text so it can be easily converted to a table.
To convert the text each column’s content needs to be separated by a single tab and you need to have a paragraph marker at the end of each line. To check your text is correctly formatted, click the Home tab and click the Show/Hide¶ button to see the tab marks in the document (they are small right pointing arrows).

Make sure there is only one tab marker between each item in the list. If you don’t have data for a particular column add two tab marks to indicate that one column is empty.

Click the Show/Hide¶ button again when you are done.
Select the list and choose Insert > Table > Convert Text To Table.

Word should automatically suggest the correct number of columns. From the Separate text at options select Tabs, set the AutoFit behavior to AutoFit to contents if the items are short like ours are and click Ok.

The text will be automatically placed in a new table ready for you to continue to work on it.

Labels: Autofit, convert text to table, Microsoft Word 2013, tabs, Word 2007, Word 2010
Friday, November 1st, 2013
Convert Hex to VBA colors

Unbelievable! Hex colors don’t work in VBA without conversion!
It is totally unbelievable to me but today I wanted to put an ActiveX option button on an Excel worksheet. I could set the BackStyle to transparent so I can see the color in the worksheet through it but every time I clicked the option button it showed up white – and UGLY.
I managed to get the hex color of the worksheet – I got the RGB from Excel then put it in PaintShop Pro to get the hex value. So R242, G157, B 0 became #F29D00 hex.

At this point I was feeling rightly proud of my color conversion skills until I tried to set the Backcolor property to this value. It WAS BLUE!? not orange… WTF?

Seems like VBA color isn’t the same as Hex colors … it is nearly the same but not quite. You need to switch the R and B values with each other. So my orange #F29D00 becomes #009DF2 for VBA – of course you need to then wrap it in the other little bits so it looks like this: &H009DF2& and all is hunky dory. Paste that into the Properties box and VBA makes it into a nice long integer all by itself – that bit at least is simple.
So now you know how to convert hex colors to VBA colors.
I just have to ask the burning question – WHY? Why isn’t good ol’ RGB good enough for Microsoft – why is it BGR? And just which programming genius dreamed that one up?
Labels: Hex, hex to vba color, rgb, specifying colors in VBA, VBA, vba color conversion


Sunday, October 20th, 2013
Hanging Indents in Google Docs

If you’re writing a paper with a bibliography or works cited page in Google Docs, you may be frustrated to find there’s no formatting button for hanging indents.
You can create these manually, however, using Doc’s ruler tool. If the ruler is not already visible, select View > Show Ruler. It will appear across the top of your document.
To create your hanging indent, first select the text you wish to add the indent to. Notice two small blue shapes on the left side of the ruler, a triangle and rectangle.

The rectangle represents your left margin, the triangle your indent. There is also a grey section of the ruler that shows you the standard 1 inch margin. Move the triangle to 1/2 inch right of the left margin. Keep in mind that while a 1/2 inch indent is standard, you should adjust this if a different sized indent is required. Now pull the rectangle back to the original left margin. You should see your text move with these shapes such that the text’s margin aligns to the rectangle and the hanging indent aligns with the triangle.Keep in mind that just like any other formatting choice, this indent will only be applied to text you’ve selected or text written following the change.
The rectangle represents your left margin, the triangle your indent. There is also a grey section of the ruler that shows you the standard 1 inch margin. Move the triangle to 1/2 inch right of the left margin. Keep in mind that while a 1/2 inch indent is standard, you should adjust this if a different sized indent is required. Now pull the rectangle back to the original left margin. You should see your text move with these shapes such that the text’s margin aligns to the rectangle and the hanging indent aligns with the triangle.Keep in mind that just like any other formatting choice, this indent will only be applied to text you’ve selected or text written following the change.
Labels: bibiolography, citation, google docs, hanging indent, indent, works cited
Sunday, October 13th, 2013
Use OpenType to Beautify Fonts in Word 2010 & 2013

Using OpenType, you can add caps, ligatures, and other styles to your fonts to beautify your text.
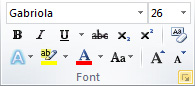
To get started with OpenType in Microsoft Word 2010, and in particular if you have the font Gabriola installed, type some text using the font Gabriola. Include some numbers because Gabriola has a particularly attractive range of numbers.
With the text selected from the Font group click the dialog launcher to open the Font dialog and select the Advanced tab.

From the Ligatures dropdown list, select Standard Only and from the Stylistic Sets dropdown list select style 6 and click Ok to apply it to the text. You will see that the text changes to show some attractive swashes on some letters. If you change to a different Stylistic Set you will see that some characters may change. You may need to increase the line spacing to see the full swashes appear.
This OpenType font feature only works for fonts that actually have these characters in them, which include Gabriola, Calibri, Cambria, Constantia, Corbel, Consolas and Palatino Linotype. You must also be working on a .docx format document and not in compatibility mode in Word. If you don’t have access to these font features, choose File -> Options -> Advanced and scroll to the bottom of the screen and click Layout Options. Ensure that the Disable OpenType Font Formatting Features checkbox is disabled.
In Word, if you set the typeface to Gabriola and then start typing you’ll notice that as you type, the characters may change because the position of the characters in relation to other characters around them has an effect on how individual characters are drawn.
Wednesday, October 16th, 2013
A Comment on Comments
Sometimes you’ll want to add a comment to a piece of text but not so that it actually appears in the text.
For example you may want to ask someone else who is working on the document with you a question about something mentioned in the text or you may want to remind yourself to check the source of a quote you have used. The best choice for this task is Word’s Comment option. Select the text to attach the comment to and select Review > New Comment. A comment box will open to the side of the document with your initials and a comment number in brackets (eg [HB1]).
If your initials or name are incorrect, alter them by selecting File > Options > General and changing the Username and Initials text boxes.
If you’re viewing a document which contains a number of comments you can move from one to the next quickly by using the Previous and Next. Use the Delete Comment button to delete a comment, leaving the text it’s attached to intact – right clicking a comment and selecting Delete Comment works the same way. You can edit the text in a comment simply by selecting the comment and typing.
You can choose to print with or without comments by selecting the print range dropdown menu under print settings and checking or unchecking Print Markup.
Using comments is particularly useful when you’re working on a document with someone else as they effectively allow you to ‘carry on a conversation’ about the document.
Helen Bradley
Labels: comments, markup, Office, print, review, Word
posted by Helen Bradley @ 9:00 am0 Comments - links to this post