Thursday, August 15th, 2013
Sorting data in Word 2007, 2010 & 2013
In the pre-ribbon versions of Word you would use the Table commands to sort data in a Word document.
In Word 2007, 2010 & 2013 you can’t use the table sort options any longer for plain old text simply because you can’t select the table options if you don’t have a table – it’s a Catch 22 situation.
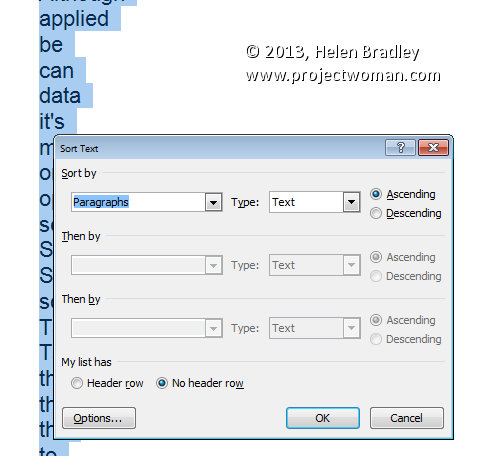
Luckily, Word now includes a proper sort option for any text – not just table text. To use it, first select the text to sort and then click the Sort button on the Home tab of the Ribbon.
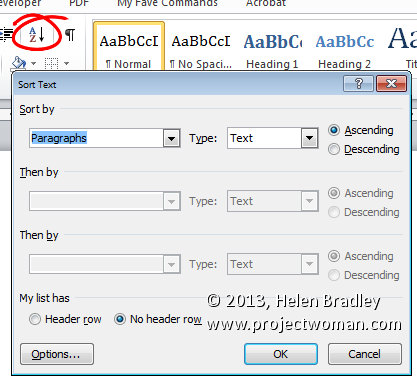
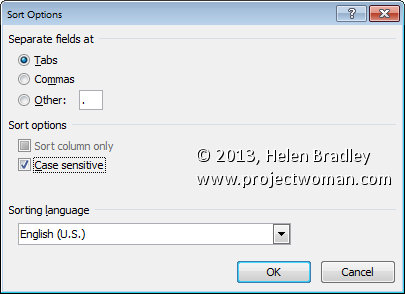
When the Sort Text dialog opens you can choose what to sort such as Paragraph or Field and the type of sort. If you want a case sensitive sort so A is treated differently to a then click Options and check the Case Sensitive checkbox.
Once you are done select the sorting options, click Ok to perform the sort.
Helen Bradley
Labels: 07, 2007, 2010, 2013, Command, data, Microsoft Office, Microsoft Word, sort, Sort Options, Sort Text, table, Table Command, text, tip, trick, Tutorial, Word, Word 2010, Word 2013
Categories:office
posted by Helen Bradley @ 5:57 am1 Comment links to this post
Friday, August 9th, 2013
How to use linked text boxes to flow text throughout a document automatically
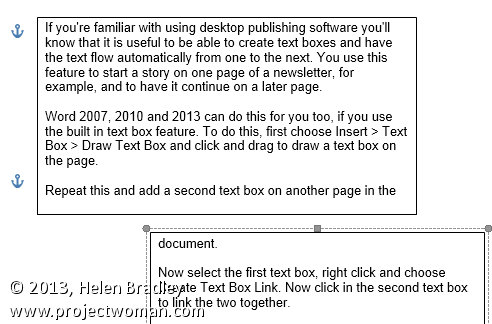
If you’re familiar with using desktop publishing software you’ll know that it is useful to be able to create text boxes and have the text flow automatically from one to the next. You use this feature to start a story on one page of a newsletter, for example, and to have it continue on a later page.
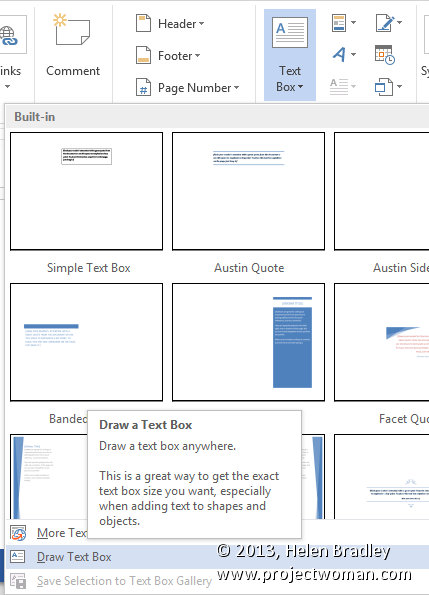
Word 2007, 2010 and 2013 can do this for you too, if you use the built in text box feature. To do this, first choose Insert > Text Box > Draw Text Box and click and drag to draw a text box on the page.
Repeat this and add a second text box on another page in the document.
Now select the first text box, right click and choose Create Text Box Link.
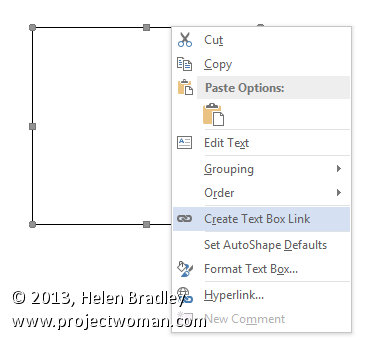
Now click in the second text box to link the two together.

In future, any text which you type into or paste into the first text box and which won’t fit because the box is not large enough to accommodate it, will flow automatically into the second text box.
Helen Bradley
Labels: 2010, 2013, automatic, Create Text Box Link, Draw Text Box, flow, insert, Microsoft Office, Microsoft Word, text, text box, tip, trick, Tutorial, Word, Word 2010, Word 2013
Categories:office
posted by Helen Bradley @ 6:09 am1 Comment links to this post
Thursday, August 1st, 2013

Know when your document was printed by adding a date and time stamp to each printed page
Add a date and time stamp all your printouts by placing the current date and time in the document footer so it prints when the page is printed.
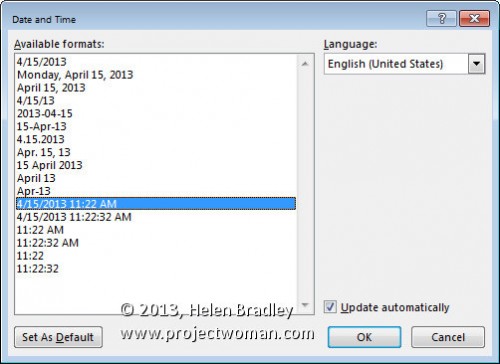
To do this in Word 2007, 2010 and 2013 choose Insert > Footer > Edit Footer. Click the Date & Time button and enable the Update Automatically checkbox. From the list of dates and times choose a date or date and time – depending on what you want to see on the page. Click Ok.
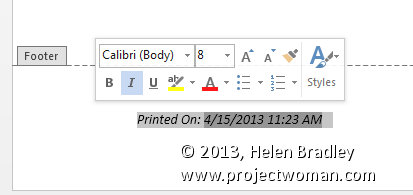
Select the text that Word has inserted in the footer and you can now format it to a small font – such as Italic 8 pt. You can also prefix the text with the words Printed On: or something similar, if desired.
Click Close Header and Footer to return to your document. Now the current date and time will be printed in the footer each time the document is printed.
Helen Bradley
Labels: 2010, 2013, add, Close Header and Footer, date, footer, header, insert, Microsoft Office, Microsoft Word, Printed On, printout, stamp, time, timestamp, tip, trick, Tutorial, Update Automatically, Word, Word 2010, Word 2013
Categories:office
posted by Helen Bradley @ 5:18 am1 Comment links to this post
Thursday, July 25th, 2013

Crop your image to a shape in Word
It is easy to crop an image to a shape such as a star or a heart in Word by using the Crop to Shape feature.
First add the image to your document then click to select it. From the Picture Tools > Format tab click Crop > Crop to Shape.
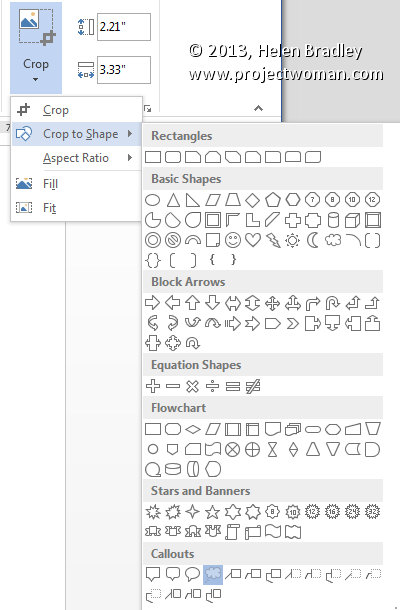
Select the shape to use to crop the image to. You can then add a shadow or reflection or other effect to the shape as desired.
Helen Bradley
Labels: 2010, 2013, AutoShape, crop, format, heart, image, Microsoft Office, Microsoft Word, Picture Tools, reflection, shadow, shape, star, thought bubble, tip, trick, Tutorial, Word, Word 2010, Word 2013
Categories:office
posted by Helen Bradley @ 5:27 am1 Comment links to this post
Thursday, July 11th, 2013
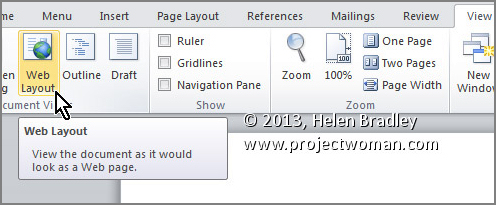
See your document as a web page and keep it looking that way
To see how any of your Word 2010 and 2013 documents will look when they are saved as web pages, select the View tab on the Ribbon, then click Web Layout.
Now, to save a document as a web page, select File > Save As. In the Save As dialog, under click the Save as type: dropdown list and choose Web Page (*.htm;*.html).
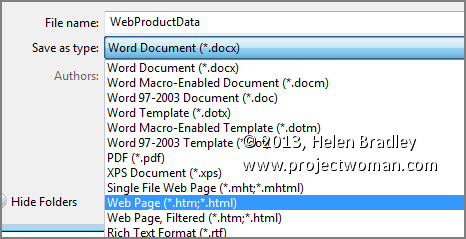
Make sure to choose a location to save the document in, give it a name (it should have the .htm extension), and click Save.
Helen Bradley
Labels: .htm, .html, 2010, 2013, file, File name, Microsoft Office, Microsoft Word, preview, save, Save As, save as type, tip, trick, Tutorial, view, Web, Web Layout, web page, Word, Word 2010, Word 2013
Categories:office
posted by Helen Bradley @ 6:13 amNo Comments links to this post
Wednesday, July 3rd, 2013
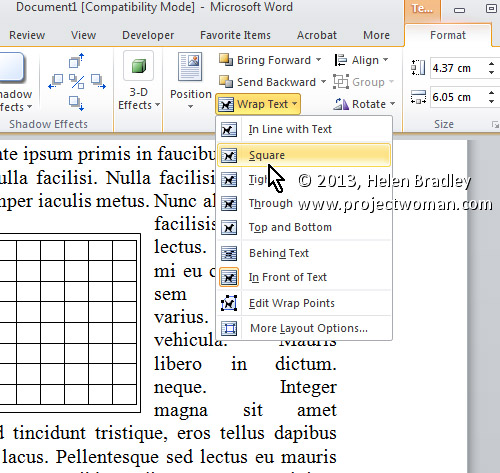
Use a text box in Word to control text wrap around a table
In a previous tip I showed you how to place a table inside a text box so you could put two tables side by side. You can use the same process to make the text on your page wrap around a table.
Click here to learn how to place a table inside a text box
To control the way text wraps around a table, first create a text box and place a table inside it.
Then click to select the text box and, from the Ribbon, select the Format tab > Text Box Tools. Click the Wrap Text dropdown menu and choose the desired wrapping option from those in the list – typically you will use Square to wrap text round the text box with its inserted table.
Helen Bradley
Labels: 2010, 2013, format, insert, Microsoft Office, Microsoft Word, option, part 2, table, text, Text Box Tools, tip, trick, Tutorial, Word, Word 2010, Word 2013, wrap, Wrap text, wraparound
Categories:office
posted by Helen Bradley @ 6:05 am1 Comment links to this post
Wednesday, June 26th, 2013
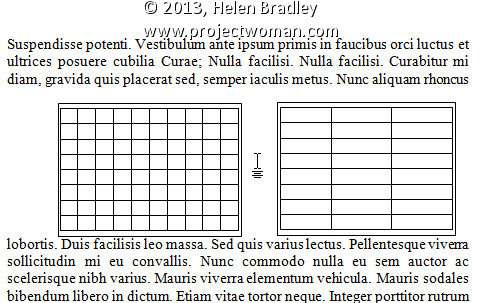
Place tables side by side in a document using text boxes to keep them in place
If you add a table to a text box in Microsoft Word, you can position the text box wherever you want it to be on the screen.
If you need two tables to be placed side by side in your document you can do so by placing each of them inside a text box and then arranging the text boxes side by side.
To do this, create a text box by selecting the Insert tab on the Ribbon, click Text Box and click Draw Text Box. Click and drag to create a text box and then click inside it and create a table by choosing Insert > Table. Repeat the process to create the second table in its text box then drag to position the text boxes side by side.
Helen Bradley
Labels: 1, 2010, 2013, insert, Microsoft Office, Microsoft Word, Page, Part 1, Ribbon, side, side by side, Simple Text Box, table, text box, tip, trick, Tutorial, Word, Word 2010, Word 2013
Categories:office
posted by Helen Bradley @ 6:00 am11 Comments links to this post
Tuesday, June 18th, 2013
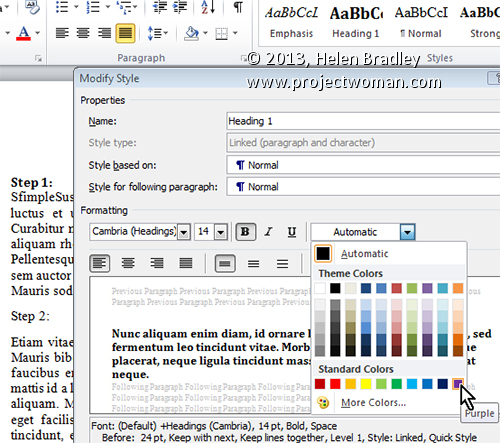
Modify a Style’s Font Color to help find missed formatting
Quickly determine which paragraphs in a document have been formatted using one style, rather than another, by changing the colour of the formatted text.
To do this, click the Home tab on the Ribbon, hover over the style’s name you want to edit in the Styles gallery. Now, right click it and select Modify. In the Modify Style dialog, change the Font Color to something that will stand out on the page (such as purple) and click OK.
Now scroll through your document to see if the style has been applied everywhere you wanted it applied. Remember, if you don’t make any changes at this point, you can quickly undo the colour change by selecting Undo.
Otherwise, when you are done formatting the document, set the colour back to the original Font Color by repeating the above steps.
Helen Bradley
Labels: 2010, 2013, color, colour, font, Font Color, format, Home, Microsoft Office, Microsoft Word, miss, mistakes, modify, Modify Style, style, Styles Gallery, tip, trick, Tutorial, Word, Word 2010, Word 2013
Categories:office
posted by Helen Bradley @ 5:44 amNo Comments links to this post
Tuesday, June 11th, 2013
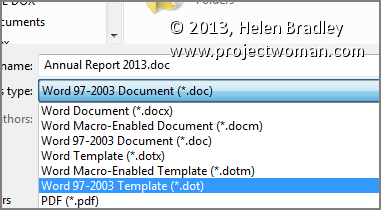
Learn to use ‘Save as type’ to format your document so users of older versions of Word can access them
You can easily exchange files with users of older versions of Word. This is because Word 2007, 2010, and 2013 essentially share the same file format. So it is pretty easy to open any Word document created using version 2007, 2010 or 2013 in any other of these three versions of Word. In addition, Word 2007, 2010, and 2013 will open files from any previous version of Word.
However, when you need to share a Word 2007, 2010, or 2013 file with someone using a much earlier version such as Word 2003 or a Mac version of Word, you must save the file using their particular Word file format. This is because the file formats are not the same and the older versions of Word cannot read the newer file formats.
To save using the appropriate format, select the File tab on the Ribbon, and click Save As. In the Save As dialog, click the Save as type: dropdown list and select the word processing format that matches the software that your other user is using such as Word 97-2003 Document (*.doc). Then click Save to save it in that format.
Helen Bradley
Labels: 2003, 2007, 2010, 2013, convert, file, format, mac, Microsoft Office, Microsoft Word, old, open, Save As, save as type, share, software, tip, trick, Tutorial, Word, Word 2010, Word 2013
Categories:office
posted by Helen Bradley @ 6:28 amNo Comments links to this post
Monday, June 3rd, 2013
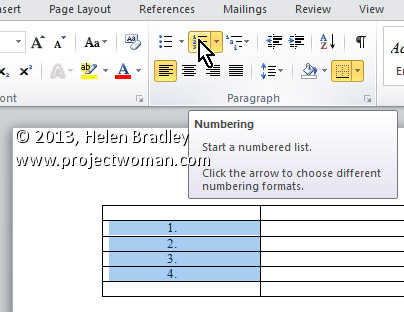
Automatically Number Any and All Rows in a Table
To automatically number rows in your table, select the column you wish to number (or the specific cells in the column you wish to number). Now, click the Numbering button on the Home tab on the Ribbon. After the rows are numbered, you can move the rows anywhere and the numbering will readjust automatically.
Helen Bradley
Labels: 2010, automatically, autonumber, cell, column, Home, Microsoft Office, Microsoft Word, Number, Numbering Button, Ribbon, row, Tab, table, tip, Word, Word 2013
Categories:office
posted by Helen Bradley @ 6:18 am2 Comments links to this post


