


Your camera’s flash can be the best tool you have for lighting a shot or the best tool you have for destroying an image – it all depends on how you use it and when. In these tips I will show you how you can tame your camera’s flash and make sure that it works for you and not against you. As you read you might be surprised to learn when you should be using your flash and when you’re better advised to turn it off and take the shot without it.
Learn to control the flash
The first step to working with the flash on your camera is to learn how to configure it so you can, in an instant, turn it on or off as required. Consult your camera’s manual and learn how to read the indicators on your camera which tell you the current status of the flash. You should be able to turn the flash off so that it does not fire even in low light conditions and you should be able to enable it so that it fires even in full sun. These skills are essential for taking good photographs.
Avoiding redeye
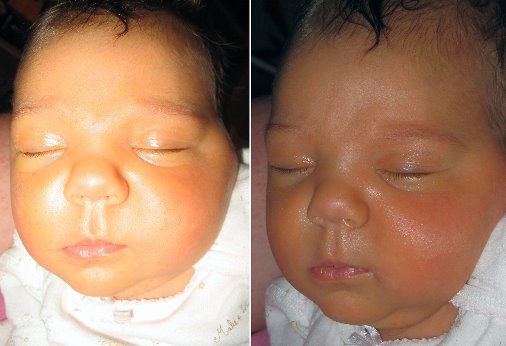
One technique typically used to avoid redeye is to turn on the camera’s redeye reduction flash. This option fires a small flash before the full strength flash and this has the effect of shrinking the pupil size so that the redeye effect is less likely to occur. Unfortunately it also has the effect of misleading your subject into thinking that the photograph has been taken so that they feel free to move and the resulting shot is inevitably blurry.
Rather than using the redeye reduction flash I suggest you disable it and, instead, use other means to reduce redeye. To avoid the redeye issue without the using the redeye reduction flash make sure that the lights in the situation in which you are using the flash are turned up as high as they can be. With good room lighting your subject’s eyes will be less likely to be red. An externally mounted flash can also help – see tip 5 below. Of course, if all else fails you can remove the redeye effect in your digital photo software and many printers and photo services can also remove it.
Understand its limits
If you’ve ever been to a sporting event at night you will have seen people high up in the grandstands using their camera’s flash to take a photograph of the action below. This is the least effective way to capture a good photograph. Your camera’s flash has a range of about 9 feet which makes it of no use at all in a sporting situation.
Next time you’re at the game, turn off your camera’s flash and switch the camera to night mode so that it understands that more light will be needed to take the shot. Brace yourself carefully using a tripod if you have one and then take the shot without the flash. The result will be a much better photograph.
Use the fill flash
It might seem counterintuitive to use a flash when taking a photo in bright sunlight but it is one time you really need the power of your flash. Consider the situation where you have your child in front of you on the beach and a beautiful sunny beachscape behind them. If you take a photograph of the child without using the camera’s flash your child will be in deep shadow with the beach scene behind him or her perfectly exposed. On the other hand if you use the camera’s main flash or its fill flash if it has a special flash for this purpose, you’ll get both your child and the beach scene perfectly exposed. Any time you are shooting in bright sunlight where your subject is within flash range you should use your flash to light them correctly.
Another use for the fill flash is where your subject is lit very strongly from one side such as where they are standing by a sunlit window. Using the flash will even out the deep shadows on the other side of their face giving you a more evenly lit portrait.
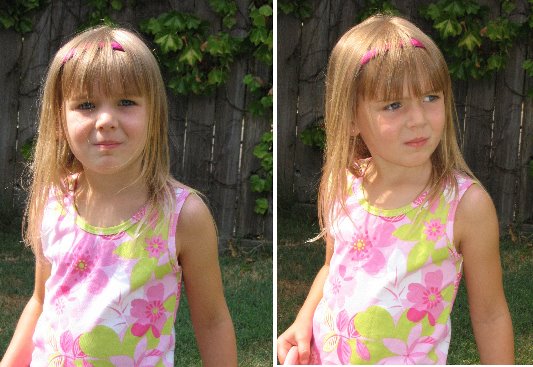
The photo on the left is shot without the flash, on the right, the fill flash adds delicate color to the child’s face and evens out the sun’s harsh shadows.
Off camera flash
Many cameras, in particular digital SLR cameras, have the ability for you to mount an off camera flash. This flash can either be hand held or mounted to a hot shoe connector on the top of the camera. These special flash mounts raise the flash bulb a few inches above the camera and offer you the ability to angle the flash head so it doesn’t fire direct into your subject’s face.
If you are photographing indoors with a flash mounted on your camera, angle the flash so it fires off the ceiling with the result that the scene will be bathed with light. You may need to make a small adjustment to your camera to allow a little more light into the shot to compensate for not having quite as much light available as you would if the flash fires direct into your subject’s face but the resulting image will be much more flattering and you’re unlikely to encounter a problem with redeye.
The photo on the left is shot with a regular flash direct at the subject, the one on the right has the light bounced well away from the subject.
Create a silhouette
If you have a beautiful sunset in front of you and a person standing in front of it between the sunset and the camera there is a temptation to use the camera’s flash to light the person and also capture the sunset. If you plan to do this, make sure you choose a long exposure so you get plenty of the sunset in your photo as well as your subject. On the other hand you can capture an equally interesting image by turning off the flash and adjusting the exposure to -1 or -2 to slightly underexpose the image. Now capture the sunset and you will find that your subject is a dark outline silhouetted against the brighter sunset.
Instant color correction
If you are shooting indoors where fluorescent or incandescent lights are creating a color cast you can avoid the cast and color balance your image using your flash. The light from your camera’s flash is a more neutral light and free of unsightly color casts, so firing the flash indoors will light the scene with the clean flashlight and reduce the colorizing effect of the light bulbs. You don’t need to turn the lights off because the flashlight will be strong enough to neutralize them.
Flash not allowed
When you encounter a situation where you are not allowed to use flash photography but there is no ban on taking photographs then you’ll need to understand how to compensate for not having a flash. Disable the flash on your camera and try a few test shots to see if the lighting is sufficient to take the photograph. Increasing the ISO equivalency on the camera so that you are shooting with 200, 400, 800 or higher ISO will capture more light for the same shutter speed. in a dark situation. The downside of this is that you will have a more grainy photo as a result. You can also experiment with a slower shutter speed but you will need to strike a balance between speed and the likelihood of movement marring your shots. The longer the camera takes to capture the image, the more light it will capture but, in consequence, any movement will result in an unsatisfactory blur in your images.
When you’re in the situation of not being allowed flash photography a long exposure can help you get the shot you’re after.
Diffusing the flash
The flash on a point and shoot camera can be very harsh and you might find it washes out your subjects because it is just too strong. To get a more even lighting effect, diffuse the flash by placing something in front of it. For example semi-opaque sticky tape placed over the flash will help diffuse the light as will a small sheet of wax paper held in front of it or taped over it. Another option is to hold a piece of shiny white card underneath the flash angled slightly up so that you bounce the light from the flash upwards to create a more diffused light.
Creative flash
Your flash is more than a simple lighting source and it can be used for creative purposes too. If you set your camera to a long exposure to take a night shot with the flash turned off you will capture elements like car lights as streaks on your photo. On the other hand if you use the same long exposure with a flash you can capture a subject close by with the flash and then capture the movement behind the subject with the longer exposure. If you are working with a human subject ask them to stay very still throughout the entire shot well past when the flash is fired. Alternatively if the person moves you will get an interesting ghostlike effect on your photos. Of all the tools in your camera the flash can give you some of the best creative opportunities but it will help if you spend some time experimenting with it before you need to use it in a practical situation.
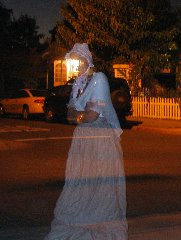
This ghostly Halloween image was created using a flash combined with a long exposure.
Used correctly, the flash on your camera can be a great addition to your photography allowing you to take beautifully lit portraits in even the harshest of light conditions and to capture interesting and creative images.
very goood