Thursday, July 2nd, 2009

PowerPoint: Custom slide navigation with Action buttons


While many people make their presentations in the presence of an audience and they move from one slide to the next, not all presentations are delivered this way. Many slide shows are viewed by people at their desk and when you are creating presentations for display this way, you can create a custom navigation scheme for the user to use to progress through the show.

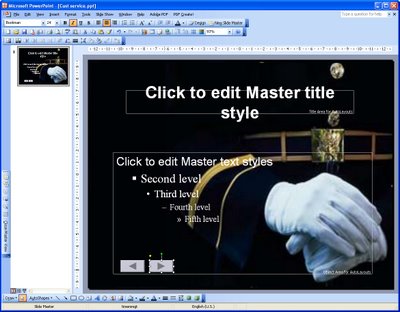
To do this, start by choosing View > Master > Slide Master to move to the Slide Master view. In PowerPoint 2007 select the topmost slide in the layout pane. Choose Slideshow > Action buttons and select the Action Button: Back or Previous. Click and drag the Action button on the slide – the Action Settings dialog shows Hyperlink To: Previous Slide – click Ok.

Repeat and this time add the Action Button: Forward or Next. This Action button is hyperlinked by default to the next slide.

Add an Action button that goes to the first slide by choosing Slideshow > Action buttons > Action Button: Home.

To size the Action buttons Control + Click on each of them in turn, right click and choose Format AutoShapes. Select the Size tab and adjust the width and height for all at the one time.

Click the Draw button on the Drawing toolbar, choose Align or Distribute > Distribute Horizontally to create even spacing between each button. Drag the shapes into the footer area so they are clear of the area covered by the slide content. Click Close Master View to return to your presentation.

Any shape can be configured to perform like an Action button. Add the shape to the slide, right click and choose Action Settings from the menu. You can hyperlink the shape to any slide, Office document or web page.

Helen Bradley

Wednesday, February 21st, 2007

Getting into PowerPoint Actions

When you create PowerPoint presentations that will be used or viewed by one person at a time, rather than by a group, you can customise movement using Action buttons.

Using an action button you can take a user to another place in the presentation or offer Yes and No as a choice to progress to the next slide and take the user to different places depending on their answer.

To add an action button, click on the slide to contain the action and chose Slide Show, Action Buttons and choose Action Button: Information and drag to place the button on the slide. When the Action Settings dialog appears, choose Hyperlink to and select the slide to link to. When a user clicks the button they will be taken to that slide.

If you want them to be able to return to where they came from you can add an Action: Return button to the slide you’re sending them to and they can click it to return to where they came from. This is handy for providing a slide with more information on the topic, for example.

You can use Actions without the buttons that PowerPoint provides. So, for example, you can use custom icons or AutoShapes and place them on the slide. Then right click the image and choose Action Settings from the menu. From here you can configure the same action options for the shape as you do for a PowerPoint Action button.

Action buttons can also be used to display an Excel worksheet or chart, a Word document, or even a web page, for example. When you’re creating an action button that should appear on all the slides in a presentation, you should create it on the Slide master by choosing View, Masters, Slide Master. Then the action button will be accessible to all slides in the presentation. If you need to block it from one slide, place an object over the top of it – action buttons under other objects are disabled and cannot be clicked.

Helen Bradley