Wednesday, November 21st, 2007
Picture this, you have a line of type in Word with a phone number in it. But… when ever you type it the first part of the phone number goes on one line and the next part scrolls around to the next line. It just won’t ‘stick’ all together.
What you need is a hard space. This is some thing that looks like a space, prints like a space but sticks things together. To use it, remove the space that is between the two pieces you want to stick together then press Control + Shift + Space Bar and you have your hard space.
Word also has a sticky/hard hyphen. It shows between two words but never splits words across the end of a line. Same thing – Control + Shift + Hyphen.
Helen Bradley
Labels: hard hyphen, hard space, Microsoft Word
Categories:Uncategorized
posted by Helen Bradley @ 1:09 am6 Comments links to this post
Friday, November 2nd, 2007
When Microsoft Word first included the Click and Type option it helped a lot of new users who couldn’t work out how to type anywhere on the page.
For those of us used to using WordPerfect 5.1 it solved another problem entirely. It lets you include left and right aligned text on the same line. Double click at the left margin of one line and type a word – it aligns to the left. Now, on the same line, double click at the right margin and type a word – it is right aligned – both pieces of text align and work independently of each other. It’s something you couldn’t do easily without this tool.
Helen Bradley
Labels: Click and type, left align, Microsoft Word, right align
Categories:Uncategorized
posted by Helen Bradley @ 8:10 pmNo Comments links to this post
Monday, June 4th, 2007

I use the £ and ¢ symbols a lot but they’re not on my keyboard. However they’re on my toolbar, thanks to the ability to customize Word’s toolbars.
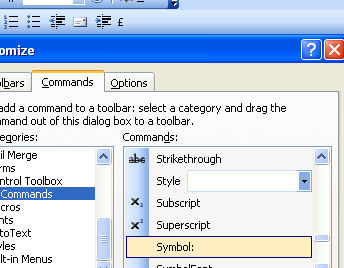
Right click Word’s toolbar and choose Customize and then the Commands tab. Click the All Commands option in the Commands list and locate and click the Symbol: entry. Drag and drop it onto a toolbar and, when the symbol dialog appears, click the symbol to attach to the button and click Ok.
The toolbar button displays the font name and the symbol number. To make it look prettier, right click the button and type a different name for it. If the symbol can be typed using the keyboard by pressing the Alt key and typing out the numbers then do this. Alternately, click the Edit Button Image button and draw the symbol to create your own icon.
And, if you’re curious, the £ symbol is Alt + 0163 and the ¢ symbol is Alt + 155 – so now you know.
Helen Bradley
Labels: Microsoft Word, special symbols., toolbars
Categories:Uncategorized
posted by Helen Bradley @ 8:06 pmNo Comments links to this post
Wednesday, May 23rd, 2007
As an extension to yesterday’s tip my preference for moving items around a Word document is to hold the Shift and Alt keys together and to use the Up and Down arrow keys.
This moves a paragraph up and down a document or, if you have more than one paragraph selected, it moves all of them up and down a document.
If you do this inside a table you move the table row up and down the table – neat but there’s more to come. If the table row moves past the top of a table it is broken out of the table and it becomes a table all of its own. Move some table rows from one table down into another table and they’re automatically incorporated into the second table. It’s an amazingly simple yet effective way of moving things around a Word document.
Helen Bradley
Labels: Microsoft Word, Moving paragraphs, table rows
Categories:Uncategorized
posted by Helen Bradley @ 7:35 pmNo Comments links to this post
Monday, May 7th, 2007

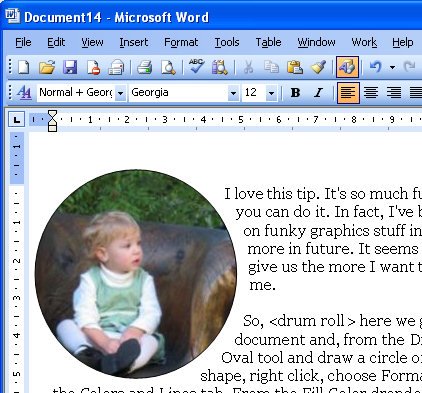
I love this tip. It’s so much fun and so unexpected that you can do it. In fact, I’ve been working a lot lately on funky graphics stuff in Word so expect to see more in future. It seems like the fewer tools they give us the more I want to make them work for me.
So, here we go. Open a Word document and, from the Drawing toolbar, click the Oval tool and draw a circle on the page. Click the shape, right click, choose Format AutoShape and click the Colors and Lines tab. From the Fill Color dropdown list choose Fill Effects then the Picture tab. Then click Select Picture and locate and open your image by clicking Insert. Click the Lock picture aspect ratio checkbox and click Ok twice. It sounds complicated but it’s really pretty easy to do and the results.. well they’re great.
Better still, you can use any shape – it doesn’t have to be a circle… any of the AutoShapes will do.
Helen Bradley
Labels: circular images, Microsoft Word, shapes
Categories:Uncategorized
posted by Helen Bradley @ 4:31 pmNo Comments links to this post
Monday, April 23rd, 2007
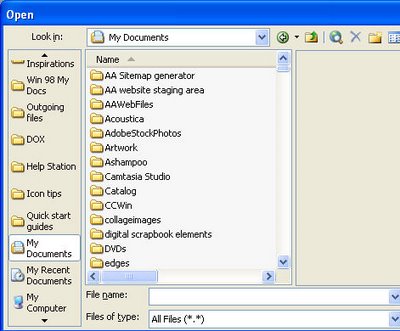
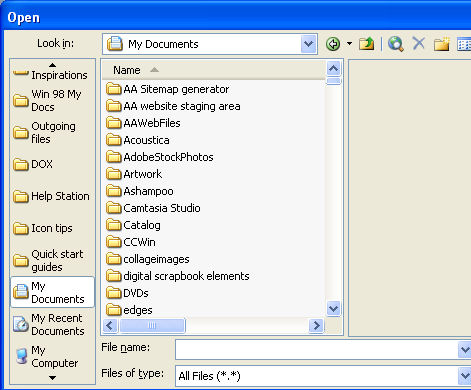
Until I discovered how to add folders in the list down the left of the Word and other Office program’s Save As and File Open dialogs I spent hours navigating to get to the right folder to save a file. Some days it felt like it would be simply easier to dump everthing in the one folder and worry about finding it later on. Ok, I know – bad idea – but it was tempting.
Now I fill my My Places list with all the folders I need long term and short term so saving files in the right folders is simplicity itself. All I do is click the folder in the list on the left and I’m there – just where I want to be.
To do this yourself, from inside Excel or Word, for example, choose File, Save As and notice the My Places bar down the left of the Save As dialog. Navigate to the folder that you want to add to your My Places toolbar and select the folder. Click the Tools menu option in the top right of the dialog and choose Add to My Places. The folder will be automatically added to the bottom of your My Places bar. You can now click it to open the folder anytime you need it and it stays there from one Office session to the next.
Once you no longer need it, you can remove the folder from the list by right clicking it and choose Remove. You can also rename the folder and reorder items in the list by right clicking and choose Delete or Move Up/Move Down as required. You can also switch to small icons if there are too many folders in your My Places bar to see them clearly. The same folders turn up when you choose to open or save a file. Organization is just a click away.
Helen Bradley
Labels: Excel 2003, Microsoft Word, My Places., Office
Categories:Uncategorized
posted by Helen Bradley @ 3:24 pmNo Comments links to this post
Tuesday, April 17th, 2007
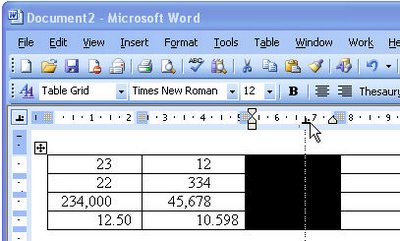
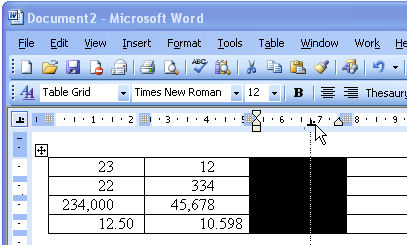
While you may not realize it, we all use the number of characters in a number to determine just how big or small it is. For example 1000000 written like this is harder to determine the magnitude of than 1,000,000. So when you want your users to be able to understand the numbers that you are working with not only is it handy to use commas to separate the digits but aligning the numbers using their decimal points allows a quick check of how big a number is by how far it extends towards the left hand side of the page.
When you are working in a table of figures Word provides a simple way of aligning numbers. Select the column in your table and from the Ruler bar (View, Ruler) click on the tab indicator in the top left corner by the ruler, until you see the Decimal tab option appear. When the Decimal tab indicator shows, click on the ruler where you want the decimal tab to appear in the column of numbers.
Now when you type a number into that column it will be automatically aligned on the decimal tab and there’s no need to insert an actual tab character. Of course if you do want to include a tab character remember that you must hit Ctrl + Tab in a table because the Tab key simply moves you from one cell to the next and doesn’t actually add a tab character.
Helen Bradley
Labels: decimal alignment, Microsoft Word, table
Categories:Uncategorized
posted by Helen Bradley @ 3:37 pm2 Comments links to this post
Friday, April 13th, 2007
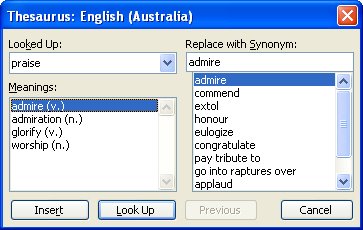
I hate it when Microsoft replaces things I like with tools I don’t like. Of course, one man’s (or should that be woman’s) meat is another’s poison so some folks out there probably like the new thesaurus pane in Word, I dislike it a lot. It just seems to be a lot of effort for precious little result – it practically never provides anything even remotely useful for me.
So, if you’re like me and you like the old Thesaurus in Word more than the task pane version you can still use it. Add it to a toolbar by right clicking a toolbar and choose Customize, Commands tab and, from the Categories list choose Tools. In the Commands list are two Thesaurus entries, you need the first of these. Drag and drop it onto a toolbar and click Close.
To test it, select a word and click the new button and your old Thesaurus dialog will appear. Much nicer in my book.
I guess I should be thankful Microsoft hasn’t made it impossible to customize toolbars – oops – I spoke too soon, in Word 2007 it did just that!
Helen Bradley
Labels: Microsoft Word, Thesaurus, toolbar
Categories:Uncategorized
posted by Helen Bradley @ 3:11 pmNo Comments links to this post
Friday, April 6th, 2007
My history is as a WordPerfect 5.1 user if any of you can remember that far back!
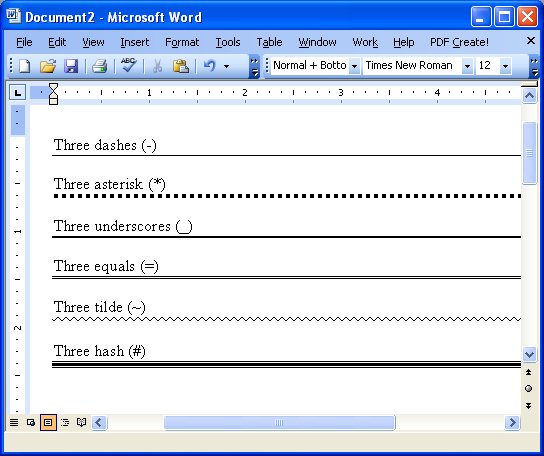
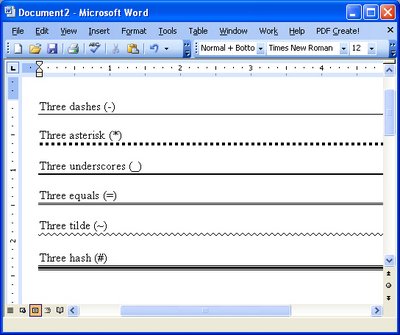
WordPerfect had a great tool for creating horizontal lines and when I came to Word it took me ages to realize that Word didn’t have a tool anywhere near as useful. However Word can create horizontal lines if you know how to do it. Press the Enter key and then type three hyphens in a row and press Enter again – Voila! (well at least we hope so) – a horizontal line. If it doesn’t work for you choose Tools > AutoCorrect Options > AutoFormat As You Type tab and enable the Border Lines checkbox. Then try again. There are other line styles that you can use for example three asterisks creates a blocky line, three underscores a thick line, three equal signs a double line, three pounds [#] signs, an attractive thin thick thin line combination, and three tildes a squiggly line.
While Word’s lines aren’t as intuitive as those in WordPerfect 5.1 perhaps by giving us six different styles it’s set to win back some friends.
Helen Bradley
Labels: lines, Microsoft Word
Categories:Uncategorized
posted by Helen Bradley @ 7:58 pmNo Comments links to this post
Wednesday, April 4th, 2007

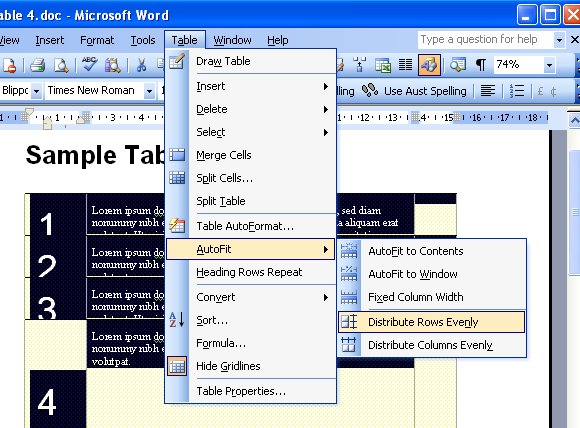
Hands up anyone who has ever spent hours trying to juggle a Word table to be evenly spaced. I confess to have dragged on one too many table borders in my time and all in the name of consistency.
In fact, consistency is much more easily obtained. So, I suggest you start by filling your table cells with whatever you need to put in them. Ignore that one looks deeper than the others. I like to finish all my table cell entries with two Enter keys – that prebuilds in a nice buffer of space.
Then, when you’re done, go to the bottom of the bottomost cell and drag it down so the bottom cell is lots deeper than the others. Select the table – best way is to click inside it and choose Table, Select, Table. Now choose Table, AutoFit, Distribute Rows Evenly – instantly all your rows are evenly sized. If you haven’t made them quite big enough, repeat the process – it’s simple because Word does all the fiddly stuff for you.
Helen Bradley
Labels: distribute, Microsoft Word, rows, table
Categories:Uncategorized
posted by Helen Bradley @ 8:02 pmNo Comments links to this post