Tuesday, April 23rd, 2013

Lightroom Tip – Choose the features to appear on your Toolbars

Learn to find and configure what displays on your Lightroom Toolbars

The toolbar which appears between the Filmstrip and the Loupe or Grid views can be configured to display a range of options. Click the down pointing arrow to choose which items to display on the toolbar from the popup menu. This is particularly useful when you are working on a laptop because there isn’t a lot of screen space. Also be aware that the toolbars for the Loupe and Grid views are different so you can set each independently of each other.

And, if your toolbar isn’t visible? Press T to toggle its visibility on and off.

Helen Bradley

Monday, October 24th, 2011

Lightroom toolbar techniques

If you’ve seen items come and go in your Lightroom interface and if you’re confused about what exactly is happening chances are you hit a keyboard shortcut that displays or hides one of the interface features. When I was new to Lightroom it was the Toolbar – I could make disappear in a heartbeat – problem was it took a lot longer to work out what had gone and how to get it back.

As I soon learned, the toolbar can be hidden and displayed using the T shortcut or you can choose View > Toolbar. The toolbar is visible in Library, Develop, Slideshow, Print and Web view – but here’s the catch – there is a separate toolbar for each module and hiding one doesn’t hide them all – likewise displaying a toolbar only does so for the current module not all of them.

That said, you’ll want to have the toolbar visible in most of the modules most of the time because it has some handy features that you will use regularly.

The toolbars in the Library and Develop modules are customizable – those in the other modules are fixed in what they display. To add to the general confusion, the toolbar you see in Grid view and the one you see in Loupe view in the Library module are both toggled on and off as if they were the same toolbar but they are separately customizable so you can select which tools appear in which view and they can look very different in each view as shown in these images of firstly Loupe view then Grid view:

To customize a toolbar click the down pointing arrow at its far right and select the options to display and hide. When you are working on a laptop, for example, and where screen real estate is a valuable commodity, you’ll need to be judicious about what tools are visible and which are not.

One option on a laptop that I like to disable is the rotation tool in Grid view in the Library. The reason is that I can set the thumbnails in Grid view so they show rotation icons so I don’t need the additional tool on the toolbar. However, in Loupe view this rotation tool doesn’t appear so I add it to the toolbar.

If you often resize your thumbnails then including the Thumbnail Size slider is a good idea – if you need the space it takes up for other tools then hide it and learn the = and – shortcut keys for managing the thumbnail size instead.

One gotcha that is a guaranteed disaster in the making for new Lightroom users is the apparent duplication of rating, color and flags on the Toolbar and on the bar across the top of the Filmstrip. These are NOT duplicates and instead they are each very different options. The tools on the Toolbar are used to apply a flag, color and rating to images in the Grid or Loupe views. Those above the filmstrip are filters that you use to filter your images based on the flags, colors and ratings you have applied to them. It is important to understand the difference. If you get into trouble and some of your images disappear, selecting Filters Off from the dropdown list above the filmstrip will display all your images again.

Helen Bradley

Friday, September 30th, 2011

Secrets of the Lightroom toolbar

If you’ve seen items come and go in your Lightroom interface and if you’re confused about what exactly is happening chances are you hit a keyboard shortcut that displays or hides one of the interface features. When I was new to Lightroom it was the Toolbar – I could make disappear in a heartbeat – problem was it took a lot longer to work out what had gone and how to get it back.

As I soon learned, the toolbar can be hidden and displayed using the T shortcut or you can choose View > Toolbar. The toolbar is visible in Library, Develop, Slideshow, Print and Web view – but here’s the catch – there is a separate toolbar for each module and hiding one doesn’t hide them all – likewise displaying a toolbar only does so for the current module not all of them.

That said, you’ll want to have the toolbar visible in most of the modules most of the time because it has some handy features that you will use regularly.

The toolbars in the Library and Develop modules are customizable – those in the other modules are fixed in what they display. To add to the general confusion, the toolbar you see in Grid view and the one you see in Loupe view in the Library module are both toggled on and off as if they were the same toolbar but they are separately customizable so you can select which tools appear in which view and they can look very different in each view as shown in these images of firstly Loupe view then Grid view:

To customize a toolbar click the down pointing arrow at its far right and select the options to display and hide. When you are working on a laptop, for example, and where screen real estate is a valuable commodity, you’ll need to be judicious about what tools are visible and which are not.

One option on a laptop that I like to disable is the rotation tool in Grid view in the Library. The reason is that I can set the thumbnails in Grid view so they show rotation icons so I don’t need the additional tool on the toolbar. However, in Loupe view this rotation tool doesn’t appear so I add it to the toolbar.

If you often resize your thumbnails then including the Thumbnail Size slider is a good idea – if you need the space it takes up for other tools then hide it and learn the = and – shortcut keys for managing the thumbnail size instead.

One gotcha that is a guaranteed disaster in the making for new Lightroom users is the apparent duplication of rating, color and flags on the Toolbar and on the bar across the top of the Filmstrip. These are NOT duplicates and instead they are each very different options. The tools on the Toolbar are used to apply a flag, color and rating to images in the Grid or Loupe views. Those above the filmstrip are filters that you use to filter your images based on the flags, colors and ratings you have applied to them. It is important to understand the difference. If you get into trouble and some of your images disappear, selecting Filters Off from the drop-down list above the filmstrip will display all your images again.

Helen Bradley

Saturday, August 21st, 2010

5 (More) Lightroom Panel Tricks

When you spend a lot of your editing time in Lightroom it makes sense to learn how to work the interface so it behaves as you need it to. In a previous post (http://digital-photography-school.com/my-5-coolest-lightroom-commands) I listed some of my favourite Lightroom interface features. Here are my next favourite five, most of which have earned a place in my repertoire courtesy of spending far too much time editing on a 12″ laptop where screen space is at a premium:

Learn the F keys

The function keys F5, F6, F7 and F8 can clean up the Lightroom screen very quickly. F5 controls the top panel, F6 the bottom, F7 the left and F8 the right panel. Pressing any one of these keys will hide or display the appropriate panel. It’s an easy way to get rid of a panel you don’t want to see without having to reach for the mouse.
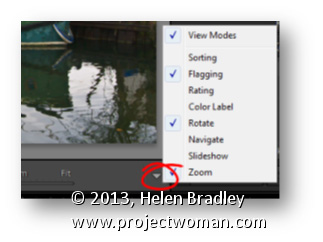
It is T for toolbar

At some time you may have toggled your toolbar off by mistake. When it goes, it takes with it handy tools such as Flag, Rate, Color Labels, the rotation tools, zoom tool and your Loupe and Grid buttons. In short, one accidental press of the T key can wipe out a lot of Lightroom functionality. When these tools go missing, press T and they’ll all come back again.

More panel magic – Tab key

When you need to instantly remove the side panels from the screen, hit the Tab key. Shift Tab will toggle all panels on and off, Tab toggles just the side panels.

Open a second window – Yep – how cool is that?

If you want to see the Grid, Loupe, Compare or Survey View in a new second window, press F11. Once the second window is open, you can select what to view in it.

In Loupe view you can Lock the second window so that you see a single image in it regardless of what is visible on the main screen or choose Normal to view the currently selected image or Live to see the image under the mouse pointer.

To get rid of this window, press F11 again or click its Close button.

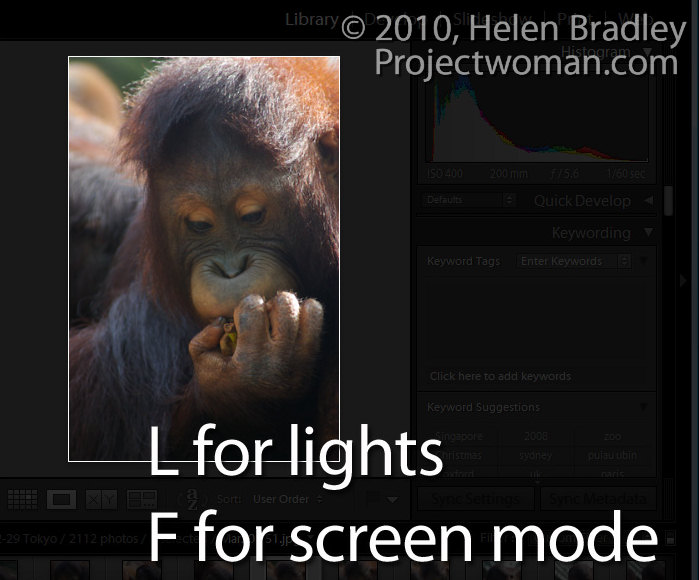
Lights out and screen modes

The L key toggles through the various lights out mode. The first is lights down, the second lights out and then press it again to return to the regular mode. This is handy when you want to see one image or the entire grid without any screen distractions. Similarly the F key scrolls around various screen modes including Normal, Full Screen with Menu bar,  Full Screen and Full Screen and Hide Panels.

More info for Mac users:

Thanks to Facebook user Victor Cincola for this additional information for Mac users. You will need to use Command + F11 to open a second window on the Mac. In addition if your function keys F5, F6 etc do not work  as described above you have Apple shortcuts enabled so you will need to use Fn + F5, Fn + F6 and so on – check your keyboard for the Fn key.

Helen Bradley

Friday, April 13th, 2007

Bring back my Word thesaurus tool, please!

I hate it when Microsoft replaces things I like with tools I don’t like. Of course, one man’s (or should that be woman’s) meat is another’s poison so some folks out there probably like the new thesaurus pane in Word, I dislike it a lot. It just seems to be a lot of effort for precious little result – it practically never provides anything even remotely useful for me.

So, if you’re like me and you like the old Thesaurus in Word more than the task pane version you can still use it. Add it to a toolbar by right clicking a toolbar and choose Customize, Commands tab and, from the Categories list choose Tools. In the Commands list are two Thesaurus entries, you need the first of these. Drag and drop it onto a toolbar and click Close.

To test it, select a word and click the new button and your old Thesaurus dialog will appear. Much nicer in my book.

I guess I should be thankful Microsoft hasn’t made it impossible to customize toolbars – oops – I spoke too soon, in Word 2007 it did just that!

Helen Bradley

Friday, February 9th, 2007

Display an Excel Workbook’s path

Sometimes it’s handy to show the path of an Excel workbook on the screen. Here’s a workaround using a toolbar to do this.

  1. Right click on the menu bar and choose Customize and then the Commands tab.
  2. From the Categories list choose Web and, from the Commands list drag the Address option onto a toolbar or into the menu bar.
  3. Click Close and voila! the file’s full path will appear in the box.

Helen Bradley