Reflections in Puddles
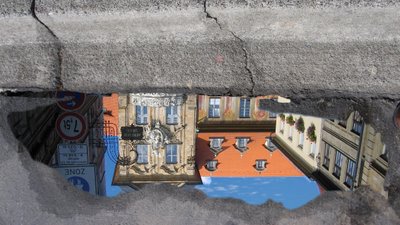
Creating a reflection that looks like a puddle on the ground is a fun technique. Start with an image of a pavement or brick and convert the background layer to a regular layer. Add a new layer on the image and, using black paint and a semi hard brush with 100% opacity, paint a puddle shape over the image.
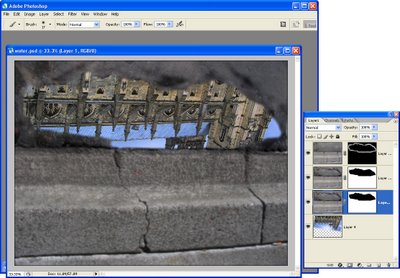
Open the image to use as a reflection in the puddle and flip it vertically by choosing Image > Transform > Flip Vertical. Drag this layer onto the image with the black puddle in it and move it to the bottom of the stack. Control + Click on the layer thumbnail for the puddle to select it, add a feather to the selection and choose Select > Inverse to invert it. Hide the puddle shape layer.
Now click the original image layer and click the Add Layer Mask icon at the foot of the Layer Palette and a layer mask will be added to the image opening a hole in the pavement so you see the image through it.
Move the image into position and then darken the pavement if desired using the Burn tool or duplicate the pavement layer and apply the Multiply blend mode to the duplicate and then reduce the opacity to suit.
To edit the reflection paint with black or white on the mask layer. Painting with black will add the reflection in that area and painting with white will remove it. With some fine tuning you should have an interesting result, fig 1.

Fig 1 Create a reflection in a pavement image to show off your favorite sky or streetscape.
Mirror Reflections
Having said in part 1 that you should avoid using mirrors to create reflections, here is one way you can do it with a single image and without sacrificing reality – unless of course that’s what you want to do.
Open an image of a reflective object – a car rear vision mirror is a good choice and it’s easy enough to go out and shoot one if you don’t have anything else to work with. Convert the background layer of the image into a regular layer by double clicking on it and click Ok.
Open an image with a scene that you want to show reflected in the mirror and drag the image layer from this image onto the image with the mirror in it. You can now close the second image.
When you look at objects through a mirror they are in revere so you should mirror any image that has type or signs etc, that will look wrong if not flipped. To do this, click the layer to flip and choose Edit > Transform > Flip Horizontal. Hide this new layer for now by clicking its Layer Visibility icon.
Click the bottom layer to make it active and make a selection around the area where the second image should appear inside the mirror. Feather the selection a little by choosing Select > Feather and apply a small feather value to soften the edge – in Photoshop CS3 and CS4 you can use Refine Edge to refine the selection edges.
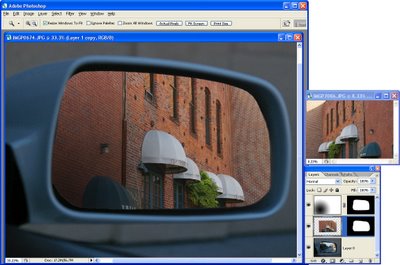
With this selection in place, click the Layer Visibility icon for the topmost layer so it is visible again. Click the Add Layer Mask icon at the foot of the layer palette and, immediately you do this, a layer mask will be created that automatically places the image inside the mirror.
Notice that the layer mask is a black and white image and, where it is black, that part of the image is hidden and where it is white that part of the image shows. A final touch is to darken the inside edge of the mirror as it was in the original image, see fig 2.

Fig 2. This simple reflection is created by placing a scene inside a reflective object such as a car mirror.
To adjust what portion of the image appears in the mirror, undo the link between the layer mask and the image (it is a small chain icon between them in the layer palette), move the layer into a new position and apply the link again.
If you’re interested in seeing some great real life pavement reflections so you can analyze their characteristics to apply them to your images, visit Photochiel’s wonderful Reflectins collection at Flickr: http://www.flickr.com/photos/photochiel/sets/140720/show.


Post a Comment
Please feel free to add your comment here. Thank you!