How to install Picture package into Photoshop CS6
Yes! It can be done! Don’t let anyone tell you it can’t.
Ok, so if you read some of the information that’s available on the web you’ll be lead to believe that, in Photoshop CS6 the Picture Package feature has at last been permanently removed from Photoshop and only the Contact Sheet feature is available.
You’ll also read that the Picture Package is not a supported plug-in. Well, it might not be supported but that doesn’t mean it doesn’t work. If you are a Windows user then it does work – in fact it works just fine. And thanks to J. J. Mack’s research here, step by step is how to put the Picture Package back in Photoshop CS6 for Windows.
Step 1
Download the Picture Package and Contact Sheet add-in for Photoshop CS5 from this location: http://www.adobe.com/support/downloads/detail.jsp?ftpID=4688. It is part of the Optional Plugins collection.
Step 2
Once you’ve downloaded the plug-in zip file, open it up because what you want is two parts of it. You want the appropriate ContactSheetII.8LI file and the layouts.
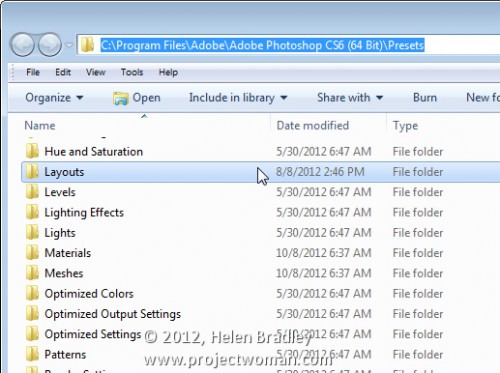
So, once you’ve unzipped the file use Windows Explorer to locate your Adobe folder – you will need the C:\Program Files\Adobe\Adobe Photoshop CS6 <64 bit or 32 bit>\Presets folder. Depending on whether you are using the 32 or 64 bit version of Photoshop, you will need to locate the correct folder. On my machine, I am using the 64 bit version of Photoshop so the folder is: C:\Program Files\Adobe\Adobe Photoshop CS6 (64 Bit)\Presets.
Put the folder of Layouts that were in the zip file into this folder – so you will now have a Presets\Layouts folder with a set of layouts in it.
Step 3
Locate your Adobe Photoshop \Required\Plug-Ins\Automate folder – the Required folder is at the same level as your Presets folder so, on my computer it is here:
C:\Program Files\Adobe\Adobe Photoshop CS6 (64 Bit)\Required\Plug-Ins\Automate
Into this folder copy the ContactSheetII.8LI file from the zip download.
Step 4
Once you’ve done this simply close and restart Photoshop.
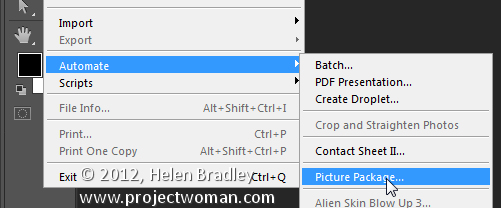
Choose File > Automate and you’ll see the Picture Package option.
You’ll also find that you have two Contact SheetII entries – you want to use the second one of these as this is the one that is installed with Photoshop CS6.
If desired you can use the Edit Menus feature to remove the unwanted entry from the Automate menu to make things neat and tidy.
Step 5
To run the Picture Package plug-in in Photoshop CS6, choose File > Automate > Picture Package. You can now proceed as you did with earlier versions. You can edit layouts, open layouts, you can click on an image to add it, you can go and add a file to the layout and basically do anything that you used to do with the Picture Package in any earlier version of Photoshop.
So when someone tries to tell you that Picture Package is not available in Photoshop CS6 feel free to send them here to prove that it can be done.


Nice Tutorial, trims
Thanks Helen,
The dowload link saved me from hunting for the files on my old disks. Worked a treat 🙂
I did all that and I get the error Can not find any layout files in Presets/layers Any ideas?
Thank you