Tuesday, October 16th, 2012

Install Picture Package in Photoshop CS6 – step by step

How to install Picture package into Photoshop CS6

Yes! It can be done! Don’t let anyone tell you it can’t.

Ok, so if you read some of the information that’s available on the web you’ll be lead to believe that, in Photoshop CS6 the Picture Package feature has at last been permanently removed from Photoshop and only the Contact Sheet feature is available.

You’ll also read that the Picture Package is not a supported plug-in. Well, it might not be supported but that doesn’t mean it doesn’t work. If you are a Windows user then it does work – in fact it works just fine. And thanks to J. J. Mack’s research here, step by step is how to put the Picture Package back in Photoshop CS6 for Windows.

Step 1

Download the Picture Package and Contact Sheet add-in for Photoshop CS5 from this location: http://www.adobe.com/support/downloads/detail.jsp?ftpID=4688. It is part of the Optional Plugins collection.

Step 2

Once you’ve downloaded the plug-in zip file, open it up because what you want is two parts of it. You want the appropriate ContactSheetII.8LI file and the layouts.

install picture package add in into Photoshop CS6

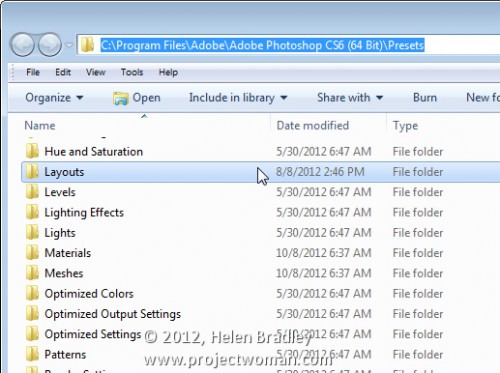
So, once you’ve unzipped the file use Windows Explorer to locate your Adobe folder – you will need the C:\Program Files\Adobe\Adobe Photoshop CS6 <64 bit or 32 bit>\Presets folder. Depending on whether you are using the 32 or 64 bit version of Photoshop, you will need to locate the correct folder. On my machine, I am using the 64 bit version of Photoshop so the folder is: C:\Program Files\Adobe\Adobe Photoshop CS6 (64 Bit)\Presets.

Put the folder of Layouts that were in the zip file into this folder – so you will now have a Presets\Layouts folder with a set of layouts in it.

Step 3

Locate your Adobe Photoshop \Required\Plug-Ins\Automate folder – the Required folder is at the same level as your Presets folder so, on my computer it is here:

C:\Program Files\Adobe\Adobe Photoshop CS6 (64 Bit)\Required\Plug-Ins\Automate

Into this folder copy the ContactSheetII.8LI file from the zip download.

Step 4

Once you’ve done this simply close and restart Photoshop.

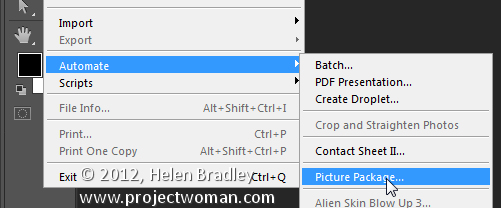
Choose File > Automate and you’ll see the Picture Package option.

You’ll also find that you have two Contact SheetII entries – you want to use the second one of these as this is the one that is installed with Photoshop CS6.


If desired you can use the Edit Menus feature to remove the unwanted entry from the Automate menu to make things neat and tidy.

Step 5

To run the Picture Package plug-in in Photoshop CS6, choose File > Automate > Picture Package. You can now proceed as you did with earlier versions. You can edit layouts, open layouts, you can click on an image to add it, you can go and add a file to the layout and basically do anything that you used to do with the Picture Package in any earlier version of Photoshop.

So when someone tries to tell you that Picture Package is not available in Photoshop CS6 feel free to send them here to prove that it can be done.

Helen Bradley

Tuesday, January 10th, 2012

Pattern fills for your Excel 2007 charts

In Excel 2003 and now in Excel 2010 , there are pattern fills which you can use to fill chart bars so your charts print just great in black and white.

Unfortunately the same feature was removed from Excel 2007 – wtf? I have no clue why but it was but it has to be a very silly thing to have done.

If you are using Excel 2007 and you need to use pattern fills with a chart you are out of luck – well not really – you just need to read the rest of this tip because I can tell you how to put the fills back into Excel 2007.

To begin, download this handy add-in: http://officeblogs.net/excel/PatternUI.zip 

Update: This link is no longer live so patternui.zip is not longer available. You can find an add-in here (with instructions which achieves the same thing) courtesy of Andy Pope.

The zip file contains a single file patternUI.xlam which you need to extract and place somewhere you will find it easily and where it won’t get deleted by accident. You could make an Excel add-ins folder for it, for example.

Once you’ve done this, open Excel 2007 and choose the Office button > Excel Options > Add-ins and from the Manage dropdown list, select Excel Add-ins and click Go. This opens the old Add-ins dialog from earlier versions of Excel. Click Browse and locate the .xlam file that you just unzipped and placed somewhere safe. Select it and click Ok. Ensure that the PatternUI option appears in the Add-ins available list and that it is checked and click Ok.

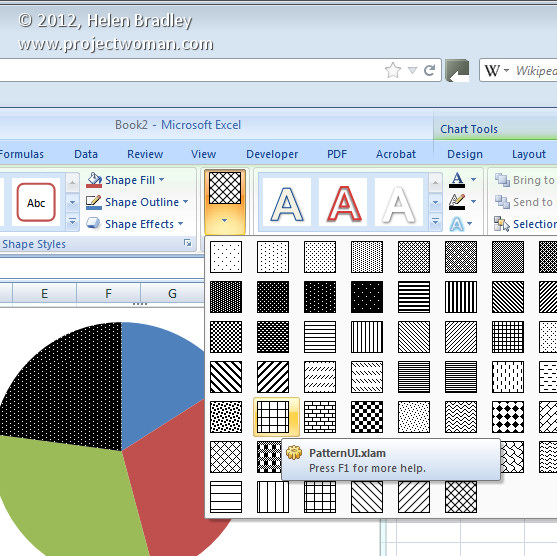
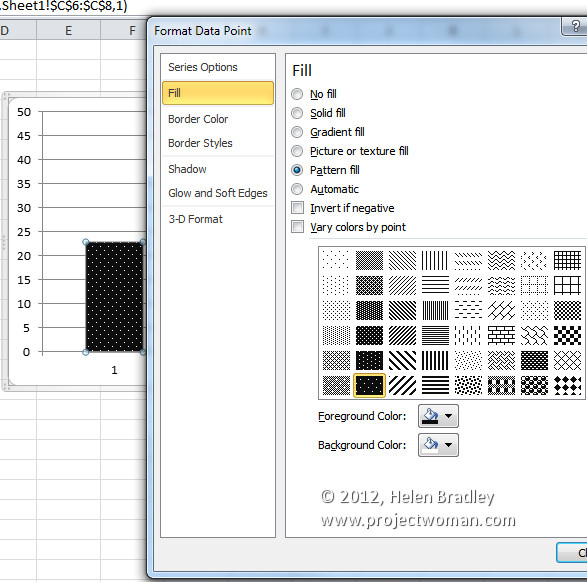
Now create an Excel chart. Once you have you chart, click on the data series to fill with a pattern – if you have a single series plotted then select just one of the columns at a time. Select the Chart Tools > Format tab and notice that you now have an option called Patterns available. Click the Patterns option and select a pattern to apply to the currently selected chart series or column. Click on each series or column in turn and apply a pattern to it. When you are done, you can print your chart as usual.

Installed add-ins are managed automatically by Excel so you will find that the add-in will still be there and accessible next time you use Excel.

If you are using Excel 2010 you don’t need this add-in as the pattern fills are back where they should have been all the time.

Helen Bradley

Sunday, June 5th, 2011

Install and use the Droste Filter in Photoshop CS4, CS5 & CS5.5

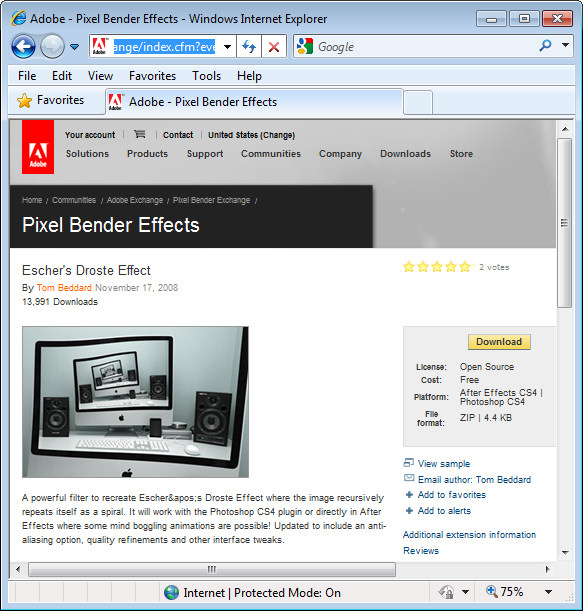
I an earlier blog post I introduced Pixel Bender a new extension for Photoshop CS4 and CS5 from Adobe Labs. In this month’s tutorial I’ll show you a great filter which lets you create a Droste effect with an image. The filter is free to download and once it is installed you can apply it from inside Pixel Bender. It was created by Tom Beddard who is author of a lot of really wonderful filters – you can see more of them here: http://www.adobe.com/cfusion/exchange/index.cfm?event=authorExtensions&authorid=14858639

The Droste effect is an image effect named after a Dutch cocoa company called Droste. In 1904 it produced packaging for its cocoa product showing a woman carrying a tray with a box of cocoa and a cup on it. A small version of the package appeared on the cocoa box on the tray and so on – each version of the image being successively smaller than the last.

To create the Droste effect you must first have Pixel Bender installed so, if you don’t, visit my earlier post to learn where to find it and how to install it. Then, you’ll need to download the Droste filter from: http://tinyurl.com/pbdroste.

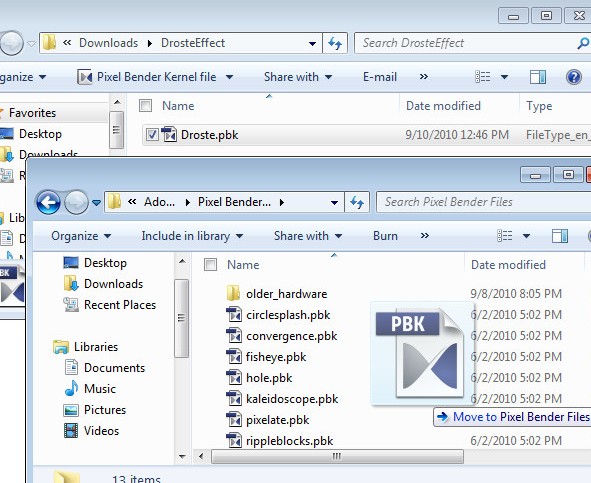
Unzip the folder and copy the .pbk file to your Program Files\Adobe\Adobe Photoshop CS5\Pixel Bender Files folder. Restart Photoshop and the Droste filter will be in place.


Start with an image that is square with some element of interest centered in the middle of the image. I chose a flower against a neutral background – start with something simple as you learn how the filter works – then plan to use a more complicated image later on.

Make a note of the size of the image by choosing Image > Image Size and write down the image width and height.

There is a physical limit to the file size of images you can use with Pixel Bender which is 4096 x 4096 so make sure your image is smaller than this. Even smaller images render faster.

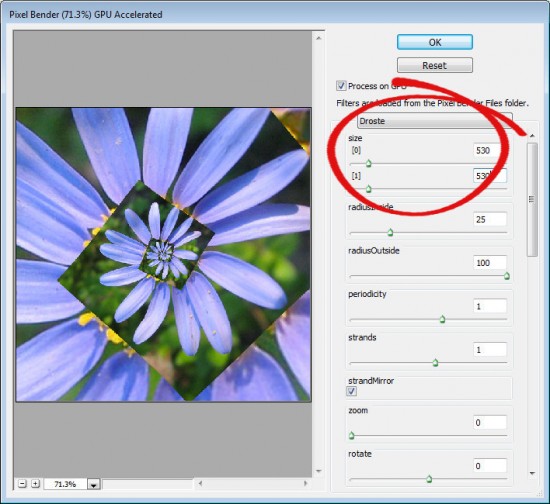
To run the filter, choose Filter > Pixel Bender > Pixel Bender Gallery and select Droste from the dropdown list. If you have used the filter previously, hold Alt (Option on the Mac) and click on the Reset button to reset the filter settings.

Set the Size [0] and Size [1] sliders to match the width and height of your image – my image is 530 x 530 pixels.

By default, you should see a typical Droste file image with straight edges.


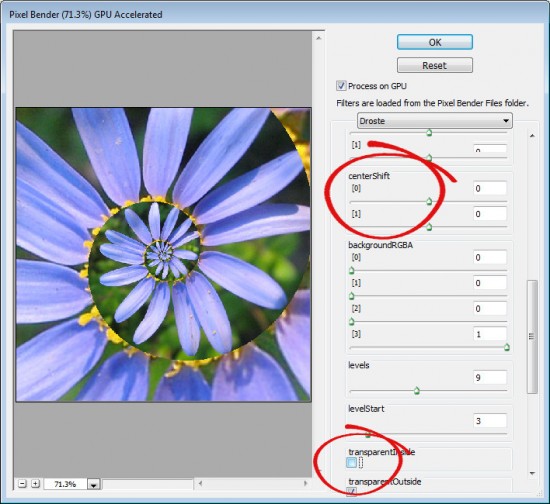
To turn the straight edges into a curved spiral, deselect the TransparentInside checkbox.

If the image is off center, the spiral will look askew at this point. To change the center point of the image and align it with the center of the spiral, adjust the centerShift [0] and [1] sliders – each of these operates in a different dimension. Adjust the center of the image until the spiral looks correct.

To adjust the center of the image itself, use the Center [0] and [1] sliders.

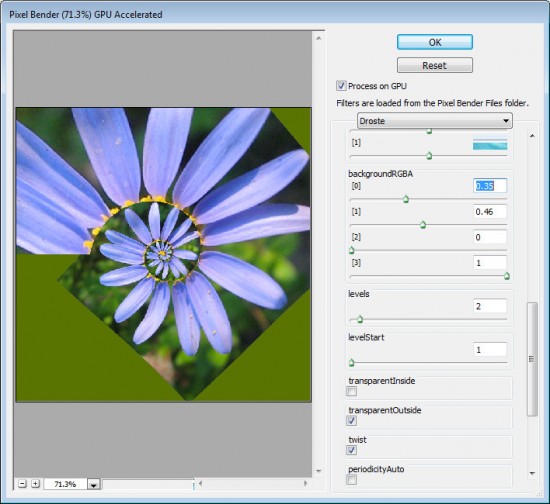
If you do not have an image spiral that completely fills the image area you will see some black background color outside the spiral. You can control the color used for this background by setting the BackgroundRGBA values. The [0] setting controls the Red value, [1] controls Green, [2] controls Blue and [3] controls the opacity of the background. The default is that all sliders are set to 0 and the Opacity slider to 1 which gives the black color. You can view the current background by setting Levels to 2 and the LevelsStart value to 1. Then create your own background color and, when you’re done, increase the Levels value to back up again to around 7.

To make the spiral tighter or looser, adjust the RadiusInside value. Set it to a very small value to get a small number of loops and to something like 50 to get one with lots of loops. The default setting is 25.

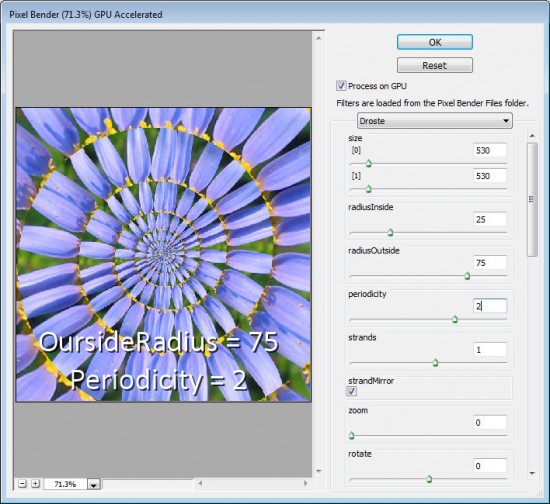
Decreasing the OutsideRadius twists the spiral more tightly. The default value of 100 makes the spiral looser.

Periodicity is the number of times the image repeats in each loop of the spiral. If you set this to 2 the image will be repeated twice per spiral – the Default value is 1.

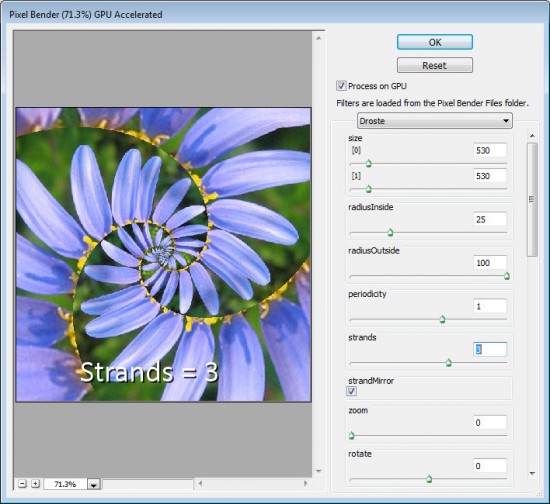
The Strands value sets the number of loops in the spiral. If you set this to 2 you will have two interlocking spirals and if you set it to three you’ll get three strands/spirals  and so on.

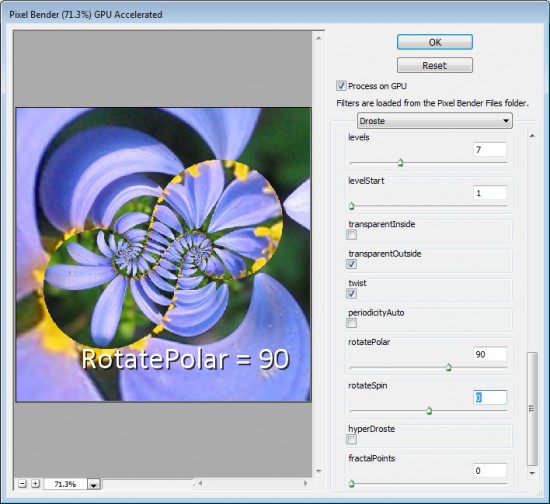
Other interesting effects include using the RotatePolar value. By setting it to, 90 as shown here you will get different spiral loops on the screen. Having done this, you can then select RotateSpin to adjust the effect.

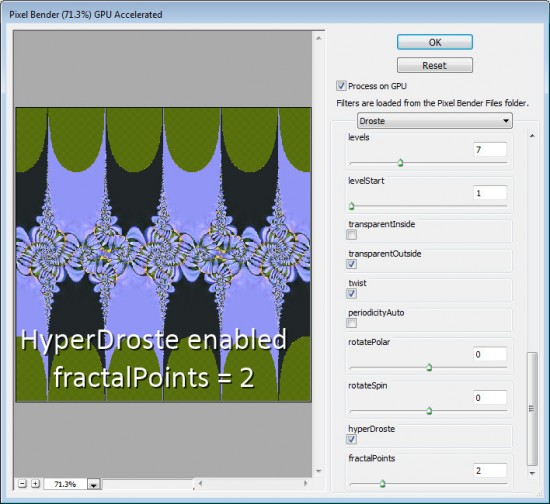
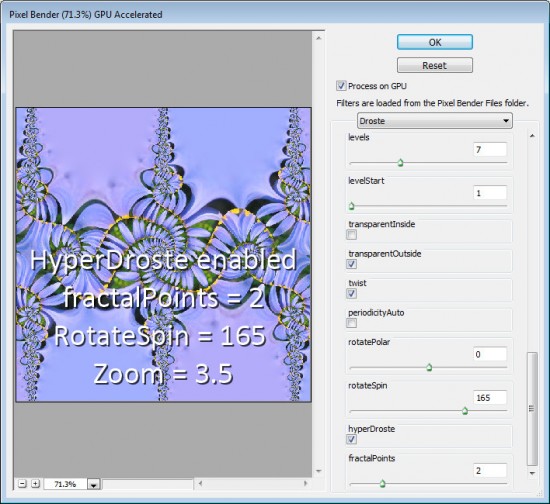
If you enable HyperDroste then adjust the FractalPoints value, you will create an image that is reminiscent of a fractal style image.

If desired adjust the Zoom value to zoom into the design.

Use RotateSpin and RotatePolar with FractalPoints and HyperDroste to fine tune the effect.

When you have a design you like, click Ok button to apply the Droste effect to your image.

Once you know how the controls in the Droste filter work you’re ready to apply it to a more complex image.

To get best results, start with a square image with something of interest in the center and make sure to set the image dimensions in the filter before working with the other sliders.


Helen Bradley