


Some time ago I wrote a post on batch resizing images in Photoshop. You can find the link here: http://projectwoman.com/2009/09/batch-resize.html. I also wrote an article on resizing in Lightroom which you can find here: http://projectwoman.com/2009/10/resizing-images-in-lightroom-2.html.
Someone then wrote to me explaining that they are using Photoshop Elements and that the resize feature in Photoshop does not work in Photoshop Elements. They are correct, but there is a way of batch resizing in Photoshop Elements and here’s how to do it.
Step 1
In Photoshop Elements, choose File > Process Multiple Files. This opens the Process Multiple Files dialog.

Here you can select which images to process. You can select either a folder of images, all opened files or you can click import and import images from an external device such as a camera card.
Typically, the best option will be to place all the images in a folder and process the files from that folder. To do this, click the Browse button opposite the Source box and choose the folder to process. Enable the Include All Subfolders checkbox if desired.
Step 2
Select the destination folder for the resized images (you can create one from this dialog), or, if desired, select Same as Source.
In the file naming area, select Rename Files if this is desired. You can then choose the naming convention such as typing a document name and the sequential numbering system to be used.

Step 3
In the image size area, select Resize Images as that’s what we came here to do.
Select Constrain Proportions as you will want your images to be resized in proportion and not skewed or distorted out of shape.
Now type the largest Width or Height to use for your resized images. If you enter 600 for the Width you will be unable to enter a value for the Height and vice versa. This is because you can only set one value – width or height (in this situation this resizing tool works differently to the corresponding tools in Photoshop and Lightroom).
So if you enter, for example, 600 as the Width all images will be sized so their width is 600 and their respective heights will be adjusted in proportion. Portrait images will be taller than 600 pixels and Landscape ones will be shorter.
Here too you should set the resolution for the images. If you plan to send your photos to an online sites for printing, you may want to match the resolution to what that site requires. For the web select 72 dpi.

Step 4
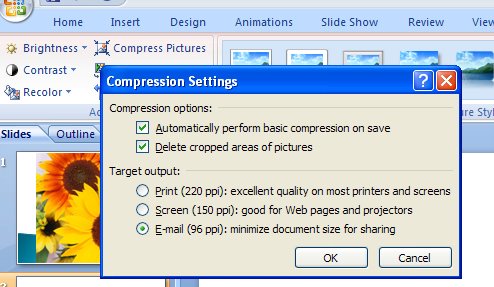
To convert the files to a different format or to compress them, from the File Type dropdown list, select the file format to use. For JPEG format images, you can choose Max, High, Medium or Low quality.

Step 5
You can also apply a Quick Fix to your images as you process them. These fixes include Auto Levels, Auto Contrast, Auto Color or Sharpen.
You can also apply Labels to your image such as adding a watermark or caption by configuring the options in the Labels area.
When you are done, click Ok to process the folder of files or the group of files that you had selected for processing.

Tip
If you want to resize images so their longest edge is a set value such as 600 then you will need to presort Landscape and Portrait images into separate folders and process them separately.
Thursday, March 22nd, 2007
Pictures inside Excel comments
In a previous tip of the day, I showed you how to create shaped comments in Excel but today I’m going to go one step further and create pictures inside the comment.
As you might expect, start off in Excel and add a comment to a cell. Right-click the cell and choose Show comment and then click the border of the comment to select it. Choose Format, Comment and, from the Colors & Lines tab’s Color dropdown list choose Fill Effects and then the Picture tab and click Select Picture.
Find a picture to add to your comment from those in your My Pictures folder, enable the Lock Picture Aspect Ratio checkbox and click OK twice. You’ll now have the image inside your comment.
Depending on the image that you have used you may want to change the format of the text, for example coloring it a different color and sizing it large enough so that it can be easily seen.
For more tips and tricks and helpful Office columns, visit Projectwoman.com
Helen Bradley
Labels: comments, Excel 2003, images
Categories:Uncategorized
posted by Helen Bradley @ 6:27 pmNo Comments links to this post