Wednesday, February 3rd, 2010

Better Photos Tip #9 – Read the Histogram

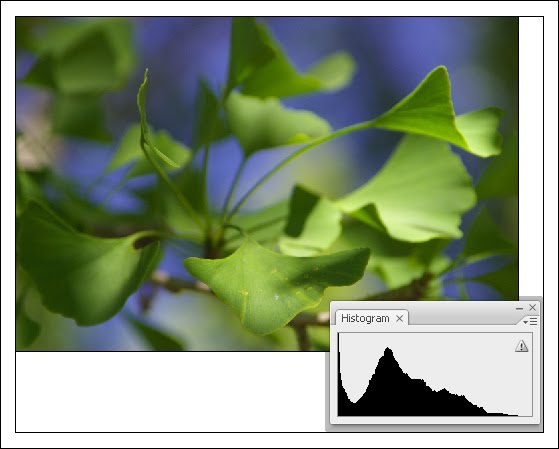
The image histogram on your camera shows the tonal range in the image, use it to assess the quality of the image. Here there is a little too much data in the shadows (we say the shadows are plugged) and we could adjust the exposure accordingly.

To understand if you need to adjust your exposure, check the image histogram in the camera rather than relying on the image that appears in the LCD screen.

The histogram gives you a graphical representation of the image’s tonal range. If the chart data doesn’t extend from one edge of the chart to the other, you will probably have a muddy lacklustre image.

If the chart is too far to the left, you need to lighten the image and if all the data is to the right the image is being overexposed.

If you’re using a digital SLR you control the exposure by enlarging the aperture or decreasing the shutter speed to let in more light or vice versa to reduce the amount of light.

On a point and shoot camera, the exposure compensation feature lets you adjust the exposure amount to compensate for lighting issues. Typically you can adjust the exposure by any amount in the range -2.0 – +2.0 to darken or lighten the image. 
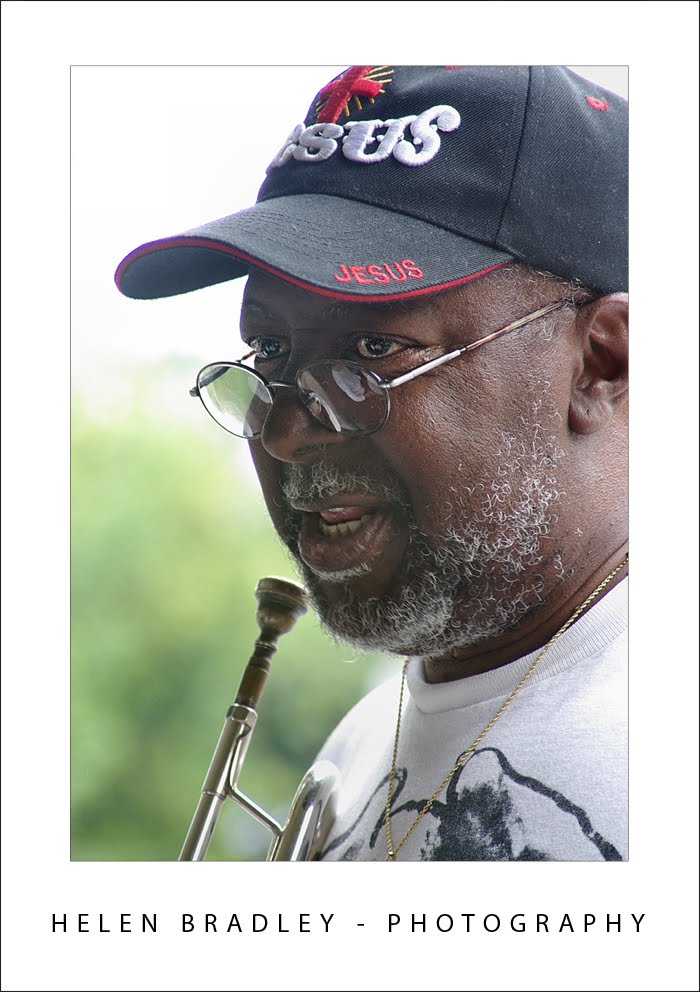
Exposure compensation was used here to expose this musician correctly against a very light background – I traded blown out highlights in the background for a properly exposed foreground.

Helen Bradley

Thursday, January 28th, 2010

Better Photos Tip #8 – Take 2 steps forward

When capturing an image, get in close to the subject so they fill your viewfinder.

If there is one technique most digital camera users can use today to instantly improve their photos it is to stand at least two or three steps closer to their subject.

Most photographers stand too far away from their subjects so the subject ends up being very small relative to the rest of the photo.

When you move closer to your subject you make them larger in the viewfinder so they fill the photograph.

The result is not only a much more interesting photo but, because the subject fills the screen, there is less distracting background detail. If you can’t get physically closer to your subject use the zoom on your camera to zoom in closer.

Helen Bradley

Sunday, January 24th, 2010

Better photos tip #7 – Don’t just look – See

When you really look at a scene you may find things to photograph you might not have noticed at first glance.

When you are looking for things to photograph, study your surroundings. There are plenty of photo opportunities even in places that look anything but photographic.

A good exercise for budding photographers is to set yourself a challenge to photograph a predetermined subject matter such as numbers, signs, a particular colour or shapes like circles or rectangles.

Go out with your camera and set yourself an hour to complete the task. When you set yourself a challenge to capture a particular subject, you have to look to find it in a larger scene.

As you do you’ll see a range of things that you may not otherwise notice.

Part of what sets a good photographer apart from a mediocre one is the ability to see the possibilities in a scene.

Helen Bradley

Wednesday, January 20th, 2010

Better photos tip #6 – Depth of field

This image shows a shallow depth of field – the statue is in focus but everything else is nicely blurred.

There is a benefit you get when you use the macro setting on your camera and that is that when you use it your camera generally captures the image using a very small depth of field.

Depth of field is the area in focus around and in front of and behind the subject of the image. When you have a large depth of field, everything is in focus and where the depth of field is small, only a very small portion of the image is in focus.

Shooting with a small depth of field requires some skill because you have to make sure that the subject itself is in sharp focus – so that the rest of the image is not.

Check the LCD screen or viewfinder to ensure that the subject looks crisp and in focus before shooting. When you have taken the shot, check the image and zoom in to it and make sure the subject looks sharp – the LCD screen preview at the regular size won’t show clearly enough if you have the subject sharp enough.

Depth of field will be a new concept if you’ve only used inexpensive film cameras in the past. Automatic film cameras shoot with a very wide depth of field so that everything in the photograph is in focus. In the days of film, only SLRs were capable of capturing images with a small depth of field.

Digital cameras changed that and many point and shoot cameras can capture images with smaller depths of field if you know how. The secret is in using the camera’s manual controls to set the aperture manually rather than leaving the camera to make the choice. This same option is available with digital SLRs and the results, because of the lenses you use, are generally better with a digital SLR.

For a small depth of field, adjust the aperture to a value such as f2.8 or f3.6 so it is very wide and so the camera takes in a lot of light. To get a large depth of field so everything in the image is in focus, use an aperture setting of f8 or f16 for example. This setting lets in less light so the shutter speed will be much slower than when shooting with an aperture value of f2.8 for example.

Helen Bradley

Tuesday, January 12th, 2010

Better Photos Tip #4 – No flash at night

When taking photographs at night, turn off the flash and take a long exposure to capture the lights.

When shooting a night time concert, sporting event or even the city lights you might think your camera’s flash is a necessity. Unfortunately it’s not only next to useless at a distance of over 2-3 metres but using it will force the camera to use a faster shutter speed than you need so all you’ll get is a severely underexposed image.

Instead, disable the camera’s flash and switch the camera to night mode shooting so it will meter for the surrounding darkness and set a slow shutter speed allowing you to capture the detail in the scene.

A downside of the slow shutter speed is that any camera movement will result in the subject being severely blurred. When shooting at night without a flash, use a tripod or brace the camera so that it does not move.

On the flip side, when you take long exposures at night you can capture light trails from car headlights and taillights as they pass in front of you which can look really great.

Helen Bradley

Friday, January 8th, 2010

Better photos Tip #3 – get down low

The best photos of animals and kids happen when you get down to their level.

When you are photographing children and animals, get down to their level so you shoot from the side and not the top of their head.

This may require you to sit on the floor or to put the animal or the child on a table or bench.

If you are capturing animals that move a lot it can be helpful if you have a handler to hold the animal while you take the photograph.

A good time to photograph the family cat is when they are basking in the sun or asleep.

Helen Bradley

Page 4 of 41234