Wednesday, July 17th, 2013

The simple secret to photographing silky smooth water

Fall in love with silky water photography – it’s so easy when you know how

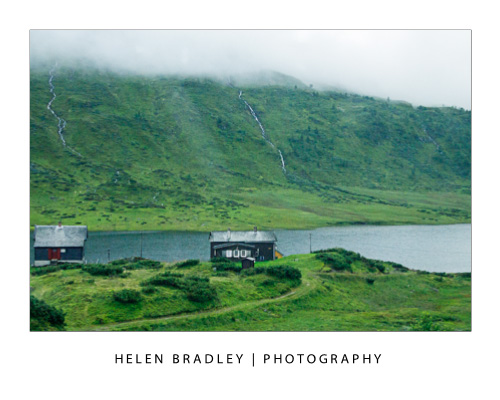
You have probably seen images like the one above that feature impossibly smooth water.

You might have even asked yourself how it was done? Or perhaps you think it is something that can’t be done without expensive equipment and lots of know how.

Well that’s not true. I shot this image with no extra equipment and I’m going to tell you how.

The secret is to shoot really slow. This image took 10 seconds to shoot.

Now I can’t stand still for 2 secs, much less 10 and neither can you so start by finding somewhere to put the camera. I found a place for it at ground level and took a test shot to see it would work, which it did. I backed off the zoom and the composition was pretty good.

So, I had a sturdy place to shoot from. Now, how to easily slow everything down?

You see, slow shooting is what you need for this image. In this night shot the only thing that will be moving a lot is the water. If you can capture the image over a long enough time the movement of the water will blur deliciously and the buildings will remain sharp. That’s the secret to the shot – a long exposure that blurs the water but leaves everything else nicely exposed and sharp.

One option for a long exposure is to use Tv mode on the camera – fancy speak for controlling the speed of the camera. I opted not to do this as I really wanted to use a small aperture and I didn’t want to let the camera choose the aperture size – it would have chosen too large a size resulting in a smaller depth of field – I wanted a deep depth of field so everything would be in focus.

I could have used Manual mode but then I’d have had to make calculations for the shutter speed – too much time and effort to get this right.

So, I selected Av or Aperture Priority mode and set the aperture to f/11. That is a very small aperture so the shot is going to take some time to capture – especially after dark. So far so good. But I wanted it to be slower still and I didn’t want a lot of  noise messing up the image.

The next setting was for ISO which is sensitivity. You use small values like 100 in the daylight and 6400 at night. I set it to 100 – totally the wrong setting for shooting at night because it makes for long shutter speeds but remember we want silky water so it works here. Also a small ISO like ISO100 means less noise than higher ISO values. Don’t get me wrong, I love noise in my images but in its place – I didn’t want it for this image.

So ISO100 both slows down the shot and reduces noise.

So, now the camera is set up, it is nearly time to shoot.

The final camera setting is to set it up for continuous shooting. Ideally you need to take a few shots at once so you want to press the shutter down and hold it and have the camera take a few shots in a row without you having to repeatedly press the shutter. The problem with pressing the shutter is that it moves the camera and movement = blur which is so not what  you want.

Continuous capture means you sit with your finger on the shutter so you don’t move much except on the first and last shot – that’s why you take a few – the first and the last will probably have movement because of the shutter press and release – the shots in the middle should rock!

Now place the camera in the place you already determined it is secure and steady. Steady yourself – I sat down beside it – press the shutter and hold it.

Wait through at least 3 shots (remember the first and last in the sequence are probably ruined so you need at least 3 and preferably more).

When the sequence is complete, review the shots, correct any issues and try again. I took about 4 series of 4+ images to get a couple that were great.


Helen Bradley

Wednesday, May 15th, 2013

How to photograph bluer skies

If the skies in your photos are a lighter blue than they should be here is how to capture bluer skies in your photos

If you find that the skies in your summer photos look less vibrant than they should consider investing in a polarizing filter.

A polarizing filter cuts out reflected glare and the result is that colours look more saturated so your skies look bluer. The polarizing filter will also allow you to capture, for example, fish in a pond rather than capturing the glare from the sunlight bouncing off the pond.

When purchasing a polarizing filter, make sure to select the right polarizer for your camera – some won’t work on a camera that uses a through the lens metering system. The polarizer is a glass filter that simply screws onto the lens on the camera so its diameter needs to match the size of the thread on your lens.

If you are using a point and shoot camera then you may need a special attachment to be able to add a polarizer to the camera.

When you are using the polarizer, screw it onto the camera and then turn the ring on it to find the position that gives the best results before capturing the shot.

Helen Bradley

Saturday, May 11th, 2013

Photography quick tip – find an angle

Do you always capture photos face on to your subject? If so, add some variety by finding a different angle to shoot from

To add interest to your photos, find a new angle to shoot from.

Instead of always shooting face onto your subject, get down low or get up high to capture something more interesting.

If your point and shoot camera has an adjustable LCD screen you can even get underneath objects like flowers for an even better result.

Helen Bradley

Saturday, April 20th, 2013

Spring photo inspiration and how to capture great flower photos

Capture the magic of spring with great flower photos

There’s simply no better time to get out and take photographs than in Spring. The weather is great, the colors are spectacular and the flowers are at their peak. Flowers are great to photograph – they don’t get fractious and they don’t blink so they’re good subjects to practice your skills on. Here, I’ll introduce some techniques to try that will ensure you get great photos.

Get up close and personal
When you see a wonderful flower to photograph, move very close so the flower fills the camera’s viewfinder or its LCD screen. When you are this close, the camera won’t focus properly unless you set it to Macro mode – this is indicated by the flower icon and it’s usually easy to find. If you can’t see it, check your camera’s manual to learn how to set this mode. With macro mode set, you should see the flower in focus and you can take the shot.

Macro mode not only ensures the flower will look crisp and in focus but it also has the effect of blurring out the background detail. In macro mode your camera shoots with a short depth of field so only objects on the same plane as the flower should be in focus, things closer to you or further away than the flower won’t be in focus. This is an effect that photographers try to achieve. It is, however, critical that your camera focuses on the flower.

To check the camera is focusing correctly press the shutter release half down and check the LCD screen. If the object is out of focus, let go the shutter release, move the camera so the flower is centred in the screen and press half down again. When the focus is correct, continue to hold the button half down as you move the camera slightly to compose the shot. Then continue to press the button to take the shot.

Even though the background in the shot will be blurred in macro mode, you should still check that any background that is visible is not distracting. If it will ruin your shot, move and try shooting from higher up or lower down so the background isn’t as visible.

Apply the rule of thirds
Apply the Rule of thirds to your flower photography. This rule says you should divide the area being photographed into a grid like a tic tac toe board. Place something of interest along one of the horizontal or vertical lines or where the lines intersect. The result is that you’re not centering everything – and your photo will look much better.

Vary your position
Don’t take all your photos close up and, instead, look out for opportunities to photograph masses of flowers. If you position yourself carefully you can make a bank of flowers look as if they go on forever!

Include the kids
Occasionally, include children or other people in your flower photos for some added interest.

Shoot side on and from underneath
Vary how you shoot your flowers too. While it is typical to take photos of a flower looking into it, you don’t have to take them this way. Shooting from the side will show the shape of the flower and, in some cases, this is what makes them compelling subjects.

Unusual photos can also be taken shooting blind from under the flower. To do this, you’ll benefit from having a polarizing lens on your camera particularly if you’re photographing on a sunny day. This will cut a lot of the glare and give you deep saturated colors. Hold the camera at ground level under the flower and shoot up through the flower to the sky avoiding shooting direct into the sun. The results you’ll get will be of the “hit or miss” variety – because you can’t see what you’re shooting you’ll have to try a few times until you get results you like. However, you’ll get a totally new perspective on things and you just might be surprised at how interesting the photos are.

Walk and snap
If you’re lucky enough to live in a rural area, take a walk along your favorite towpath or lane and capture the wild flowers that are so often overlooked as subjects for photography. If you live in a city – visit a local park or photograph the colorful display of a local flower vendor. When you’re shooting up close, one flower is all you need to get a wonderful shot.

Helen Bradley

Friday, April 12th, 2013

Talk to the Animals – Photograph at the Zoo – Part 2

Photographing at the zoo offers unique opportunities for getting great animal photos

Zoos are a great place to polish your photography skills and to get photos of animals and birds you may never see otherwise.

However, just because the animals are caged doesn’t mean they are easy to photograph so there is plenty to think about and work around.

The plus is that your perseverance will be rewarded and you can get some truly great photos if you know how. Here are some tips for a successful day photographing at the zoo.

Camera settings

To get in close to the animals, use the longest zoom lens you can handle. The downside of a zooming in close with a big zoom lens is that any movement will be exaggerated so you will need to hold the camera steady to capture the shot in focus.

Using a large aperture like such as f3.8, f4.0 or f4.5 will let more light into the camera so the exposure time can be reduced to help you get sharper images. Also consider increasing the ISO to get a faster shutter speed.

A side benefit of using a large aperture on the lens is that you will get a shallower depth of field around the subject and the background and foreground will be blurred. When you’re shooting at the zoo this is an advantage as it minimizes the impact of cages and man made objects.

Just ensure that the camera focuses accurately on the animal you are photographing because of this short depth of field is a double edge sword – if you’re not focused tight on the subject it will be out of focus.

Shooting in low light

Some displays at the zoo are indoors and to shoot in these low light conditions start by adjusting your camera’s ISO equivalency to a high value such as 800, 1,600 or 3,200.

At these settings the camera is more sensitive to light so you can capture your image without using a flash. Not only is the use of a flash typically not permitted in indoor displays, it is also unlikely to give you good results because, instead of lighting the scene it is more likely to bounce back at the camera or wash out the scene.

Take care to adjust for what lighting there is in indoor displays. Very often the lights throw an orange or green cast over the image.

Adjust the white balance setting on the camera to negate the cast and you won’t have to clean up your photographs later on.

What to capture


When you’re planning what to shoot, look for opportunities such as capturing an animal when it is looking directly at you.

To do this, you will need to be in a good position relative to the animal and you will need to be patient – and lucky.

Another option is to capture the animal where you can see its eyes and when it is doing something interesting like eating or yawning. Again, take your time, be ready with your camera positioned and be patient.

In some circumstances you may find yourself forced to shoot through glass or perspex. Walk around the area to find a good place where there are minimal reflections and where dirt on the window won’t be distracting.

If you’re forced to shoot an animal through a fence, get close to the fence so you can shoot through gaps in it or make the fence an interesting feature.

Even if you’re forced to crop parts of the animal away to get a clear shot you can still end up with a worthwhile image.

Of course, always photograph from a safe distance – some animals are belligerent and dangerous and up close to a fence won’t be safe if they are the other side of it.

If you have the luxury of spending time with animals that are active and in a good position for you to capture them, spend the time you have wisely.

Take your time

Instead of taking a couple of good shots and moving away from the animal, wait around to see what creative opportunities arise that might give you a great shot.

By waiting, you may find the animals interact with each other, playing or fighting or that they arrange themselves in interesting patterns that turn a good photograph into a great one.

When you’re next looking for an opportunity to hone your photography skills it may be time for a visit to your local zoo to take advantage of the wealth of photographic opportunities offered there.

Helen Bradley

Tuesday, April 2nd, 2013

Photographing in the Midday Sun Part 3

Here are some more techniques for capturing great images in full sun

The worst possible time to take photos is when the sun is overhead. But that doesn’t mean you should head home, because you can capture good images even when the light is harsh. Here are some techniques to put to use at midday:

Capture Reflections

You can capture reflections in just about any light and when the sun is at its highest you’ll find interesting reflections where one building is reflected in another and also reflections in water such as in fountains and lakes where the surrounding areas are reflected.

If the water is still the reflections will be perfect and if the water is rippling you may capture abstract patterns. If you are experiencing sunshine after rain look for water on the ground so you can capture things reflected in puddles. In fact, reflections can be an interesting way of capturing a tourist attraction in a way that it’s different to what you’ve ever seen before.

Capture shadows

With the sun high overhead, anything between the sun and the ground or the face of a building will throw strong shadows. By looking for shadows, you can often capture an interesting image either by capturing the shadow rather than the object itself or by getting both the object and its shadow. The brighter the sun the crisper the shadows will be so look for an interesting contrast between the shadow and its surrounds.

Shadows are like reflections in that you won’t necessarily see shadows or reflections until you train your eye to look for them. When you do start looking for them you’ll see shadows and reflections everywhere and you’ll wonder how you ever missed seeing them before.

Capture Lens Flare

When the sun is very bright, you’ll find that shiny objects result in little flares where the sun hits them. These flares can make an attractive star shape and add sparkle to your images. You might also see interesting patterns where the sun is filtered through trees or along narrow alleys between buildings. Look out for these opportunities to capture light that you won’t see at other times of the day.

When capturing a lens flare you’ll may need to slightly underexpose the image so the flare is captured as a subtle star rather than an overexposed white blob. To do this, adjust your camera to manual mode and increase the shutter speed or reduce the aperture to underexpose the image.

Alternatively use the camera’s Exposure Compensation (EV) adjustment to underexpose the image. You will need to experiment with the setting but start with around -1 (one stop underexposed) and adjust from there. The result should be an underexposed image with a good looking flare. You can adjust the remainder of the image in post processing to bring back some detail. If you capture the image in a raw format, you will ensure you have plenty of image data to work with in post processing.

Go for Hot!

In bright sunlight colors can look very rich indeed. If you can zoom in to get the color and avoid excessive shadows or bright spots you can capture color that is nearly impossible to get in other light.

This car image was shot on a blistering hot day with high overhead sun in horrible conditions for photographing. By zooming in to remove all the background and choosing a great vehicle to shoot I’ve captured an image rich with color that would have looked a lot duller in other light.

Helen Bradley

Wednesday, March 13th, 2013

Updated review – Photoshop Express for the iPad

I’ve been revisiting some of the apps I’ve previously reviewed to see what changes have been made to them recently and how they have developed. One of these apps is Adobe Photoshop Express for the iPad. This app is free but it does have some in app purchases – one of which – the Camera pack that includes Noise removal – you can safely ignore. I think it is expensive and not worth the $4.99 that Adobe charges for it. However, ymmv.

The free Effects in Photoshop Express are pretty limited and there are just nine of them so unless you buy the add on Effect Pack ($2.99) you won’t have a lot of creative options. That said, the Effect Pack has a lot of fun effects in it. You could get access to similar effects for free in other apps, but if you want everything in one place you might consider this pack worth shelling out for. There is also a Border pack for 99¢.

Like many free apps the add on borders and effects are shown in the app so you can see them but not use them unless you buy them. You can’t hide them either so this might be a bit off putting – personally I’d rather not see what I don’t own, but that’s my take on it.

One change to the app that I like is the on screen prompts showing you how to use the app. This was a huge complaint that I had initially with the app as it had no indication as to how you made your adjustments. I thought at the time that this made it very hard for inexperienced users to use the app as it wasn’t clear how to do so. In a free tool aimed at beginner users I thought this was inexcusable.

Now the first time you choose an option like Brightness and Contrast an overlay appears showing you how to adjust these options. It’s much less confusing and a whole lot easier to work with. So much so that I’d wholeheartedly recommend this app for beginner to intermediate users.

In Photoshop Express you can edit images from your Camera Roll or capture images using the app. What you cannot do is upload images to Adobe Revel – the new online replacement for photoshop.com (and which was previously called Adobe Carousel – have I confused you yet?). You can also not download images from Adobe Revel to edit them in the app. Since Adobe owns all these sites and apps it would be nice if all its apps and storage locations talked to each other instead of operating in isolation.

Other changes I noticed is that the feature for adding effects and borders has been revamped allowing you to see the full range of effects and borders in one large screen already in place on a small version of your images. Those that are not enabled have a blue mark on the corner and there is a shopping cart link in the bottom right of the screen that you can use to buy add on packs, if desired.

So far as sharing is concerned, Photoshop Express is light on options when compared with some other apps. You can share to Facebook, Twitter, Tumblr and email images but that is all. You can also save images to your Camera Roll.

In all, the changes to Adobe Photoshop Express are welcome and make the app a lot more usable for its target audience. I now actually like this app and would heartily recommend it particularly for beginner to intermediate users looking for a simple and easy to use photo fixing tool.

Helen Bradley

Tuesday, October 30th, 2012

7 Camera Settings for Capturing Better Photos

Whether you are using a Point and Shoot or a DSLR camera here are seven camera settings that will help you capture better photos:

Tip 1 – Adjust for light

Most digital cameras, in particular SLRs, let you select ISO film equivalencies. Choose 100 – 200 sensitivity for photographing in bright light conditions and use 400 – 800 when there is less light.  In very poor light you can capture at 3200 – 6400 or higher but you will find that, as a result, there will be more film grain visible in the final image a a result.

To capture an image like this at night you should have an ISO setting of at least 800 -1600 or higher and a tripod to steady the camera.

Tip 2 – Choose your mode

Most cameras, in particular point and shoot cameras have settings for portrait, landscape, night shooting, sports, etc. Choose the correct mode for the type of conditions and the camera will automatically configure the ideal settings to ensure the best shots in the available light conditions.

For an image like this choose Landscape mode so it is all in focus.

Tip 3 – Depth of field

Use your camera’s Aperture Priority setting and set the aperture to a small f stop such as 2.8 to capture photographs with an interesting depth of field. Focus the camera on the object to appear in focus and, when you do, objects in front and behind this object will appear pleasingly out of focus.

Here I focused on the girl in front with a very small f stop and she is in focus – the girl facing us is not.

Tip 4 – Axe the digital zoom

Of the two types of digital camera zoom, which you will find in both point and shoot cameras and camera phones only Optical Zoom is a true zoom . If your camera offers digital zoom it is best to disable it or avoid using it. Digital zoom merely increases the size of the image captured and crops away the area not required. Optical zoom actually zooms into the scene to capture it at full size.


Tip 5 – Adjust exposure

Avoid over or under exposed photos using your camera’s exposure compensation settings. These can usually be adjusted to somewhere between -2 to +2EV. To lighten a shot use + values and to darken one, use – values.

Here is the same Boston building captured at -2, 0 and +2 exposure – the one on the right is the better exposed shot.

Tip 6 – Set the correct White balance

Different light sources throw different color casts onto your photos. For instance, inside lighting such as florescent and tungsten globes will throw blue/green or orange tints onto your image. When shooting indoors without a flash, set the white balance mode to match the light source, to remove any undesirable color cast.

This camera is set to an ISO of 80 (suitable for a very bright day) and AWB – Auto White Balance – this  means the camera will adjust the white balance – not good for indoor shooting but should be fine out of doors in full sun.


The image on the left was shot in tungsten light with no white balance adjustment. The one on the right was shot in the same position but with white balance set to tungsten light – the color is much improved.


Tip 7 – Set the Flash

Use your flash when capturing portraits on a very bright day. While it may seem counter productive, the flash will light your subject’s face and avoid the deep shadows that the overhead sun will cast on their face.

On the left the little girl is captured with no flash and over head sun. On the right I fired the flash and her face and clothes are more evenly lit.


Helen Bradley

Saturday, October 20th, 2012

How to shoot from a (fast) train


Ok, I’ve struggled with taking good shots on trains for a while now. The biggest problem is that by the time I know I have bad results it’s just impossible to go back and try to fix the problem.

Recently,  on a trip between Bergen and Oslo in Norway I nailed the shoot and ended up deleting only one third of my shots. There’s no way you won’t mess up a lot of your shots when shooting from a train or fast moving car, but with these tips you can make the percentage that are keepers so much higher.

First of all you have a choice between noise and blur. You need to bite the bullet on this – you can get sharp images but you might have a bit of noise. Personally, I actually like some noise and I think it’s fine. But, if you can’t live with some noise it might be as well to pack your camera away and just enjoy the trip.

Second you need a small aperture so you get a lot of the image in focus. I shoot at 7.1 or 8 which is pretty small so it  requires a corresponding high ISO to compensate. So, I dial up the ISO to 1600 and sometimes 3200. That is very sensitive but it means I can capture at speeds like 1/2000 of a second or even much faster than that – and that freezes the motion.

Third, you need to use manual focus. Unless you have a stupid fast focus on your camera it will get caught trying to focus and refocus and you won’t ever get a shot as the train moves. The autofocus will  be confused by things going fast close like trees, tall grass and power poles. If you manually focus you can work faster and ignore distractions. I have to say, I practically NEVER shoot manual so in shooting manual in this situation I’m doing this because there really isn’t any alternative to doing so.

Fourthly, the grass is always greener on the other side of the train. You will always think your side of the train has nothing interesting and it is all on the other side. This probably isn’t the case so don’t keep running back and forth  across the train. Instead, focus on what is on your side of the vehicle, learn to anticipate what you might see so you can react to it instantly when you see it.

Fifthly, I like to sit facing backwards so things move away from me and in a window seat of course. YMMV on this.

Once you are set up, find a direction to shoot that minimizes the reflections from the train window and inside lighting and start shooting. Accept the fact that trees and poles will mess up a lot of shots but if you take more than the usual number of pictures you will get a good number of good shots. Also accept that you will miss more than you capture depending on the situation. On my trip across Norway trees, power poles, tall grass and numerous tunnels played havoc with my shooting but the skies were wonderful and I did nail some really great shots and i felt way more in control of the shooting than ever before.

So, next time you are. on a fast train traversing a continent, set your camera up and enjoy the shooting experience.

Helen Bradley

Tuesday, February 22nd, 2011

Photography – why you should use a polarizer

Polarizer.jpg

Using a polarizing filter on your camera’s lens ensures crisp blue skies and saturated colours even as here, when shooting into the sun.

You may have already noticed that you can encounter problems you’re capturing photos in very bright sunlight. On the beach, for example, you may find your camera exposes for the lighter areas leaving the remainder of your photograph underexposed and very dark.

In bright sunlight you can benefit from using a Polarizing Filter over the lens of your camera. These filters are obtainable for most DSLR cameras and simply screw onto the lens.

For a point and shoot camera you’ll need to determine if it can take a polarizing filter either on a bracket that screws into the camera’s tripod mount or, in some cases using a special adaptor called a tele converter that screws over the lens and that has a screw mount for the filter.

Image showing a polarizing filter for a dslr and one for a point and shoot which uses a tele converter to mount it

How to buy

When purchasing a polarizing filter for a digital camera you will generally want to purchase a circular polarizer. The other option is a linear polarizer – however circular polarizers are typically recommended for cameras that meter through the lens (TTL) which is what a digital SLR does.

When using your polarizing filter notice it has a marker on it that you can use as a reference point for adjusting it. Look through the viewfinder and turn the filter slowly. As you do this you will notice that the preview will change.

At some point of the rotation it may have no effect at all and at other points it will have an increasingly strong effect. Turn it until you get the effect you are looking for which is good rich color and no washed out skies. When you find the sweet spot go ahead and capture your photo.

A polarizing filter will give you better colour saturation and brighter, bluer skies. It’s also a good filter for photographing things under water from above the water surface such as a tropical reef or seaweed because it cuts out the sun’s reflection on the water surface allowing you to capture the underwater detail.

This blue sky would have been washed out if the photo had not been captured using a Polarizing filter:

An image shot using a polarizing filter to ensure rich blue skies

Helen Bradley

Page 1 of 3123