Saturday, May 18th, 2013

View Offline in Google Docs


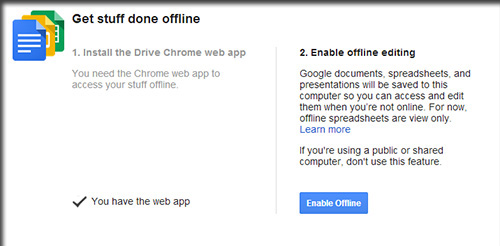
You can easily enable offline viewing of any Google Docs documents. By default this ability is turned off, so you may want to enable it for emergency situations if you rely on Google Docs for viewing and editing important files. Keep in mind that you must be using Google’s Chrome web browser to do this. Chrome can be downloaded here. Also note spreadsheets can only be viewed, not edited, using this method.

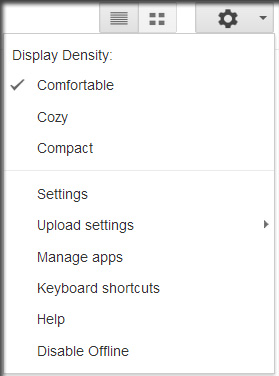
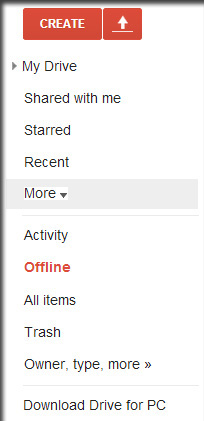
To do this, go to your Google Drive and click the More button along the left side, under the Create button. This will open a small dropdown menu that includes the Offline option. Select this, and then follow the simple instructions to enable offline mode. This really involves just two clicks and some waiting. Once you have selected the Enable Offline button, you’ll have to wait some time so that all of your documents can be downloaded to your computer for offline storage. All offline documents will be listed in the Offline section once this is done.

If you want to disable offline editing for any reason, simply click the gear icon toward the top right of Google Drive and select Disable offline.


Helen Bradley

Wednesday, March 13th, 2013

Updated review – Photoshop Express for the iPad

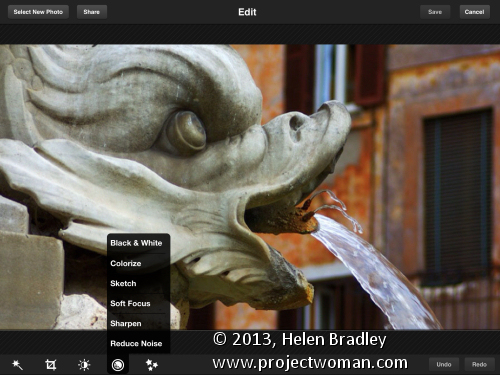
I’ve been revisiting some of the apps I’ve previously reviewed to see what changes have been made to them recently and how they have developed. One of these apps is Adobe Photoshop Express for the iPad. This app is free but it does have some in app purchases – one of which – the Camera pack that includes Noise removal – you can safely ignore. I think it is expensive and not worth the $4.99 that Adobe charges for it. However, ymmv.

The free Effects in Photoshop Express are pretty limited and there are just nine of them so unless you buy the add on Effect Pack ($2.99) you won’t have a lot of creative options. That said, the Effect Pack has a lot of fun effects in it. You could get access to similar effects for free in other apps, but if you want everything in one place you might consider this pack worth shelling out for. There is also a Border pack for 99¢.

Like many free apps the add on borders and effects are shown in the app so you can see them but not use them unless you buy them. You can’t hide them either so this might be a bit off putting – personally I’d rather not see what I don’t own, but that’s my take on it.

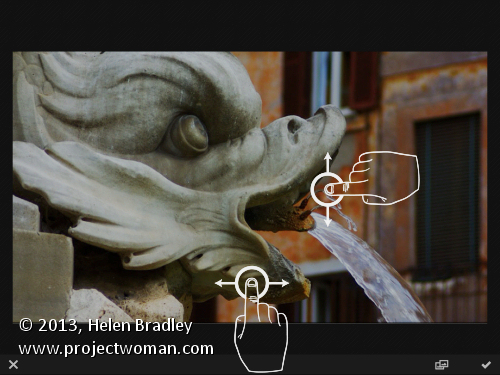
One change to the app that I like is the on screen prompts showing you how to use the app. This was a huge complaint that I had initially with the app as it had no indication as to how you made your adjustments. I thought at the time that this made it very hard for inexperienced users to use the app as it wasn’t clear how to do so. In a free tool aimed at beginner users I thought this was inexcusable.

Now the first time you choose an option like Brightness and Contrast an overlay appears showing you how to adjust these options. It’s much less confusing and a whole lot easier to work with. So much so that I’d wholeheartedly recommend this app for beginner to intermediate users.
In Photoshop Express you can edit images from your Camera Roll or capture images using the app. What you cannot do is upload images to Adobe Revel – the new online replacement for photoshop.com (and which was previously called Adobe Carousel – have I confused you yet?). You can also not download images from Adobe Revel to edit them in the app. Since Adobe owns all these sites and apps it would be nice if all its apps and storage locations talked to each other instead of operating in isolation.

Other changes I noticed is that the feature for adding effects and borders has been revamped allowing you to see the full range of effects and borders in one large screen already in place on a small version of your images. Those that are not enabled have a blue mark on the corner and there is a shopping cart link in the bottom right of the screen that you can use to buy add on packs, if desired.
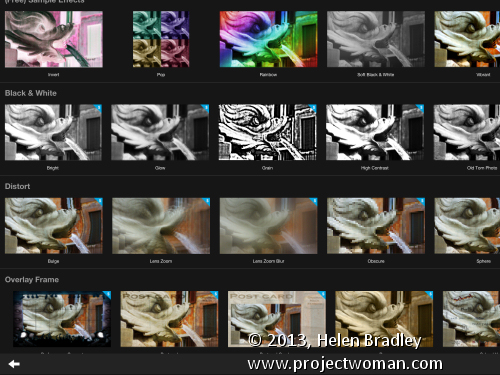
So far as sharing is concerned, Photoshop Express is light on options when compared with some other apps. You can share to Facebook, Twitter, Tumblr and email images but that is all. You can also save images to your Camera Roll.

In all, the changes to Adobe Photoshop Express are welcome and make the app a lot more usable for its target audience. I now actually like this app and would heartily recommend it particularly for beginner to intermediate users looking for a simple and easy to use photo fixing tool.

Helen Bradley
Tuesday, November 20th, 2012

Photoshop – Understanding Smart Objects

Smart Objects are a great tool for working with images in Photoshop but did you know there are two ways to make copies of them. One way you duplicate the Smart Object so every instance of it will always be the same image and the other way you copy the Smart Object but unlink it so you can change out one image without changing the other.

Also make sure to watch my video on Smart Objects here.

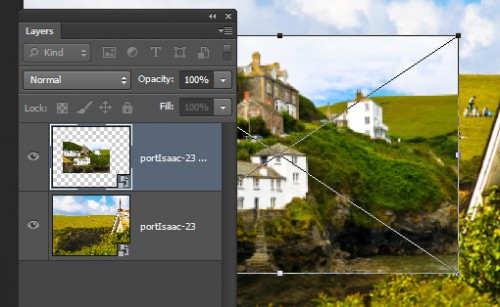
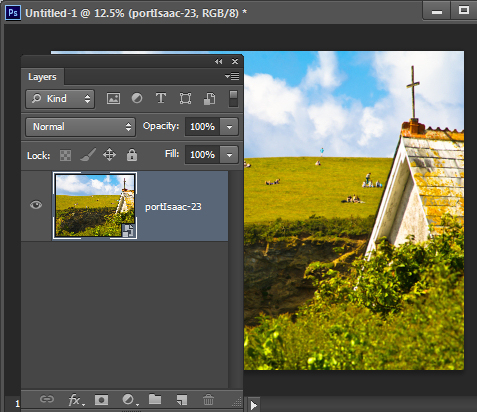
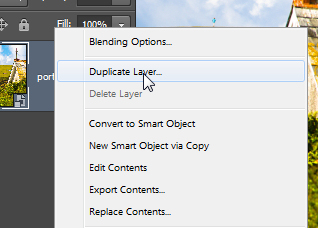
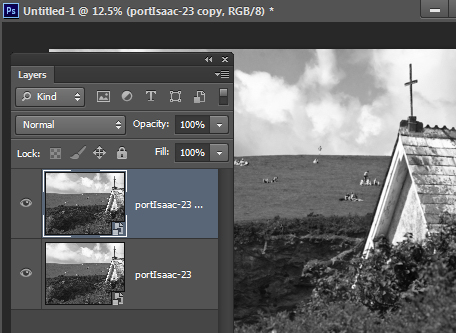
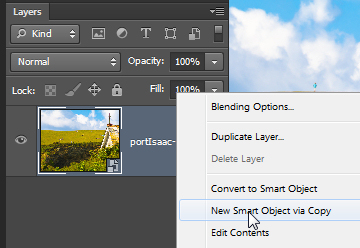
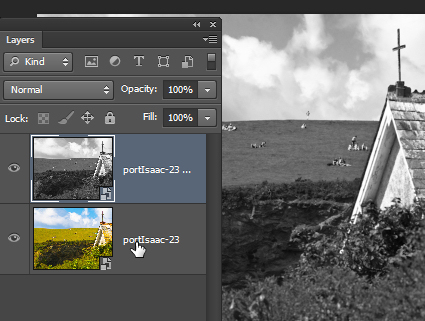
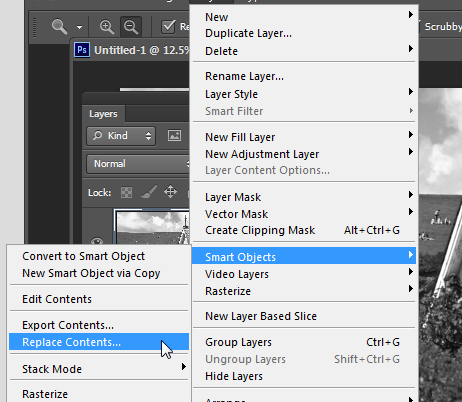
Here’s how it works: Start with a new Photoshop document and add an image as a Smart Object – my favorite way to do this is to choose File > Place and place the image inside the file.  This gives you one image as a Smart Object in the Layers palette. Now, the first way to duplicate a Smart Object is to right click and choose Duplicate Layer. This makes an exact copy of the layer so anything you do with the Smart Object on this layer will be done to both layers. Here I double clicked on one of the layer thumbnails and opened the actual image on that layer. I converted it to black and white then closed and saved it and this is what I have now in Photoshop. The two Smart Object layers are both changed. The alternative is to right click the Smart Object layer and choose New Smart Object via Copy. You get the same result as the earlier option with one exception – the two images are separate and they can be altered individually. Here I did the same alteration as before, only this time the image on the top layer is changed an not the one on the bottom layer. If desired you can change the image on the layer. To do this, click the layer to select it and choose Layer > Smart Objects > Replace Contents. Locate a different image to use, click it and click Place. Here I have resized the placed image so you can see they are different. If I had done this with the Duplicate layer then both images would be replaced. Which of these options you use really depends on what you want to do with the image. Sometimes  you want two of the same image, sometimes not.

Helen Bradley
Tuesday, July 3rd, 2012

Clean up scanned line drawings in Photoshop


We hand draw a lot of images that you can buy and use as borders for your photos. These scanned sketches need to be cleaned up before selling them as there is often some residual mess from the scanning process.

Some of this might be dust on the scanner glass and occasionally we get small ink dots on the paper.

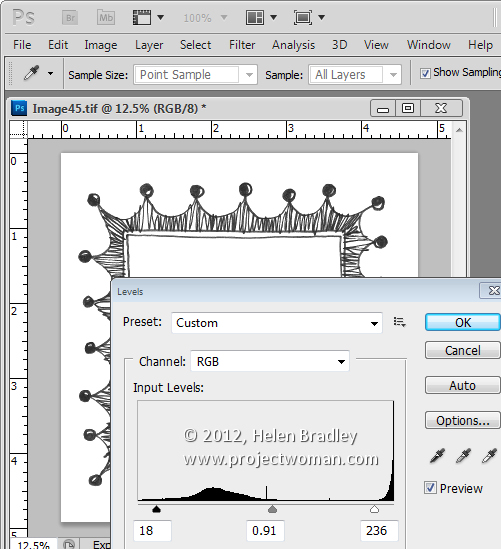
To remove these flaws from the scans once the scans have been made, we use Image > Adjustments > Levels and drag inwards at both ends of the slider to make the blacks blacker and the lights lighter. Sometimes a midtones adjustment is made to darken the blacks too. This fix gets rid of any small discolorations on the paper.


Then obvious problems can be fixed by painting over them with a white brush.

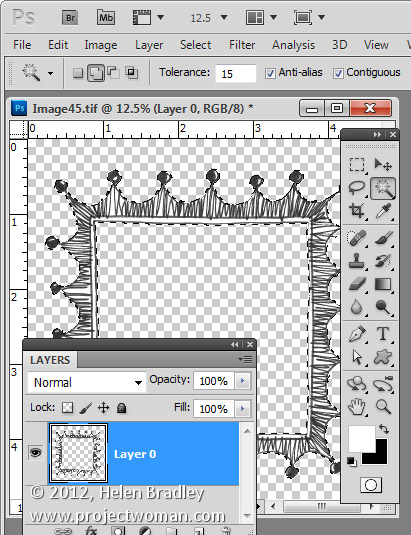
One other way to clean up when you got black line art on white paper is to make a selection of the white content. Start by making the background layer a regular layer by double clicking on it in the Layers palette. Set the Tolerance for the Magic Wand to ten or fifteen and click on the white areas to select all the white content. Then delete by pressing Delete.


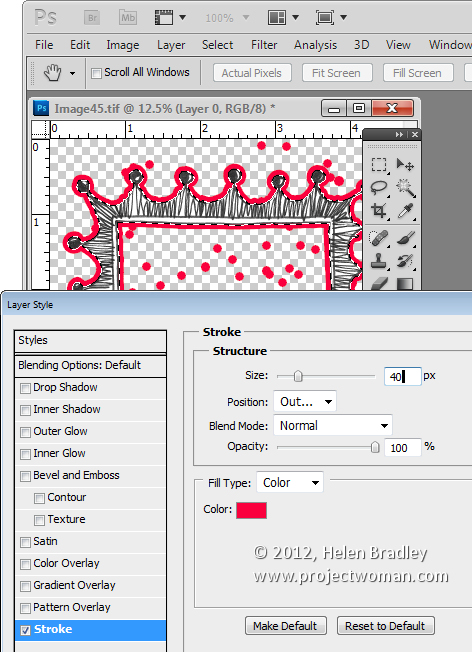
Now click the Add a Layer Style icon at the foot of the Layer palette. Choose Stroke and create a stroke that is red in color and quite big – just how big depends on the image – here mine is 40 pixels in size.


What this stroke does is to identify where the spots are on your image. Everywhere there’s a red dot on the image there is a stray tiny black or colored dot on the image itself – right in the middle of the red dot. It is this dot that is surrounded by your coloured stroke and the colour just makes it easier to find and fix it.

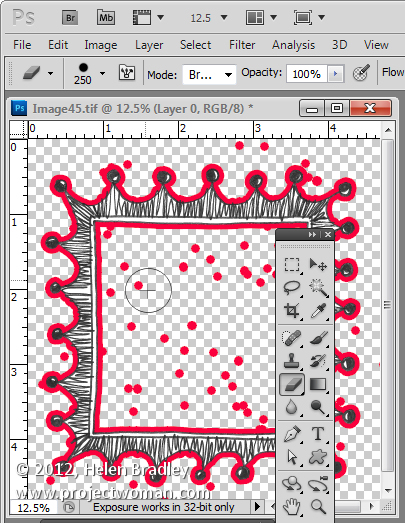
Grab a small hard edge eraser and start erasing the problem areas. All you need to do is to click in the middle of a dot and the problem will disappear. Make sure not to get too close to the lines if yours are uneven as there will be some natural bumps in hand-drawn images but you don’t want too much.


When you’re done and everything is nice and clean drag and drop the stroke layer into the trashcan.

Then you can put fill the areas you want to fill back with white by setting white as the foreground color and use the paint bucket to fill the empty spaces with white. Alternately add a white filled layer below your image and merge the two layers together.

If you like this frame, it and others are for sale for less than a buck for 10 here.

Helen Bradley
Monday, June 25th, 2012

Dreamweaver to Photoshop


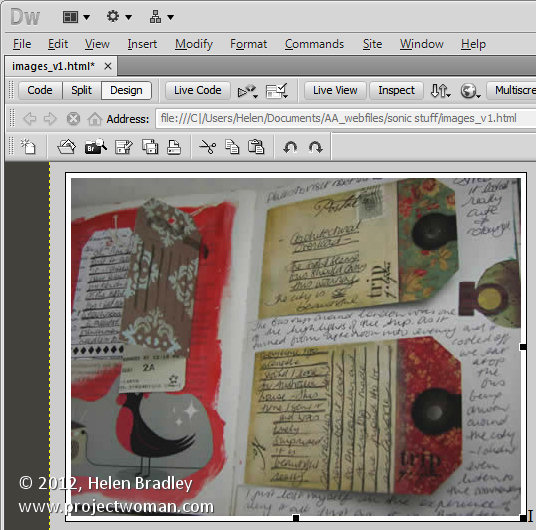
While Dreamweaver has some rudimentary tools for photo editing, if you want to do some real image editing, you’re better advised to take the image to a photo editor to do so.

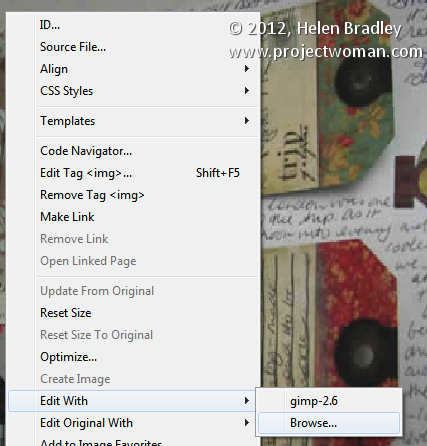
From Dreamweaver you can send an image to Photoshop by right clicking it and choosing Edit With > and choose the image editor to use from the list. If Photoshop is not in the list you can browse to find it, if desired.


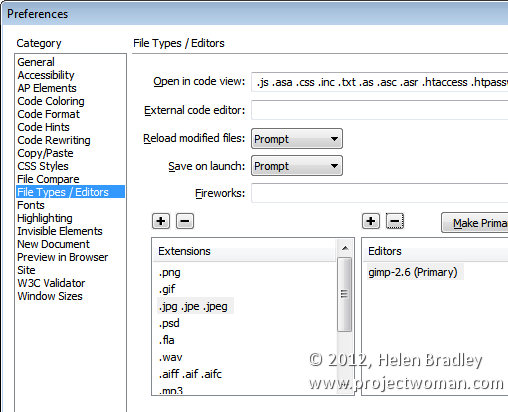
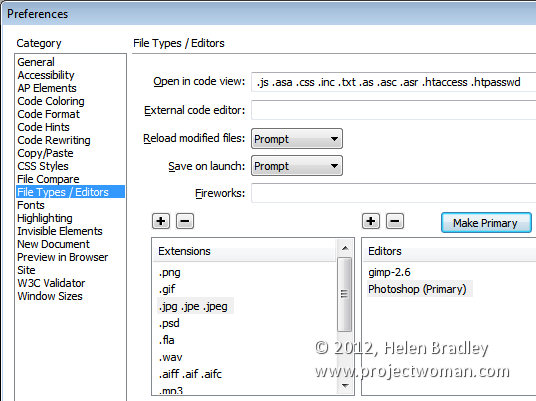
However, it’s better still to add Photoshop permanently to the list and to do this, choose Edit > Preferences > File Types/Editors and in the Extensions list, select the file extension to set the external editor for. In most cases you will be choosing .jpg .jpe .jpeg.


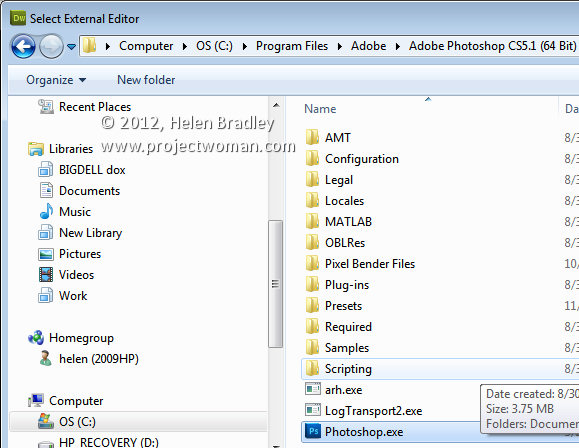
In the Editors box, click the plus (+) symbol above the box and browse to find the executable file for your version of Photoshop (or another program if desired). In most cases this will be in your C:\Program Files or C:\Program Files (x86) folder.


You can make an editor the primary one by selecting it in the list and choose Make Primary and then click Ok.


Next time you choose Edit With, you’ll be able to choose Photoshop and the image will be passed from Dreamweaver to Photoshop – if Photoshop isn’t open it will be opened automatically for you.

Helen Bradley
Monday, February 26th, 2007

Smarter editing in Microsoft Publisher

When you’re working with large pieces of text in Microsoft Publisher, you may find it easier to work in Word rather than Publisher. This way you can concentrate on your text without having to deal with layout issues.

Then, when you have finished settling your text, import it into a Publisher text box by clicking in the text box and choose Insert, Text file and browse to locate and import your file.

On the other hand, you can edit a piece of text in Word from inside Publisher if you right click a text frame in Publisher and choose Change Text, Edit Story in Microsoft Word to export it to Word. When you’re done, choose File, Close & Return to return to Publisher.

Helen Bradley