Friday, March 22nd, 2013

Sync photos from iPad or iPhone to your Mac

Learn how to download photos from your iPad or iPhone to your Mac


I’ve been using iCloud on the PC for a while now to sync photos from my iPad to my PC and it works well. On my new Mac, however, I had a problem, you see the feature is built in so you don’t have to install it – but you do have to find it! Here’s how:

1. Assuming you already have an iPad or iPhone and you have been taking photos with it, then you want to get them to your Mac. Start on your iPad and make sure it is set to sync. Do this in Settings – scroll to find Photos & Camera and make sure that My Photo Stream is turned on. This means that when you are on a wifi connection your photo stream will be synced with iCloud.

Note:
The photo stream has some limits. One is that iCloud itself only stores images for 30 days so after that they disappear. However provided you are connected via wifi on a regular basis these will be synced frequently so that won’t be a big issue.

On a device like the iPad and iPhone the photo stream will only contain those most recent 1,000 images – older ones are removed. This is because you have less space on your iPad and iPhone than on a Mac or PC. Remember too that the photo stream contains images from the iPad/iPhone and from your Mac or PC so this 1,000 image limitation is for images from all devices in total, so it’s not as big as it might seem.

On the PC that is less of a problem because you have a special Photo stream folder that you put images into to sync them, so you know how many you are putting there. It is more of an issue on the Mac because the process is more automated so you have to be mindful of what is happening. On your Mac or PC all the images from your Photo stream are stored – because there is more storage available on them.

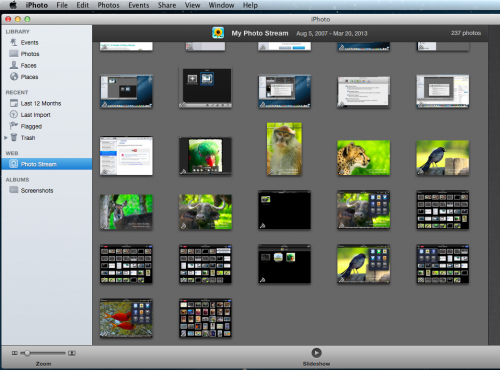
2. To set up the Mac. You need to click iPhoto to launch it and then click Web: Photo Stream and turn this on.

3. Now, if you are connected via wifi you can wait as your photo stream downloads automatically for you otherwise this will happen automatically next time you are connected.

Once images are downloaded to iPhoto they will be added to the Photos folder so even if you turn off Photo Stream at some time the images that are already downloaded will have be stored there permanently.

Helen Bradley

Tuesday, July 3rd, 2012

Clean up scanned line drawings in Photoshop


We hand draw a lot of images that you can buy and use as borders for your photos. These scanned sketches need to be cleaned up before selling them as there is often some residual mess from the scanning process.

Some of this might be dust on the scanner glass and occasionally we get small ink dots on the paper.

To remove these flaws from the scans once the scans have been made, we use Image > Adjustments > Levels and drag inwards at both ends of the slider to make the blacks blacker and the lights lighter. Sometimes a midtones adjustment is made to darken the blacks too. This fix gets rid of any small discolorations on the paper.


Then obvious problems can be fixed by painting over them with a white brush.

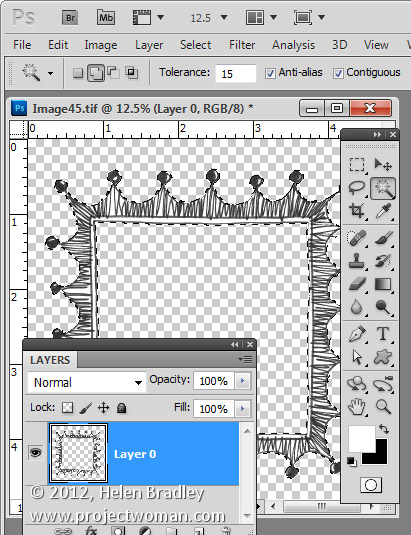
One other way to clean up when you got black line art on white paper is to make a selection of the white content. Start by making the background layer a regular layer by double clicking on it in the Layers palette. Set the Tolerance for the Magic Wand to ten or fifteen and click on the white areas to select all the white content. Then delete by pressing Delete.


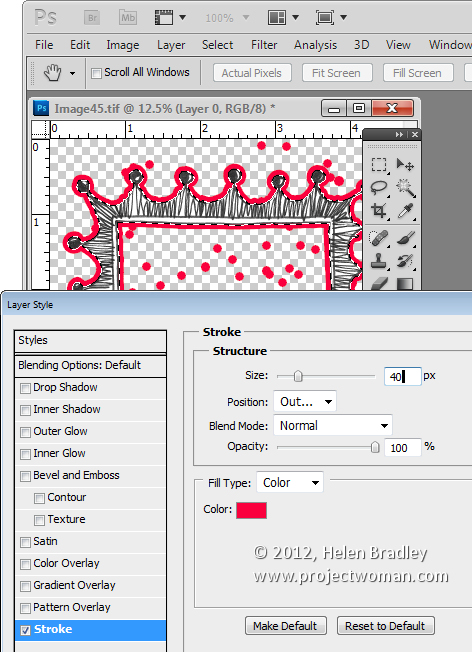
Now click the Add a Layer Style icon at the foot of the Layer palette. Choose Stroke and create a stroke that is red in color and quite big – just how big depends on the image – here mine is 40 pixels in size.


What this stroke does is to identify where the spots are on your image. Everywhere there’s a red dot on the image there is a stray tiny black or colored dot on the image itself – right in the middle of the red dot. It is this dot that is surrounded by your coloured stroke and the colour just makes it easier to find and fix it.

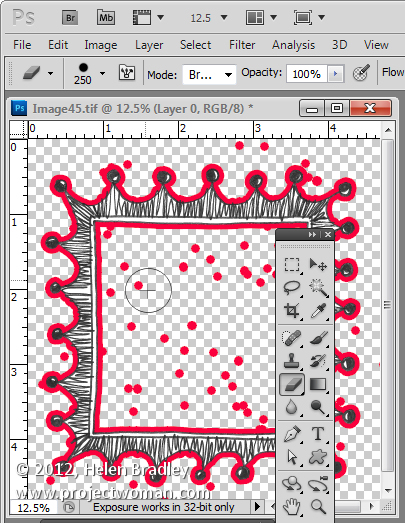
Grab a small hard edge eraser and start erasing the problem areas. All you need to do is to click in the middle of a dot and the problem will disappear. Make sure not to get too close to the lines if yours are uneven as there will be some natural bumps in hand-drawn images but you don’t want too much.


When you’re done and everything is nice and clean drag and drop the stroke layer into the trashcan.

Then you can put fill the areas you want to fill back with white by setting white as the foreground color and use the paint bucket to fill the empty spaces with white. Alternately add a white filled layer below your image and merge the two layers together.

If you like this frame, it and others are for sale for less than a buck for 10 here.

Helen Bradley

Thursday, June 28th, 2012

Bulk delete photos from the iPad


I’ve been taking a lot of screenshots lately and I have over 1,200 photos on my iPad – a lot more than I really want to store there.

When I went to delete the photos in bulk, I banged my head pretty quickly up against a problem with the iPad. It’s not immediately apparent how you delete a lot of images at one time and deleting them one at a time will get very cumbersome very quickly.

Here’s how to do it:

To begin, launch the Photos app, tap the Albums link and then make sure you’re viewing the Camera Roll or the place where your image are stored. I wanted to remove them from the Camera Roll so I tapped that.


Now press the bent arrow icon in the top right corner of the screen and you’ll see options on the left for Share, Copy and Delete.


Tap an image to select it and then go ahead and select each of the images to delete – they’ll get checkmarks on them to show they are to be deleted. To undo the setting, tap the image again.


Then when I you have those you want to delete selected, tap the Delete button and choose Delete Selected Photos to remove them.


It is, as you might have expected this is ridiculously simple once you know how to do it but difficult until you do.

The good news is that the images aren’t removed from your iCloud download folder on your PC. So, for example, if you’ve previously had the images synched so they appear on your PC in a folder of iPad downloads, the images will still be on your PC at the end of the process – they’re just removed from your iPad.

Helen Bradley