Tuesday, January 31st, 2012

5 Gotchas in the Lightroom Print Module

When you’re setting up single or multiple image printing in the Lightroom Print module here are some things to be aware of:

Nonexistent Drag and drop

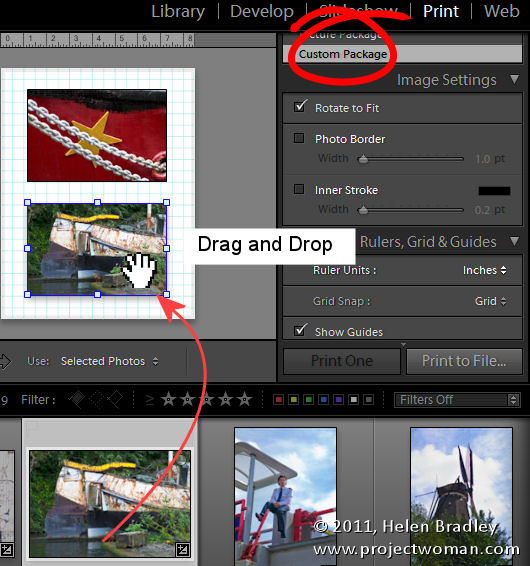
You can drag and drop pictures onto a print template in Lightroom in some circumstances but not in others. This can be confusing but there is some logic behind it.

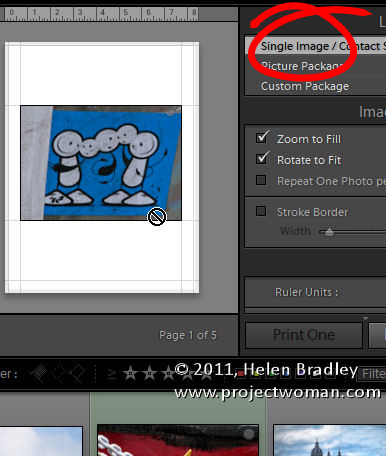
When you select a Lightroom template from the Template Browser, make sure to open the Layout Style panel on the right at the same time. Templates can be one of three layout styles and each operates differently. Knowing what style a template is will help you understand its behavior.

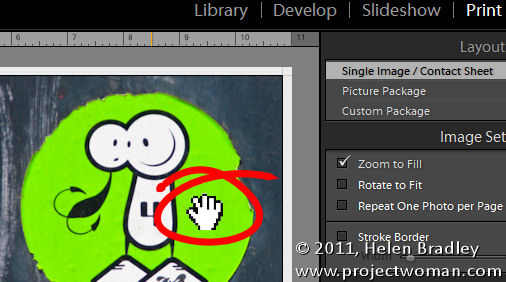
If it is a Single Image/Contact Sheet template then you must select images on the filmstrip to add them to the contact sheet and they appear in the layout in the order they appear in the filmstrip. You can’t drag and drop images from the filmstrip into a Single Image/Contact Sheet layout.

If the template is a Custom Package then you can drag and drop an image into any of the containers on the screen. You can also drag and drop an image into any position in the layout and it will sit on the screen even overlapping other images.

If a template is a Picture Package, then you can fill it by clicking an image in the filmstrip. A picture package prints multiple images on a single sheet of paper. If you select two images in the filmstrip, you’ll then have two pages in your picture package – one for each of the selected images. You can drag and drop an image into a Picture Package but when you do, you’ll create all sorts of issues. Not only will you add a new image to the layout page you are seeing on the screen but you’ll do the same for all the pages in the current layout. It’s generally best not to drag and drop images into an already tightly designed picture package layout.

Understand Border behavior

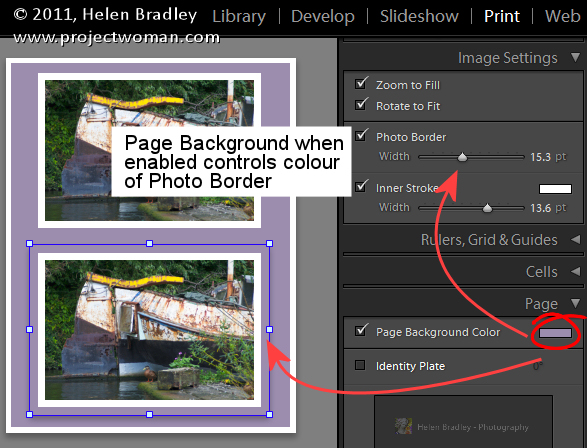
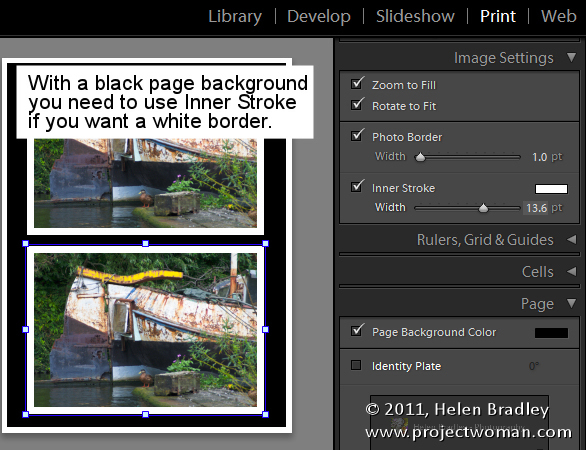
If you have a Photo Border enabled for a either a Custom Package or a Picture Package then the width of the border will make the image smaller. The color of the border is the color of the page background if you have a page background selected. If not, it will be white. If you set an Inner Stroke then it too will reduce the size of the image but it can be set to your choice of color.

So, for example, if you want a black page background but a white border around your images, set the page background color to black and use the Inner Stroke rather than the Photo Border to apply the white border to the image.

Identity Plate Behavior

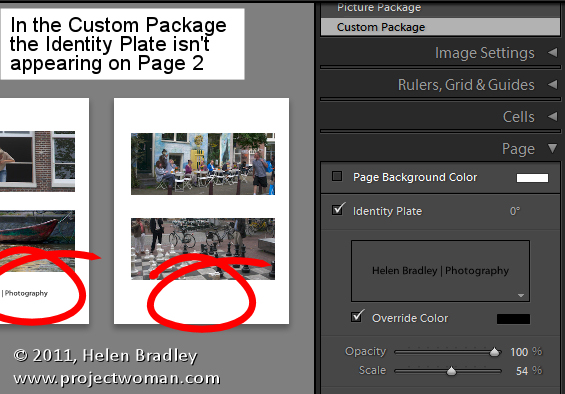
When you add an Identity Plate to a Custom Package it appears once on the page and you resize it to suit and place it where you want it to go. However, it only appears once in the layout so, if you add a second page to the print layout, the identity plate will appear only on the first page.

Alternatively you can add the identity plate to every image by selecting Render On Every Image. Now the identity plate will appear on each image rather than on each page but it will appear in the very middle of the image and  you can’t move it.

So, if what you want is your name on each printout as an Identity Plate, create a Custom Package design with an Identity Plate but not set to render on every image. Make sure the identity plate is in the correct position and fill the page with images and print or save it. Then fill it again with a new set of images and output the result and repeat as required.

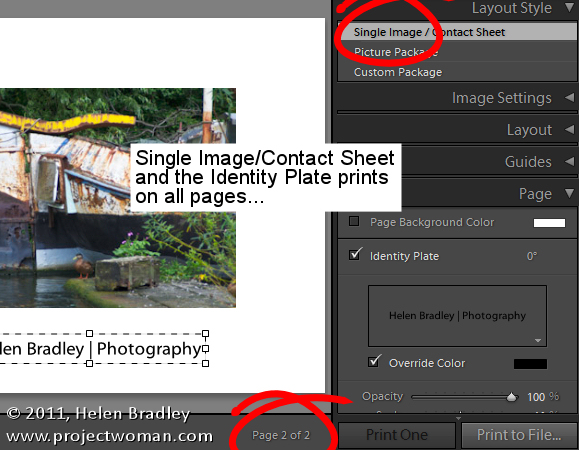
On the other hand, an Identity Plate added to a Single Image/Contact Sheet prints on every page of the document in the place you position it in.

Any size JPG output

You can print your layout to a JPG file that you can then upload to the web or send out for printing. To do this, from the Print Job panel, click the Print To: dropdown list and choose JPEG File.

Set the File Resolution and then the Custom File Dimensions for the page. Then, when you’re done assembling the images, click Print to File to print the layout to an image file rather than to a printer.

Crop your images

When you’re working with a Single Image/Contact Sheet, if the image is set to Zoom To Fill it will be made large enough to fill the container on the page. If the image height and width does not match the size of the container then part of the image will be removed. You can adjust the positioning of the image within the container by dragging on it with the mouse.

If you have a Picture Package or Custom Package selected you can move an image within its container also, but to do so you must hold the Ctrl key (Command) on the Mac.

The different behaviors of images within what appear to be similar layouts in Lightroom can be confusing but once you understand that different layout styles bring with them different key combinations and behaviors you’ll be on your way to creating great looking prints in Lightroom.

Helen Bradley

Thursday, January 26th, 2012

Winter Photography tips #7 – Work with what you have

Winter scenery typically lacks the bold colors of the other seasons. However, there’s still plenty of good subject matter to photograph. Look for the contrast of bare trees against wintry skies or soft snow hanging from the boughs of prickly conifers.

Contrast in line and texture make a great focal point for your images.

In the city, look for winter fogs and mists that partially hide buildings and in the country, look for elements which break the landscape drawing your eye to them such as a stream running through snow, a fence, hoof prints in icy paddocks or early bulbs.

Helen Bradley

Tuesday, January 24th, 2012

Do you clean your own Sensor?

Every digital camera user will have confronted or will confront one day the issue of sensor dust. Every time you change the lens on your SLR there is a chance that dust will enter your camera. Some of this dust finds its way to the camera’s sensor with the result that you see unwanted and distracting spots on your images.

Built-in dust removal

Most cameras have some sort of dust removal feature built in. For example, my Pentax K7 has one that applies (according to its manual) “ultrasonic vibrations to the filter on the front surface of the CMOS sensor for approximately one second”. Sometimes this is all it takes to remove the dust. Just as often, however, the dust remains stuck fast.

This isn’t unusual because there are different ways dust can get to the sensor area and not all of it is ‘loose’ in the sense that it can be shaken off. Some particles can actually become stuck to the sensor.

Also, just to be clear, when I am talking about dust on the sensor, it isn’t really on the sensor itself but rather on a thin glass plate that is on top of the sensor. It’s just easier to call it sensor dust and to talk about cleaning the sensor than talk about cleaning the glass filter on top of the sensor.

When built-in methods fail

If your camera’s on board dust removal feature fails, the recommended solution is to send your camera to a service center that is authorized by your camera manufacturer and to have them clean it.

Because this is a service, you’ll be charged appropriately for it. You’ll also be without your camera for the length of time it takes to get it cleaned. Inspite of these issues, for most camera owners this is the safest and best solution.

Another option is to utilize the cleaning services provided by your local camera store. However, this is not without its risks – if the service technician isn’t authorized by the camera manufacturer to clean the camera then the cleaning could void your warranty -even if the cleaning doesn’t cause damage to the camera.

However, for a lot of photographers these options are just plain expensive and inconvenient.

For me, the issue is just that – cost and convenience. To get my camera cleaned at the local camera store costs $75 a time and it involves a one week turnaround – the service technician picks up and delivers to the store only on Tuesdays. In addition I have two one-hour round trips to drive to the camera store to drop it off and pick it up and I have to strip everything off the camera including the camera strap before it goes out and then put it all back together when it is done. All of this I was content to do until Mike from my local camera store suggested an alternative – cleaning the sensor myself.

Not for the faint of heart

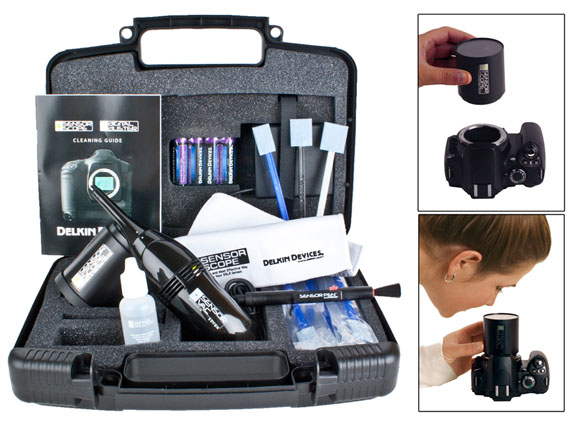
On Mike’s recommendation, I bought a sensor cleaning kit which included a vacuum, wipes and cleaning solution as well as a magnifying light all packaged in a padded toolkit. The cost of the kit was a little more than one cleaning so on my second cleaning I stood to be ahead on cost.

Kiss your warranty goodbye

I’m not recommending self-cleaning to anyone. It is a decision each camera owner needs to make themselves. You need to do as I did and ask yourself if you are prepared to shoulder the cost if you damage your camera and void your warranty? If not, then pay your money and leave it to the professionals.

I accepted I would be up for the cost of a new camera body if I damaged it because that’s about what it would cost to fix the damage I would do if the cleaning went wrong. I also acknowledged that I have probably voided my camera warranty by cleaning the camera myself even if it isn’t damaged by the cleaning. However, for me it made sense to see if I could save some time and effort by doing my own cleaning.

Scouts’ motto: Be prepared

Here is what I suggest you do if you plan to clean your own camera:

1 Read the Manual

However you behave and whatever you do in any other aspect of your life this is the one time you should read the manual for your camera and your cleaning kit before you get started. In fact, read it four or five times until you’re completely familiar with what you’re about to do and the risks.

I also found a good deal of useful information at the Cleaning Digital Cameras website (http://www.cleaningdigitalcameras.com).

In short the better informed you are the more likely you are not to fail. And if it all sounds too risky and beyond your skills, then don’t do it – after all that’s why they have service centers that do it for you!

2 Power it up

If your camera has an AC connector, connect it to the AC so that you won’t run out of power in the middle of the cleaning. This is an extremely dangerous situation as lack of power will cause the camera to shut down and if it shuts down on your cleaning tool then you are almost guaranteed to damage something.

If you don’t have a mains power connector for your camera, make sure to charge a fresh set of batteries and put these in the camera before you begin.

3 Make sure you have a problem

This probably should really be step 1 – you need to make sure you have a problem before you start. If your camera is not dirty then don’t clean it.

Many cameras will have some form of dust alert system that will show you dust on the sensor. For the Pentax K7 there’s a dust alert setting that requires you to set the camera in C or AF.S shooting mode and point at an evenly lit even color subject such as a white wall or an empty word processing document on a computer screen and take a shot. The resulting image shows you if there is dust and where it is.

You will need to read your camera’s manual to see if you have a similar system and how to capture an image of the dust.

Of course, some of us will be in no doubt that our camera needs cleaning because we can see the dust on our photos. My own cleaning efforts were driven by a particularly large gob of dust stuck in the middle of the sensor which showed up on nearly every image I shot and which just wouldn’t move inspite of numerous attempts to vibrate it free.

4 Check your tools

Check your tools before you begin making sure that you have everything that you need arranged on a clean work surface in a clean environment. Because you’ll be removing the lens from the camera you don’t want to risk getting dust into it while you are cleaning it.

5 Prepare the camera

Your camera will have a sensor cleaning feature in it. You use this to raise the mirror so you can access the sensor to clean it. Check your camera’s manual for instructions as to how to access this feature and how to return the camera to its usual setting when you are done. On my camera, simply powering it off resets it – so I have to be very careful not to touch the power button while cleaning it and that’s why freshly charged batteries are critical.

6 Clean the sensor

Clean your camera following the instructions in your camera’s manual and those in your sensor cleaning kit (all the time having regard to the terms of your camera’s warranty).

Take care – this is a delicate piece of equipment and needs to be cleaned with a light and steady hand. A half cleaned sensor in a camera that still works is better than a squeaky clean sensor in a broken camera.

7 Check the results

When you have finished cleaning, check the results to make sure the dust is gone.

Now for the good news

The good news is that many people do clean their sensors successfully.

If you do it yourself and if you do it right, you will find the cost of sensor cleaning is much less than sending the camera away to be cleaned. It’s also very convenient because you don’t have to be without your camera for a period of time and it feels good to know you can deal with a dust problem yourself.

For me, it will be a task I’ll always approach with some trepidation and mindful that it’s one that needs to be done carefully and not hurriedly or under stress. It does however give me a new sense of freedom particularly when traveling. With my cleaning kit I’ll never be caught on day one of a two-week trip with a nasty gob of dust on the sensor and no way to remove it until I get home.

Helen Bradley

Sunday, January 22nd, 2012

Winter Photography tips #6 – Light and Shadow


The light in winter is different to light in summer and because the sun is lower in the sky you get longer shadows.

When taking photographs in winter, take notice of where the shadows are falling.

If you photograph with the sunlight falling across the scene you can capture detail in not only the light but also in the play of light and shadow.

This contrast adds detail and interest to a landscape or anywhere where you have objects large enough to cast shadows and the sun to create them.

Helen Bradley

Thursday, January 19th, 2012

Winter Photography tip #5 – Play with Depth of Field

Winter is a great time to capture images taking advantage of your camera’s ability to create depth of field effects.

Get close to your subject and use an aperture setting of f2.8 or f4. When you use a wide aperture you achieve a very small depth of field so there will be a small amount of the image in focus and most of it out of focus. This is a great way to turn an otherwise humdrum subject into something a lot more interesting.

Helen Bradley

Saturday, January 14th, 2012

Winter Photography tips #4 – Capture Reflections

When you’re looking around a scene for photographic opportunities take the time to look down as well as out and up.

Winter brings with it not only stiller waters but also puddles created by rainfall.

On any day when rain has fallen a wealth of photographic opportunities exist at your feet. Capture a scene in a puddle to get a reflected image with artistic qualities that simply aren’t there when you take a photograph of the object itself.

Helen Bradley

Tuesday, January 10th, 2012

Winter Photography Tip #3 – get in close


Often it is the small things that offer the most creative opportunities in winter photography.

Look for the little things around you such as a drop of water hanging from a leaf, or a steaming cup of cocoa.

To capture small objects use the macro setting on your camera which is indicated by a flower shape icon. Get in close to the item that you want to shoot – your camera’s manual will tell you how close your camera can focus with macro enabled.

Helen Bradley

Saturday, January 7th, 2012

Winter photography Tip #2 – Grab the Color

Any splash of colour in a winter scene will show up beautifully and can be the makings of an attractive image.

Look out for things as simple as a blue sky over a snow covered mountain or a skier’s jacket.

The colour will be the first thing that the viewer’s eye will go to in the photograph so make sure to place it in an appropriate position in the shot. Draw an imaginary tic-tack-toe board across your view finder and position the colorful item where two lines intersect to get a more vibrant photograph.

Helen Bradley

Sunday, February 7th, 2010

Better Photos Tip #10 – Camera Raw vs, jpeg

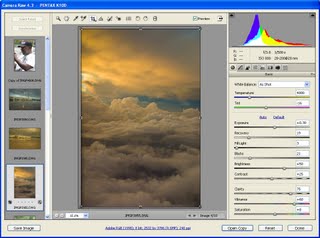
Capturing in Camera RAW offers superior image adjustment options for your photos.

If your camera is capable of capturing images using the RAW format, this will allow you more editing opportunities later on.

It’s a good idea to capture JPEG when shooting regular snapshots simply because JPEGs are easier to process and use and to use RAW for more creative captures.

Some cameras have a button you can press which gives you a one shot RAW capture so you can shoot in JPEG but easily capture a single RAW shot when you need one.

Helen Bradley

Page 3 of 41234