Monday, March 31st, 2014

Create Guides Accurately in Illustrator


image credit ©ezza116, istockphoto.com

Learn to place guides in Illustrator in the position you want them to appear

Sometimes the differences between Illustrator and Photoshop are really annoying. In Photoshop it is simple to place guides in exactly the position you want them to appear but in Illustrator it isn’t easy at all.

I want to create a square document with guides half way vertically and horizontally so, I’ll start with a new document of a fixed and known size such as 1000 x 1000.

Then choose View > Rulers > Show Rulers so you can see the rulers top and left. With the Selection tool selected, click and drag on the ruler and drag a guide into position. You probably won’t be able to get it exact but that’s ok for now. You can go ahead and drag a guide from the other ruler too.

Guides are, by default, locked so you need to unlock them to move them. Choose View > Guides > Lock Guides to disable the check mark. Now you can drag the guide into position. On the Tool options bar you will see values for X and Y. For the vertical guide, X should be half your document width – in my case 500 and for the horizontal guide the Y value should be 500.

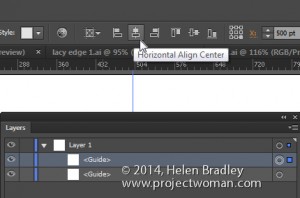
If you open the Layer palette you will see that guides are objects in the current layer. This means that you can click on a guide to select it in the Layer palette and use the tools at the top of the screen to align the guide. So, clicking on it and choosing Horizontal Align Center will center the vertical guide and Vertical Align Center will center a Horizontal guide.

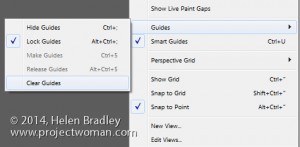
Once your guides are in position, choose View > Guides > Lock Guides to lock them so they won’t move. On this same submenu you can hide guides – this locks them when they are unhidden again or clear guides to remove them from the document entirely.


Other handy tricks include being able to create a vertical guide by dragging down from the top ruler  and hold Alt or Option to change if from horizontal to vertical.

You can make new guides (but not existing ones) snap to dividers on the rulers if you hold Shift as you draw them by dragging down from the ruler.
Helen Bradley

Helen Bradley

Tuesday, May 15th, 2007

Grid and Guides in PowerPoint 2007

If you’re like me you like to have everything neatly aligned on your PowerPoint slides. If you don’t, a slide with navigation and action buttons can very quickly become very untidy.

To line everything up, you need to be able to see the gridlines. Gridlines on a PowerPoint slide? I hear you ask. Why not?

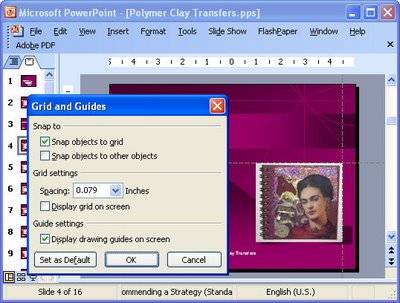
To see the gridlines, right click an empty area on a slide and choose Grid and Guides. Select the Display Grid on Screen checkbox and configure the grid size and click Ok. You can also display drawing guides using the same dialog. By default these are placed in the middle of the slide horizontally and vertically.

To add a new guide, hold the Control key as you drag a new guide from an existing one.

Reverse the process to hide the guides and grids when you’re done.

Helen Bradley

Wednesday, March 14th, 2007

PowerPoint Guides

If you’re a perfectionist like I am (on a good day, anyway), you will want everthing lined up neatly on your PowerPoint slides. To do this, use Drawing Guides. To do this, choose View, Grid and Guides and enable the Display Drawing Guides on Screen checkbox.

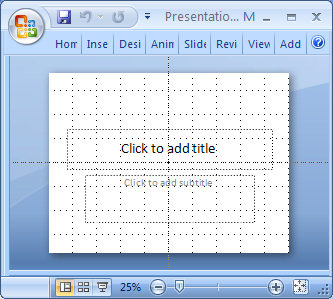
You’ll see two cross hatch grid lines. To move them simply hold your mouse over them and move one. To create a new guide, hold the Control key as you drag on an existing guide. To remove a guide drag it off the slide.

You can now neatly line everything up that needs to be lined up.

Helen Bradley

Friday, March 9th, 2007

Cool moves in Publisher

Here are some of my favorite tips for getting things lined up in Publisher 2003:

To move a number of objects together, select them and choose Arrange, Group from the menus or click the Group button which appears when the objects are selected. You can now move and size the objects all at once. Choose Arrange, Ungroup to ungroup them again.

The Nudge and Measurement menus help you move objects in small increments. Choose Arrange, Nudge and tear off the Nudge menu to have access to the buttons. The measurement toolbar (View, Toolbars, Measurement) helps you position objects with pinpoint accuracy.

To create a ruler guide, position your mouse over the horizontal or vertical ruler bar and, when the mouse changes shape, drag the ruler guide into position. To display rulers, choose View, Rulers. Use these guides as an aid for lining up objects on your page. Right click the guide to access other options.

Helen Bradley