Wednesday, October 17th, 2007

Keep Outlook trim, taught and terrific!

To ensure your Outlook .pst file stays trim and doesn’t get bloated with old and outdated emails, configure its AutoArchive options so that older messages are automatically removed or filed away. To do this, right click the folder to archive (such as your InBox) and choose Properties, AutoArchive tab and select the Archive this folder using these settings option. Now enable the Clean out items older than and set the appropriate time period. Only select to Permanently delete old items if you really don’t want them saved. Enable, instead, Move old items to default archive folder and Click Apply.

If you haven’t got AutoArchive configured to run periodically, you’ll get a warning to this effect and Outlook will set it to 14 days by default. You can change the timing by choosing Tools, Options, Other, AutoArchive. Now, every 14 days (or when you specify), AutoArchive will run and the old items will be moved to your archive folder. Your archive file will appear in your folders list so you can drag and drop messages from it back into your regular Outlook folder if there are archived messages you need to refer to.

The reason you need to do this is two-fold. One is that Outlook stores everything in its PST file – emails, contacts, appointments and worst of all – email attachments. So the file can get very large indeed. At or near 2GB in size the file becomes unstable and you risk losing everything – permanently – can we just say “Don’t put all your eggs in one basket”? Archive now – before your computer does the deed for you – permanently and with little or no chance of recovery.

Helen Bradley

Wednesday, October 17th, 2007

10 Top Flash Photography Tips

Your camera’s flash can be the best tool you have for lighting a shot or the best tool you have for destroying an image – it all depends on how you use it and when. In these tips I will show you how you can tame your camera’s flash and make sure that it works for you and not against you. As you read you might be surprised to learn when you should be using your flash and when you’re better advised to turn it off and take the shot without it.

Learn to control the flash
The first step to working with the flash on your camera is to learn how to configure it so you can, in an instant, turn it on or off as required. Consult your camera’s manual and learn how to read the indicators on your camera which tell you the current status of the flash. You should be able to turn the flash off so that it does not fire even in low light conditions and you should be able to enable it so that it fires even in full sun. These skills are essential for taking good photographs.

Avoiding redeye
One technique typically used to avoid redeye is to turn on the camera’s redeye reduction flash. This option fires a small flash before the full strength flash and this has the effect of shrinking the pupil size so that the redeye effect is less likely to occur. Unfortunately it also has the effect of misleading your subject into thinking that the photograph has been taken so that they feel free to move and the resulting shot is inevitably blurry.

Rather than using the redeye reduction flash I suggest you disable it and, instead, use other means to reduce redeye. To avoid the redeye issue without the using the redeye reduction flash make sure that the lights in the situation in which you are using the flash are turned up as high as they can be. With good room lighting your subject’s eyes will be less likely to be red. An externally mounted flash can also help – see tip 5 below. Of course, if all else fails you can remove the redeye effect in your digital photo software and many printers and photo services can also remove it.

Understand its limits
If you’ve ever been to a sporting event at night you will have seen people high up in the grandstands using their camera’s flash to take a photograph of the action below. This is the least effective way to capture a good photograph. Your camera’s flash has a range of about 9 feet which makes it of no use at all in a sporting situation.

Next time you’re at the game, turn off your camera’s flash and switch the camera to night mode so that it understands that more light will be needed to take the shot. Brace yourself carefully using a tripod if you have one and then take the shot without the flash. The result will be a much better photograph.

Use the fill flash
It might seem counterintuitive to use a flash when taking a photo in bright sunlight but it is one time you really need the power of your flash. Consider the situation where you have your child in front of you on the beach and a beautiful sunny beachscape behind them. If you take a photograph of the child without using the camera’s flash your child will be in deep shadow with the beach scene behind him or her perfectly exposed. On the other hand if you use the camera’s main flash or its fill flash if it has a special flash for this purpose, you’ll get both your child and the beach scene perfectly exposed. Any time you are shooting in bright sunlight where your subject is within flash range you should use your flash to light them correctly.

Another use for the fill flash is where your subject is lit very strongly from one side such as where they are standing by a sunlit window. Using the flash will even out the deep shadows on the other side of their face giving you a more evenly lit portrait.


The photo on the left is shot without the flash, on the right, the fill flash adds delicate color to the child’s face and evens out the sun’s harsh shadows.

Off camera flash
Many cameras, in particular digital SLR cameras, have the ability for you to mount an off camera flash. This flash can either be hand held or mounted to a hot shoe connector on the top of the camera. These special flash mounts raise the flash bulb a few inches above the camera and offer you the ability to angle the flash head so it doesn’t fire direct into your subject’s face.

If you are photographing indoors with a flash mounted on your camera, angle the flash so it fires off the ceiling with the result that the scene will be bathed with light. You may need to make a small adjustment to your camera to allow a little more light into the shot to compensate for not having quite as much light available as you would if the flash fires direct into your subject’s face but the resulting image will be much more flattering and you’re unlikely to encounter a problem with redeye.


The photo on the left is shot with a regular flash direct at the subject, the one on the right has the light bounced well away from the subject.

Create a silhouette
If you have a beautiful sunset in front of you and a person standing in front of it between the sunset and the camera there is a temptation to use the camera’s flash to light the person and also capture the sunset. If you plan to do this, make sure you choose a long exposure so you get plenty of the sunset in your photo as well as your subject. On the other hand you can capture an equally interesting image by turning off the flash and adjusting the exposure to -1 or -2 to slightly underexpose the image. Now capture the sunset and you will find that your subject is a dark outline silhouetted against the brighter sunset.

Instant color correction
If you are shooting indoors where fluorescent or incandescent lights are creating a color cast you can avoid the cast and color balance your image using your flash. The light from your camera’s flash is a more neutral light and free of unsightly color casts, so firing the flash indoors will light the scene with the clean flashlight and reduce the colorizing effect of the light bulbs. You don’t need to turn the lights off because the flashlight will be strong enough to neutralize them.

Flash not allowed
When you encounter a situation where you are not allowed to use flash photography but there is no ban on taking photographs then you’ll need to understand how to compensate for not having a flash. Disable the flash on your camera and try a few test shots to see if the lighting is sufficient to take the photograph. Increasing the ISO equivalency on the camera so that you are shooting with 200, 400, 800 or higher ISO will capture more light for the same shutter speed. in a dark situation. The downside of this is that you will have a more grainy photo as a result. You can also experiment with a slower shutter speed but you will need to strike a balance between speed and the likelihood of movement marring your shots. The longer the camera takes to capture the image, the more light it will capture but, in consequence, any movement will result in an unsatisfactory blur in your images.

When you’re in the situation of not being allowed flash photography a long exposure can help you get the shot you’re after.

Diffusing the flash
The flash on a point and shoot camera can be very harsh and you might find it washes out your subjects because it is just too strong. To get a more even lighting effect, diffuse the flash by placing something in front of it. For example semi-opaque sticky tape placed over the flash will help diffuse the light as will a small sheet of wax paper held in front of it or taped over it. Another option is to hold a piece of shiny white card underneath the flash angled slightly up so that you bounce the light from the flash upwards to create a more diffused light.

Creative flash
Your flash is more than a simple lighting source and it can be used for creative purposes too. If you set your camera to a long exposure to take a night shot with the flash turned off you will capture elements like car lights as streaks on your photo. On the other hand if you use the same long exposure with a flash you can capture a subject close by with the flash and then capture the movement behind the subject with the longer exposure. If you are working with a human subject ask them to stay very still throughout the entire shot well past when the flash is fired. Alternatively if the person moves you will get an interesting ghostlike effect on your photos. Of all the tools in your camera the flash can give you some of the best creative opportunities but it will help if you spend some time experimenting with it before you need to use it in a practical situation.


This ghostly Halloween image was created using a flash combined with a long exposure.

Used correctly, the flash on your camera can be a great addition to your photography allowing you to take beautifully lit portraits in even the harshest of light conditions and to capture interesting and creative images.

Helen Bradley

Tuesday, October 16th, 2007

OOPS! I didn’t mean to send THAT!

If you too often send an email message and then think “Oh no! I forgot to say xyz” or “Oops, I shouldn’t have been that blunt”, then build a delay into Outlook so the messages aren’t sent right away. It just might save you having to write a second email or save you grovelling to your boss!

To do this use a rule to delay sending emails. Choose Tools, Rules and Alerts and click on New Rule. Choose the Start from blank rule option and then select Check messages after sending and click Next. Click Next as all messages will be delayed (but you can set an exception shortly) and click Next and Ok again to confirm the rule will apply to all sent messages. Choose Defer delivery by a number of minutes and set this to the number to wait – say 2 minutes and click Next.

Now, set an exception for messages that just have to be sent immediately, for example, select Except if it is marked as importance and set this to High. Click Next, type a name for the rule such as Delayed Send, enable the Turn on this rule checkbox and click Finish.

Now, whenever you click Send, your messages will be held for 2 minutes before being sent except if you make them High importance.

No more grovelling!

Helen Bradley

Thursday, October 11th, 2007

Set Outlook as your default email program

It’s handy to be able to click an email address on a web page and have your email software launch automatically with a new message ready for you to type. It’s a nuisance if you do this and the wrong email software opens.

It is, however, quite easy to set any email software to be the default program to use in these circumstances. To do this, choose Start, Control Panel, and then click Internet Options. Click the Programs tab and, from the Email list, select the email program to use as the default. Click Ok and you’re done.

Helen Bradley

Tuesday, October 9th, 2007

Quickie calculations in Word 2003

Older versions of Word included a Calculate option on the Tools menu which let you make quick calculations.

If you’re using Word 2003 you can add the tool back by right clicking any toolbar and choose Customize. Select the Commands tab and, from the Categories list choose All Commands and scroll the Commands list to locate ToolsCalculate. Drag this onto the Tools menu and hold your mouse there until the menu opens and then drop the option into place. If desired, right click the new entry and remove the word Tools from its name so it simply reads Calculate.

Now test your new menu item by typing some values eg 24, 25 & 26 and select them. Choose Tools, Calculate and the status bar will display “The result of the calculation is 75”. If you later click Control + V you can paste the result of the calculation (75) into your document.

To sum a column of numbers, hold Alt as you drag over the column with your mouse then choose Tools, Calculate. It also works inside tables and you can type a more detailed calculations such as 25*25 and it will calculate the result for you (answer: 625)

So, put away the calculator and let Word to the work for you.

Helen Bradley

Friday, October 5th, 2007

Toolbar buttons..

Last post I showed you how you can compress the font in a document to give it a classier look. Today, now that you have the font compression value sorted out, I’ll show you how to make a toolbar button for it so you can apply it with a single click.

Right click any toolbar in Word 2003 or earlier and choose Customize then select the Commands tab and, from the Categories list choose All Commands. Scroll to locate the Condensed: item and click it. At the foot of the dialog a box appears from which you can select a point size to adjust to, for example, if you use 0.3 pt the type that. Now drag the Condensed option onto the toolbar and close the Customize dialog.

In future to condense your type, select it and click your toolbar button.

Helen Bradley

Wednesday, October 3rd, 2007

Smaller and better looking fonts

When you’re writing newsletters, company reports and other documents in Word you may find that they look more professional if you condense your font slightly. Even a reduction as small as .3 points changes the look of the font significantly and makes it look, well just a little more classy.

To do this, select the text to alter and choose Format, Font, Character Spacing tab and set the Spacing to Condensed and the By value to, say, .3 points.

If it’s too tight, loosen it up a bit, if not, try a little more compression until you get something you like.

Helen Bradley

Tuesday, October 2nd, 2007

Read the &%*^$# Manual!

The ins and outs of Camera Manuals

When your camera’s manual is inches thick and looks like it’s written in a foreign language, Helen Bradley has some sage advice.

When you first purchase a digital camera you’ll be anxious to open the box and get started. If you’re like many people you’ll be putting the camera manual to one side because it’s just too thick and too complicated to deal with. However, the manual contains lots of valuable information and, when you’re able to sift out the useable details from the information you don’t currently need, it can be a good resource for taking better pictures. So what’s important information to look out for and what can you skip for now? I’ll show you what’s what and why you need it.

Configuring Image Size and Quality
When you purchase a digital camera one of the key selling points will been the number of Megapixels that the camera is capable of capturing. The larger the number of megapixels, the larger the images can potentially be – they will be wider and higher than images from a camera that has a lower megapixel value. Depending on what you intend to use your photos for, you may not need to use your camera at the maximum possible image size.

In fact, you may prefer to reduce the size to make handling the photographs easier and so you can store more photos on your camera card. So, if your camera can capture more than 4 Megapixels of data and, if the main purpose of your photography is to print 4 x 6 or 5 x 7 images and to be able to email and share them with friends, consider reducing the size of the images. Check your camera manual to see what size options it offers and how to set the camera to a smaller size image.

Another issue to consider is image quality. Because captured images take up so much room, most cameras will compress the image data so that more images can be stored on the camera’s card. While it may makes good sense to reduce the overall size of the images that you capture if you don’t need them to be very large, selecting a lower quality of image is not generally advisable – you’ll still want high quality images even if they are smaller. Check the camera’s manual to see what compression alternatives are available and configure the camera so that the highest possible quality (the lowest possible compression) is used. Now, even if you are shooting smaller images, you will still maintain the highest possible quality in those images.

If your camera has the option to capture Camera Raw format images, consider whether you really want to be processing Camera Raw images. Unless you have a graphics program capable of handling Camera Raw images and unless you understand the implications – for example that these images cannot be shared easily with others or displayed on the web without being converted to another format – it may be preferable to shoot and store images in another format for example JPG which is more easily managed.

Configure White Balance

This object has been photographed with a range of white balance settings. As you can see the different settings result some strong color casts being present.

Most digital cameras have configuration settings available for White Balance. The white balance adjustment is required because light is different in color in different circumstances and the white balance adjustment allows you to compensate for this color change. For example, sunlight is much warmer and bluer than the light that you will see when the sky is cloudy or overcast. In addition, indoor light from incandescent globes is a different and more yellow color than either sunlight or the blue/white color that is given off by fluorescent tubes. Configuring your camera’s white balance to the type of light that you are shooting in will ensure that your images do not have a distinct color cast that you’ll have to fix later on.

Setting the ISO
When you shoot with film camera you may have been aware that there are different film speeds which are indicated by the film’s ISO number. Typically you will have used ISO 100 to 400 speed film in most point and shoot cameras. ISO 400 film is fast and can freeze action easily but the downside is that it is grainer so the images have a more distinct film grain. ISO 100 is slow film so the images are less grainy but the camera will need to let in more light to capture the shot so this film is not as good for shooting fast action on a cloudy day or shooting in low light.

Most digital cameras have ISO equivalent settings allowing you to choose an ISO equivalent speed when you’re shooting using manual settings. Check your camera’s manual and, when you are shooting on a bright sunny day, use ISO 50, 100, or 200 equivalency on your camera. In low light or on cloudy days, you can set the value to 400 or higher. If you are using the automatic setting on your camera, your camera will probably make an ISO choice when taking the shot, but when you set the aperture and speed yourself using the manual settings on the camera, this ISO equivalency setting will impact shot you take.

Understand Fill Flash
When shooting a person in front of a landscape or seascape on a bright sunny day, you are well advised to use the fill flash. This lights the subject, ensuring that they are captured clearly as well as the lighter background.

Your camera will, most likely, have a variety of flash settings and it’s important you know how to identify and use them. Look for Automatic flash which leaves the choice to the camera to determine whether the flash should fire or not; No Flash where the camera is prevented from firing the flash even in circumstances where it is required, and Fill or Forced Flash which forces the camera into firing the flash.

Adjusting Exposure

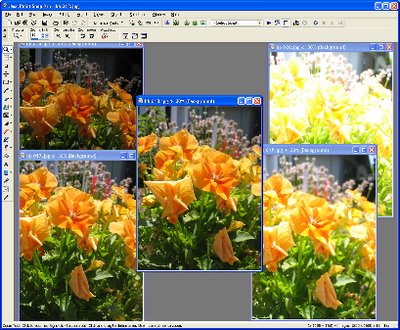
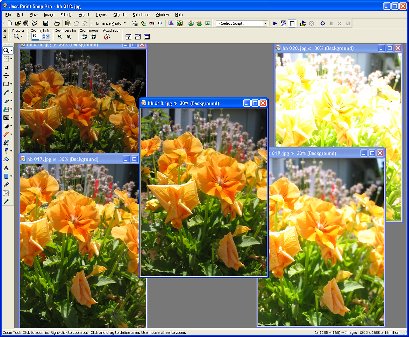
The central photo is taking using the standard exposure, those on the right are reduced 1 & 2 stops and those on the left increased 1 & 2 stops.

Most digital cameras have an exposure control which allows you to override the calculated exposure and to increase or decrease the exposure by one or two stops. Increasing the exposure will lighten the subject giving an overall lighter image. If the images you are capturing are too bright, then decrease the exposure by a stop or a fraction of a stop and the image captured will be a little darker than usual. In general, these exposure controls can be used in conjunction with the automatic focusing and shooting features of the camera.

Other Camera features
There are many other things that your camera manual can tell you about your camera. For example, your camera may be able to shoot in black and white or in sepia mode – this saves you having to convert the image in your graphics software – but remember it’s not reversible so you can’t put the color back in.

You may also find that your camera includes a video option for shooting short video clips. Don’t count on this feature as an alternative to shooting still shots or as an alternative to using a camcorder, but it is a fun tool to use for short clips. It is also possible using some software to extract still images from the video clips – although the quality won’t usually be as good as taking still images.

Look also for an explanation of the built in modes that your camera offers for shooting in a variety of situations. Learn how to set up and use night shooting mode, sports mode, landscape and portrait modes. If your camera has manual settings for aperture and speed, read how to set these up to get better control of your shots.

Other options to look for are for the ability to display a slide show with the contents of your camera card on a television. In this case, you will need to configure the camera for NTSC output to match the format of your TV.

Some cameras can help you shoot shots to make a panorama and can even stitch the images for you. You may also find options for automatically rotating images inside the camera (handy if you’re planning to play a slide show on the TV), for adjusting the strength of the flash output, configuring file names, locking photos so you can’t accidentally delete them etc..

When to study the manual
Your camera’s manual is a tool that is worthwhile reading when you first buy your camera to establish how to configure it for your basic needs – on/off, inserting and removing cards and batteries. Revisit the camera manual in a month’s time and you’ll be ready to learn more about what the camera offers. Again after a few months more, have another look at the camera manual. The basics will now be familiar to you and you’ll be ready to delve into some of the camera’s more advanced features. Practice your new found skills and knowledge to ensure that you are getting the maximum value from your purchase.

Helen Bradley

Monday, October 1st, 2007

Take a snap – Excel 2003 and earlier.

Need a copy of part of an Excel worksheet? Too easy!

You can take a picture of a range in Excel and, for example, insert into Word as a picture or place it an image in another area on a workbook. To do this, first select the area to snap and hold Shift as you open the Edit menu. Choose Copy Picture, select As shown on screen or As shown when printed and click Ok.

Now go ahead and paste the image wherever you desire. This Shift + Edit menu option also works for copying a clip art or other type of image inserted into an Excel workbook.

Helen Bradley

Page 3 of 3123