Monday, March 29th, 2010

Flash movies and Windows 7

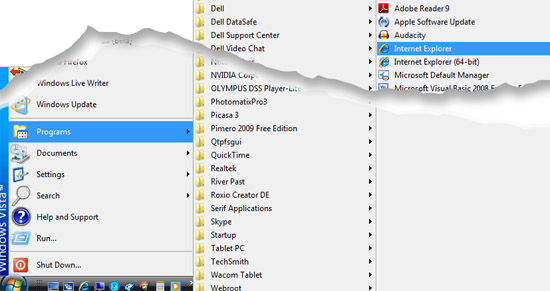
Internet Explorer 32 bit browserToday I had a particularly annoying half hour. It was a simple enough scenario, I wanted to play a Flash videos on my 64 Bit Windows 7 computer. Internet Explorer – Nada! Firefox – Nada! My Conclusion – this is not good…

For reasons better known to the folks at Adobe, the company has not yet updated its Flash player to support 64-bit browsers on 64-bit operating systems. The key to the problem is the combination operating system and browser you’re using.

A 64-bit browser on a 64-bit operating system won’t play Flash movies, but a 32-bit browser running on a 64-bit operating system will – with some tweaking.

So what do you do? The solution with a Windows 7 machine is deceptively simple. Select the Start button, choose Programs and then look for Internet Explorer. You will find there are two versions of Internet Explorer installed: Internet Explorer and Internet Explorer (64-Bit). Internet Explorer is the 32-bit browser so, if you run that and not the 64 bit version you’re half way to the solution.

What I’ve done is to replace the link to the Internet Explorer (64-Bit) browser on my system everywhere it appears such as in the Start menu and the Quick Launch Bar with the 32-bit version. I can live without the ‘benefits’ of a 64-bit browser if I can view Flash movies the way I expect them to play.

If you find the movies do not play or stop part way through, as I did, right click the movie and see which version of Flash Player you’re using. If it is version 10 then uninstall it (using Control Panel > Programs), and go find version 9 and install it in its place. You can download version 9 from here:  http://kb2.adobe.com/cps/142/tn_14266.html – this is a source of archived older Flash Players.

So, if anyone from Adobe is listening, please can you get us a 64-bit Flash Player? While there is one available at labs.adobe.com for Linux there is nothing yet available for 64-bit browsers running on 64-bit operating systems for Windows or Mac. Given that so many people are switching to 64-bit operating systems, if only because it allows you to address great wads of memory, it really is time that the big name companies came to the party and provided basic tools compatible with these systems.

Helen Bradley

Saturday, March 27th, 2010

Thank you Kevin Ames

fantasy portrait collage

I have just returned from Photoshop World in Orlando and I am full of inspiration for upcoming projects. However one of the classes just inspired me so much that I had to start playing with the concept first. The idea is from Kevin Ames who taught it as a class called Fantastic Portraits…It’s Smoke, Mirrors & Photoshop.

The starting point is half a face, mirrored and stuck back together and then it’s up to you. This is my finished project – it’s a tiny file as I did it on the plane home and I really wanted to conserve battery but still get a reasonable result. With smaller images in Photoshop, of course everything goes much faster but the downside is that the final image is less useful because it is very small.

Here in addition to mirroring the face, I replaced the lips, pupils and part of the nose to get the face I wanted. I used the liquify filter repeatedly to reshape the face and the dodge and burn tools to add highlights and shadows – my additon to the basic concept. Then I brushed on the dots, added lots of backround interest and fashioned her a gold necklet. It helps if you have lots of textures and other interesting elements to use – for example, her hat is a fancy street light from a local park and there is a metal grate, a stairwell and a rusty texture making up the background.

It is a fun way to blow a few hours.

If you’re interested, here’s my starting image (courtesy of my friend Brenda), as you can see, the journey from start to end gave me something totally unrecognizable.

Helen Bradley

Friday, March 26th, 2010

Faux panos in Lightroom


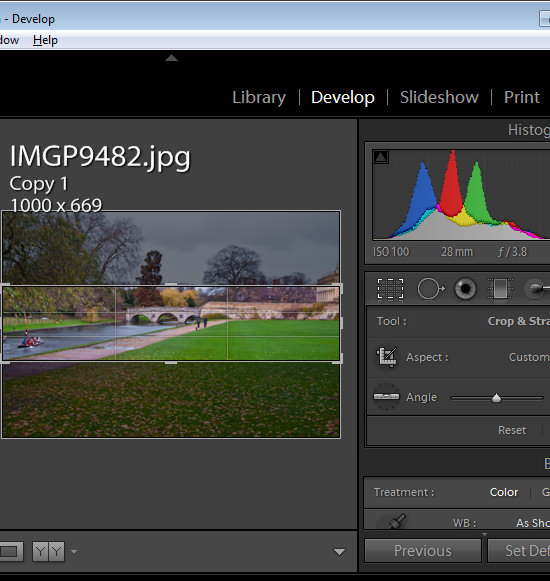
Lightroom finished panorama of Cam River Cambridge, Uk

Ok, so I am using Lightroom for this but seriously you can do this in Photoshop or any application you like. It’s a faux panorama and you do it with one image by simply cropping the image to a long width and a small depth. You need the right image – it needs to have plenty of data across the middle of the image but it does have so much punch that it can turn a ho hum snapshot into something that looks so much more.

Lightroom crop to create a panorama

So, in Lightroom, select your image, move to the Develop module, crop the image to as wide as you can and a small height/depth and then Export it. This one I framed in the Lightroom Print module before printing to a file and posting it. All too simple really and everyone will think you’ve been snapping panos instead of infusing your images with a little creativity.

Oh, and for a tip in a tip, press Control + ‘  (Command + ‘ on the Mac) to make a virtual copy before cropping so you still have your original visible in Lightroom.

Helen Bradley

Wednesday, March 17th, 2010

Photoshop: High Impact Sharpening

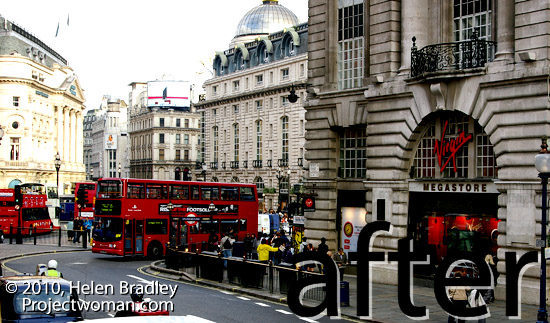
after image high radius low amount sharpening

There’s a lot been written about sharpening your images and traditionally when you sharpen you’ll choose a low radius value. In fact, Photoshop will let you choose really large radius values when sharpening even though, for correct sharpening what you need is a Radius of around 0.5 – 1 for a sharp image and just a little larger for an image that lacks sharpness.

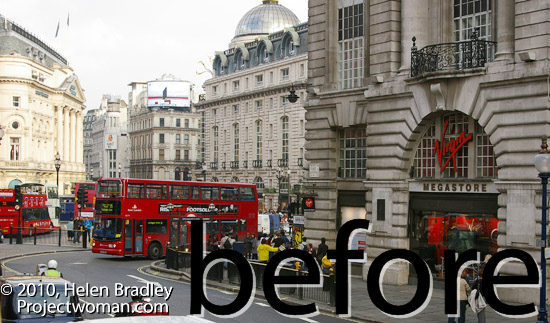
before high radius low amount sharpening

So what is the value of being able to select really large radius values? The answer lies in a technique known as high radius low amount sharpening. It’s a way to add a huge visual impact to your images.

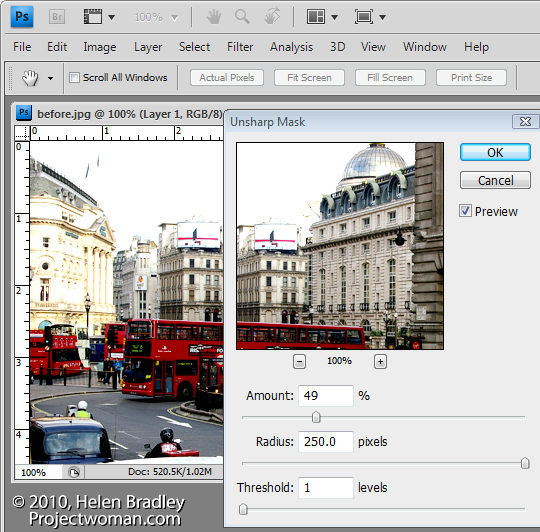
To see it at work, choose Filter > Sharpen > Unsharp Mask. Reduce the Amount to around 30 and push the Radius value up very high. You’ll need to keep the Threshold amount very low.

What Amount does is adjust the amount of sharpening so you don’t want a lot of this type of sharpening. By setting the Radius to a high value you’re pushing the sharpening halos away from the edges in the image into the image content areas so that everything is being given a significant contrast boost.

The Threshold setting is an amount representing the difference between pixels on the edges that you want to effect. It works the opposite to how you might think it would work – a small value gives you much more impact than a large value. So a value of 1 or 2 up to 10 is sufficient.

Once you have a high Radius and low Threshold value set, adjust the Amount to suit your taste.

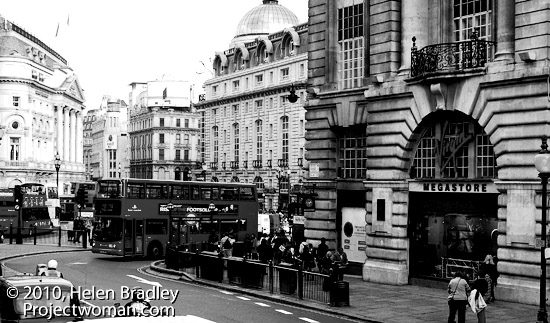
While this feature works really well on color images particularly busy color images, it also gives black and whites a really big shot in the arm.

Apply high radius low amount to a black and white photo of london

And while you’re in Photoshop, know that this is the only place you can apply this fix. You cannot do this in Lightroom or in Camera RAW. The reason is that both Lightroom and Camera RAW allow a maximum radius setting of 3.0 and here, because we want to crank up the radius really high, Photoshop is our only option.

Helen Bradley

Thursday, March 11th, 2010

Photoshop – Copy and Invert Masks

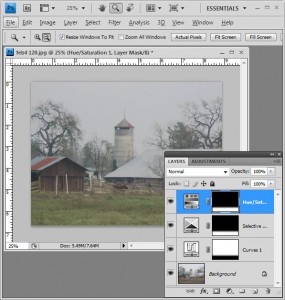
Photoshop copy and invert a mask

This is totally cool. I was playing around in Photoshop the other night and needed to duplicate a mask and then invert it. I remember that you can copy a mask using two fingers and the mouse button so that means it’s some combination of the Control, Alt and Shift keys – that’s all you really need to remember – the rest is experimentation.

Well, I did the two finger drag using Shift and Alt and this must be a keystroke combination I haven’t used before because lo and behold! it not only copies the mask but it inverts it too!

So, to copy a mask, drag it using Control + Alt (Command + Option on the Mac). To copy and invert the mask, Shift + Alt (Shift + Option on the Mac).

Helen Bradley

Wednesday, March 10th, 2010

Step 9 Photo-editing workflow – Fixing imperfections

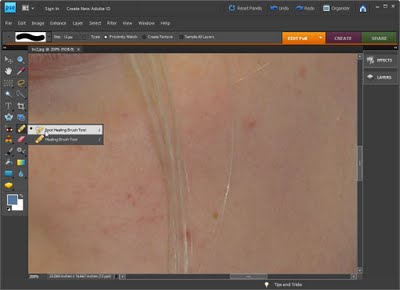
If you have a photograph of someone who has blemishes on their skin you can remove these by using the Spot Healing Brush tool.

Select the Zoom tool and zoom in onto the areas that require fixing.

Click the Spot Healing Brush tool and adjust the brush size so it is just big enough to cover the problem area.

Click once on the area and the blemish will disappear. If the fix is not perfect choose Edit > Undo Spot Healing Brush, adjust the brush size and try again.

Helen Bradley

Sunday, March 7th, 2010

Step 8 Photo-editing workflow – Fix skin tones

Often you will encounter difficulties when fixing colour problems in an image where there are significant areas of skin tones. Skin tones are more difficult to fix than general colour casts, in part because we’re all so familiar with what skin tones should look like that we ‘know’ immediately when they look wrong.

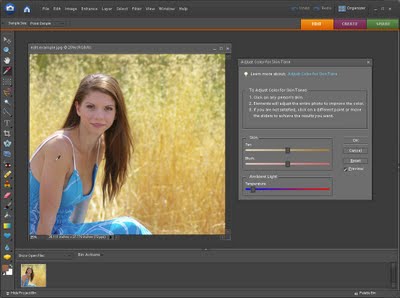
Luckily Photoshop Elements has a good tool for fixing skin tones. To apply this fix to your image choose Enhance > Adjust Color > Adjust color for skin tone. The mouse cursor will change to an eyedropper and you should use this to click on an area of skin tone in the image.

If you don’t get good results sampling from a person’s face, try sampling on their neck or arm – sometimes makeup on the face can give poor results and skin not covered in makeup gives better results.

Once you have selected the skin tone, if the fix isn’t good enough, use the Blush and Tan adjustments until you match what the skin should look like. The Ambient Light temperature slider lets you warm up or cool down the colour fix.

Helen Bradley

Thursday, March 4th, 2010

Step 7 Photo-editing workflow – Fixing colour problems

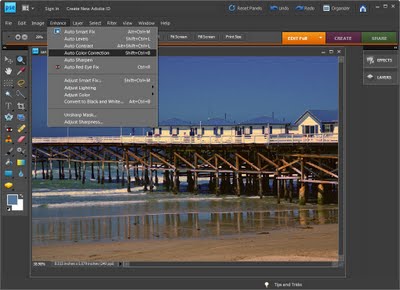
Whenever you believe that there is something wrong with your photo’s colour or tonal range a good place to start fixing it is with your software’s automatic fix options.

In Photoshop Elements choose Enhance > Auto Smart Fix and preview the result. If you do not like it choose Edit > Undo and try one or all of the Auto Levels, Auto Contrast, Auto Colour correction options under the Enhance menu.

Each of these adjusts the image in a different way and if they work on your image then they’re a simpler way of fixing it than having to do it manually.

Helen Bradley

Wednesday, March 3rd, 2010

Photoshop – Cut Text from an Image

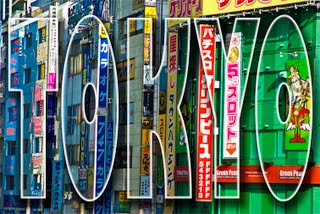
This is a cool effect that you see quite a lot in advertising and elsewhere. It involves cutting some text out of an image so you see an image in the text shape.
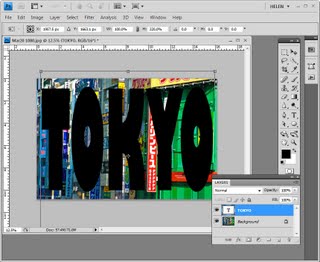
Step 1
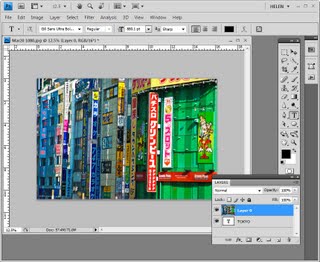
To begin, open an image to use and then use the Type tool to type some text over the top of it. Make sure that the type is very large and that it covers a lot of the image so choose a thick font.
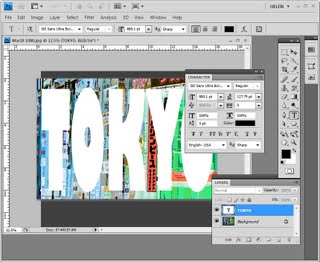
Step 2
You can adjust the Tracking and Font size of the text in the Character palette to ensure that the text is large and so that you do not have excessive spaces between characters.Step 3
Double-click on the background layer of the image and click Ok to convert it to a regular layer. Drag the image layer on top of the text layer in the layer palette.Step 4
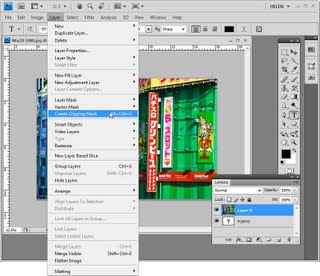
With the image layer selected, choose Layer > Create Clipping Mask to clip the image to the shape of the text on the layer underneath. Step 5
To add some extra dimension to the effect, duplicate the image layer by selecting it and choose Layer > Duplicate Layer and click Ok.

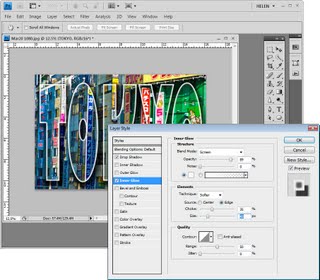
Drag this layer containing a second copy of the image to the bottom of the layer stack. Select the text layer again and add layer style such as a Inner Glow or a Drop Shadow to finish the effect.

Photoshop, Photoshop Creative, clipping mask, text effect

Helen Bradley

Monday, March 1st, 2010

How to install fonts in Windows 7

fonts

Ok. It should be dead easy to install fonts into Windows if you have been doing it since Windows 3.1. Until Windows 7 you went to the Control Panel, chose Fonts then installed them using the handy dandy dialog. Ok. Not so simple but it worked and it has done so for years.

Fast forward to Windows 7. No Font dialog as I remember it and no font install option. Ok, step backward, think, investigate, light bulb moment encountered.

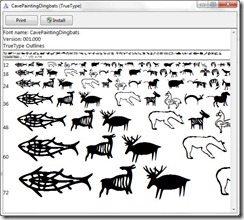
In Windows 7 there are multiple ways to install fonts but seriously only one I’d bother using. Open the folder containing the font file, unzip it to see the TTF file if it is zipped then double click the font’s ttf file name. A dialog opens showing you what the font looks like and, at the top, you will find an Install button. Click it and seconds later the font is installed. Really? It’s how it always should have been done.

You can drag and drop the .ttf file into the fonts list via the Control Panel but seriously – why bother going to the effort. You can also right click on a font’s .ttf file and choose Install from the menu too but I like to check the font before installing so it is method #1 for me.

Helen Bradley