Saturday, July 5th, 2014

Lightroom – Hand Tint a Photo Effect

Create an Old Time Hand Tint Effect to a Photo in Lightroom

Learn how to apply an old time hand tint effect to a photo in Lightroom. You will see how to convert the image to black and white and then how to color it using the  Adjustment Brush. This technique can be applied to a range of images and the effect works well when you want a hand tinted look for your photo.

Helen Bradley

Wednesday, April 17th, 2013

Lightroom Tip – Locate your Adjustment Brush and Graduated Filter fixes

Lost your Adjustment Brush or Graduated Filter fix? here’s how to find it.

When you add an Adjustment Brush fix or add a Graduated Filter to an image in Lightroom a marker, called an Edit Pin, is placed on the image to indicate where the fix is located. You need to click this if you want to ever edit the fix.

To select the adjustment, target the tool that you want to fix – so, if you want to fix a Graduated Filter adjustmt will change to a black circle surrounded by a lighter circle – this tells you the adjustment is selected so you can now go and edit it.

Helen Bradley

Friday, January 28th, 2011

Crafting images in Lightroom

Lightroom has more tricks up its sleeve than simple photo fixes such as exposure and contrast. It’s possible to craft images inside Lightroom and, in many ways, the tools in Lightroom make the task easier than it would be in Photoshop or another editing program.

In this post I’ll show you a way to turn a relatively hum drum image into something much more visually exciting. So, when you don’t get the image you want straight out of the camera see if, armed with some simple Lightroom tools, you can coax some better results from it. Remember too that this is a creative technique – you’re not looking for realism as much as a way to create a different look for your image.

Step 1

Start out with an image that has what I call “good bones”. It needs to be pleasingly composed and it needs to have something that compels you to want to look at it and to spend some time working with it. Good contenders for this process are images with interesting skies and these include heavy clouds and clouds captured at sunset and sunrise.

Step 2

In the Develop module use the adjustments in the Basic panel to apply global adjustments to the image. I focus in detail on the adjustments that aren’t available in the Adjustment Brush and Graduated Filter such as Blacks, Fill Light, Recovery and Vibrance.

I will adjust the Recovery slider at least half way to the right and adjust Fill Light to get some detail from shadows. I’ll adjust the Blacks even to the extent of plugging some shadows for now. I’ll also use other adjustments such as Exposure and Brightness just as a start.

The fact that none of these changes are permanent is a big plus because if you don’t like the results later on you can come back and readjust them.

Step 3

Having dealt with the overall image I’ll now turn my attention to parts of it. Here there are three areas in particular – the hut and bottom right of the image, the bottom left and the sky.

Starting with the hut I’ll drag the Graduated filter in from the bottom right of the image. Then I’ll bring some detail out in that area by adjusting Brightness, Exposure and Clarity.

Step 4

The sky is treated the same way as the hut. This time the Graduated Filter is dragged down from the top. Then I decreased Exposure and Brightness to reveal the detail in the clouds. I added some Contrast and Clarity and a hint of dull yellow color.

Step 5

In the bottom left of the image another Graduated Filter adjustment fine tunes this area of the image and adds a hint of dirty yellow color. Reducing both Sharpness and Clarity softens the details here.

At this point I might consider adding a second Graduated Filter over the top of this one to again reduce Clarity to soften the details even more. The Graduated Filter can be used cumulatively so adding one on top of the other enhances the effect.

Step 6

Once I’ve finished with the Graduated Filter, I will return to the Basic panel and fine tune the settings there. Here I adjusted the Brightness and Fill Light to lighten the image a little.


Step 7

At this point I cropped the image to remove some excess detail from the bottom and right edges to focus interest more in the water and the hut.

Step 8

To finish, I used the Adjustment Brush on the plastic crates. By painting over them with the brush and reducing the Exposure slightly they are made a little less distracting.

At any time I can revisit any of the changes I have made including those applied with a Gradient Filter or the Adjustment Brush and adjust the settings if desired.

Not every image will lend itself to this treatment but many will. You should note too that here I was working on a jpg image and because of the in camera processing applied to jpg images and the fact that much of the data that the camera captures is discarded in the process of saving an image as a jpg, the scope for adjusting this image was significantly less than would have been the case if I had the image captured as a raw file.

Helen Bradley

Tuesday, April 20th, 2010

Lightening backgrounds in Lightroom

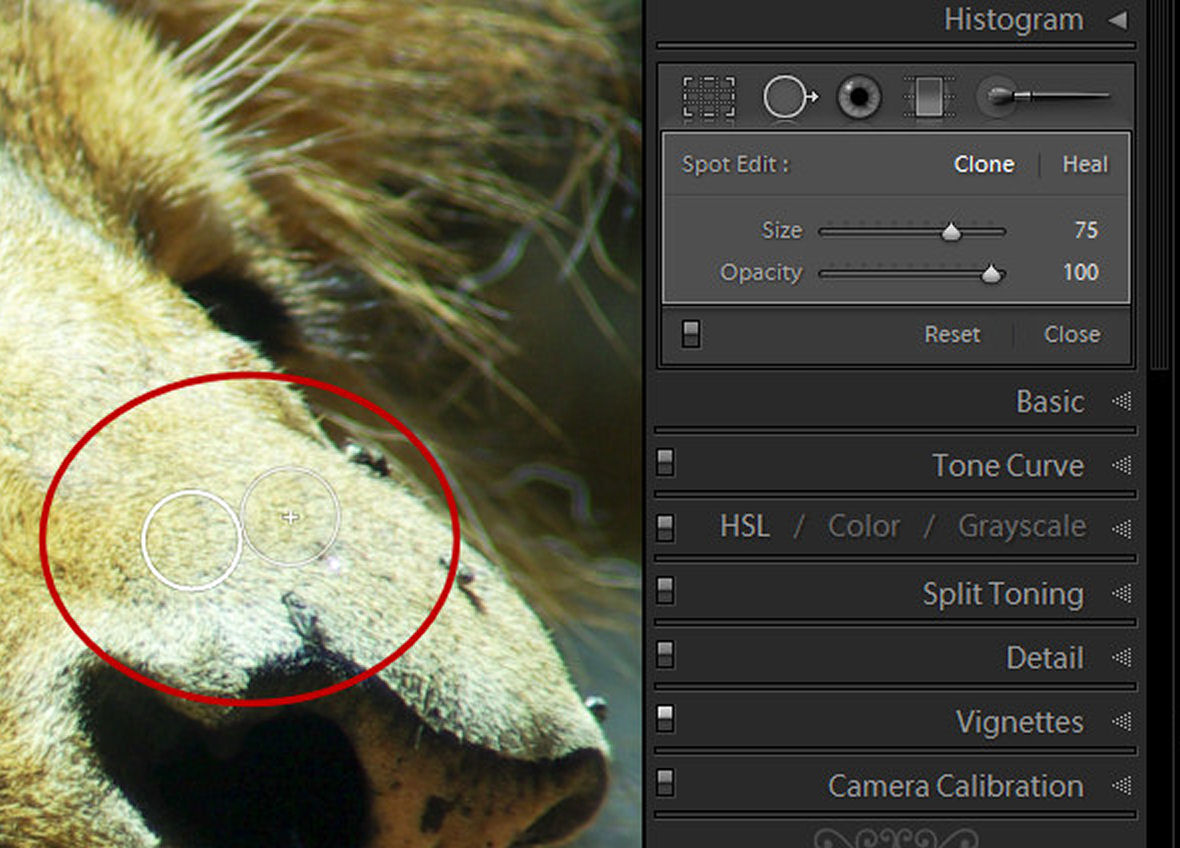
I was recently asked by photographer Rhonda Pierce to look at an image that she’d taken and to suggest how the background could be lightened to white in Lightroom.

This image raises an interesting question for anyone involved in postproduction and trying to understand when to use Lightroom and when to use Photoshop for editing.

Ultimately, if this image is to be printed at a large size then Lightroom really isn’t the tool for the job. There is too much wispy hair, particularly on the left side of the model’s face just opposite her mouth, which is cumbersome to work with in Lightroom. Selecting around the hair and doing a detailed job really isn’t possible or feasible in Lightroom. Ideally, Photoshop and a good extraction tool such as Vertus Fluid Mask would be the best combination to use.

However, if the image is not going to be printed at a large size and, for example, it’s destined for the web or if it is a preview image for a client where they’ll choose their favorite image from a series, then Lightroom is a good tool for the job. While Lightroom won’t do such a good job, it will do it very fast and, at the resolution we’ll be using the image we probably won’t see any real difference anyway. For this use, we can compromise on quality and harness the superior speed of Lightroom.

Later on, if this is the image the client chooses and if it will be printed at a large size, then we can wind back the Lightroom changes, export the image to Photoshop and do a proper job. We’ll only be spending time fixing those images that the client is actually paying for and that need a quality fix applied.

Lightening the background in Lightroom
So, assuming this image is destined for the web or for client preview purposes, let’s go back to the original question as to how the background can be lightened in Lightroom.

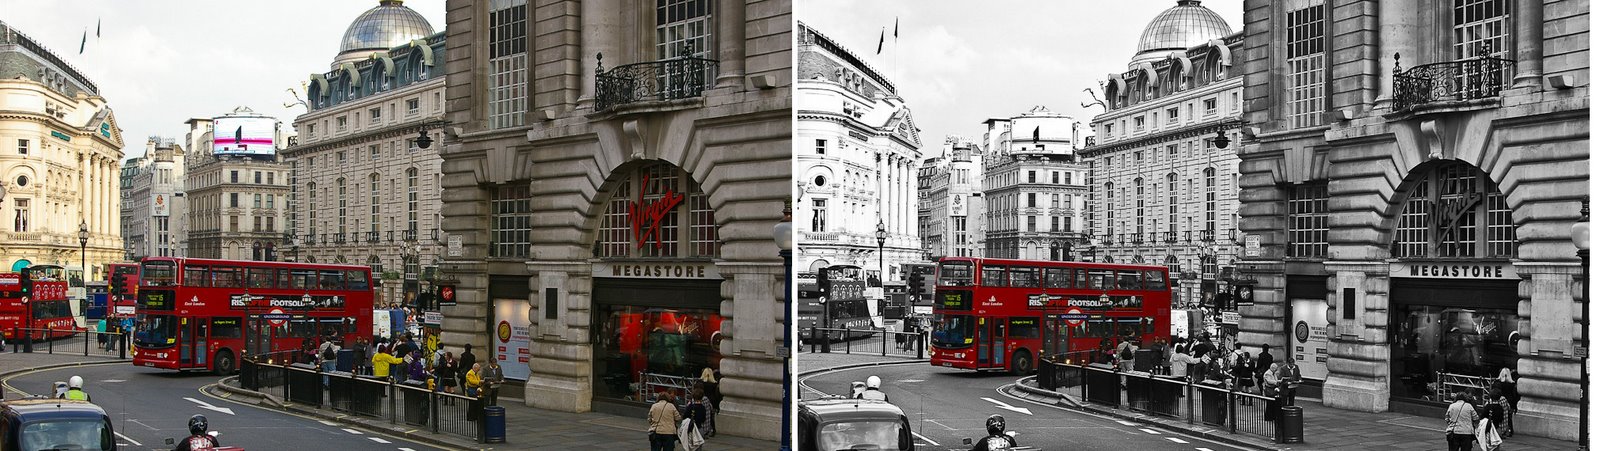
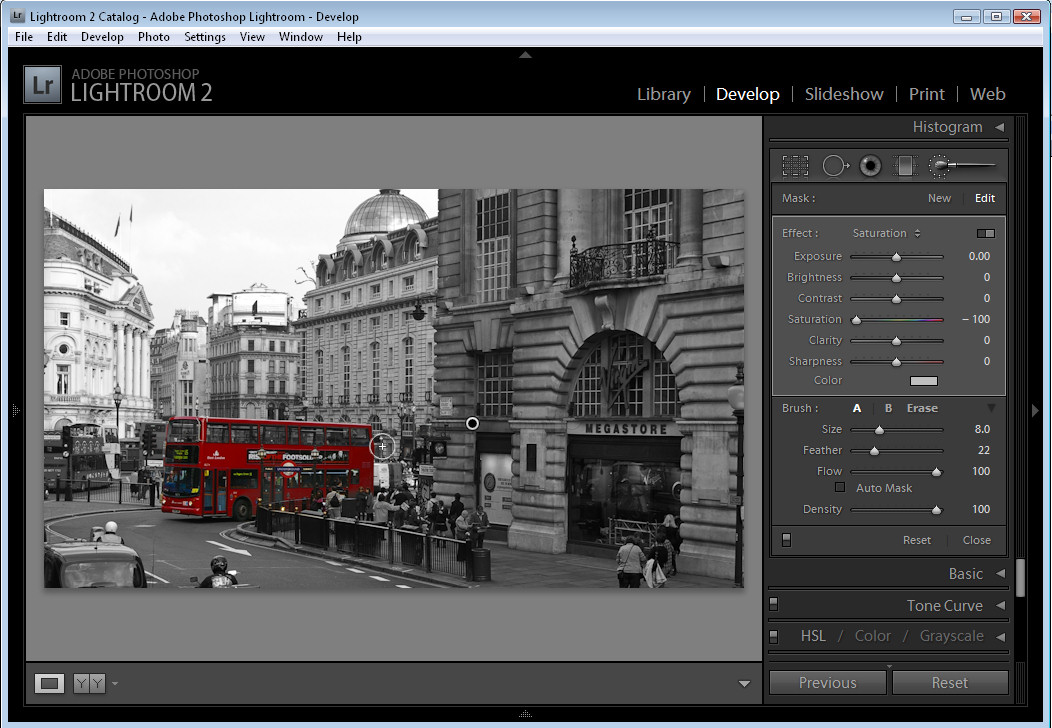
Any solution will require us to isolate the background. It’s not possible to lighten the background in Lightroom without affecting everything else in the image and that will destroy the rest of the image. The Adjustment Brush is the obvious solution.
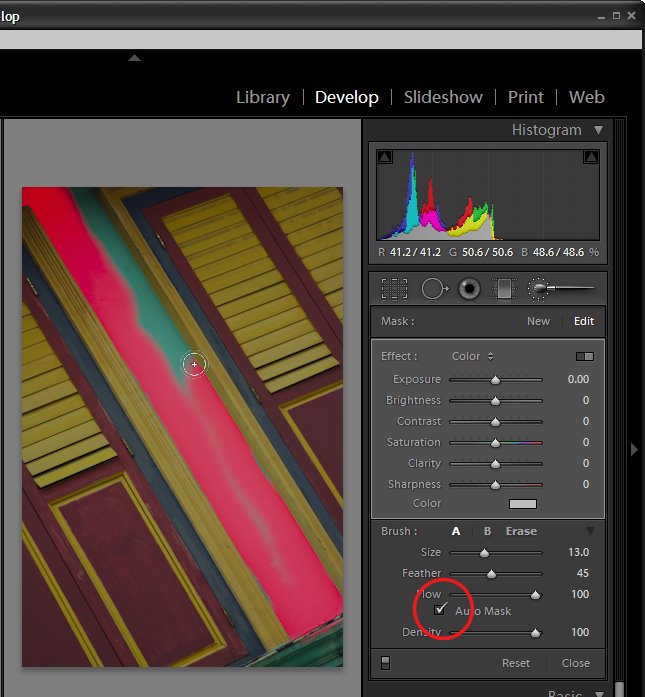
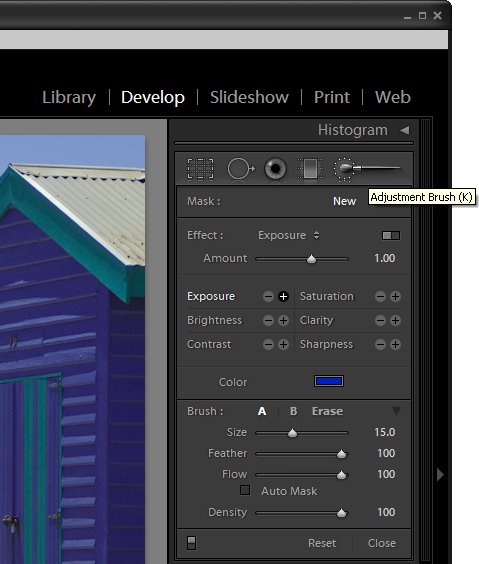
Step 1
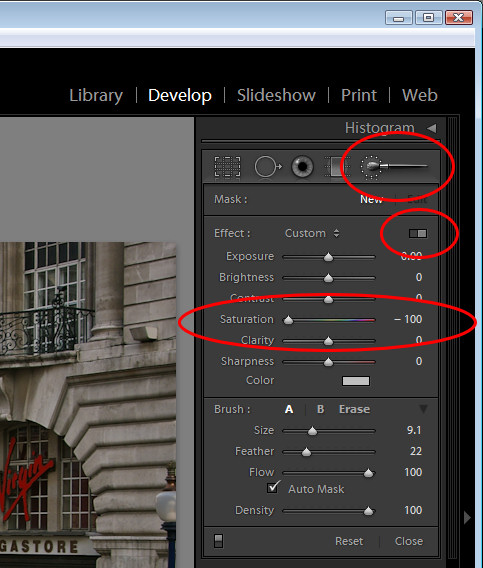
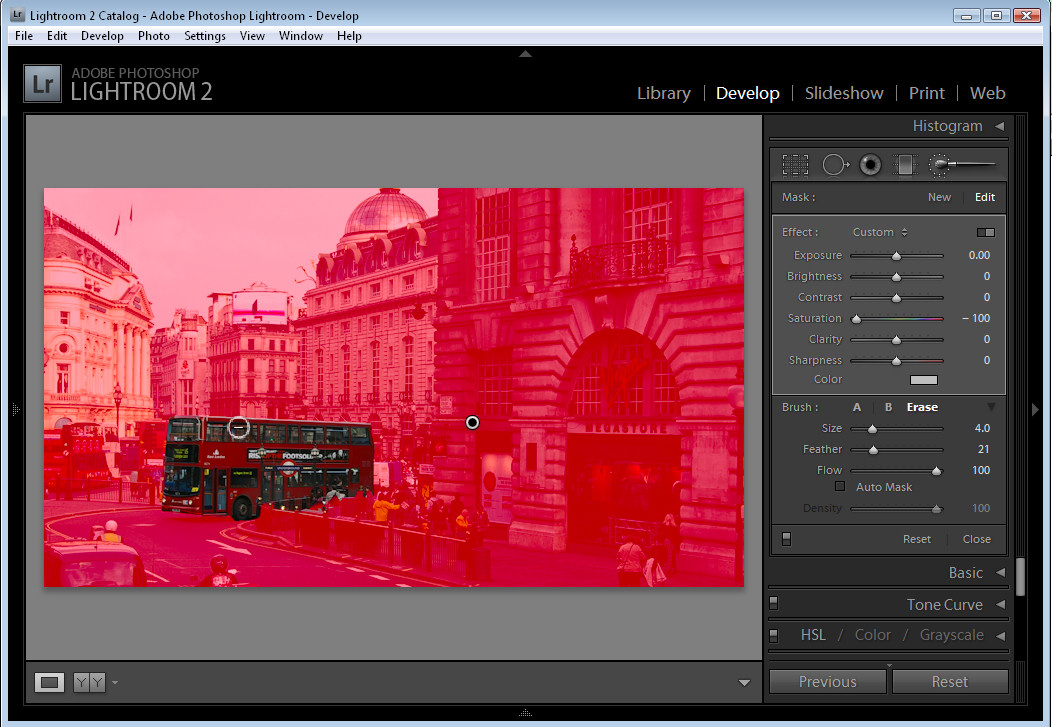
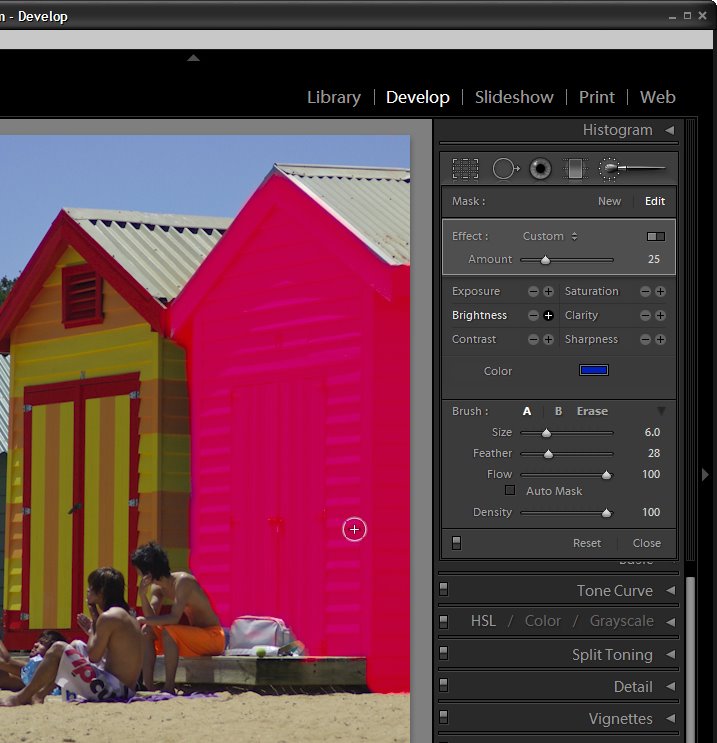
Click the Adjustment Brush in the Develop module and size Brush A so it is big enough to paint over the background. Add a small feather, and for this job, enable Auto mask so Lightroom will do most of the selection work for us. Set Density to 100.

Click and paint over the background with the brush. When you lift the brush you’ll see the Adjustment Pin. Make sure the cross hair in the middle of the brush stays on the background and then the Auto Mask feature will ensure that the brush doesn’t paint over anything but the background.


Step 2
To see the painted area, press the O key and a red overlay will appear. This makes it easier to see where you are working.
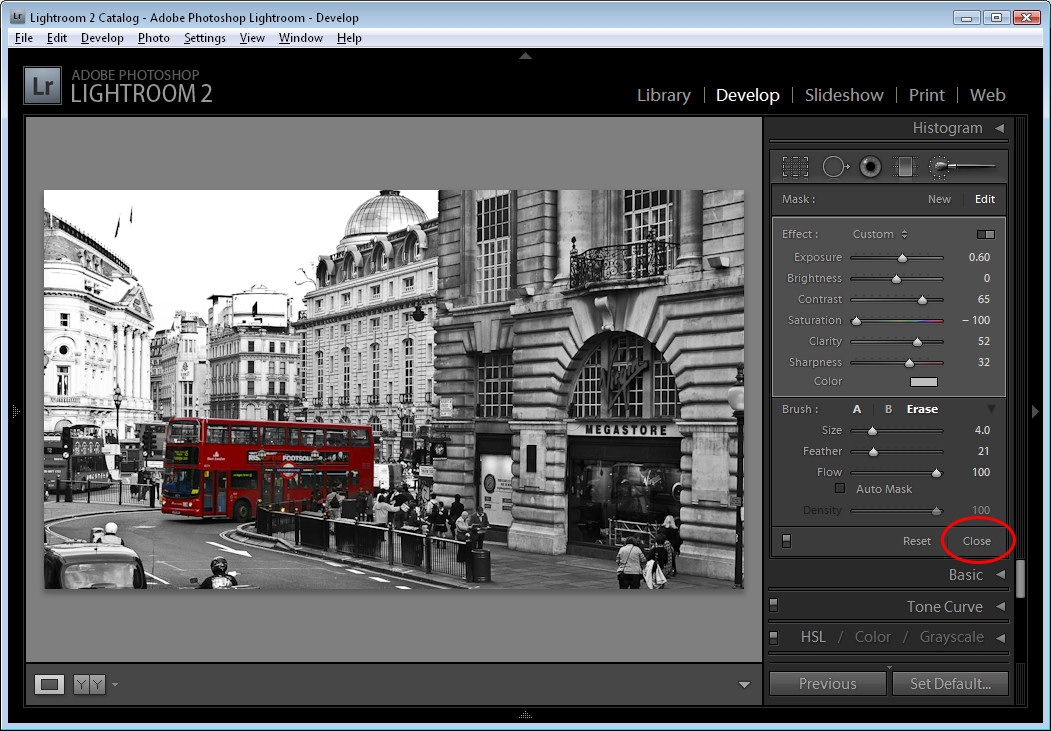
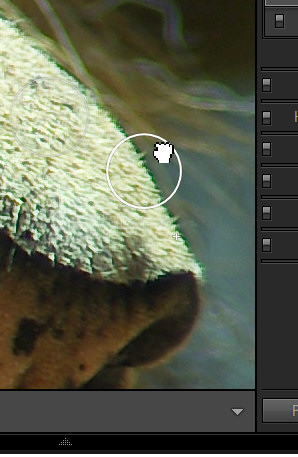
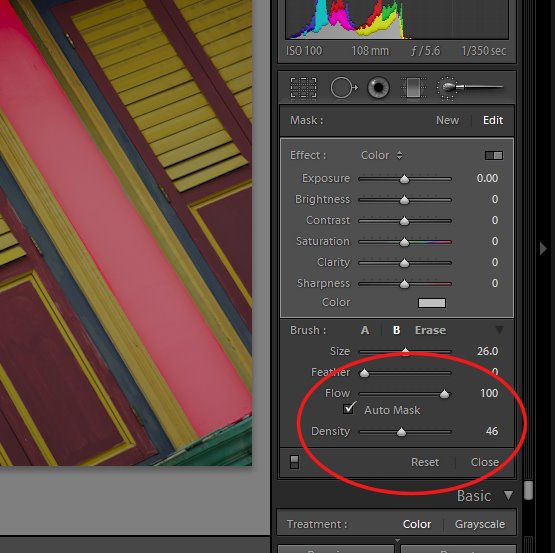
Step 3
To get the background behind the very fine hairs you might be tempted to select a very small brush and try to isolate the areas manually. However, to do the job fast, it’s more efficient to size the brush very large so the center can be positioned over an area of the background and the rest of it extends over the wispy hair area. It might help to significantly decrease the density at this point to around 30 so that you only partially select the background in the wispy hair area.

Position the brush over an area of the background so the rest of it extends over the wispy hair area and click once.
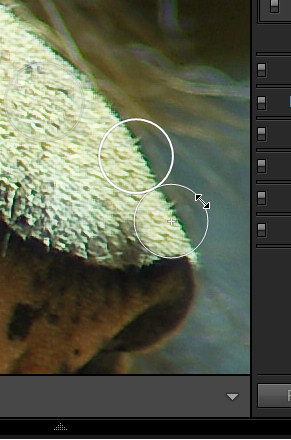

Step 4
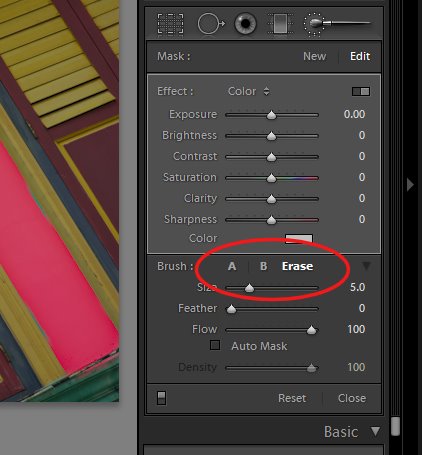
Return to 100% density and continue to work in the other background areas making sure to avoid the wispy hair.

When the area that you want to effect are selected, press O to hide the mask.
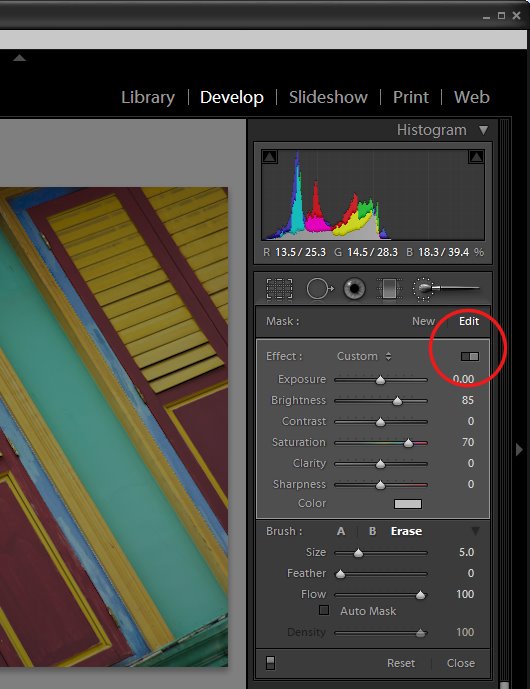
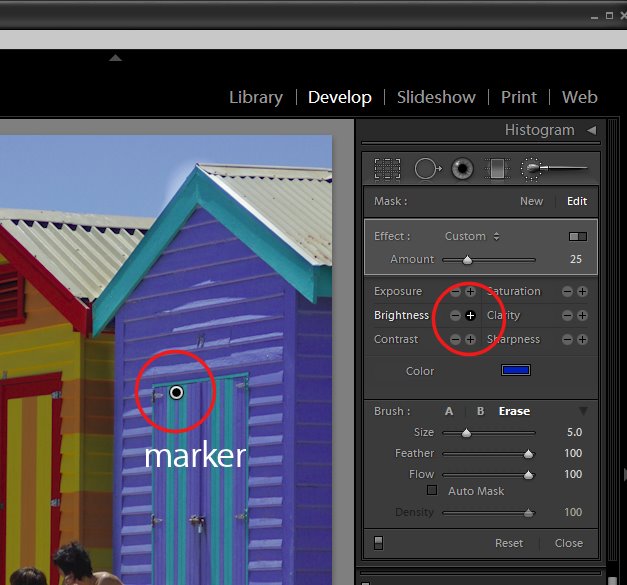
Step 5

Now adjust the settings for the Adjustment Brush. Increase the exposure and brightness until the background is white.

Click Close to close the panel and deselect the Adjustment Brush.

Step 6
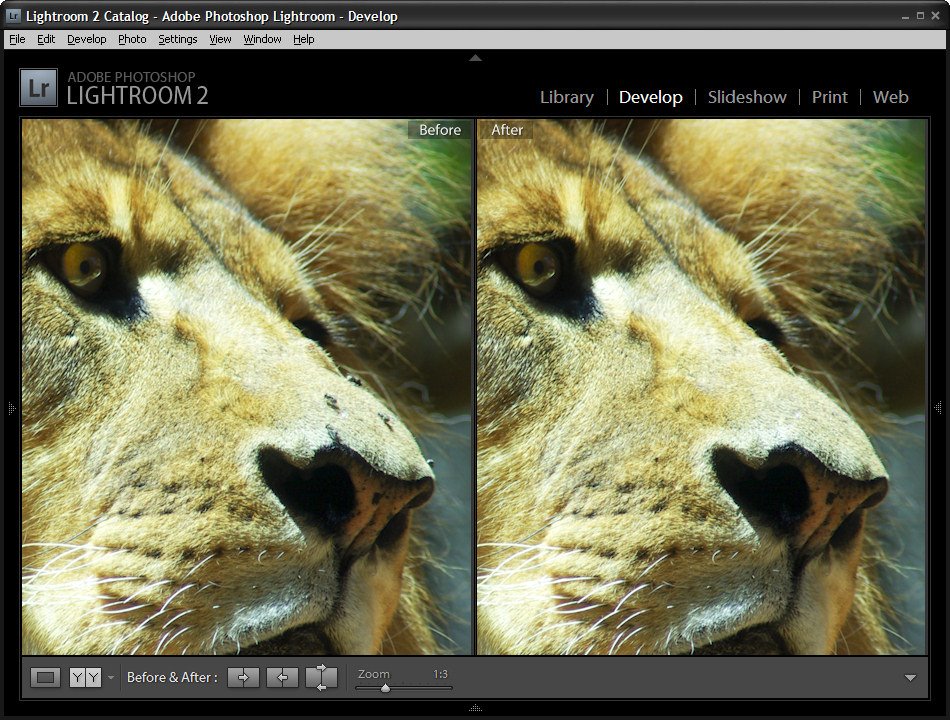
Check the wispy hair area and you’ll see that not all the grey has gone but, when viewed in context of the remainder of the image the results are acceptable.

Press the backslash key (\) to see the image before and after the fix.

Helen Bradley

Tuesday, October 13th, 2009

Highlight Color effect in Lightroom


One effect many people like to use with their photos is to remove all the color from the image and leave it in only one place in the image. For example, in a wedding shot you might turn the entire image into black and white leaving just the bride’s bouquet in color.

Here’s how to achieve this effect in Lightroom using the Adjustment Brush.


Start with the image selected in Lightroom and switch to the Develop module.

Click on the Adjustment Brush and make sure you have it set to Show Effect Sliders so that you can adjust multiple sliders at once. Drag the Saturation to -100.


Click the letter O so that you can see as you paint and with a large size hard paintbrush click on the image in an area you want converted to black and white and then paint over the image in all places that it should be turned to black and white.

It will be quicker if you set the feather to a low value, the brush to a large size and disable the Auto Mask option for now.


To work close around the edges of the area that you want to leave in color, set the brush size smaller and work slowly around the edges.

If you go too far, press the Alt key (Option on the Mac) and paint out the overlay color. The Eraser uses a different brush so make sure it too is set to have Auto Mask disabled and a low Feather value.

To zoom in click Z and to move the image, press the Spacebar as you drag on it.


Once you have the area selected that you want to convert to black and white, disable the overlay color by pressing the O key.

This leaves the selected area in black and white and the unselected area in color.

You can now tidy up the edges if necessary by using the Adjustment Brush tool – just make sure that you click on the marker for the Adjustment before you start painting – it should show a black center – if not, you’re making a new adjustment and not editing the existing one.


You can adjust the other sliders, if desired, to improve the black and white portion of the image. For example you can boost the Contrast and Clarity if desired. When you’re done, click the Close option at the foot of the panel to finish.

In this example I added another adjustment using the Adjustment Brush over the top of this one to reduce the exposure and brightness in the sky to add back some of the cloud detail lost in the conversion of the image to black and white.

Helen Bradley

Friday, July 10th, 2009

Fixing Blemishes in Lightroom

Spot_before-after.jpg
When you have an image which needs some spot fixing before printing you can often do the work in Lightroom and avoid the necessity of a round trip to Photoshop. Lightroom has both a Clone and a Heal tool available for fixing blemishes and removing problems such as spots caused by dust on your camera’s sensor.

To see how to use these tools in Lightroom, start by selecting an image to fix and select the Lightroom Develop module.

Step 1

Locate the Spot Removal tool which is situated below the Histogram and to the immediate right of the Crop tool. You can also select it by pressing its shortcut key N.

For the brush options, you have the choice of Clone or Heal so select the option to use.

Clone works similarly to the Clone Stamp in Photoshop where you select the portion of the image to fix and then the portion to replace it with. Apart from choosing the Size of the brush and the Opacity Lightroom simply replaces one area of the image with another without making an attempt to blend the fix.

If you choose Heal then Lightroom samples the area you’re trying to fix and attempts to blend in the replacement area so the fix is less apparent.

Step 2

Select Clone or Heal and then adjust the size using the slider or the square brackets [ and ]. Your brush size needs to be large enough to cover the area to fix.

You can click on the area to fix and leave Lightroom to choose the source image data to fix it with or click on the part of the image to fix and continue to hold the left mouse button as you drag to find an area to use to for the fix. You will see a preview of how the fix will look to help you determine a good part of the image to use. Only let go the mouse button when you have your selection in place.

When you have applied the fix you will see two circles on your image – they appear when you hold the Spot Removal Tool over the image. The circle with the thickest edge is the selected area and the circle with the + symbol in it defines the area you are fixing.


If you did not get the fix exactly right you can click inside either of the circles and drag the selected circle to a different position.


You can also select a circle and then position your mouse over the edge till it turns into a double headed arrow and then drag to resize it.

You can change a fix applied using the Heal option to a Clone fix (or vice versa). To do this, select either of the two circular marker and click Heal or Clone in the Develop tools panel to change the fix type. This allows you to experiment to find which gives the better results.

In our example, Heal worked well on the lion’s nose in areas which were all hair and Clone worked along the top edge of the nose where the fix markers spanned part of the nose and part of the background behind.

To see the image without the circular markers, press H to hide them. Press H again to display them.

To see the Before/After results reflecting just the effect of applying the Spot Removal Tool, click the On/Off switch in the Spot Removal tool area of the Develop panel. This works better than the backslash key (\) which toggles on/off all the fixes you have made to the image and not just the most recent one.


If you have problems such as sensor dust that appear in the same position in a series of images, you’ll appreciate the ability to copy the Spot Removal tool fix from one image to others. Right-click the fixed image, choose Settings > Copy Settings and from the Copy Settings dialog enable the Spot Removal checkbox disabling all other options that you do not want to copy. Click Copy to copy the effect and then paste it onto the other images which also suffer the same problem. While this may not be an ideal fix for all of them, it will give you head start on fixing most of them.

Helen Bradley

Tuesday, June 30th, 2009

Lightroom: More Adjustment Brush techniques


You just gotta love the Adjustment brush in Lightroom 2. It makes Lightroom a great tool for quick fixes and, honestly, I’ve used Photoshop a lot less since I started using Lightroom. I love the combination, Lightroom is fast and so smart and Photoshop is there for when I need specialist effects. So, on to today’s post…

In an earlier post I talked about using the Adjustment Brush in Lightroom 2 at a simple level – sort of Adjustment Brush 101. In this post I’ll show you some advanced features of the adjustment brush which help you make multiple adjustments to the image at one time and to do so more easily. Consider this Adjustment Brush 102.


In the Develop module, when you have the Adjustment Brush selected there is a switch that you can click to switch between Button and Slider mode. In button mode you can adjust one of the Exposure Brightness, Contrast, Saturation, Clarity and Sharpness settings at a time. In Slider mode, you can adjust any one or more of these options.


In the Brush area of the panel you will see an AutoMask option. When this is enabled, you can paint around the inside edge of an area and the AutoMask feature will mask the area ensuring your brushstrokes don’t go over the edge. This works best on areas where the edge is distinct and recognizable. When you paint, make sure you have the main part of the paint brush inside the area you want to effect.

To toggle between AutoMask being on or off as you paint, hold the Control key as you paint (Command on the Mac).


In the Brush area you will see two brushes, A and B. You can switch between the two by clicking on the A or B indicator. Each brush has its own Size, Feather, Flow and Density settings, and AutoMask can be enabled for either or both of the brushes. Having two brushes lets you configure each differently and switch easily between the two.

Each brush can be switched into the third brush mode – Erase mode by holding the Alt key (Option on the Mac) as you paint with either brush.


Setting the brush size defines the area of the brush and it is the central circle which you see when you are painting. The Feather amount adds an additional softness to the brush which is shown by the second outer circle. A hard brush has a Feather of 0 and it shows as a single circle.

Flow specifies the flow for the brush which can be set to less than 100 so you can build up an effect gradually by painting over an area multiple times. The Density slider adjusts the opacity and controls the maximum opacity of the brush strokes. So, if you have Flow set to a low value and Density to 50, the maximum opacity that the brush can reach regardless of how many times you paint over an area is 50.


In the Effect area is a Color option which allows you to paint over an image with a color of your choice. To do this, select the color to use and then paint over the area to apply it to. You can use this to colorize a black and white image or, as I’ve done here, paint over a dark blue area with yellow to make it dark green.

Tip: Interested in learning more about Lightroom? Check out my post on understanding Clarity, Vibrance and Saturation in Lightroom 2.

Helen Bradley

Tuesday, May 12th, 2009

Lightroom: Spot fixing with the Adjustment Brush

One of the exciting new features in Lightroom 2 is the adjustment brush which lets you to make spot fixes to your image in Lightroom. These fixes apply to only the area you select rather than the entire image. This means you can make local adjustments for contrast, saturation, exposure, brightness, clarity and sharpness without having to take the image to Photoshop to do this.

In this post I’ll show you how to get started using the adjustment brush in Lightroom. 2


Step 1
Open Lightroom and click the Develop module. Locate the Adjustment Brush and click it to select it. Hold the brush over the image to check its size. The inner circle is the hard part of the brush and the outer circle shows the edge of the feathering. To adjust the brush size use the [ and ] keys or adjust the Size and Feather using the sliders.


Step 2
Select the adjustment to make, such as Brightness or Saturation by clicking its + symbol to increase its value or the – symbol to decrease it. Then start painting on the image to adjust that part of the image. When you start painting the effect onto the image, Lightroom places an identifying marker on the screen. Here I have Brightness selected and the marker is visible.


Step 3
If you don’t know where you have painted – and it’s often very hard to know exactly – press the O key to view or hide a mask which shows the area you have painted on. If you prefer to, you can display the mask as you work. The mask also appears if you hold your mouse over the marker.

To erase the brush strokes, click the Erase option in the brush area and erase over the area to remove the strokes. To return to painting click brush A which is the default brush and continue to paint over the area. You can also use the brush with the Alt (Option on the Mac) to remove the painted areas rather than switching between the brush and eraser.


Step 4
If the effect is too much or too little you can adjust the intensity of the effect using the slider.


Step 5
If another area of the image requires fixing, click the New option and then repeat the steps to select a fix and then paint it onto that part of the image. Later on you can adjust either of the fixes by first clicking the Adjustment Brush tool to select it and then click on the marker for the area to change – you will see that the word Edit is now highlighted – and you can now adjust the painted area or adjust the amount of the fix.

In a future post I will look at some more advanced functions of the Adjustment Brush.

Helen Bradley