Tuesday, October 29th, 2013

Controlling Depth of Field in your Photographs

Learn what depth of field is and how your camera settings affect it

Some subjects need to be fully in focus to be shown at their best and others need dreamy out of focus backgrounds to create the right setting. The feature that is key in both situations is called depth of field – it gives you both that ‘everything in focus’ look and it also gives you soft out of focus look. Depending on what you are photographing getting the depth of field right is often the difference between a snapshot and great image.

I’ll explain what depth of field is and how to control it with your camera settings.

What is depth of field?

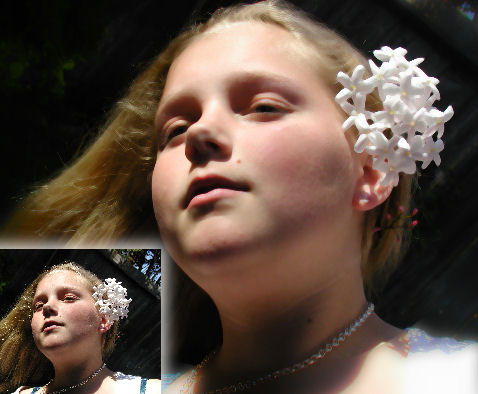
At its simplest, depth of field is the zone of sharp focus in front of, around and behind the subject in your photo when you are focused on that subject. When you have a shallow depth of field, only a small area around the subject will be in focus and quite often only a small part of the subject will be in focus. Everything else in the image will be out of focus with things further away from the subject, either in front of or behind the subject, being more out of focus the further away they are. This image has a shallow depth of field – it’s a great way to shoot flowers:

When the depth of field is deep, nearly everything in the shot is in focus. You control the depth of field in your images by adjusting the camera’s settings for aperture, adjusting the focal length of the lens and the distance you are from the subject. This image has a deep depth of field – that’s important as we want to see everything in this scene from the grass in front of us to the horizon miles and miles away.

Let’s look at each of these in turn.

Control depth of field with aperture

One way that you can control the depth of field in an image is to change the aperture that you are using. For this, you will need to have your camera set to Aperture Priority or Manual mode. Selecting an aperture that is very large, such as f/1.4 to f/2.8 will give you a shallower depth of field around your subject. The aperture used for this image was a huge f1.4 so only a small portion of it is in focus:


If you shoot with a small aperture, such as f/9 to f/11 or more you will find that more of the image will be in focus, which gives you a deeper depth of field. If everything else stays the same, the difference in the aperture setting you use can result in a very different image. The aperture used here was a small f11:

One benefit of shooting with a large aperture, such as f/1.4 to f/2.8, is that a lot of light is getting into the camera so you can use a fast shutter speed. Conversely, a down side of shooting with a small aperture such as f/9 to f/11 or more is that less light gets into the camera so you will need to use a slower shutter speed  or a higher ISO value. In some cases you will be shooting with such a slow shutter speed that you will need to use a tripod.

Control depth of field with focal length

The focal length of your lens can also have an impact on the depth of field when you use this to make a subject bigger. So, if you are shooting with a 50 mm lens, you will get a much deeper apparent depth of field than you would if you were capturing an image with a 200 mm lens at the same aperture and if, in both situations the subject size is the same. The depth of field is actually not significantly different but it looks different because there is more background in an image when you capture it with a 50mm lens than you will get when you capture it with a 200 mm lens. So a rough rule of thumb is that the more zoomed into the subject that you are, the shallower the depth of field will appear to be. This giraffe was shot at f5.6 which isn’t a particularly large aperture but it was shot at 300mm zoom so the giraffe is quite sharp and the background is nicely out of focus:


If you are shooting landscapes you will get best results when you use a short lens such as a 28 mm lens as the image will appear to have a much deeper depth of field. On the other hand, a zoom lens can be a good lens to use when shooting portraits because the further you’re zoomed in to the subject the less background will be in the image and the shallower depth of field you will appear to have. This image was shot at f11 with a 28mm lens so everything from the lamp post to the building is in focus:

Control depth of field by varying the distance from your subject

The distance between the subject and the camera is another way that you can impact depth of field. So, for example, if you photograph a subject close up, such as in the region of up to 10 feet away, then the depth of field will be much shallower and more of the image behind the subject and a little in front of the subject will be out of focus. On the other hand, if you move the subject further away from you so that the subject is 20 feet away then the depth of field will be much deeper and there will be a lot more of the image in front and behind the subject in focus. This image was shot with a 200mm lens – the singer was relatively close to the camera  and the background was some distance behind him so the musician is in focus and the background nicely out of focus:

Whenever you’re considering depth of field, you should also note that, when the subject is in focus, the amount of the image that is in focus behind the subject will be greater than the amount of the image that is in focus in front of the subject. The ratio is approximately one-third to two-thirds, so the depth of field will extend roughly one-third in front of the subject and two-thirds behind the subject.

Helen Bradley

Thursday, June 13th, 2013

Lightroom Tip – Clarity and Portraits

Add that Softened Look to Your Portraits with the Clarity Slider

One time when you’ll want to use a negative value for Clarity in Lightroom is when you have a portrait that you want to give a softened look to.

Negative clarity softens an image so it’s a good choice to use. Just adjust the slider to the left to around -20 or more depending on the results.

Use this on portraits of women and children or to give an image an ‘Early Hollywood/Casablanca’ feel.

Helen Bradley

Monday, November 26th, 2012

Photoshop – Quick Portrait Makeover

Touch up your portraits with this quick video tutorial. I’ll show you how to remove blemishes and soften skin tones.


Transcript:

Hello, I’m Helen Bradley. Welcome to this video tutorial. In this tutorial I’m going to show you how you can do a quick and easy portrait makeover.

Let’s have a look and see before we begin exactly what we’re going to achieve. So this is the starter image that I started off with. And I did some spot fixing on it to make sure that I had removed the skin blemishes and then I brought out the detail from the shadows. And this is the starting point that I then had and this is the effect that we’re going to look at creating. We’re going to soften the skin and brighten the eyes in our model. So let’s have a look and see how we would start off with spot fixing this image.

I would go into this image and then I would start by selecting the spot healing brush tool here because this is a tool that you can simply just paint over problems on the skin and it will fix them. So I went over this image really, really carefully. I zoomed in and I got every single one of the blemishes on this model’s skin and it’s probably a five minute job to just neaten the image up and just to get a really good starting point for it. And then having done that I did a shadows and highlights adjustment to bring some detail out of the shadows. So I’ll choose Image, Adjustments, Shadows/Highlights. And the default setting is 35. Now I used that. It was probably a little bit high. So you could probably bring it down a little bit perhaps to around 23 or 24, but there’s a good starting point for your image. And from there you’re ready to go ahead with the softening effect.

So let’s go back to the image that I’ve spot fixed and now let’s get rid of the two layers that are the fixed layers. And we’re just going to work from the point at which we opened up some of the shadows and highlights. So the first thing that we’re going to do is to create a duplicate of this background layer, just duplicate it and then we’re going to blur it. So I’m going to choose Filter, Blur, and then Gaussian Blur. I’m going to set the blur value to sort of a lowish sort of value. What I want to do is blur the model’s skin and use that in a minute to paint over her skin. So I want something that’s sort of a little bit over what I want my final effect to be but not totally over. So I’m thinking here about 9 or 10 pixels will be a good amount for this image, so I’ll just click Ok.

And having blurred that layer a little bit I want to add a bit of noise into it and I’ll do Filter, Noise and then Add Noise. And we want to bring in monochromatic noise and we want it to be Gaussian. Gaussian noise applies more noise to the lighter areas of the image and less to the darker areas. And we want probably somewhere between 5 and 10 percent noise. And this slider is really hard to adjust at that level so I’m just going to type in 7.5 percent and that’s giving us a nice little bit of noise in her skin tones, so I’ll click Ok.

So we do not want the image to look exactly like this. We just want that to be a starting point. So let’s add a mask to this layer. I’m going to Alt or Option click on the Add Layer Mask icon. And what that does is removes the blur. it will remove the entire effect from the model. And we’re going to paint on this mask to bring back in the softening where we want it to be. So I’m going to select my brush tool and select a nice soft brush, this one’s a good brush to use, and I’m going to paint with white. I’m just going to size the brush up a little bit. Now you’ll be a bit more careful than I am being, but what I’m doing is selecting over all the areas, painting over all the areas that I want the skin to be softened. So that is basically everywhere but her nose and mouth and eyes. Although I want the skin on her nose to be softened, I don’t want to soften this detail around here. And I may want to soften this area, but I don’t want to soften her eyebrows themselves. So very carefully softening by painting on the image with white in the areas that you want it to be softened. And you can see on the mask here the areas that we’ve got and perhaps any areas that we might have missed out on at this stage. Again, I don’t want to soften that jaw line too much. that’s a nice strong line and I want to keep that there.

Now that I’ve done that I can adjust the opacity of this layer a little bit. I’m going to adjust it down to zero which is totally removing the sharpening effect. And now I’m just going to march it up using the scrubby slider until I get the amount of softening that I want. So I really want a subtle softening, not totally obvious but just subtle softening of the skin. And I think probably about 30 percent is a good value for this image.

Now I’m going to make another duplicate of this background layer and drag it to the top because what I want to do now is to fix her eyes. So all I’m going to do is focus on this top layer and I’m going to look for some stronger color and contrast in her eyes. So I’m going to choose Image, Adjustments, Curves. Curves is a good adjustment for this and again I’m going for slightly more than I need. So there is some more whites in her eye. Now I know that the blue color of her eye is in this area, so let’s add a bit more contrast through that area.

So let’s see. That’s the before and that’s the after on her eye. So I’m just going to click Ok to accept that, but of course that’s not the image effect that we what. We want more of this effect, but we’d like to borrow some of the eyes from this effect. So again I’m going to Alt or Option click on the Add Mask icon to add a layer mask. And again with my paintbrush which is already preset and my white paint I’m going to target the mask and paint over her eye. Now again this is probably going to be too much, but we can tone it down a little bit by again adjusting the opacity of the mask. So we’ll just take it up to what we want it to be. I am thinking it’s probably going to be a little too much, maybe about 50 percent.

So let’s have a look at the starting point for the image. This is post having been spot fixed and post having had shadows and highlights applied to it. Then we added the skin softening and finally we added a little bit brighter eyes in our portrait.

I’m Helen Bradley. Thank you for joining me for this video tutorial. If you liked the tutorial please click to like it on YouTube. Consider also subscribing to my YouTube channel. You’ll be advised when new videos are launched and right now that’s about twice a week. You can also visit my website projectwoman.com where you’ll find more tips, tricks and tutorials on Photoshop, Photoshop Elements. Lightroom, Illustrator and more.

Helen Bradley

Saturday, March 17th, 2007

Soft Focus Portrait in Photoshop

Portraits typically look much more flattering when they have a soft focus look. This is a fix that will give even a so-so portrait a lift. The colors in the image will be more muted and softer and more flattering to the subject. And, when you’re done, crop the final result very tightly to get that professional look.

Start by duplicating the background layer on the photo – choose Window, Layers to view the Layers palette, right click the background layer and choose Duplicate Layer and then Ok. Click the top layer and choose Filter, Noise, Median to smooth the image on this layer – choose a value of around 5 for the radius. Now apply a slight aging effect to this top layer by choosing Image, Adjustments, Hue/Saturation and reduce the saturation and use the Hue slider to create a slightly aged yellowing of this layer I set Saturation to -50 and Hue to -10 and click OK. Now experiment with the layer opacity of this top layer to vary the result – you want something softer than the original.

To finish, make a elliptical selection around the subject, invert the selection using Select, Inverse and add a feather using Select, Feather and add a large feather to the selection. Blur the result to soften the area around the subject and then crop the photo to size to finish.

Helen Bradley