Tuesday, March 3rd, 2009

Protect part of a Word document


You know when it happens. You’re developing a template or document for someone to work on and you know that they will clobber part of it when you least expect it. So, you want to protect this from happening and make sure your document never gets destroyed.

Problem is how to do it?

Solution? Read on..

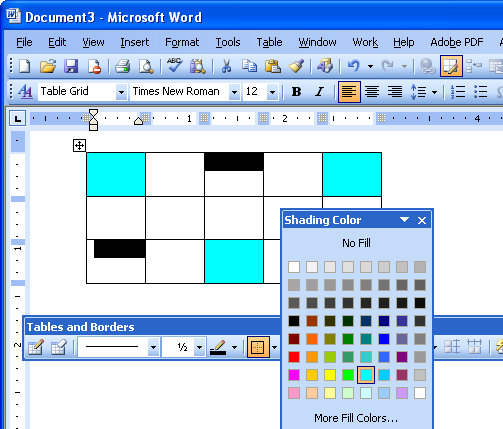
Ok.. so, Word has a document protection feature you can use but it only protects the whole document. But, it can be tweaked to protect only part – but we have to set it up to work this way. So, you have to add section breaks around the area to protect. Pretty easy to do. Click just above where the protection is to start and choose Insert > Break > Continuous – this adds a continuous section break in at this point and, because it’s continuous there isn’t really any indication it’s there.

Move to just beyond the area to protect and repeat to add another continuous section break. If you just want to protect the beginning or end of your document you only need one section break.

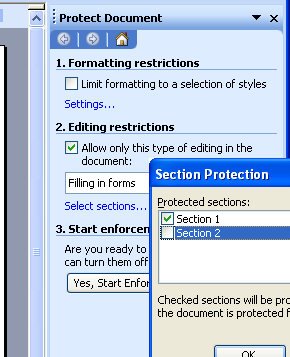
So far, so good. Now for the protection bit. Choose Tools > Protect Document and in the Editing Restrictions area, click the checkbox and from the list choose Filling in Forms. Now click Select Sections and check the sections to protect (ie leave the ones you want to be able to edit unchecked).

Then click Yes, Start Enforcing Protection and, if desired, add a password.

Now users are locked out of the protected area of the document and they can’t change it.

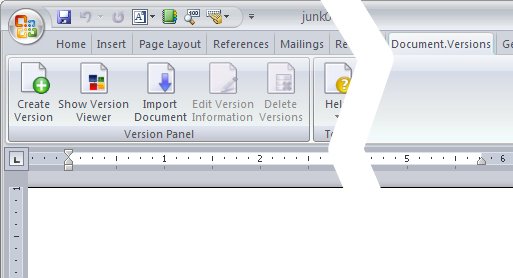
In Word 2007 it works just the same. Find the section breaks in Page Layout > Breaks > Continuous and the protection tool in Review > Protect Document > Restrict Formatting and Editing.

Neat huh?

Helen Bradley

Friday, January 9th, 2009

Change spelling wavy underline color

Ok, so this post can happily be filed in the “Gee I really needed to know that – NOT!” category. It’s seriously fun but, unless you’re color blind, not something you absolutely HAVE to know.

It’s easy (if you’re a dab hand at changing registry entries) to change the color of the wavy underlines used for spelling and grammar errors in Word 2007. Choose Start > Run > Regedit and locate this key:

HKEY_CURRENT_USER\Software\Microsoft\Shared Tools\Proofing Tools

If the SpellingWavyUnderlineColor entry exists, double-click it and when the Edit DWORD value dialog appears, click Hexadecimal and type an eight digit hexadecimal number representing the RGB color value of the color to use (add two leading zeros to the value). So to use Blue, type 000000FF and click Ok. If the value isn’t in the list, choose Edit > New > DWORD value, type SpellingWavyUnderlineColor and then double-click it and change its DWORD value to the hexadecimal number you want to use.

To change the grammar underline color, change the GrammarWavyUnderlineColor value, and to change the contextual spelling error color change the ContextualSpellingWavyUnderlinecolor entry. If any entries don’t exist, just create them.

When you’re done, close the registry, restart the computer, and restart Word and the changes will be in place.

If you don’t know what hexadecimal color is what, visit http://www.patman.org/webdesign/hexcolors2.asp and find a color and its appropriate hexadecimal value here. Add two leading zeros and you’re done.

Of course, before you touch the Registry you should back it up in case everything goes pear shaped. Also – NEVER mess with anything you don’t understand!

Helen Bradley

Sunday, December 28th, 2008

Don’t Spell Check This..


Often when you’re working on a document including one which contains code, or foreign language words you will want the document spell checked but you’d like the code or foreign language words omitted – so you’re not distracted by the red underlining everywhere.

To do this, in Word 2007, select the text you don’t want to be checked and double click the Language entry on the status bar – typically this will show English (United States) or similar. When the dialog appears, choose the Do not check spelling or grammar checkbox. This disables spell checking for this particular word or selection. The rest of the document is spell checked as usual but words you don’t want to be checked, won’t be.

Helen Bradley

Tuesday, March 4th, 2008

MIA – Word 2007 loses Versions

There was a handy utility in Word prior to and including Word 2003 which disappeared without ceremony in Word 2007 called Versions. The premise was that you could save multiple versions of a document – like a snapshot of the document at different stages of its development – inside the one file. The document took with it a history of what it had looked like at various times in its past. To use it, choose File > Versions and then just save a version now or set it to save one automatically each time you close a file.

If you didn’t use versioning, you may not mourn its passing. If you did use it you are left wondering why it got axed. It was a handy tool, it worked, it did a job that meant many folk who might otherwise have lost work permanently actually had the backups of their work on hand when they needed it. Nice work Microsoft – NOT!

Anyway the clever folk at Edenic Software have created a neat little add-in which puts Versions back into Microsoft Word. The tool is called Document.Versions and it installs as a new Ribbon entry. It works pretty much like the old tool but this one is nice and visible and made by folks who care so it’s likely to be around for quite some time. I’ve been trialling a Beta version and the final release is out very soon.

If you loved versions and if you’re annoyed (I’m trying to be polite here) that Microsoft took away a great tool, then take yourself over to OfficeVersions.com and grab a trial version of the add-in. You can trial it for 30 days and then buy a licence for less than it will cost in your time to get back information you’ve lost when someone edits your document without turning on Tracked Changes, for example!

Oh, and look out for other .Version tools coming soon. Versions add-ins for Excel and PowerPoint are planned – called Spreadsheet.Versions and Slideshow.Versions. While versioning was never a feature of either Excel or PowerPoint that doesn’t mean these won’t be very handy additions to Excel 2007 and PowerPoint 2007 too.

Helen Bradley

Saturday, December 22nd, 2007

Word 2007 – Building Blocks

Whenever you type the same thing in Word more than once, ask yourself if there isn’t a smarter way to work. The new Building Blocks feature in Word 2007 lets you create and save frequently used content so that it can be easily inserted into your document.

So, for example if you repeatedly add a disclaimer or a bio to your documents, create it as a building block and insert it into the document when required. To do this, type the text to create as a building block and select it. Choose Insert, Quick Parts and choose Save Selection To Quick Part Gallery. Type a name for the block, select the gallery to attach it to and the category and description of the Building Block. It’s best to save the building block to buildingblocks.dotx as building blocks saved to this file are available regardless of which template is currently in use. Choose the options for the content and click Ok.

In future, to add a Building Block to a document, click the Insert tab and then Quick Parts and select the block to add.

Helen Bradley

Wednesday, December 5th, 2007

Images in Word tables

It is possible to place an image inside a table cell in Word. To do this, first create a table, click inside the cell and then choose Insert Picture > From File and select the image to insert. You can size the image inside the table cell as requiredby dragging on its sizing handles.

If you set the image’s Text Wrapping to Behind Text or In Front of Text the image will no longer be constrained to the table and will jump out of it and operate independently of it. To wrap text around the image inside the table cell use the Square or Tight options for best results. In Line With Text only wraps one line and it’s pretty awful.

Helen Bradley

Tuesday, October 30th, 2007

Making Columns in Word

There are lots of ways to create text in columns in Word but the easiest is to type the text (or at least some of it) and select it or position the cursor where the columns should begin. Then choose Format, Columns and select the number and spacing of columns.

From the Apply To dropdown list choose what to apply the columns to. If you have text selected, you’ll typically select Selected text. If you haven’t selected text you can apply them to the Whole Document or This Point Forward. Using This Point Forward lets you create a heading on the page with the text in columns under it.

Helen Bradley

Saturday, September 29th, 2007

Smarter Table Headings in Word

When you have a table in Word that extends beyond a single page in your document it can be hard to follow what the table is all about when you’re looking at page 2 because the headings are all back on page 1.

Solve this problem in Word by selecting the rows that contain the headings and, from the Table Tools tab on the toolbar, click the Layout option and then choose Repeat Header Rows. The contents of the header row will now appear on all pages where the table appears.

Helen Bradley

Thursday, September 20th, 2007

Color your world in Word 2007

Let’s face it, plain old white backgrounds are, just that, plain old white backgrounds. If you’re like me, you’ll want to change the color of your page background.

To do this, choose the Page Layout tab from the Word 2007 Ribbon, and choose the Page Color dropdown list and choose a page color from it. If you choose a color from a Theme set then, later, when you change the Theme – the page color changes accordingly.

Helen Bradley

Wednesday, September 19th, 2007

Formatting table cells in Word

Since Microsoft Word 2002, it has been possible to format a series of cells in a table all at the one time, even if they are not contiguous (a lovely word that means not side-by-side).

To do this, select the first cell then Control + click on the other cells that you want to share the same formatting. Once all the cells are selected you can apply a formatting such as a shading to those cells. Note, that the Shading button on the Tables and Borders toolbar in Word 2002/2003 is the one to use, the one on the Drawing toolbar is the Fill button – it looks the same but doesn’t work the same!

Selecting and formatting non contiguous cells all at ones makes it a quicker process to format a table than it would be if you selected and formatted each cell individually.

However, of course, the F4 key still works in cells in a table so you can, for example, fill a cell with a shading color or a format option and then click in another cell and press the F4 key and have that format applied to this cell too. The F4 key is a repeat key which repeats the previous command and it’s a great key to learn to use anytime you’re working with Word.

Helen Bradley