Friday, May 18th, 2007

Languages and Word 2007

I write articles for magazines all over the world. One day I’ll wake up and think Canadian and other times I’m English or an Aussie or American.

Each country spells differently, it can be color or colour or honor or honour and there are really tricky ones like dialing and dialling. To help out, I use the Language options in Word. It used to be easy in Word 2003, select the document using Control + A, and apply the language to it using the Tools options.

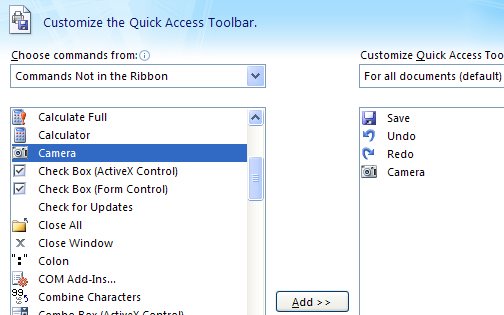
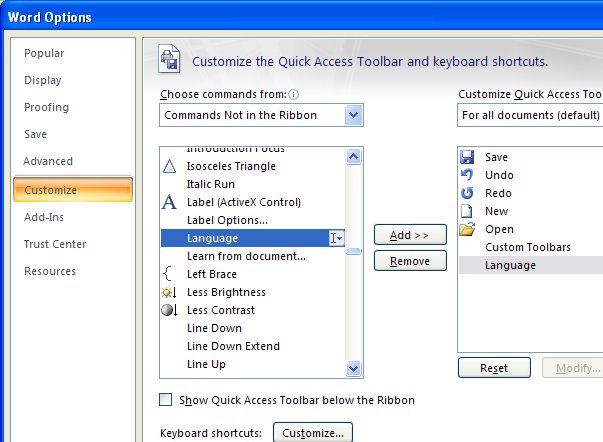
I spent a horrible amount of time in Word 2007 en-route to New Jersey recently looking for the Language tool. Yikes, could not find it anywhere. Ring the alarm bells, I need this feature. My solution, use the Customize tool and add the Language option to the Quick Access toolbar. Now it’s where you want it, handy and accessible. Bummer it can’t be found on the Ribbon anywhere but at least this now works and probably it’s better than even in Word 2003.

Helen Bradley

Thursday, May 17th, 2007

Camera Icon in Excel 2007

Hi Jim from Calgary!

Jim wrote and asked, “I’ve been using the camera icon for years and I can’t find it in Excel 2007. Can you see it anywhere?”

He also said, “nice blog thanks” – so anyone that nice deserves an answer.

So, Jim, don’t go looking for the camera on the Ribbon it isn’t there. You probably already know you can’t customize the Ribbon either so you can’t put it just anywhere you like – thanks Microsoft! You’re limited to the Quick Access toolbar – that little bar to the right of the Office button. Click the down arrow to its immediate right and choose More Commands. From the Choose Commands From list choose ‘Commands Not in the Ribbon’ (that’s how I figure it probably isn’t on the ribbon), and then locate the Camera. Click it and click Add. Then click Ok. Now the camera is on the Quick Access Toolbar and it works as it always used to – least so far as I can see.

If you’ve now got a great new camera icon on your toolbar but you don’t know what to do with it, then visit my Snap an Excel range blog entry to find out…

Helen Bradley

Wednesday, May 16th, 2007

Vanishing Point in Photoshop CS3

The Vanishing Point Filter in Photoshop lets you create perspective grids that you can drop an image into.

To do this, copy the image to paste into the grid into the clipboard and open or create the image to put it into. Add a new layer to this image, select it and choose Filter, Vanishing Point Filter.

Click the Create Plane Tool and click on the four corners of the grid. Move the points if necessary, you need a blue grid (if it’s yellow or red it isn’t correct and won’t work). Now, you can drag a second related plane by holding the Control key (Command on the Mac) and drag from a side to create a second pane. Don’t worry about the direction just that it’s at right angles to the existing pane. Let go the mouse. Hold the Alt key (Option on the Mac) and drag to align the pane, fine tune using the Angle value.

Now either continue to create planes or paste the image using Control + V (Command + V on the Mac). Select the Marquee tool and move it into position on the grid. Use the Transform tool to size it if desired. When you’re done, click Ok.

If you need to remove or delete the plane – for example to start over, click on it so it’s selected and press Backspace.

The Vanishing Point Filter is heaps of fun – use it to apply an image to a building, the side of a truck, or just in thin air!

Helen Bradley

Tuesday, May 15th, 2007

Grid and Guides in PowerPoint 2007

If you’re like me you like to have everything neatly aligned on your PowerPoint slides. If you don’t, a slide with navigation and action buttons can very quickly become very untidy.

To line everything up, you need to be able to see the gridlines. Gridlines on a PowerPoint slide? I hear you ask. Why not?

To see the gridlines, right click an empty area on a slide and choose Grid and Guides. Select the Display Grid on Screen checkbox and configure the grid size and click Ok. You can also display drawing guides using the same dialog. By default these are placed in the middle of the slide horizontally and vertically.

To add a new guide, hold the Control key as you drag a new guide from an existing one.

Reverse the process to hide the guides and grids when you’re done.

Helen Bradley

Monday, May 14th, 2007

Never miss a trick with Outlook 2007

I often get emails that need attention such as a tip that a reader sends in for an column I write in the Sydney Morning Herald that I like and plan to use in an upcoming column – just not now. I flag it by right clicking and choose Follow Up and then a flag, like this week, next week, no date etc..

Having done that, the item appears automatically in my Outlook 2007 to do list so, provided the To do bar is showing, it’s there and I can check the items and find the tip whenever I need it. Combine follow up with color categories and you’re set. When you’re done with an item, right click it in the To Do bar and mark it as complete and it disappears.

Seriously, the To Do bar has the ability at last to be some use in Outlook 2007 so it’s time to begin using some behaviors that will make it work for you.

Helen Bradley

Friday, May 11th, 2007

Working between Office 2007 & 2003

If you’re using Office 2007 in a workgroup with others who are 2003 users, then you’ll encounter problems with them not being able to read your 2007 documents.

The simple solution is to change the default save format in the Office 2007 applications so they save automatically in the older formats. To do this, click the Office button and choose the Word Options button (for example), and click the Save option. In the dropdown list, Configure the Save files in this format option to the 97-2003 format.

You’ll need to do this separately for each application you want to change the default save format for.

Of course, this doesn’t stop you from saving in the new format or any other supported format. It just ensures that the default save format is backwardly compatible with other users.

Helen Bradley

Thursday, May 10th, 2007

PDF Writer for Office 2007 – free!

Why would you go to all the trouble of creating Office 2007, packaging it into a cute box and then leave some of the best bits out? Ask Microsoft because I sure as heck don’t understand it. In the past they’ve left out Producer for PowerPoint, options in Excel and now, in Office 2007, the PDF writer. Seriously – it’s silly and it’s sad ’cause lots of folks don’t know that these tools are there so they struggle along without them or worse still, go and pay for something they could have had for free.

So, in the interests of getting the word out, here’s a download link for the PDF writer for Office 2007. Grab it, install it and use it.. you’re entitled to it.

Helen Bradley

Wednesday, May 9th, 2007

Speed up slow ol’ Outlook 2007

Ok, so Outlook 2007 is running like a dog. It’s slow and cumbersome to use. Microsoft has admitted it and pointed a finger at overlarge .PST files. One wonders why Microsoft persists in forcing hapless users to jam all their emails (plus attachments) and RSS feeds into one .PST file anyway. Heaven help the new user who plain doesn’t understand what a .PST file is anyway, much less why it affects their system performance.

Until the folks at Redmond come to their collective senses and offer us an alternative solution, your options are to work around it. Split your emails into multiple .PST files by archiving them and keep your main .PST file at a small size.

Here are Microsoft’s current series of recommendations for speeding up Outlook 2007, it’s a KnowledgeBase article, and here’s a link to an update for Outlook that promises to fix some of the speed issues: Microsoft Outlook 2007 update download site.

I just have to have the final word here… why, in 2007, should are we still bothered by this stuff?

Helen Bradley

Tuesday, May 8th, 2007

Text on a chart, Excel

It’s easy enought to place a title or Y and X axis titles on a chart but what about a note or comment?

The secret is in the Drawing tools. Display the Drawing toolbar and click on the Text Box button. Now you can drag a text box on your chart and add text inside it. Size it, format it and you’re off.

Helen Bradley

Monday, May 7th, 2007

Circular images in Word

I love this tip. It’s so much fun and so unexpected that you can do it. In fact, I’ve been working a lot lately on funky graphics stuff in Word so expect to see more in future. It seems like the fewer tools they give us the more I want to make them work for me.

So, here we go. Open a Word document and, from the Drawing toolbar, click the Oval tool and draw a circle on the page. Click the shape, right click, choose Format AutoShape and click the Colors and Lines tab. From the Fill Color dropdown list choose Fill Effects then the Picture tab. Then click Select Picture and locate and open your image by clicking Insert. Click the Lock picture aspect ratio checkbox and click Ok twice. It sounds complicated but it’s really pretty easy to do and the results.. well they’re great.

Better still, you can use any shape – it doesn’t have to be a circle… any of the AutoShapes will do.

Helen Bradley

Page 2 of 3123