Friday, December 20th, 2013

Where to Install Photoshop Brushes on the PC and Mac

Curious or confused about where brushes go? Here’s the info you need and how to do it

It’s pretty easy to find the wrong place to install brushes on the PC and the Mac. The Adobe program file folders are more accessible than the user areas where you really should be installing your brushes. So, to help you out, here is where the brushes should go and a couple of tips for showing the hidden and hard to find folders on the PC and the Mac:

In Mac OS X:

Photoshop CS4
~/Library/Application Support/Adobe/Adobe Photoshop CS4/Presets/Brushes

Photoshop CS5
~/Library/Application Support/Adobe/Adobe Photoshop CS5/Presets/Brushes

Photoshop CS6
~/Library/Application Support/Adobe/Adobe Photoshop CS6/Presets/Brushes

Photoshop CC
~/Library/Application Support/Adobe/Adobe Photoshop CC/Presets/Brushes

The tilde (~ ) indicates your hidden user library.

You can open it this way:

1 Launch Finder
2 Choose Go > Go to Folder
3 Type ~/Library and click Go
4 This opens the ~/Library folder and you can now navigate to the appropriate folder listed above.

On a Windows PC:

Follow these instructions to install the brushes where they can be found by both 32 and 64 bit versions of Photoshop (this is the prefered method of installing downloaded brushes):

Photoshop CS4
C:\Users\<your name>\AppData\Roaming\Adobe\Adobe Photoshop CS4\Presets\Brushes

Photoshop CS5
C:\Users\<your name>\AppData\Roaming\Adobe\Adobe Photoshop CS5\Presets\Brushes

Photoshop CS6
C:\Users\<your name>\AppData\Roaming\Adobe\Adobe Photoshop CS6\Presets\Brushes

Photoshop CC
C:\Users\<your name>\AppData\Roaming\Adobe\Adobe Photoshop CC\Presets\Brushes

To locate your c:\users\<your name>\AppData folder, launch Windows Explorer and type this in the address bar :

%USERPROFILE%\AppData

This automatically opens the AppData folder for you so you can now navigate to the desired folder as detailed above.

Helen Bradley

Tuesday, June 11th, 2013

Word 2010 and 2013 Tip – Save documents for use with older Word versions

Learn to use ‘Save as type’ to format your document so users of older versions of Word can access them

You can easily exchange files with users of older versions of Word. This is because Word 2007, 2010, and 2013 essentially share the same file format. So it is pretty easy to open any Word document created using version 2007, 2010 or 2013 in any other of these three versions of Word. In addition, Word 2007, 2010, and 2013 will open files from any previous version of Word.

However, when you need to share a Word 2007, 2010, or 2013 file with someone using a much earlier version such as Word 2003 or a Mac version of Word, you must save the file using their particular Word file format. This is because the file formats are not the same and the older versions of Word cannot read the newer file formats.

To save using the appropriate format, select the File tab on the Ribbon, and click Save As. In the Save As dialog, click the Save as type: dropdown list and select the word processing format that matches the software that your other user is using such as Word 97-2003 Document (*.doc). Then click Save to save it in that format.

Helen Bradley

Tuesday, April 16th, 2013

Help! My images disappeared from my iPad and iPhone

Understand the limits of the Photo Stream and how to save images from it so they aren’t removed from your iPad or iPhone

Sometimes you may know that you had some images on your iPad or iPhone but suddenly you find that they’ve gone.

This happens to me when I drop some images into my Photo Stream on my Windows PC that I want to use on my iPad. I drop images into the Uploads folder on my PC and, via the iCloud, they are synced automatically to my iPad. I know the images got there safely – I put them there months ago and I know that I saw them on my iPad but suddenly today they aren’t there. Confusing? Happened to you? It probably has and here is the explanation as to why they disappear and how to stop them from doing so.

The issue is the Photo Stream. The photo stream on the iPad and iPhone only store the last one thousand images – if you shoot lots of images and, say have your iPhone and iPad synced then you’ll run out of space pretty quickly. When you do then images are knocked out of the Photo Stream to make room for more recent ones.

The issue doesn’t happen on your Mac or PC because they have plenty of space so photos in your Photo Stream folders there are always there – it is just a protection against junking up your iPhone or iPad with ‘stuff’.

So, what do you do when you want to keep some of the images from your Photo Stream permanently and you don’t want to lose them? The answer is to move them to an album or to your Camera Roll. The images in your camera roll and in albums are there to stay. And just to clarify, you don’t have to move images from the Photo stream that you captured with that device – because images you capture on the iPad for example are in the Camera Roll and stay there. The images you want to save are those that get synced to the iPad via iCloud from other devices such as your iPhone or PC or Mac – they are the ones that only hang around for a short time.

How to move images from your Photo Stream to an album

So, to move a lot of images to an album (an easy solution for lots of images that you want to save to somewhere that isolates them from all your other images), tap Photos, tap Photo Stream, tap My Photo Stream.

You should now see all the thumbnails of images in your photo stream. Then tap Edit.

In this mode you can now tap the images that you want to save – each of them should have a blue checkmark on them. Now tap Save and choose to Save to an Existing Album or Save to New Album.

I have an album for images I want to edit and play with on the iPad called Editable Pix so I typically tap that to select it. This lets me store those images so they are isolated from all the other images in my Camera Roll.

How to move images from your Photo Stream to your Camera Roll

It is also possible to save photos from the Photo Stream to the Camera Roll. The advantage of this is that they are in the Camera Roll itself and in some situations that might work best for you.

To do this, again tap Photos, tap Photo Stream, tap My Photo Stream so you see all the thumbnails of images in your photo stream. Again tap Edit. In this mode you can now tap the images that you want to save – each of them should have a blue checkmark on them. Now, tap the Share button in the top left of the screen:

And choose Save to Camera Roll. (It is very confusing that these two processes that really are so similar are handled so differently in iOS6).

How to save one image from your Photo Stream to your Camera Roll

Now, if you just want to save one image from the Photo Stream to the Camera Roll, tap Photos, tap Photo Stream, tap My Photo Stream so you see all the thumbnails of images in your photo stream. Tap the one image that you want to copy to the Camera Roll so it is showing full screen. Now tap the Send to button that is a box with an arrow coming out of it in the top right of the screen and choose Save to Camera Roll from the menu.

Now you will never again lose images off your iPhone or iPad that you really want to keep.

Helen Bradley

Sunday, March 17th, 2013

Add images to your iPad & iPhone photo stream from your Mac

See how to upload images from your Mac to your iPad or iPhone

Sometimes you will get images on your Mac that you want to share with your devices such as your iPad or iPhone. To do this you can add them to your photo stream and they will be synced automatically next time you are connected using a wifi connection.

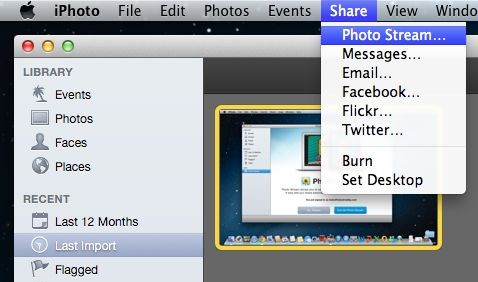
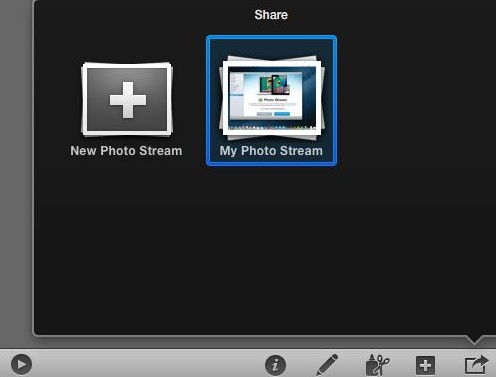
To do this, from inside iPhoto, click the image(s) to add to the photo stream then click the Share option on the toolbar, click Photo Stream > My Photo Stream. The images will be uploaded to your photo stream and then downloaded to other devices when they next update via a wifi connection.

Of course, for this to work the images have to be in iPhoto. If an image is not, for example, it is on the desktop – you can add it to iPhoto by dragging and dropping it into iPhoto and then add it to your photo stream.

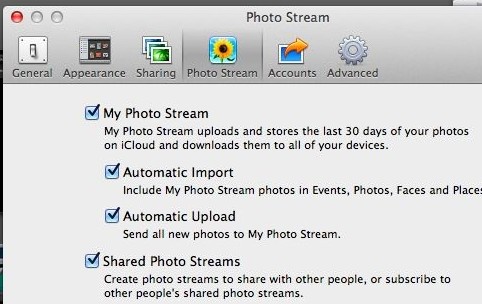
Of course if you have your iPhoto set up to automatically send all new images to your photo stream the very process of adding images to iPhoto will add them to your Photo Stream. To do this in iPhoto, choose iPhoto > Edit Preferences > Photo Stream and, under My Photo Stream (which should already be enabled), check Automatic Import.

Helen Bradley

Tuesday, November 27th, 2012

First 24 hours with your new Mac

Ok, yep, I just bought a brand spanking new MacAir – for a few reasons and one is its weight – it is so so light with its solid state drive. I got a 13 inch one with 8GB ram and 256 Gb drive but on reflection I really think I could have done with the 11.6 version except this larger screen does have a higher resolution.

So enough of my new toy – it’s a while since I’ve owned a Mac and while some things are all so familiar, many are not. Here’s my take on what I’ve learned so far.

1 Download Chrome and use it – I don’t like Safari much at all.

2 When you install Office 2011 Mac you’ll get an error asking you to close Safari. The red button in the top corner might close the screen but it doesn’t actually close the program – go figure! Instead you need to find it on the dock and right click it and choose Quit. Oh! your mouse only has one button? – Yikes! The shortcut is to Control + Click on the Safari button and then you can choose Quit. Then Office installs just fine.

3 Weather! If you swipe to the right (or press Control + Right Arrow) a cute little desktop appears with a calculator, calendar, weather and clock. Problem is that the weather is inevitably going to be the wrong city. Well check and look for the little i icon – it is the information/settings option. Click it and you can select the weather for the place you are interested in viewing.

4 Keychain – it’s a tool for storing passwords so you don’t have to enter them every time – but the dialog doesn’t make it clear exactly what it does and it talks about ‘private’ information so it looks scarier than it is! Bottom line – I use it.

5 Open a web page in a new tab – Command + click on the link.

6 Take a shot of the Mac Screen – Command +Shift+3: Capture the screen to a file on the desktop – if you add Control to this the capture goes to the clipboard instead. Or Command+Shift+4 to select an area to be saved as a file on the desktop – add Control to save it to the Clipboard. There are other options but that’s the basics to remember.

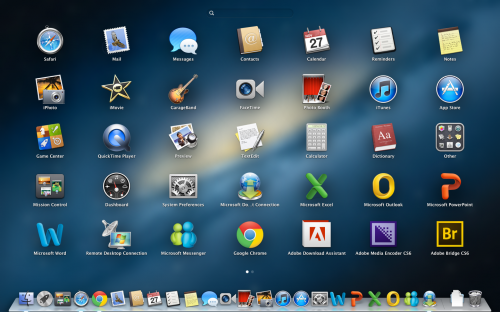
7 Can’t find your newly installed Mac apps – click the Launch Pad icon and you’ll see everything that is installed. Once you know how to do this you can start cleaning up the dock and get rid of the things you don’t use to make way for those that you do – but that’s another day’s post!

Helen Bradley

Page 2 of 212